AUX JEEP WRANGLER 2021 Owner handbook (in English)
[x] Cancel search | Manufacturer: JEEP, Model Year: 2021, Model line: WRANGLER, Model: JEEP WRANGLER 2021Pages: 276, PDF Size: 4.47 MB
Page 69 of 276
SAFETY
SAFETY FEATURES...........68
Anti-Lock Brake System (ABS)......68
Electronic Brake Control System.....69
AUXILIARY DRIVING SYSTEMS . .77
Tire Pressure Monitor System (TPMS) . .77
OCCUPANT RESTRAINT
SYSTEMS..................84
Occupant Restraint Systems........84
Important Safety Precautions.......84
Seat Belt Systems..............85
Supplemental Restraint Systems (SRS). .92
Child Restraints — Carrying Children
Safely......................99
Transporting Pets..............112
SAFETY TIPS...............112
Transporting Passengers..........112
Exhaust Gas.................112
Safety Checks You Should Make
Inside The Vehicle.............113
Periodic Safety Checks You Should Make
Outside The Vehicle.............114
SAFETY
67
Page 79 of 276
Gear Approximate HDC Set
Speed
3rd 4 mph (6.5 km/h)
4th 5.5 mph (9 km/h)
DRIVE 7.5 mph (12 km/h)
REVERSE 1 mph (1.5 km/h)
However, the driver can override HDC opera-
tion by applying the brake to slow the vehicle
down below the HDC control speed. If more
speed is desired during HDC control, the
accelerator pedal will increase vehicle speed
in the usual manner. When either the brake or
the accelerator is released, HDC will control
the vehicle at the original set speed.
Enabling HDC
1. Shift the transfer case into 4WD LOW
range. Refer to “Four-Wheel Drive Opera-
tion” in “Starting and Operating” for fur-
ther information.
2. Push the “Hill Descent” button. The “Hill
Descent Control Indicator Light” in the
instrument cluster will turn on solid.NOTE:
• If the transfer case is not in 4WD LOW
range, the “Hill Descent Control Indica-
tor Light” will flash for five seconds and
HDC will not be enabled.
• If the ESC senses that the brakes are
overheating the “Hill Descent Control
Indicator Light” will flash for five sec-
onds and HDC will become deactivated
until the brakes have cooled.
Disabling HDC
Push the “Hill Descent” button or shift the
transfer case out of 4WD LOW range. The
“Hill Descent Control Indicator” light in the
instrument cluster will turn off.
AUXILIARY DRIVING
SYSTEMS
Tire Pressure Monitor System (TPMS)
The Tire Pressure Monitoring System (TPMS)
will warn the driver of a low tire pressure
based on the vehicle recommended cold
placard pressure.The tire pressure will vary with temperature
by about 1 psi (7.0 kPa) for every 12°F
(6.5°C). This means that when the outside
temperature decreases, the tire pressure will
decrease. Tire pressure should always be set
based on cold inflation tire pressure. This is
defined as the tire pressure after a vehicle
has not been driven for more than three
hours, or driven less than 1 mile (1.6 km)
after a three-hour period. Refer to “Tires” in
“Servicing and Maintenance” for information
on how to properly inflate the vehicle’s tires.
The tire pressure will also increase as the
vehicle is driven; this is normal and there
should be no adjustment for this increased
pressure.
The TPMS will warn the driver of a low tire
pressure if the tire pressure falls below the
low pressure warning threshold for any rea-
son, including low temperature effects, or
natural pressure loss through the tire.
The TPMS will continue to warn the driver of
low tire pressure as long as the condition
exists, and will not turn off until the tire
pressure is at or above recommended cold
placard pressure. Once the “Tire Pressure
77
Page 217 of 276
MULTIMEDIA
CYBERSECURITY............216
RADIO 130.................217
Clock Setting.................218
Equalizer, Balance And Fade.......218
Radio Operation...............218
CD/DISC Operation.............218
Audio Jack Operation............219
UCONNECT 430/430N.......220
Clock Setting.................221
Menu.....................221
Equalizer, Balance And Fade.......222
Radio Operation...............223
CD/DVD Disc Operation..........225
Audio Jack Operation............226Hard Disk Drive (HDD) Operation. . . .226
Cleaning Your Touchscreen Radio. . . .229
Garmin Navigation.............229
Main Navigation Menu...........229
Following Your Route............231
TIPS CONTROLS AND GENERAL
INFORMATION.............232
Steering Wheel Audio Controls......232
Reception Conditions............232
Care And Maintenance...........232
Anti-Theft Protection............232
AUX/USB/MP3 CONTROL — IF
EQUIPPED.................233
UCONNECT PHONE..........234
Phone Pairing................234
Phonebook..................235
Making A Phone Call............236
Receiving A Call — Accept (And End). .236
Mute (Or Unmute) Microphone During
Call......................236
Transfer Ongoing Call Between Handset
And Vehicle..................236
Changing The Volume...........236
UCONNECT VOICE COMMAND. .236
Voice Command Operation.........236
Voice Text Reply..............239
BLUETOOTH STREAMING
AUDIO...................239
MULTIMEDIA
215
Page 219 of 276
RADIO 130
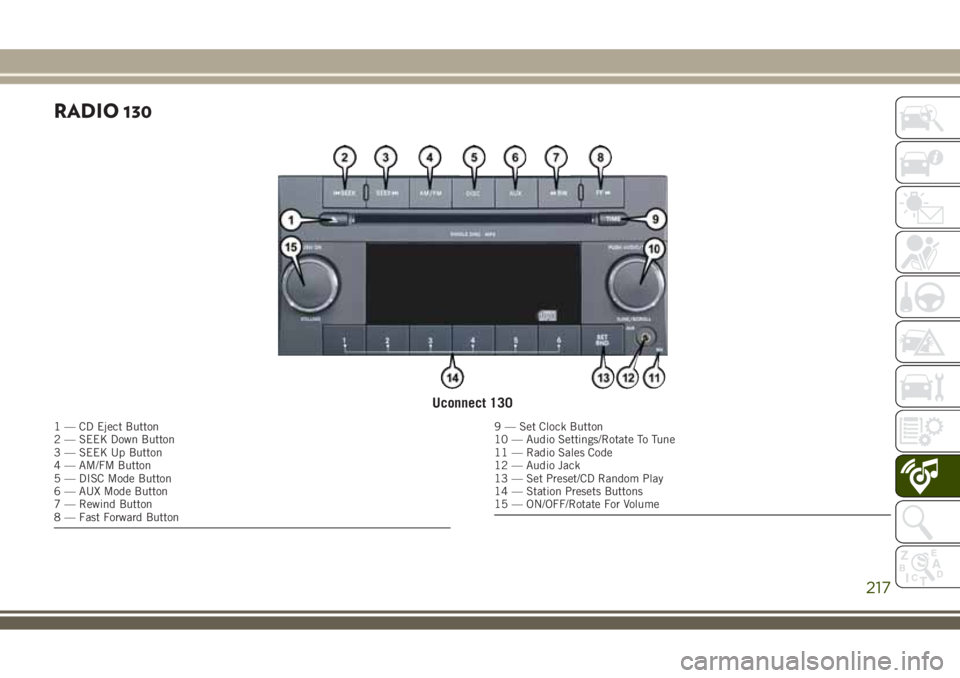
Uconnect 130
1 — CD Eject Button
2 — SEEK Down Button
3 — SEEK Up Button
4 — AM/FM Button
5 — DISC Mode Button
6 — AUX Mode Button
7 — Rewind Button
8 — Fast Forward Button9 — Set Clock Button
10 — Audio Settings/Rotate To Tune
11 — Radio Sales Code
12 — Audio Jack
13 — Set Preset/CD Random Play
14 — Station Presets Buttons
15 — ON/OFF/Rotate For Volume
217
Page 221 of 276
Audio Jack Operation
The AUX/Audio Jack provides a means to
connect a portable audio device, such as an
MP3 player or an iPod, to the vehicle’s sound
system. This requires the use of a 3.5 mm
stereo audio patch cable.
Pushing the AUX button will change the
mode to auxiliary device if the Audio Jack is
connected, allowing the music from your por-
table device to play through the vehicle's
speakers.
The functions of the portable device are con-
trolled using the device buttons, not the but-
tons on the radio. However, the volume may
be controlled using the radio or portable de-
vice.
219
Page 223 of 276
NOTE:
• Your radio may not be equipped with the
Uconnect Voice Command and Uconnect
Phone features. To determine if your radio
has these features, push the Voice Com-
mand button on the radio. You will hear a
voice prompt if you have the feature, or see
a message on the radio stating “Uconnect
Phone not available” if you do not.
• Your radio has many features that add to
the comfort and convenience of you and
your passengers. Some of these radio fea-
tures should not be used when driving be-
cause they take your eyes from the road or
your attention from driving.Clock Setting
1. Turn the radio on, then press the screen
where the time is displayed.
2. Press the “User Clock” button on the
touchscreen or the time display (Naviga-
tion radio only).
3. To adjust the hours, press either the “Hour
Forward” or “Hour Backward” button on
the touchscreen.
4. To adjust the minutes, press either the
“Minute Forward” or “Minute Backward”
button on the touchscreen.
5. To save the new time setting, press the
screen where the word “Save” is
displayed.
Menu
• Push the MENU button on the faceplate to
access the System Setup menu and the My
Files menu.
• Push the MENU button on the faceplate in
an active mode (CD, AUX, etc.) to change
mode specific settings.
221
Page 228 of 276
• Push the MEDIA button on the faceplate to
display the media source tabs at the top of
the screen. Select the source by pressing
the “HDD,” “DISC” or “AUX” media source
button on the touchscreen.
NOTE:
Your Touchscreen Radio will usually auto-
matically switch to the appropriate mode
when something is first connected or inserted
into the system.
Insert A CD/DVD Disc
• To insert a disc, push the LOAD button on
the faceplate.
• With the printed side upwards, insert the
disc into the disc slot of the radio. The radio
pulls the disc in automatically and closes
the flip screen. The radio selects the appro-
priate mode after the disc is recognized,
and starts playing the first track. The dis-
play shows “Reading...” during this
process.Seek Up/Seek Down
• Push the SEEK UP or SEEK DOWN buttons
on the faceplate to seek through tracks in
Disc Mode. Holding the SEEK UP button on
the touchscreen will fast forward through
the track until the beginning of the track is
reached; if still held it will fast-forward
through the next sequential track(s) (if ran-
dom play mode is not active) until released.
Holding the SEEK DOWN button on the
touchscreen will fast-reverse through the
track until the beginning of the track is
reached; if still held it will fast-reverse
through the next sequential track(s) (if ran-
dom play mode is not active) until released.
Audio Jack Operation
The AUX/Audio Jack provides a means to
connect a portable audio device, such as an
MP3 player or an iPod, to the vehicle’s sound
system. This requires the use of a 3.5 mm
stereo audio patch cable.• Push the MEDIA button on the faceplate
then the “AUX” button on the touchscreen
to change the mode to auxiliary device if
the Audio Jack is connected, allowing the
music from your portable device to play
through the vehicle's speakers.
NOTE:
The functions of the portable device are con-
trolled using the device itself, not the buttons
on the radio. However, the volume may be
controlled using the radio or portable device.
Hard Disk Drive (HDD) Operation
• The Hard Disk Drive (HDD) mode gives you
access to the audio files on the internal
hard disk drive. It functions similar to a CD
player, with the exception that the internal
HDD can hold more tracks.
• It is also possible to import display pictures
to the internal hard disk drive. The pictures
can be displayed on the right half of the
radio screen.
MULTIMEDIA
226
Page 235 of 276
If the check has a positive outcome, the
system will start to operate, whereas if the
comparison codes are not the same or if the
electronic control unit (Body Computer) is
replaced, the system will ask the user to enter
the secret code. See an authorized dealer for
further information.
AUX/USB/MP3 CONTROL —
IF EQUIPPED
There are many ways to play music from
iPod/MP3 players or USB devices through
your vehicle's sound system.
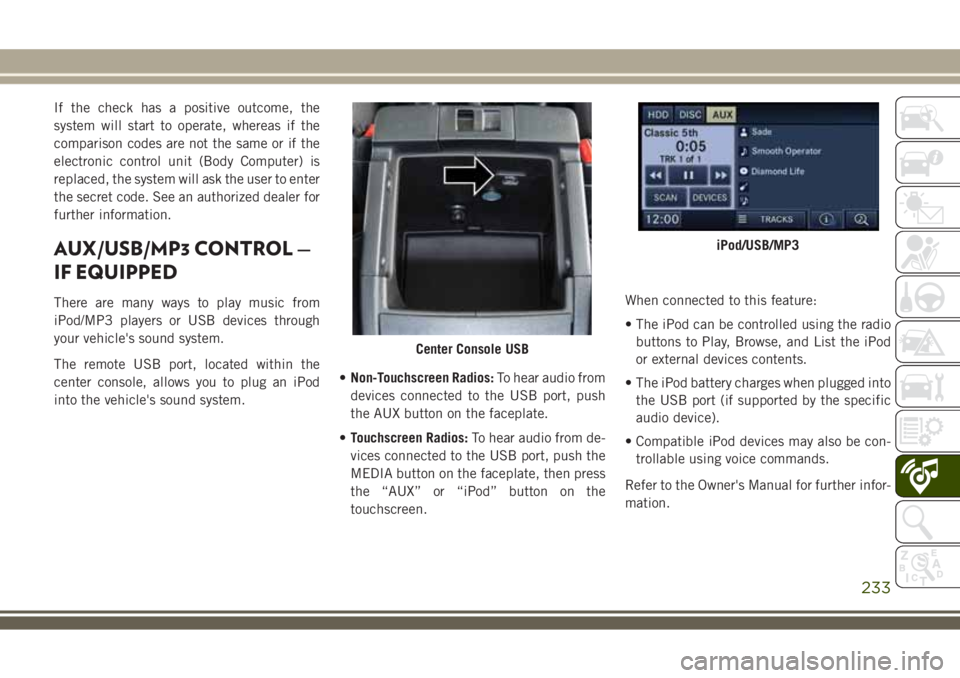
The remote USB port, located within the
center console, allows you to plug an iPod
into the vehicle's sound system.•Non-Touchscreen Radios:To hear audio from
devices connected to the USB port, push
the AUX button on the faceplate.
•Touchscreen Radios:To hear audio from de-
vices connected to the USB port, push the
MEDIA button on the faceplate, then press
the “AUX” or “iPod” button on the
touchscreen.When connected to this feature:
• The iPod can be controlled using the radio
buttons to Play, Browse, and List the iPod
or external devices contents.
• The iPod battery charges when plugged into
the USB port (if supported by the specific
audio device).
• Compatible iPod devices may also be con-
trollable using voice commands.
Refer to the Owner's Manual for further infor-
mation.
Center Console USB
iPod/USB/MP3
233
Page 241 of 276
Voice Text Reply
If equipped with Uconnect Voice Command,
your radio may be able to play incoming Short
Message Service (SMS) messages (text mes-
sages) through the vehicle's sound system. It
also allows you to respond by selecting from
various predefined phrases.
NOTE:
Not all phones are compatible with this fea-
ture. Refer to the phone compatibility list at
UconnectPhone.com. Connected mobile
phones must be bluetooth-compatible and
paired with your radio.
• Push the “Voice Command” button
and after the BEEP, say “SMS” to get
started.
NOTE:
To access the tutorial, push the “Voice Com-
mand” button
. After the BEEP, say
“tutorial.” Push any button on the faceplate
or press any button on the touchscreen to
cancel the tutorial.
WARNING!
Any voice commanded system should be
used only in safe driving conditions follow-
ing applicable laws regarding phone use.
Your attention should be focused on safely
operating the vehicle. Failure to do so may
result in a collision causing you and others
to be severely injured or killed.
BLUETOOTH STREAMING
AUDIO
If equipped with Uconnect Voice Command,
your Bluetooth-equipped iPod devices, cell
phones or other media players, may also be
able to stream music to your vehicles speak-
ers. Your connected device must be
Bluetooth-compatible, and paired with your
radio (see UconnectPhone.com for pairing
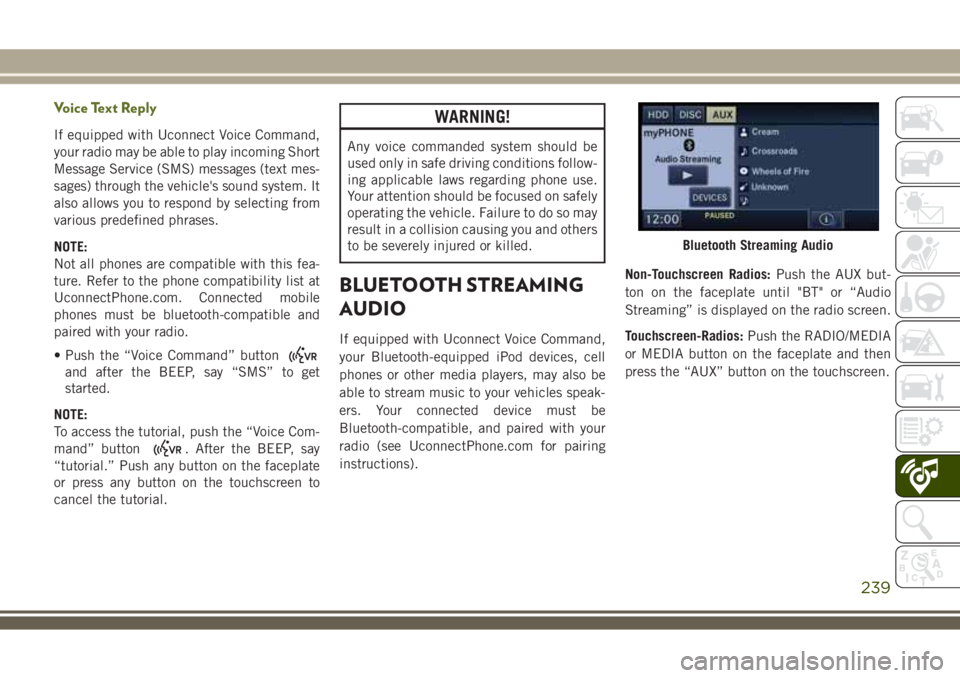
instructions).Non-Touchscreen Radios:Push the AUX but-
ton on the faceplate until "BT" or “Audio
Streaming” is displayed on the radio screen.
Touchscreen-Radios:Push the RADIO/MEDIA
or MEDIA button on the faceplate and then
press the “AUX” button on the touchscreen.
Bluetooth Streaming Audio
239
Page 265 of 276
Owner's Manual (Operator Manual).....4
Parking Brake................121
Pets......................112
Phone (Uconnect)..............234
Power
Outlet (Auxiliary Electrical Outlet) . .52
Windows..................38
Power Steering Fluid............211
Pregnant Women And Seat Belts......90
Preparation For Jacking..........154
Pretensioners
Seat Belts.................90
Radial Ply Tires...............194
Radio
Presets...............218, 223
Radio 130
Operating Instructions Radio
Mode...................217
Radio Operation...............218
Rear Seat, Folding..............21
Rear Swing Gate...............51
Rear Wiper/Washer..............32
Recreational Towing.............142
Shifting Into Transfer Case
Neutral (N)...............143Shifting Out Of Transfer Case Neutral (N)
.......................144
Refrigerant..................187
Release, Hood.................51
Reminder, Seat Belt.............85
Remote Control
Starting System.............14
Remote Sound System (Radio)
Controls..................232
Remote Starting System...........14
Replacement Bulbs.............146
Replacement Keys..............17
Replacement Tires.............196
Resetting Oil Change Indicator.......58
Restraint, Head................25
Roll Over Warning................4
Rotation, Tires................201
Safety Checks Inside Vehicle.......113
Safety Checks Outside Vehicle......114
Safety, Exhaust Gas.............112
Safety Tips..................112
Schedule, Maintenance
.......170, 175
Seat Belt
Adjustable Upper Shoulder Belt
Anchorage.................89
Automatic Locking Retractor (ALR) . .90Energy Management Feature......90
Lap/Shoulder Belt Operation......88
Lap/Shoulder Belts............86
Lap/Shoulder Belt Untwisting.....89
Pregnant Women.............90
Seat Belt Pretensioner.........90
Seat Belt Reminder............85
Seat Belt Maintenance...........204
Seat Belt Reminder..............85
Seat Belts................85, 113
Adjustable Shoulder Belt........89
Adjustable Upper Shoulder
Anchorage.................89
Front Seat............85, 86, 88
Inspection................113
Operating Instructions.........88
Pregnant Women.............90
Pretensioners...............90
Rear Seat.................86
Reminder.................60
Untwisting Procedure..........89
Seats......................21
Adjustment................21
Easy Entry..............21, 23
Fold And Tumble Rear.........24
Heated...................21
Memory..................21
263