fuel cap JEEP WRANGLER 2021 Owner handbook (in English)
[x] Cancel search | Manufacturer: JEEP, Model Year: 2021, Model line: WRANGLER, Model: JEEP WRANGLER 2021Pages: 276, PDF Size: 4.47 MB
Page 57 of 276
GETTING TO KNOW YOUR INSTRUMENT PANEL
INSTRUMENT CLUSTER DISPLAY —
IF EQUIPPED................56
Instrument Cluster Display Location And
Controls.....................56
Instrument Cluster Display Messages . . .57
Gear Shift Indicator (GSI) — If
Equipped....................58
Oil Change Required.............58
WARNING LIGHTS AND MES-
SAGES ....................58
Red Warning Lights..............58
Yellow Warning Lights............61
Yellow Indicator Lights............63
Green Indicator Lights............64
White Indicator Lights............64
Blue Indicator Lights.............64
ONBOARD DIAGNOSTIC SYSTEM —
OBDII ....................64
Onboard Diagnostic System (OBD II)
Cybersecurity.................65
Loose Fuel Filler Cap Message.......65
GETTING TO KNOW YOUR INSTRUMENT PANEL
55
Page 60 of 276
• Check Gascap (refer to “Refueling The Ve-
hicle” in “Starting And Operating” for fur-
ther information)
• Oil Change Required (with a single chime)
• ECO (Fuel Saver Indicator) — if equipped
Gear Shift Indicator (GSI) — If Equipped
The Gear Shift Indicator (GSI) system is en-
abled on vehicles with a manual transmis-
sion, or when a vehicle with an automatic
transmission is in manual shift mode. The
GSI provides the driver with a visual indica-
tion when the recommended gear shift point
has been reached. This indication notifies
the driver that changing gear will allow a
reduction in fuel consumption. When the up
shift indicator is shown on the display, the
GSI is advising the driver to engage a higher
gear. When the down shift indicator is shown
on the display, the GSI is advising the driver
to engage a lower gear.
The GSI indicator remains illuminated until
the driver changes gear, or the driving condi-
tions return to a situation where changing gear
is not required to improve fuel consumption.
Oil Change Required
Your vehicle is equipped with an engine oil
change indicator system. The “Oil Change
Required” message will display in the instru-
ment cluster display for approximately
10 seconds after a single chime has sounded
to indicate the next scheduled oil change
interval. The engine oil change indicator sys-
tem is duty cycle based, which means the
engine oil change interval may fluctuate de-
pendent upon your personal driving style.
Unless reset, this message will continue to
display each time you turn the ignition switch
to the ON position. To turn off the message
temporarily, push and release theMENUbut-
ton. To reset the oil change indicator system
(after performing the scheduled mainte-
nance), perform the following procedure:
WARNING LIGHTS AND
MESSAGES
The warning/indicator lights will illuminate in
the instrument panel together with a dedi-
cated message and/or acoustic signal when
applicable. These indications are indicativeand precautionary and as such must not be
considered as exhaustive and/or alternative
to the information contained in the Owner’s
Manual, which you are advised to read care-
fully in all cases. Always refer to the informa-
tion in this chapter in the event of a failure
indication. All active telltales will display first
if applicable. The system check menu may
appear different based upon equipment op-
tions and current vehicle status. Some tell-
tales are optional and may not appear.
Red Warning Lights
— Air Bag Warning Light
This light indicates a fault with the air bag,
and will turn on for four to eight seconds as a
bulb check when the ignition is placed in the
ON/RUN or ACC/ON/RUN position. This light
will illuminate with a single chime when a
fault with the air bag has been detected, it
will stay on until the fault is cleared. If the
light is either not on during startup, stays on,
or turns on while driving, have the system
inspected at an authorized dealer as soon as
possible.
GETTING TO KNOW YOUR INSTRUMENT PANEL
58
Page 64 of 276
and automatic transmission control systems.
The light will illuminate when the ignition is
in the ON/RUN position before engine start.
If the bulb does not come on when turning
the ignition switch from OFF to ON/RUN,
have the condition checked promptly.
Certain conditions, such as a loose or missing
gas cap, poor quality fuel, etc., may illumi-
nate the light after engine start. The vehicle
should be serviced if the light stays on
through several typical driving styles. In most
situations, the vehicle will drive normally and
will not require towing.
When the engine is running, the MIL may
flash to alert serious conditions that could
lead to immediate loss of power or severe
catalytic converter damage. The vehicle
should be serviced as soon as possible if this
occurs.
WARNING!
A malfunctioning catalytic converter, as
referenced above, can reach higher tem-
peratures than in normal operating condi-
tions. This can cause a fire if you drive
WARNING!
slowly or park over flammable substances
such as dry plants, wood, cardboard, etc.
This could result in death or serious injury
to the driver, occupants or others.
CAUTION!
Prolonged driving with the Malfunction
Indicator Light (MIL) on could cause dam-
age to the vehicle control system. It also
could affect fuel economy and driveability.
If the MIL is flashing, severe catalytic
converter damage and power loss will soon
occur. Immediate service is required.
— Tire Pressure Monitoring System
(TPMS) Warning Light
The warning light switches on and a message
is displayed to indicate that the tire pressure
is lower than the recommended value and/or
that slow pressure loss is occurring. In these
cases, optimal tire duration and fuel con-
sumption may not be guaranteed.Should one or more tires be in the condition
mentioned above, the display will show the
indications corresponding to each tire in
sequence.
CAUTION!
Do not continue driving with one or more
flat tires as handling may be compro-
mised. Stop the vehicle, avoiding sharp
braking and steering. If a tire puncture
occurs, repair immediately using the dedi-
cated tire repair kit and contact your au-
thorized dealer as soon as possible.
Each tire, including the spare (if provided),
should be checked monthly when cold and
inflated to the inflation pressure recom-
mended by the vehicle manufacturer on the
vehicle placard or tire inflation pressure la-
bel. (If your vehicle has tires of a different
size than the size indicated on the vehicle
placard or tire inflation pressure label, you
should determine the proper tire inflation
pressure for those tires.)
GETTING TO KNOW YOUR INSTRUMENT PANEL
62
Page 67 of 276
If any of these systems require service, the
OBD II system will turn on the Malfunction
Indicator Light (MIL). It will also store diag-
nostic codes and other information to assist
your service technician in making repairs.
Although your vehicle will usually be drivable
and not need towing, see your authorized
dealer for service as soon as possible.
CAUTION!
• Prolonged driving with the MIL on could
cause further damage to the emission
control system. It could also affect fuel
economy and driveability. The vehicle
must be serviced before any emissions
tests can be performed.
• If the MIL is flashing while the vehicle is
running, severe catalytic converter dam-
age and power loss will soon occur. Im-
mediate service is required.
Onboard Diagnostic System (OBD II)
Cybersecurity
Your vehicle is required to have an Onboard
Diagnostic system (OBD II) and a connection
port to allow access to information related tothe performance of your emissions controls.
Authorized service technicians may need to
access this information to assist with the
diagnosis and service of your vehicle and
emissions system.
WARNING!
• ONLY an authorized service technician
should connect equipment to the OBD II
connection port in order to diagnose or
service your vehicle.
• If unauthorized equipment is connected
to the OBD II connection port, such as a
driver-behavior tracking device, it may:
• Be possible that vehicle systems,
including safety related systems,
could be impaired or a loss of ve-
hicle control could occur that may
result in an accident involving seri-
ous injury or death.
• Access, or allow others to access,
information stored in your vehicle
systems, including personal infor-
mation.For further information, refer to “Cybersecu-
rity” in “Multimedia” in your Owner's
Manual.
Loose Fuel Filler Cap Message
After fuel is added, the vehicle diagnostic
system can determine if the fuel filler cap is
possibly loose, improperly installed, or dam-
aged. A “gASCAP” message will be displayed
in the odometer. Tighten the gas cap until a
"clicking" sound is heard. This is an indica-
tion that the gas cap is properly tightened.
Push the odometer reset button to turn the
message off. If the problem persists, the
message will appear the next time the vehicle
is started. This might indicate a damaged
cap. If the problem is detected twice in a row,
the system will turn on the MIL. Resolving the
problem will turn the MIL off.
65
Page 117 of 276
STARTING AND OPERATING
STARTING THE ENGINE.......117
Manual Transmission — If Equipped . .117
Automatic Transmission — If
Equipped...................117
Normal Starting — Gasoline Engine . . .117
Extreme Cold Weather (Below –22°F Or
−30°C)....................117
If Engine Fails To Start..........118
After Starting.................119
Normal Starting — Diesel Engine. . . .119
ENGINE BREAK-IN RECOMMENDA-
TIONS....................121
PARKING BRAKE............121
MANUAL TRANSMISSION — IF
EQUIPPED.................123
Shifting....................123
Downshifting.................124
Reverse Shifting...............125
AUTOMATIC TRANSMISSION — IF
EQUIPPED................126
Key Ignition Park Interlock........127
Brake/Transmission Shift Interlock
System....................127
Five-Speed Automatic Transmission — If
Equipped...................127
Autostick...................128
FOUR–WHEEL DRIVE OPERATION
(COMMAND-TRAC I OR ROCK-
TRAC)....................129
Operating Instructions/Precautions . . .129
Shift Positions................130
Shifting Procedures.............131
Trac-Lok Rear Axle — If Equipped . . .132
Axle Lock (Tru-Lok) — Rubicon
Models....................132
Electronic Sway Bar Disconnect — If
Equipped...................133
STOP/START SYSTEM — DIESEL
MODELS WITH MANUAL TRANS-
MISSION ONLY..............134
Automatic Mode...............134
SPEED CONTROL............136
To Activate..................137
To Set A Desired Speed..........137
To Vary The Speed Setting.........137
To Accelerate For Passing.........138
To Resume Speed.............138
To Deactivate................138
REFUELING THE VEHICLE.....139
Fuel Filler Cap...............139
Loose Fuel Filler Cap Message......140
STARTING AND OPERATING
115
Page 141 of 276

Using Speed Control On Hills
The transmission may downshift on hills to
maintain the vehicle set speed.
NOTE:
The Speed Control system maintains speed
up and down hills. A slight speed change on
moderate hills is normal.
On steep hills, a greater speed loss or gain
may occur so it may be preferable to drive
without Speed Control.
WARNING!
Speed Control can be dangerous where the
system cannot maintain a constant speed.
Your vehicle could go too fast for the con-
ditions, and you could lose control and
have an accident. Do not use Speed Con-
trol in heavy traffic or on roads that are
winding, icy, snow-covered or slippery.
REFUELING THE VEHICLE
Fuel Filler Cap
The fuel filler cap is located on the driver's
side of the vehicle. If the fuel filler cap is lost
or damaged, be sure the replacement cap is
the correct one for this vehicle.
WARNING!
• Never have any smoking materials lit in
or near the vehicle when the gas cap is
removed or the tank is being filled.
• Never add fuel when the engine is run-
ning. This is in violation of most state
fire regulations and may cause the MIL
to turn on.
• A fire may result if gasoline is pumped
into a portable container that is inside of
a vehicle. You could be burned. Always
place gas containers on the ground while
filling.
CAUTION!
• Damage to the fuel system or emission
control system could result from using
an improper fuel filler cap. A poorly
fitting cap could let impurities into the
fuel system. Also, a poorly fitting after-
market cap can cause the “Malfunction
Indicator Light (MIL)” to illuminate, due
to fuel vapors escaping from the system.
Fuel Filler Cap
139
Page 142 of 276
CAUTION!
• To avoid fuel spillage and overfilling, do
not “top off” the fuel tank after filling.
NOTE:
• When the fuel nozzle “clicks” or shuts off,
the fuel tank is full.
• Tighten the fuel filler cap about 1/4 turn
until you hear one click. This is an indica-
tion that the cap is properly tightened.
• If the fuel filler cap is not tightened prop-
erly, the MIL will come on. Be sure the cap
is tightened every time the vehicle is
refueled.
Loose Fuel Filler Cap Message
After fuel has been added, the vehicle diag-
nostic system can determine if the fuel filler
cap is possibly loose, improperly installed, or
damaged. If the system detects a malfunc-
tion, the “gASCAP” message will display in
the odometer display. Tighten the gas cap
until a "clicking" sound is heard. This is an
indication that the gas cap is properly tight-
ened. Push the odometer reset button to turn
the message off. If the problem persists, the
message will appear the next time the vehicleis started. This might indicate a damaged
cap. If the problem is detected twice in a row,
the system will turn on the MIL. Resolving
the problem will turn the MIL off.
TRAILER TOWING
Trailer Towing Weights (Maximum Trailer
Weight Ratings)
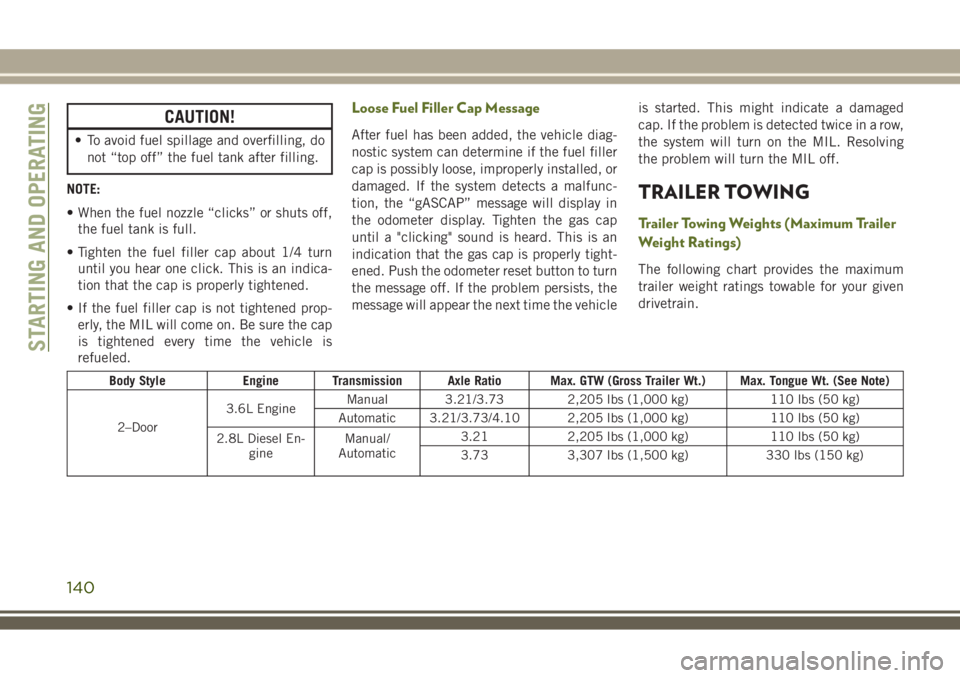
The following chart provides the maximum
trailer weight ratings towable for your given
drivetrain.
Body Style Engine Transmission Axle Ratio Max. GTW (Gross Trailer Wt.) Max. Tongue Wt. (See Note)
2–Door3.6L EngineManual 3.21/3.73 2,205 lbs (1,000 kg) 110 lbs (50 kg)
Automatic 3.21/3.73/4.10 2,205 lbs (1,000 kg) 110 lbs (50 kg)
2.8L Diesel En-
gineManual/
Automatic3.21 2,205 lbs (1,000 kg) 110 lbs (50 kg)
3.73 3,307 lbs (1,500 kg) 330 lbs (150 kg)
STARTING AND OPERATING
140
Page 184 of 276
Checking Oil Level — Gasoline Engine
To ensure proper lubrication of your vehicle's
engine, the engine oil must be maintained at
the correct level. The engine oil level should
be checked five minutes after a warmed up
engine has been shut off.
Checking the oil while the vehicle is on level
ground will improve the accuracy of the oil
level readings. Always maintain the oil level
within the SAFE zone on the dipstick. Adding
1 quart (0.95 liters) of oil when the reading is
at the bottom of the crosshatch zone will
result in a reading at the top of the cross-
hatch zone on these engines.
CAUTION!
Overfilling or underfilling the crankcase
will cause aeration or loss of oil pressure.
This could damage your engine.
Checking Oil Level — Diesel Engine
To assure proper engine lubrication, the en-
gine oil must be maintained at the correct
level. Check the oil level at regular intervals,
such as every fuel stop.For vehicles equipped with a Diesel Particu-
late Filter (DPF), it is acceptable to have an
oil level up to 3/8 inch (10 mm) above the
MAX line. Beyond 3/8 inch (10 mm) it is
recommended to change the oil.
The best time to check the engine oil level is
about five minutes after a fully warmed en-
gine is shut off.
Checking the oil while the vehicle is on level
ground will improve the accuracy of the oil
level readings. Maintain the oil level between
the MIN and MAX markings on the dipstick.
Adding 1 U.S. Quart (0.95 L) of oil when the
reading is at the MIN mark will result in a
MAX reading on these engines.
Cooling System
WARNING!
• You or others can be badly burned by hot
engine coolant (antifreeze) or steam
from your radiator. If you see or hear
steam coming from under the hood, do
not open the hood until the radiator has
had time to cool. Never open a cooling
WARNING!
system pressure cap when the radiator
or coolant bottle is hot.
• Keep hands, tools, clothing, and jewelry
away from the radiator cooling fan when
the hood is raised. The fan starts auto-
matically and may start at any time,
whether the engine is running or not.
• When working near the radiator cooling
fan, disconnect the fan motor lead or
turn the ignition to the OFF mode. The
fan is temperature controlled and can
start at any time the ignition is in the ON
mode.
Engine Coolant Checks
Check the engine coolant (antifreeze) protec-
tion every 12 months (before the onset of
freezing weather, where applicable). If the
engine coolant (antifreeze) is dirty or rusty in
appearance, the system should be drained,
flushed and refilled with fresh engine coolant
(antifreeze). Check the front of the A/C con-
denser (if equipped) or radiator for any accu-
mulation of bugs, leaves, etc. If dirty, clean
SERVICING AND MAINTENANCE
182
Page 209 of 276
TECHNICAL SPECIFICATIONS
VEHICLE IDENTIFICATION
NUMBER.................208
WHEEL AND TIRE TORQUE
SPECIFICATIONS...........208
Torque Specifications............208
FUEL REQUIREMENTS — GASOLINE
ENGINES.................209
Ethanol....................209
FUEL REQUIREMENTS — DIESEL
ENGINES.................209
FLUID CAPACITIES..........210
FLUIDS AND LUBRICANTS.....210
Engine.....................210
Chassis....................211
MOPAR ACCESSORIES........212
Authentic Accessories And Jeep
Performance Parts By Mopar.......212
TECHNICAL SPECIFICATIONS
207
Page 212 of 276
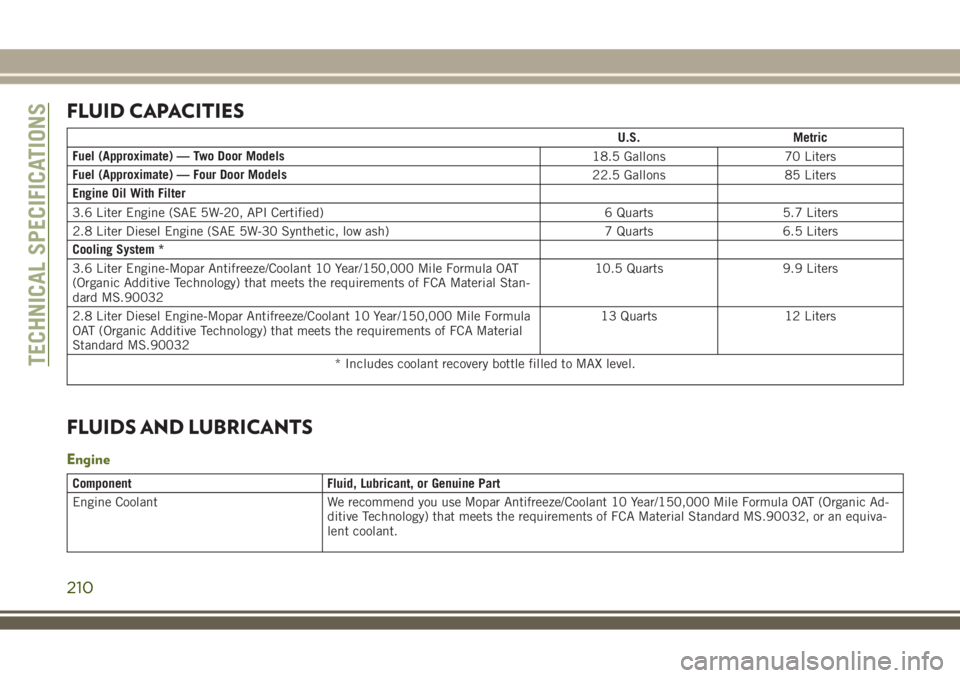
FLUID CAPACITIES
U.S. Metric
Fuel (Approximate) — Two Door Models
18.5 Gallons 70 Liters
Fuel (Approximate) — Four Door Models
22.5 Gallons 85 Liters
Engine Oil With Filter
3.6 Liter Engine (SAE 5W-20, API Certified) 6 Quarts 5.7 Liters
2.8 Liter Diesel Engine (SAE 5W-30 Synthetic, low ash) 7 Quarts 6.5 Liters
Cooling System *
3.6 Liter Engine-Mopar Antifreeze/Coolant 10 Year/150,000 Mile Formula OAT
(Organic Additive Technology) that meets the requirements of FCA Material Stan-
dard MS.9003210.5 Quarts 9.9 Liters
2.8 Liter Diesel Engine-Mopar Antifreeze/Coolant 10 Year/150,000 Mile Formula
OAT (Organic Additive Technology) that meets the requirements of FCA Material
Standard MS.9003213 Quarts 12 Liters
* Includes coolant recovery bottle filled to MAX level.
FLUIDS AND LUBRICANTS
Engine
Component Fluid, Lubricant, or Genuine Part
Engine Coolant We recommend you use Mopar Antifreeze/Coolant 10 Year/150,000 Mile Formula OAT (Organic Ad-
ditive Technology) that meets the requirements of FCA Material Standard MS.90032, or an equiva-
lent coolant.
TECHNICAL SPECIFICATIONS
210