air condition JEEP WRANGLER 2DOORS 2018 Owner handbook (in English)
[x] Cancel search | Manufacturer: JEEP, Model Year: 2018, Model line: WRANGLER 2DOORS, Model: JEEP WRANGLER 2DOORS 2018Pages: 348, PDF Size: 6.5 MB
Page 123 of 348
NOTE:
EDR data are recorded by your vehicle only if
a non-trivial crash situation occurs; no data
are recorded by the EDR under normal driving
conditions and no personal data (e.g., name,
gender, age, and crash location) are re-
corded. However, other parties, such as law
enforcement, could combine the EDR data
with the type of personally identifying data
routinely acquired during a crash investiga-
tion.
To read data recorded by an EDR, special
equipment is required, and access to the
vehicle or the EDR is needed. In addition to
the vehicle manufacturer, other parties, such
as law enforcement, that have the special
equipment, can read the information if they
have access to the vehicle or the EDR.Child Restraints — Carrying Children
Safely
Everyone in your vehicle needs to be buckled
up at all times, including babies and chil-
dren. EC directive 2003/20/EC requires
proper use of restraints in all EC countries.
Children less than 1.5 meters tall and
12 years or younger should ride properly
buckled up in a rear seat, if available. Accord-ing to crash statistics, children are safer
when properly restrained in the rear seats
rather than in the front.
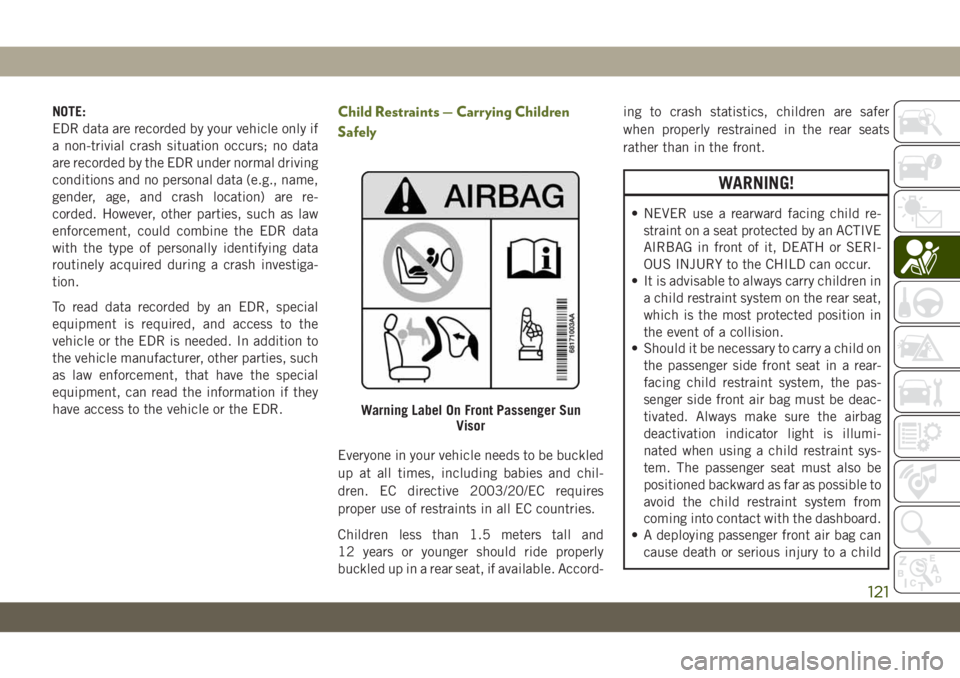
WARNING!
• NEVER use a rearward facing child re-
straint on a seat protected by an ACTIVE
AIRBAG in front of it, DEATH or SERI-
OUS INJURY to the CHILD can occur.
• It is advisable to always carry children in
a child restraint system on the rear seat,
which is the most protected position in
the event of a collision.
• Should it be necessary to carry a child on
the passenger side front seat in a rear-
facing child restraint system, the pas-
senger side front air bag must be deac-
tivated. Always make sure the airbag
deactivation indicator light is illumi-
nated when using a child restraint sys-
tem. The passenger seat must also be
positioned backward as far as possible to
avoid the child restraint system from
coming into contact with the dashboard.
• A deploying passenger front air bag can
cause death or serious injury to a child
Warning Label On Front Passenger Sun
Visor
121
Page 138 of 348
These child restraint systems, built and type-
approved according to the i-Size (ECE R129)
standard, ensure better safety conditions to
carry children on board a vehicle:
• The child must be transported rearward
facing until 15 months;
• Child restraint system protection is in-
creased in the event of a side collision;
• The use of the ISOFIX system is promoted
to avoid faulty installation of the child re-
straint system;
• Efficiency in the choice of the child re-
straint system, which isn't made according
to weight anymore but according to the
child's height, is increased;
• Compatibility between the vehicle seats
and the child restraint systems is better:
the i-Size child restraint systems can be
considered as "Super ISOFIX"; this means
that they can be perfectly fitted in type-
approved i-Size seats, but can also be fitted
in ISOFIX (ECE R44) type-approved seats.NOTE:
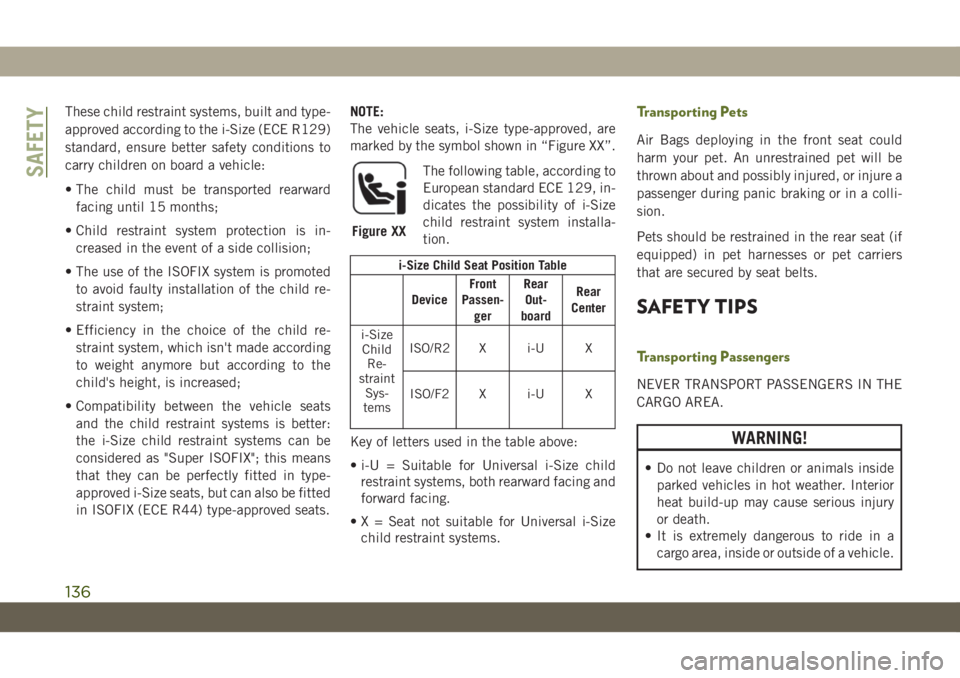
The vehicle seats, i-Size type-approved, are
marked by the symbol shown in “Figure XX”.
The following table, according to
European standard ECE 129, in-
dicates the possibility of i-Size
child restraint system installa-
tion.
i-Size Child Seat Position Table
DeviceFront
Passen-
gerRear
Out-
boardRear
Center
i-Size
Child
Re-
straint
Sys-
temsISO/R2 X i-U X
ISO/F2 X i-U X
Key of letters used in the table above:
• i-U = Suitable for Universal i-Size child
restraint systems, both rearward facing and
forward facing.
• X = Seat not suitable for Universal i-Size
child restraint systems.
Transporting Pets
Air Bags deploying in the front seat could
harm your pet. An unrestrained pet will be
thrown about and possibly injured, or injure a
passenger during panic braking or in a colli-
sion.
Pets should be restrained in the rear seat (if
equipped) in pet harnesses or pet carriers
that are secured by seat belts.
SAFETY TIPS
Transporting Passengers
NEVER TRANSPORT PASSENGERS IN THE
CARGO AREA.
WARNING!
• Do not leave children or animals inside
parked vehicles in hot weather. Interior
heat build-up may cause serious injury
or death.
• It is extremely dangerous to ride in a
cargo area, inside or outside of a vehicle.
Figure XX
SAFETY
136
Page 139 of 348
WARNING!
In a collision, people riding in these
areas are more likely to be seriously
injured or killed.
• Do not allow people to ride in any area of
your vehicle that is not equipped with
seats and seat belts.
• Be sure everyone in your vehicle is in a
seat and using a seat belt properly.
Exhaust Gas
WARNING!
Exhaust gases can injure or kill. They con-
tain carbon monoxide (CO), which is col-
orless and odorless. Breathing it can make
you unconscious and can eventually poi-
son you. To avoid breathing (CO), follow
these safety tips:
• Do not run the engine in a closed garage
or in confined areas any longer than
needed to move your vehicle in or out of
the area.
WARNING!
• If you are required to drive with the
trunk/liftgate/rear doors open, make sure
that all windows are closed and the cli-
mate control BLOWER switch is set at
high speed. DO NOT use the recircula-
tion mode.
• If it is necessary to sit in a parked vehicle
with the engine running, adjust your
heating or cooling controls to force out-
side air into the vehicle. Set the blower
at high speed.
The best protection against carbon monoxide
entry into the vehicle body is a properly main-
tained engine exhaust system.
Whenever a change is noticed in the sound of
the exhaust system, when exhaust fumes can
be detected inside the vehicle, or when the
underside or rear of the vehicle is damaged,
have a competent mechanic inspect the com-
plete exhaust system and adjacent body ar-
eas for broken, damaged, deteriorated, or
mispositioned parts. Open seams or loose
connections could permit exhaust fumes to
seep into the passenger compartment. Inaddition, inspect the exhaust system each
time the vehicle is raised for lubrication or oil
change. Replace as required.
Safety Checks You Should Make Inside
The Vehicle
Seat Belts
Inspect the seat belt system periodically,
checking for cuts, frays, and loose parts.
Damaged parts must be replaced immedi-
ately. Do not disassemble or modify the sys-
tem.
Front seat belt assemblies must be replaced
after a collision. Rear seat belt assemblies
must be replaced after a collision if they have
been damaged (i.e., bent retractor, torn web-
bing, etc.). If there is any question regarding
seat belt or retractor condition, replace the
seat belt.
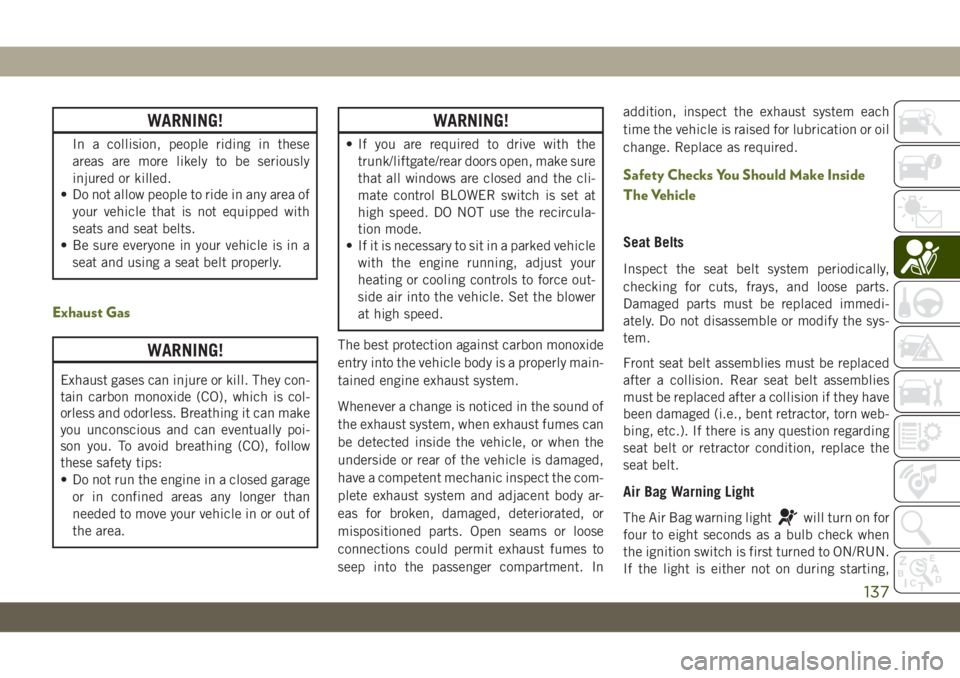
Air Bag Warning Light
The Air Bag warning lightwill turn on for
four to eight seconds as a bulb check when
the ignition switch is first turned to ON/RUN.
If the light is either not on during starting,
137
Page 148 of 348
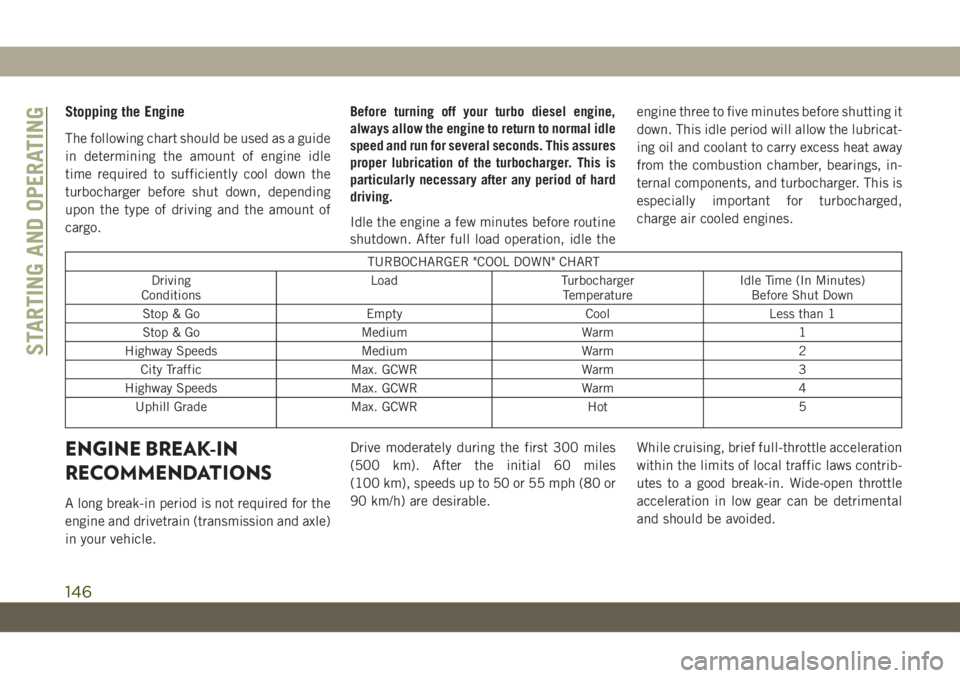
Stopping the Engine
The following chart should be used as a guide
in determining the amount of engine idle
time required to sufficiently cool down the
turbocharger before shut down, depending
upon the type of driving and the amount of
cargo.Before turning off your turbo diesel engine,
always allow the engine to return to normal idle
speed and run for several seconds. This assures
proper lubrication of the turbocharger. This is
particularly necessary after any period of hard
driving.
Idle the engine a few minutes before routine
shutdown. After full load operation, idle theengine three to five minutes before shutting it
down. This idle period will allow the lubricat-
ing oil and coolant to carry excess heat away
from the combustion chamber, bearings, in-
ternal components, and turbocharger. This is
especially important for turbocharged,
charge air cooled engines.
TURBOCHARGER "COOL DOWN" CHART
Driving
ConditionsLoad Turbocharger
TemperatureIdle Time (In Minutes)
Before Shut Down
Stop & Go Empty Cool Less than 1
Stop & Go Medium Warm 1
Highway Speeds Medium Warm 2
City Traffic Max. GCWR Warm 3
Highway Speeds Max. GCWR Warm 4
Uphill Grade Max. GCWR Hot 5
ENGINE BREAK-IN
RECOMMENDATIONS
A long break-in period is not required for the
engine and drivetrain (transmission and axle)
in your vehicle.Drive moderately during the first 300 miles
(500 km). After the initial 60 miles
(100 km), speeds up to 50 or 55 mph (80 or
90 km/h) are desirable.While cruising, brief full-throttle acceleration
within the limits of local traffic laws contrib-
utes to a good break-in. Wide-open throttle
acceleration in low gear can be detrimental
and should be avoided.
STARTING AND OPERATING
146
Page 184 of 348
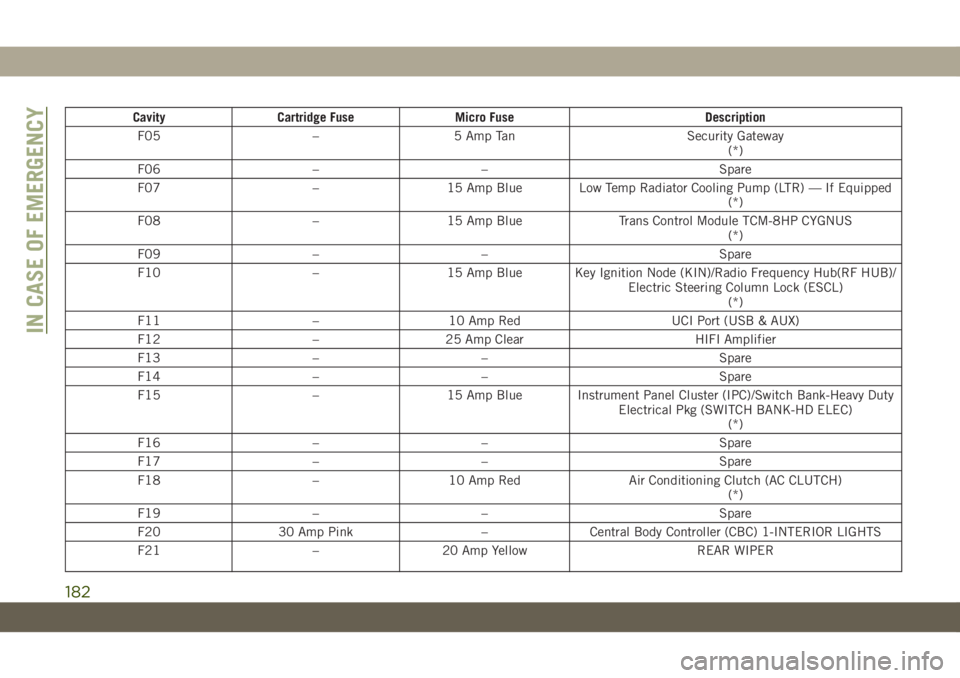
Cavity Cartridge Fuse Micro Fuse Description
F05 – 5 Amp Tan Security Gateway
(*)
F06 – – Spare
F07 – 15 Amp Blue Low Temp Radiator Cooling Pump (LTR) — If Equipped
(*)
F08 – 15 Amp Blue Trans Control Module TCM-8HP CYGNUS
(*)
F09 – – Spare
F10 – 15 Amp Blue Key Ignition Node (KIN)/Radio Frequency Hub(RF HUB)/
Electric Steering Column Lock (ESCL)
(*)
F11 – 10 Amp Red UCI Port (USB & AUX)
F12 – 25 Amp Clear HIFI Amplifier
F13 – – Spare
F14 – – Spare
F15 – 15 Amp Blue Instrument Panel Cluster (IPC)/Switch Bank-Heavy Duty
Electrical Pkg (SWITCH BANK-HD ELEC)
(*)
F16 – – Spare
F17 – – Spare
F18 – 10 Amp Red Air Conditioning Clutch (AC CLUTCH)
(*)
F19 – – Spare
F20 30 Amp Pink – Central Body Controller (CBC) 1-INTERIOR LIGHTS
F21 – 20 Amp Yellow REAR WIPER
IN CASE OF EMERGENCY
182
Page 185 of 348
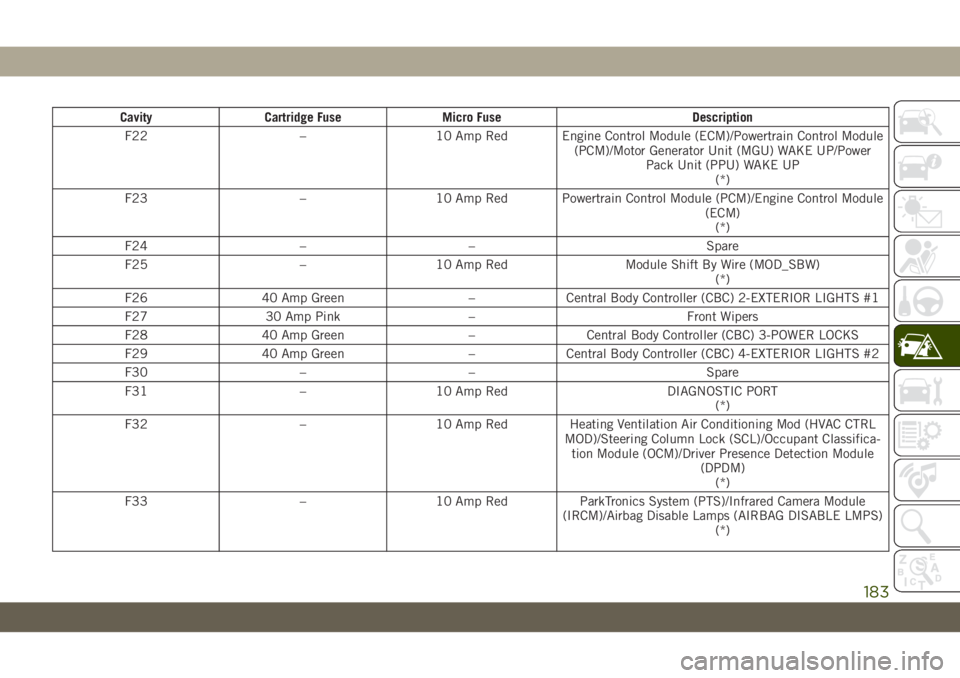
Cavity Cartridge Fuse Micro Fuse Description
F22 – 10 Amp Red Engine Control Module (ECM)/Powertrain Control Module
(PCM)/Motor Generator Unit (MGU) WAKE UP/Power
Pack Unit (PPU) WAKE UP
(*)
F23 – 10 Amp Red Powertrain Control Module (PCM)/Engine Control Module
(ECM)
(*)
F24 – – Spare
F25 – 10 Amp Red Module Shift By Wire (MOD_SBW)
(*)
F26 40 Amp Green – Central Body Controller (CBC) 2-EXTERIOR LIGHTS #1
F27 30 Amp Pink – Front Wipers
F28 40 Amp Green – Central Body Controller (CBC) 3-POWER LOCKS
F29 40 Amp Green – Central Body Controller (CBC) 4-EXTERIOR LIGHTS #2
F30 – – Spare
F31 – 10 Amp Red DIAGNOSTIC PORT
(*)
F32 – 10 Amp Red Heating Ventilation Air Conditioning Mod (HVAC CTRL
MOD)/Steering Column Lock (SCL)/Occupant Classifica-
tion Module (OCM)/Driver Presence Detection Module
(DPDM)
(*)
F33 – 10 Amp Red ParkTronics System (PTS)/Infrared Camera Module
(IRCM)/Airbag Disable Lamps (AIRBAG DISABLE LMPS)
(*)
183
Page 198 of 348
Jack Usage Precautions
To complete the Use and Maintenance Hand-
book to which this supplement is attached,
given below are some instructions on the
proper use of the jack.
WARNING!
When using the crank, make sure it turns
freely without the risk of scraping hands
against the ground.
Even the moving parts of the jack, the
“worm screw” and joints can cause inju-
ries: avoid contact with them. Clean it
thoroughly if dirtied with grease.
CAUTION!
The jack is a tool designed exclusively for
changing a wheel, in case of a puncture or
damage to a tire of the vehicle on which it
is fitted or on vehicles of the same model.
Any other use, e.g. to jack up other vehicle
models or different things, is strictly pro-
hibited. Never use it to carry out mainte-
nance or repairs under the vehicle or to
CAUTION!
change summer/winter wheels and vice
versa. Never go under the raised vehicle. If
any work under the vehicle is necessary,
contact an authorized dealer. Incorrect
placing of the jack can cause the vehicle to
drop: use it only in the positions indicated.
Do not use the jack for loads higher than
that specified on the label. Never start the
engine with vehicle raised. If the vehicle is
raised more than necessary, everything
can become more unstable, with the risk
of the vehicle dropping violently. Therefore
raise the vehicle only as much as neces-
sary for the wheel/spare.
Maintenance
• Make sure grime does not build up on the
“worm screw.”
• Keep the “worm screw” lubricated.
• Never modify the jack.
Conditions Of Non-Use:
• Temperatures below −40°C.
• On sandy or muddy ground.
• On uneven ground.• On steep roads.
• In extreme weather conditions: thunder-
storms, typhoons, hurricanes, blizzards,
storms, etc.
NOTE:
•The jack requires no adjustment.
• The jack cannot be repaired, and in the
event of a fault, it must be replaced by
another genuine one.
• No tool other than its cranking device may
be fitted on the jack.
JUMP STARTING
If your vehicle has a discharged battery, it can
be jump started using a set of jumper cables
and a battery in another vehicle, or by using a
portable battery booster pack. Jump starting
can be dangerous if done improperly, so please
follow the procedures in this section carefully.
WARNING!
Do not attempt jump starting if the battery
is frozen. It could rupture or explode and
cause personal injury.
IN CASE OF EMERGENCY
196
Page 201 of 348
4. Disconnect the opposite end of the posi-
tive(+)jumper cable from the remote
positive(+)post of the discharged
vehicle.
5. Reinstall the protective cover over the
remote positive(+)post of the discharged
vehicle.
If frequent jump starting is required to start
your vehicle you should have the battery and
charging system tested at an authorized
dealer.
CAUTION!
Accessories plugged into the vehicle
power outlets draw power from the vehi-
cle’s battery, even when not in use (i.e.,
cellular devices, etc.). Eventually, if
plugged in long enough without engine
operation, the vehicle’s battery will dis-
charge sufficiently to degrade battery life
and/or prevent the engine from starting.
IF YOUR ENGINE
OVERHEATS
In any of the following situations, you can
reduce the potential for overheating by taking
the appropriate action.
• On the highways — slow down.
• In city traffic — while stopped, shift trans-
mission into NEUTRAL, but do not increase
engine idle speed.
CAUTION!
Driving with a hot cooling system could
damage your vehicle. If the temperature
gauge reads HOT (H), pull over and stop
the vehicle. Idle the vehicle with the air
conditioner turned off until the pointer
drops back into the normal range. If the
pointer remains on HOT (H), and you hear
continuous chimes, turn the engine off
immediately and call for service.NOTE:
There are steps that you can take to slow
down an impending overheat condition:
• If your air conditioner (A/C) is on, turn it off.
The A/C system adds heat to the engine
cooling system and turning the A/C off can
help remove this heat.
• You can also turn the temperature control to
maximum heat, the mode control to floor
and the blower control to high. This allows
the heater core to act as a supplement to
the radiator and aids in removing heat from
the engine cooling system.WARNING!
You or others can be badly burned by hot
engine coolant (antifreeze) or steam from
your radiator. If you see or hear steam
coming from under the hood, do not open
the hood until the radiator has had time to
cool. Never try to open a cooling system
pressure cap when the radiator or coolant
bottle is hot.
199
Page 210 of 348
SCHEDULED SERVICING
Correct servicing is crucial for guaranteeing a
long life for the car under the best conditions.
For this reason, Jeep has planned a series of
checks and services at fixed distance inter-
vals and, where provided, at fixed time inter-
vals, as described in the Scheduled Servicing
plan. To keep the car’s efficiency in tip-top
condition, in the following Scheduled Service
plan pages a few additional checks are listed
that should be carried out more frequently
with respect to the normal coupon redemp-
tion schedule. Scheduled Servicing is offered
by all authorized dealerships according to
fixed time or mileage intervals. If, during
each operation, in addition to the ones
scheduled, the need arises for further re-
placements or repairs, these may be carried
out with the owner's explicit agreement only.
The technicians at your dealership know your
vehicle best, and have access to factory
trained information, genuine Mopar parts,
and specially designed electronic and me-
chanical tools that can help prevent future
costly repairs. If your car is used frequently
for towing, the interval between one sched-uled servicing operation and the next should
be reduced. More frequent maintenance may
be needed for vehicles in severe operating
conditions, such as dusty areas and very
short trip driving.
NOTE:
Scheduled Servicing interventions are set out
by the Manufacturer. Failure to have them
carried out may invalidate the warranty. It is
advised to inform an authorized dealership of
any small operating irregularities without
waiting for the next service.
Scheduled Servicing — Gasoline Engine
The oil change indicator system will remind
you that it is time to take your vehicle in for
engine oil replacement.
On vehicles equipped with instrument cluster
display, “Oil Change Required” will be dis-
played and a single chime will sound, indi-
cating that an oil change is necessary.
On non-instrument cluster display equipped
vehicles, “Change Oil” will flash in the in-
strument cluster odometer and a single
chime will sound, indicating that an oil
change is necessary.The oil change indicator message will illumi-
nate approximately 7,000 miles
(11,200 km) after the most recent oil change
was performed. Have your vehicle serviced as
soon as possible, within 500 miles (800 km)
(except for 2.0L gasoline engine with GPF -
Gasoline Particulate Filter). However, an ear-
lier oil change at 4,500 miles (7,500 km)
may be required if the vehicle is operated
under “Severe Duty Conditions” later in this
section.
NOTE:
• The oil change indicator message will not
monitor the time since the last oil change.
Change your vehicle's oil if it has been
12 months since your last oil change even
if the oil change indicator message is NOT
illuminated.
• Change your engine oil more often if you
drive your vehicle off-road for an extended
period of time.
• Under no circumstances should oil change
intervals exceed 7,500 miles (12,000 km)
or 12 months, whichever comes first (ex-
cept for 2.0L gasoline engine with GPF -
Gasoline Particulate Filter).
SERVICING AND MAINTENANCE
208
Page 212 of 348
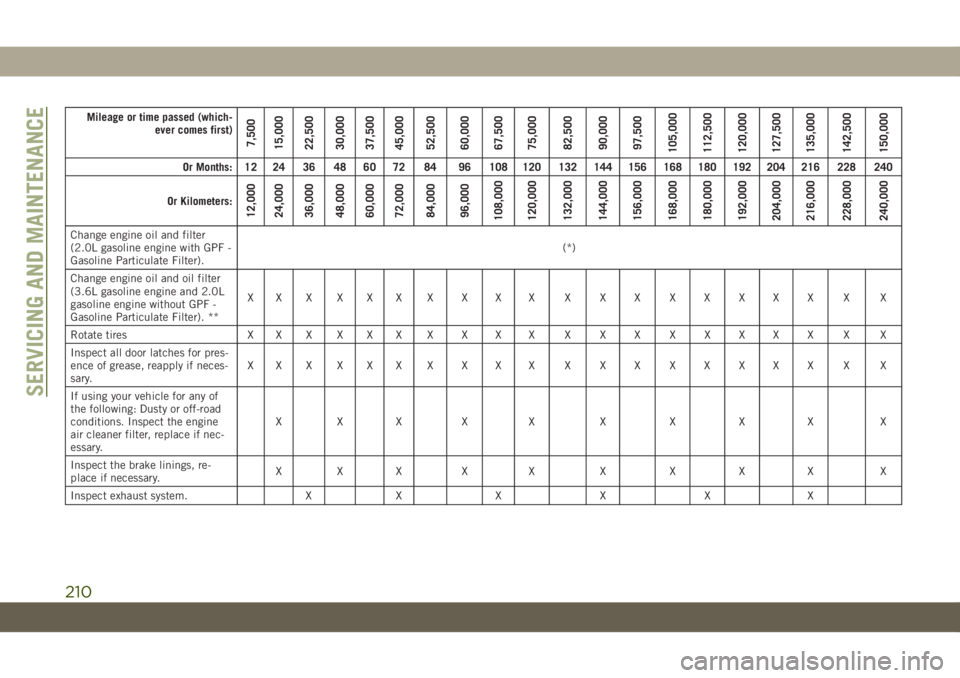
Mileage or time passed (which-
ever comes first)
7,500
15,000
22,500
30,000
37,500
45,000
52,500
60,000
67,500
75,000
82,500
90,000
97,500
105,000
112,500
120,000
127,500
135,000
142,500
150,000
Or Months: 12 24 36 48 60 72 84 96 108 120 132 144 156 168 180 192 204 216 228 240
Or Kilometers:
12,000
24,000
36,000
48,000
60,000
72,000
84,000
96,000
108,000
120,000
132,000
144,000
156,000
168,000
180,000
192,000
204,000
216,000
228,000
240,000
Change engine oil and filter
(2.0L gasoline engine with GPF -
Gasoline Particulate Filter).(*)
Change engine oil and oil filter
(3.6L gasoline engine and 2.0L
gasoline engine without GPF -
Gasoline Particulate Filter). **XXXXXXXXXX XXXXXXXX X X
Rotate tires X X X X X X X X X X X X X X X X X X X X
Inspect all door latches for pres-
ence of grease, reapply if neces-
sary.XXXXXXXXXX XXXXXXXX X X
If using your vehicle for any of
the following: Dusty or off-road
conditions. Inspect the engine
air cleaner filter, replace if nec-
essary.XXX X X X X X X X
Inspect the brake linings, re-
place if necessary.XXX X X X X X X X
Inspect exhaust system. X X X X X X
SERVICING AND MAINTENANCE
210