transmission JEEP WRANGLER 2DOORS 2018 Owner handbook (in English)
[x] Cancel search | Manufacturer: JEEP, Model Year: 2018, Model line: WRANGLER 2DOORS, Model: JEEP WRANGLER 2DOORS 2018Pages: 348, PDF Size: 6.5 MB
Page 175 of 348

9. Repeat steps seven and eight with the
transmission in DRIVE.
10. Turn the engine OFF and leave the igni-
tion in the unlocked ACC position.
11. Firmly apply the parking brake.
12. Shift the transmission into PARK (NOT
in NEUTRAL).
CAUTION!
Damage to the transmission may occur if
the transmission is shifted into PARK with
the transfer case in NEUTRAL (N) and the
engine running. With the transfer case in
NEUTRAL (N) ensure that the engine is
OFF before shifting the transmission into
PARK.13. Attach the vehicle to the tow vehicle
using a suitable tow bar.
14. Release the parking brake.
15. Disconnect the negative battery cable,
and secure it away from the negative
battery post.
Shifting Out of NEUTRAL (N)
Use the following procedure to prepare your
vehicle for normal usage.
1. Bring the vehicle to a complete stop, leav-
ing it connected to the tow vehicle.
2. Firmly apply the parking brake.
3. Reconnect the negative battery cable.
4. Start the engine.
5. Press and hold the brake pedal.
6. Shift the transmission into NEUTRAL.7. Turn the engine OFF.
8. Shift the transfer case lever to the desired
position.
NOTE:
When shifting the transfer case out of
NEUTRAL (N), the engine should remain
OFF to avoid gear clash.
9. Shift the transmission into PARK.
10. Release the brake pedal.
11. Disconnect vehicle from the tow vehicle.
12. Start the engine.
13. Press and hold the brake pedal.
14. Release the parking brake.
15. Shift the transmission into gear, release
the brake pedal, and check that the
vehicle operates normally.
173
Page 178 of 348
HAZARD WARNING
FLASHERS
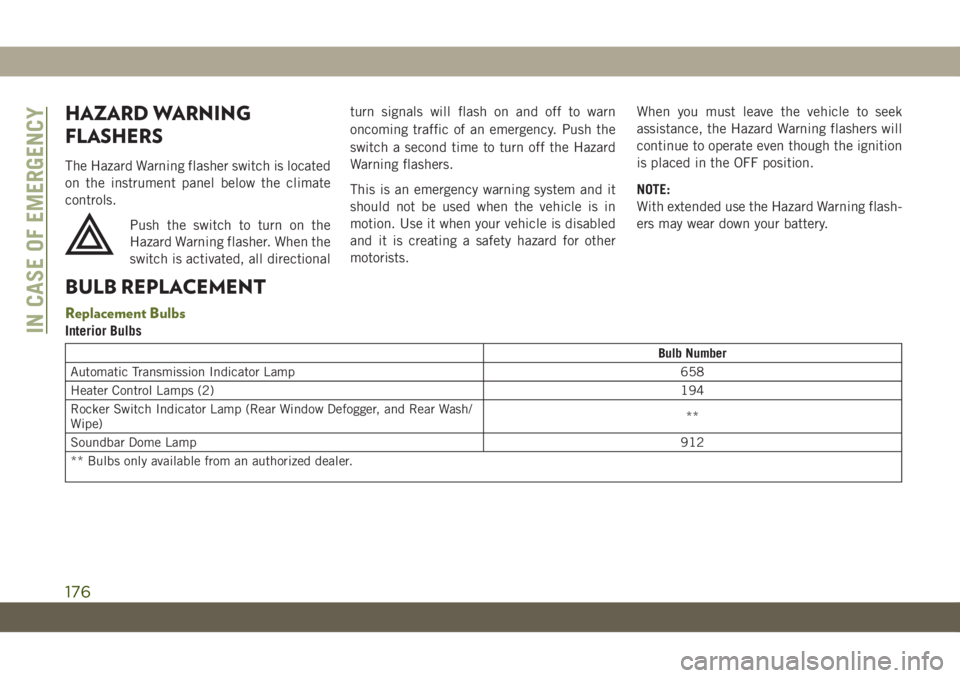
The Hazard Warning flasher switch is located
on the instrument panel below the climate
controls.
Push the switch to turn on the
Hazard Warning flasher. When the
switch is activated, all directionalturn signals will flash on and off to warn
oncoming traffic of an emergency. Push the
switch a second time to turn off the Hazard
Warning flashers.
This is an emergency warning system and it
should not be used when the vehicle is in
motion. Use it when your vehicle is disabled
and it is creating a safety hazard for other
motorists.When you must leave the vehicle to seek
assistance, the Hazard Warning flashers will
continue to operate even though the ignition
is placed in the OFF position.
NOTE:
With extended use the Hazard Warning flash-
ers may wear down your battery.
BULB REPLACEMENT
Replacement Bulbs
Interior Bulbs
Bulb Number
Automatic Transmission Indicator Lamp 658
Heater Control Lamps (2)194
Rocker Switch Indicator Lamp (Rear Window Defogger, and Rear Wash/
Wipe)**
Soundbar Dome Lamp912
** Bulbs only available from an authorized dealer.
IN CASE OF EMERGENCY
176
Page 193 of 348
3. Reinstall the tire cover if applicable.
NOTE:
If you have added aftermarket accessories to
the spare tire mounted carrier, it cannot ex-
ceed a gross weight of 85 lbs (38.5 kg)
including the weight of the spare tire.
Preparations For Jacking
1. Park on a firm, level surface. Avoid ice or
slippery areas.
WARNING!
Do not attempt to change a tire on the side
of the vehicle close to moving traffic. Pull
far enough off the road to avoid being hit
when operating the jack or changing the
wheel.
2. Turn on the Hazard Warning flasher.
3. Apply the parking brake.
4. Shift the automatic transmission into
PARK.
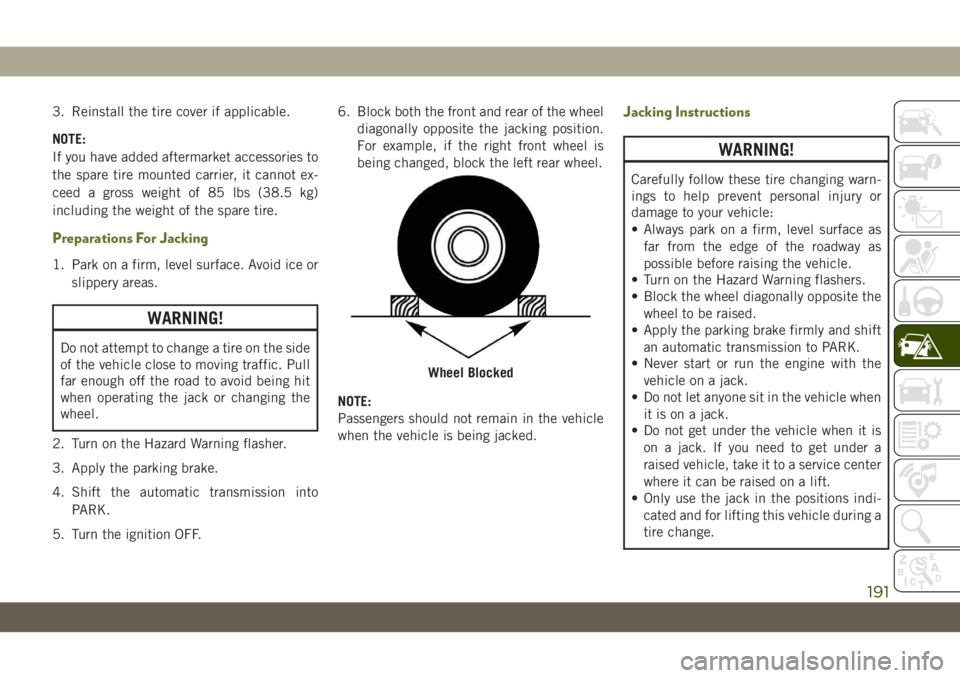
5. Turn the ignition OFF.6. Block both the front and rear of the wheel
diagonally opposite the jacking position.
For example, if the right front wheel is
being changed, block the left rear wheel.
NOTE:
Passengers should not remain in the vehicle
when the vehicle is being jacked.
Jacking Instructions
WARNING!
Carefully follow these tire changing warn-
ings to help prevent personal injury or
damage to your vehicle:
• Always park on a firm, level surface as
far from the edge of the roadway as
possible before raising the vehicle.
• Turn on the Hazard Warning flashers.
• Block the wheel diagonally opposite the
wheel to be raised.
• Apply the parking brake firmly and shift
an automatic transmission to PARK.
• Never start or run the engine with the
vehicle on a jack.
• Do not let anyone sit in the vehicle when
it is on a jack.
• Do not get under the vehicle when it is
on a jack. If you need to get under a
raised vehicle, take it to a service center
where it can be raised on a lift.
• Only use the jack in the positions indi-
cated and for lifting this vehicle during a
tire change.
Wheel Blocked
191
Page 199 of 348
CAUTION!
Do not use a portable battery booster pack
or any other booster source with a system
voltage greater than 12 Volts or damage to
the battery, starter motor, alternator or
electrical system may occur.
NOTE:
When using a portable battery booster pack,
follow the manufacturer's operating instruc-
tions and precautions.
Preparations For Jump Start
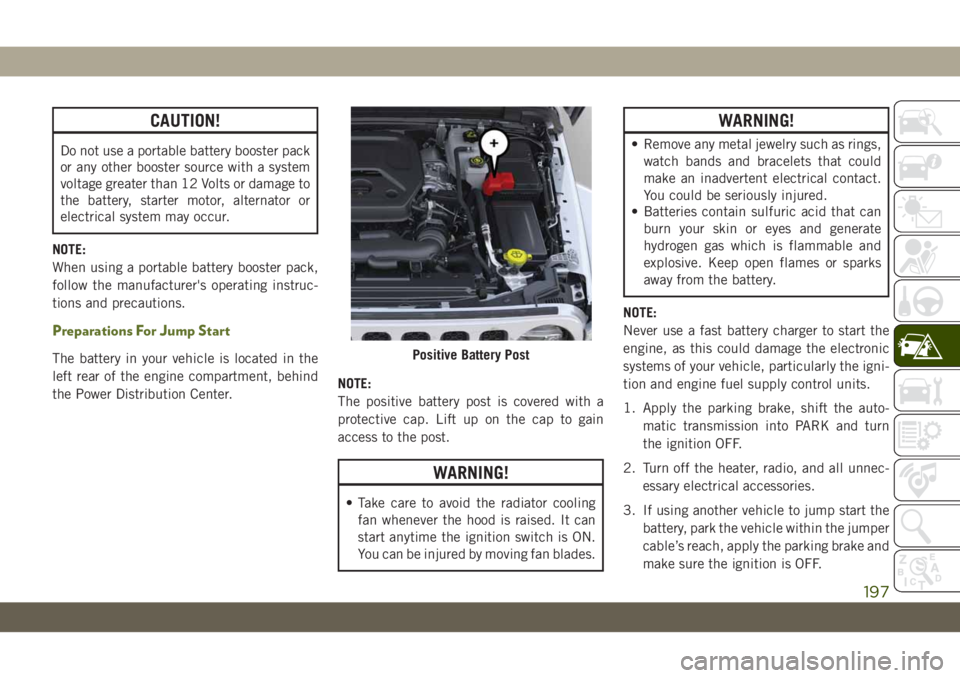
The battery in your vehicle is located in the
left rear of the engine compartment, behind
the Power Distribution Center.NOTE:
The positive battery post is covered with a
protective cap. Lift up on the cap to gain
access to the post.
WARNING!
• Take care to avoid the radiator cooling
fan whenever the hood is raised. It can
start anytime the ignition switch is ON.
You can be injured by moving fan blades.
WARNING!
• Remove any metal jewelry such as rings,
watch bands and bracelets that could
make an inadvertent electrical contact.
You could be seriously injured.
• Batteries contain sulfuric acid that can
burn your skin or eyes and generate
hydrogen gas which is flammable and
explosive. Keep open flames or sparks
away from the battery.
NOTE:
Never use a fast battery charger to start the
engine, as this could damage the electronic
systems of your vehicle, particularly the igni-
tion and engine fuel supply control units.
1. Apply the parking brake, shift the auto-
matic transmission into PARK and turn
the ignition OFF.
2. Turn off the heater, radio, and all unnec-
essary electrical accessories.
3. If using another vehicle to jump start the
battery, park the vehicle within the jumper
cable’s reach, apply the parking brake and
make sure the ignition is OFF.
Positive Battery Post
197
Page 202 of 348

MANUAL PARK RELEASE
WARNING!
Always secure your vehicle by fully apply-
ing the parking brake before activating the
Manual Park Release. In addition, you
should be seated in the driver’s seat with
your foot firmly on the brake pedal when
activating the Manual Park Release. Acti-
vating the Manual Park Release will allow
your vehicle to roll away if it is not secured
by the parking brake, or by proper connec-
tion to a tow vehicle. Activating the
Manual Park Release on an unsecured
vehicle could lead to serious injury or
death for those in or around the vehicle.
In order to push or tow the vehicle in cases
where the transmission will not shift out of
PARK (such as a dead battery), a Manual
Park Release is available.
Follow these steps to use the Manual Park
Release:
1. Firmly apply the parking brake.2. Remove the manual park release cover,
located above the gear selector, to access
the release tether strap.
3. Using a small screwdriver or similar tool,
fish the tether strap up through the open-
ing in the console base.4. Press and maintain firm pressure on the
brake pedal.
5. Pull the tether strap up and to the left
until the release lever locks into place in
the vertical position. The vehicle is now
out of PARK and can be moved. Release
the parking brake only when the vehicle is
securely connected to a tow vehicle.
Manual Park Release Cover
Tether Strap
IN CASE OF EMERGENCY
200
Page 203 of 348

To Reset The Manual Park Release:
1. Pull upward on the tether strap, releasing
it from the “locked” position.
2. Lower the Manual Park Release lever
downward and to the right, into its original
position.
3. Tuck the tether strap into the base of the
console, and reinstall the cover.
FREEING A STUCK VEHICLE
If your vehicle becomes stuck in mud, sand or
snow, it can often be moved using a rocking
motion. Turn the steering wheel right and left
to clear the area around the front wheels. For
vehicles with automatic transmission, push
and hold the lock button on the gear selector.
Then, shift back and forth between DRIVE
and REVERSE, while gently pressing the ac-
celerator. Use the least amount of accelerator
pedal pressure that will maintain the rocking
motion, without spinning the wheels or racing
the engine.NOTE:
• For vehicles with automatic transmission:
Shifts between DRIVE and REVERSE can
only be achieved at wheel speeds of 5 mph
(8 km/h) or less. Whenever the transmis-
sion remains in NEUTRAL for more than
2 seconds, you must press the brake pedal
to engage DRIVE or REVERSE.
• Push the "ESC Off" switch, to place the
Electronic Stability Control (ESC) system in
"Partial Off" mode, before rocking the ve-
hicle. Refer to “Electronic Brake Control
System” in “Safety” in your Owner’s
Manual for further details. Once the vehicle
has been freed, push the "ESC Off" switch
again to restore "ESC On" mode.
WARNING!
Fast spinning tires can be dangerous.
Forces generated by excessive wheel
speeds may cause damage, or even failure,
of the axle and tires. A tire could explode
and injure someone. Do not spin your ve-
hicle's wheels faster than 30 mph
(48 km/h) or for longer than 30 seconds
continuously without stopping when you
WARNING!
are stuck and do not let anyone near a
spinning wheel, no matter what the speed.
CAUTION!
• Racing the engine or spinning the
wheels may lead to transmission over-
heating and failure. Allow the engine to
idle with the transmission in NEUTRAL
for at least one minute after every five
rocking-motion cycles. This will mini-
mize overheating and reduce the risk of
clutch or transmission failure during
prolonged efforts to free a stuck vehicle.
• When “rocking” a stuck vehicle by shift-
ing between DRIVE/SECOND GEAR and
REVERSE, do not spin the wheels faster
than 15 mph (24 km/h), or drivetrain
damage may result.
• Revving the engine or spinning the
wheels too fast may lead to transmission
overheating and failure. It can also dam-
age the tires. Do not spin the wheels
above 30 mph (48 km/h) while in gear
(no transmission shifting occurring).
201
Page 204 of 348
TOWING A DISABLED
VEHICLE
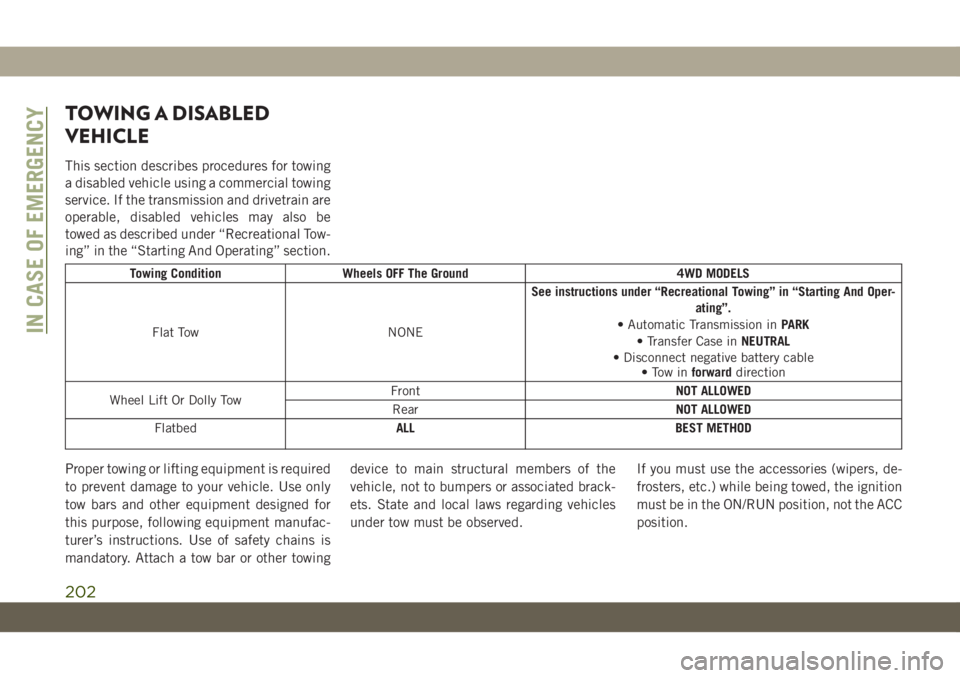
This section describes procedures for towing
a disabled vehicle using a commercial towing
service. If the transmission and drivetrain are
operable, disabled vehicles may also be
towed as described under “Recreational Tow-
ing” in the “Starting And Operating” section.
Towing Condition Wheels OFF The Ground 4WD MODELS
Flat Tow NONESee instructions under “Recreational Towing” in “Starting And Oper-
ating”.
• Automatic Transmission inPARK
• Transfer Case inNEUTRAL
• Disconnect negative battery cable
• Tow inforwarddirection
Wheel Lift Or Dolly TowFrontNOT ALLOWED
RearNOT ALLOWED
FlatbedALL BEST METHOD
Proper towing or lifting equipment is required
to prevent damage to your vehicle. Use only
tow bars and other equipment designed for
this purpose, following equipment manufac-
turer’s instructions. Use of safety chains is
mandatory. Attach a tow bar or other towingdevice to main structural members of the
vehicle, not to bumpers or associated brack-
ets. State and local laws regarding vehicles
under tow must be observed.If you must use the accessories (wipers, de-
frosters, etc.) while being towed, the ignition
must be in the ON/RUN position, not the ACC
position.
IN CASE OF EMERGENCY
202
Page 205 of 348
If the vehicle's battery is discharged, refer to
"Manual Park Release" in this section for
instructions on shifting the automatic trans-
mission out of PARK in order to move the
vehicle.
CAUTION!
• Do not use sling type equipment when
towing. Vehicle damage may occur.
• When securing the vehicle to a flatbed
truck, do not attach to front or rear
suspension components. Damage to
your vehicle may result from improper
towing.
• If the vehicle being towed requires steer-
ing, the ignition switch must be in the
ACC or ON/RUN mode, not in the OFF
mode.
Without The Key Fob
Special care must be taken when the vehicle
is towed with the ignition in the OFF mode.
The only approved method of towing without
the key fob is with a flatbed truck. Proper
towing equipment is necessary to prevent
damage to the vehicle.
Four–Wheel Drive Models
The manufacturer recommends towing with
all wheelsOFFthe ground. Acceptable meth-
ods are to tow the vehicle on a flatbed or with
one end of the vehicle raised and the opposite
end on a towing dolly.
If flatbed equipment is not available and the
transfer case is operable, the vehicle may be
towed (in the forward direction, withALL
wheels on the ground),IFthe transfer case is
inNEUTRAL(N) and the transmission is in
PARK. Refer to “Recreational Towing” in
“Starting And Operating” for detailed
instructions.
CAUTION!
• Front or rear wheel lifts must not be used
(if the remaining wheels are on the
ground). Internal damage to the trans-
mission or transfer case will occur if a
front or rear wheel lift is used when
towing.
• Towing this vehicle in violation of the
above requirements can cause severe
transmission and/or transfer case dam-
CAUTION!
age. Damage from improper towing is
not covered under the New Vehicle Lim-
ited Warranty.
Tow Eye Usage
Your vehicle is equipped with a tow eye that
can be used to move a disabled vehicle.
When using a tow eye be sure to follow the
“Tow Eye Usage Precautions” and the “Tow-
ing A Disabled Vehicle” instructions in this
section.
The tow eyes are mounted below the front and
rear bumpers.
Tow Eye Usage Precautions
WARNING!
Stand clear of vehicles when pulling with
tow eyes.
• Do not use a chain with a tow eye.
Chains may break, causing serious injury
or death.
203
Page 209 of 348

SERVICING AND MAINTENANCE
SCHEDULED SERVICING......208
Scheduled Servicing — Gasoline Engine.208
Scheduled Servicing — Diesel Engine .213
ENGINE COMPARTMENT......217
2.0L Gasoline Engine............217
3.6L Gasoline Engine............218
2.2L Diesel Engine.............219
Checking Oil Level — Gasoline Engine .220
Adding Washer Fluid............220
Maintenance-Free Battery........221
DEALER SERVICE...........221
Windshield Wiper Blades.........222
Cooling System...............224
Brake System................224
Automatic Transmission..........225
RAISING THE VEHICLE.......226
TIRES....................226
Tire Safety Information..........226
Tires — General Information.......230
Tire Types...................234
Spare Tires — If Equipped........235
Wheel And Wheel Trim Care.......236Tire Chains (Traction Devices).......237
Tire Rotation Recommendations.....238
STORING THE VEHICLE......239
BODYWORK...............239
Body And Underbody Maintenance . . .239
Preserving The Bodywork.........239
INTERIORS................242
Seats And Fabric Parts...........242
Plastic And Coated Parts..........243
Leather Parts.................243
Glass Surfaces...............243
SERVICING AND MAINTENANCE
207
Page 227 of 348
light is on. If necessary, add fluid to bring
level within the designated marks on the side
of the reservoir of the brake master cylinder.
Be sure to clean the top of the master cylin-
der area before removing cap. With disc
brakes, fluid level can be expected to fall as
the brake pads wear. Brake fluid level should
be checked when pads are replaced. If the
brake fluid is abnormally low, check the sys-
tem for leaks.
Refer to “Fluids And Lubricants” in “Techni-
cal Specifications” for further information.
WARNING!
• Brake fluid is poisonous and highly cor-
rosive. In the event of accidental con-
tact, immediately wash the affected
parts with water and neutral soap. Then
rinse thoroughly. Call a doctor immedi-
ately if swallowed.
• Use only manufacturer's recommended
brake fluid. Refer to “Fluids And Lubri-
cants” in “Technical Specifications” for
further information. Using the wrong
type of brake fluid can severely damage
WARNING!
your brake system and/or impair its per-
formance. The proper type of brake fluid
for your vehicle is also identified on the
original factory installed hydraulic mas-
ter cylinder reservoir.
• To avoid contamination from foreign
matter or moisture, use only new brake
fluid or fluid that has been in a tightly
closed container. Keep the master cylin-
der reservoir cap secured at all times.
Brake fluid in a open container absorbs
moisture from the air resulting in a lower
boiling point. This may cause it to boil
unexpectedly during hard or prolonged
braking, resulting in sudden brake fail-
ure. This could result in a collision.
• Overfilling the brake fluid reservoir can
result in spilling brake fluid on hot en-
gine parts, causing the brake fluid to
catch fire. Brake fluid can also damage
painted and vinyl surfaces, care should
be taken to avoid its contact with these
surfaces.
• Do not allow petroleum based fluid to
contaminate the brake fluid. Brake seal
WARNING!
components could be damaged, causing
partial or complete brake failure. This
could result in a collision.
Automatic Transmission
Fluid Level Check
The fluid level is preset at the factory and
does not require adjustment under normal
operating conditions. Routine fluid level
checks are not required; therefore the trans-
mission has no dipstick. An authorized dealer
can check your transmission fluid level using
special service tools. If you notice fluid leak-
age or transmission malfunction, visit an au-
thorized dealer immediately to have the
transmission fluid level checked. Operating
the vehicle with an improper fluid level can
cause severe transmission damage.
CAUTION!
If a transmission fluid leak occurs, visit an
authorized dealer immediately. Severe
transmission damage may occur. An au-
225