remove seats JEEP WRANGLER 2DOORS 2018 Owner handbook (in English)
[x] Cancel search | Manufacturer: JEEP, Model Year: 2018, Model line: WRANGLER 2DOORS, Model: JEEP WRANGLER 2DOORS 2018Pages: 348, PDF Size: 6.5 MB
Page 18 of 348
WARNING!
could operate power windows, other con-
trols, or move the vehicle.
• Do not leave children or animals inside
parked vehicles in hot weather. Interior
heat build-up may cause serious injury
or death.
CAUTION!
An unlocked vehicle is an invitation for
thieves. Always remove key fob from the
vehicle and lock all doors when leaving the
vehicle unattended.
NOTE:
Refer to "Starting The Engine," in "Starting
And Operating" in the Owner’s Manual for
further information.
REMOTE STARTING
SYSTEM — IF EQUIPPED
This system uses the key fob to
start the engine conveniently from
outside the vehicle while still main-
taining security. The system has a
range of 328 ft (100 m).
The Remote Starting System also activates
the Climate Control, vented seats (if
equipped) in temperatures above 80° F
(26.7° C), and the heated seats (if
equipped), and heated steering wheel (if
equipped) in temperatures below 40° F
(4.4° C). Refer to “Heated Seats” in “Getting
To Know Your Vehicle” in the Owner’s Manual
for further information.
NOTE:
• The vehicle must be equipped with an
automatic transmission to be equipped
with Remote Start.
• Obstructions between the vehicle and key
fob may reduce this range.
How To Use Remote Start
• Push Remote Start button on the key fob
twice within five seconds. Pushing the Re-
mote Start button a third time shuts the
engine off.
• To drive the vehicle, push unlock button,
and place the ignition in the ON/RUN po-
sition.
• With remote start, the engine will only run
for 15 minutes (timeout) unless the igni-
tion key is placed in the ON/RUN position.
• The vehicle must be started with the key
after two consecutive timeouts.
All of the following conditions must be met
before the engine will remote start:
• Gear Selector in PARK
• Doors closed
• Hood closed
• Swing Gate closed
• Hazard switch off
• Brake switch inactive (brake pedal not
pushed)
• Battery at an acceptable charge level
GETTING TO KNOW YOUR VEHICLE
16
Page 25 of 348
WARNING!
• All occupants must wear seat belts dur-
ing off-road operation with doors re-
moved. Refer to “Off-Road Driving Tips”
in “Starting And Operating” in the Own-
er’s Manual for further information.
• Do not store detached doors inside of the
vehicle, as they may cause personal in-
jury in the event of an accident.
NOTE:
•Doors are heavy; use caution when removing
them.
•Hinge pin can break if overtightened during
door reinstall (Max Torque: 7.5 ft· lb /
10 N·m). Refer to “Off-Road Driving Tips” in
“Starting And Operating” in the Owner’s
Manual for further information.
1. Roll down the glass window to prevent any
damage.2. Remove the hinge pin screws from the
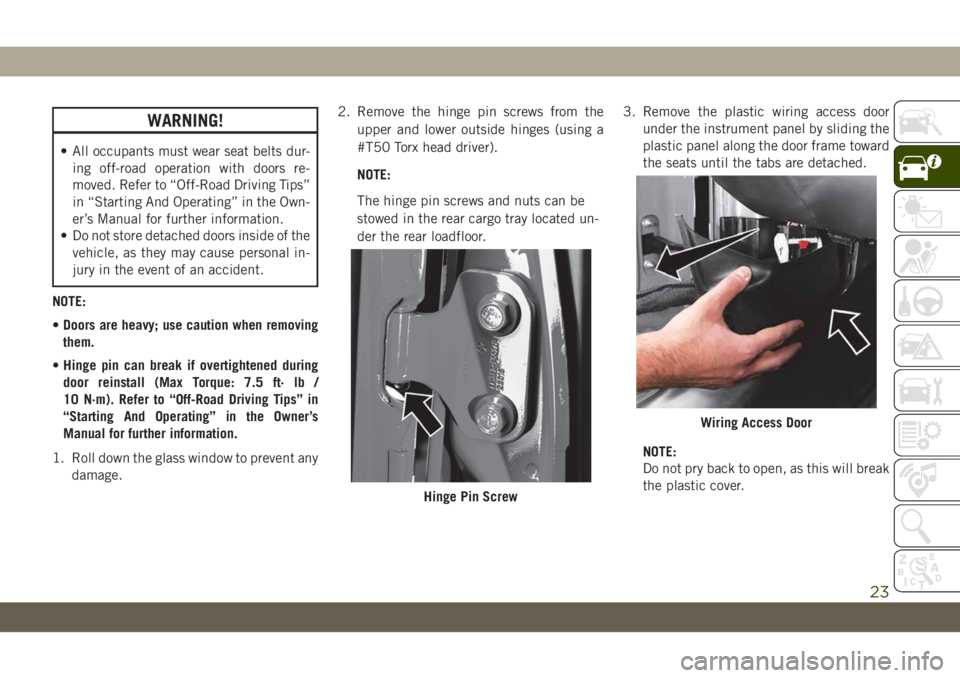
upper and lower outside hinges (using a
#T50 Torx head driver).
NOTE:
The hinge pin screws and nuts can be
stowed in the rear cargo tray located un-
der the rear loadfloor.3. Remove the plastic wiring access door
under the instrument panel by sliding the
plastic panel along the door frame toward
the seats until the tabs are detached.
NOTE:
Do not pry back to open, as this will break
the plastic cover.
Hinge Pin Screw
Wiring Access Door
23
Page 28 of 348
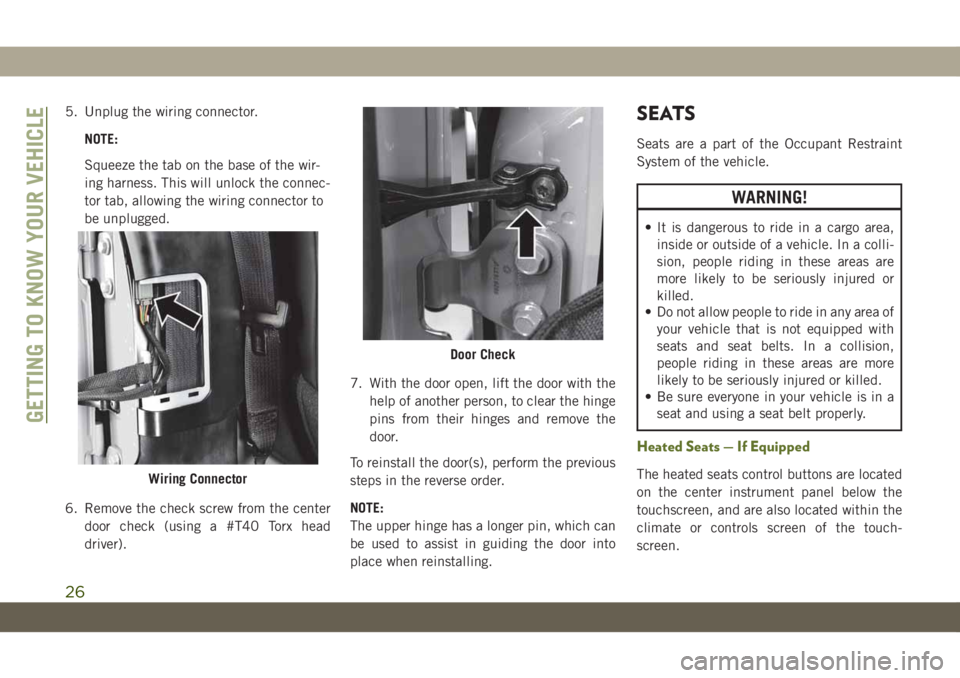
5. Unplug the wiring connector.
NOTE:
Squeeze the tab on the base of the wir-
ing harness. This will unlock the connec-
tor tab, allowing the wiring connector to
be unplugged.
6. Remove the check screw from the center
door check (using a #T40 Torx head
driver).7. With the door open, lift the door with the
help of another person, to clear the hinge
pins from their hinges and remove the
door.
To reinstall the door(s), perform the previous
steps in the reverse order.
NOTE:
The upper hinge has a longer pin, which can
be used to assist in guiding the door into
place when reinstalling.SEATS
Seats are a part of the Occupant Restraint
System of the vehicle.
WARNING!
• It is dangerous to ride in a cargo area,
inside or outside of a vehicle. In a colli-
sion, people riding in these areas are
more likely to be seriously injured or
killed.
• Do not allow people to ride in any area of
your vehicle that is not equipped with
seats and seat belts. In a collision,
people riding in these areas are more
likely to be seriously injured or killed.
• Be sure everyone in your vehicle is in a
seat and using a seat belt properly.
Heated Seats — If Equipped
The heated seats control buttons are located
on the center instrument panel below the
touchscreen, and are also located within the
climate or controls screen of the touch-
screen.Wiring Connector
Door Check
GETTING TO KNOW YOUR VEHICLE
26
Page 31 of 348
To Raise The Rear Seat
Raise the seatback and lock it into place.
Then, raise the head restraint until it locks
into place. If interference from the cargo area
prevents the seatback from fully locking, you
will have difficulty returning the seat to its
proper position.
WARNING!
Be certain that the seatback is securely
locked into position. If the seatback is not
securely locked into position the seat will
not provide the proper stability for child
seats and/or passengers. An improperly
latched seat could cause serious injury.
Fold And Tumble Rear Seat — Two Door
Models
NOTE:
• Prior to folding the rear seat, it may be
necessary to reposition the front seats.
• Be sure that the front seats are fully upright
and positioned forward. This will allow the
rear seat to fold down easily.Folding The Rear Seat
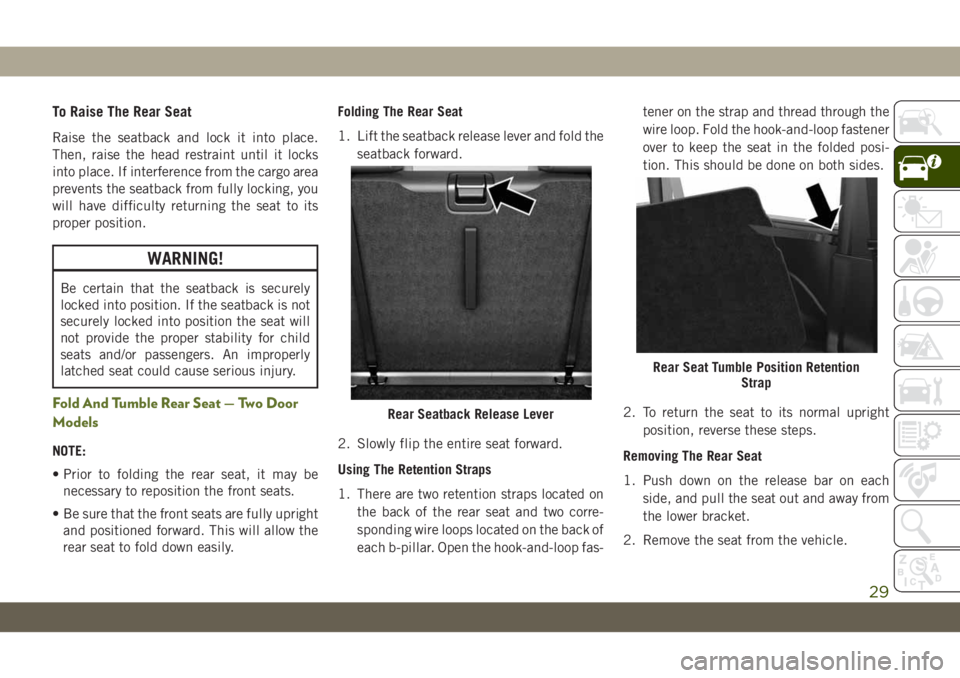
1. Lift the seatback release lever and fold the
seatback forward.
2. Slowly flip the entire seat forward.
Using The Retention Straps
1. There are two retention straps located on
the back of the rear seat and two corre-
sponding wire loops located on the back of
each b-pillar. Open the hook-and-loop fas-tener on the strap and thread through the
wire loop. Fold the hook-and-loop fastener
over to keep the seat in the folded posi-
tion. This should be done on both sides.
2. To return the seat to its normal upright
position, reverse these steps.
Removing The Rear Seat
1. Push down on the release bar on each
side, and pull the seat out and away from
the lower bracket.
2. Remove the seat from the vehicle.
Rear Seatback Release Lever
Rear Seat Tumble Position Retention
Strap
29
Page 32 of 348
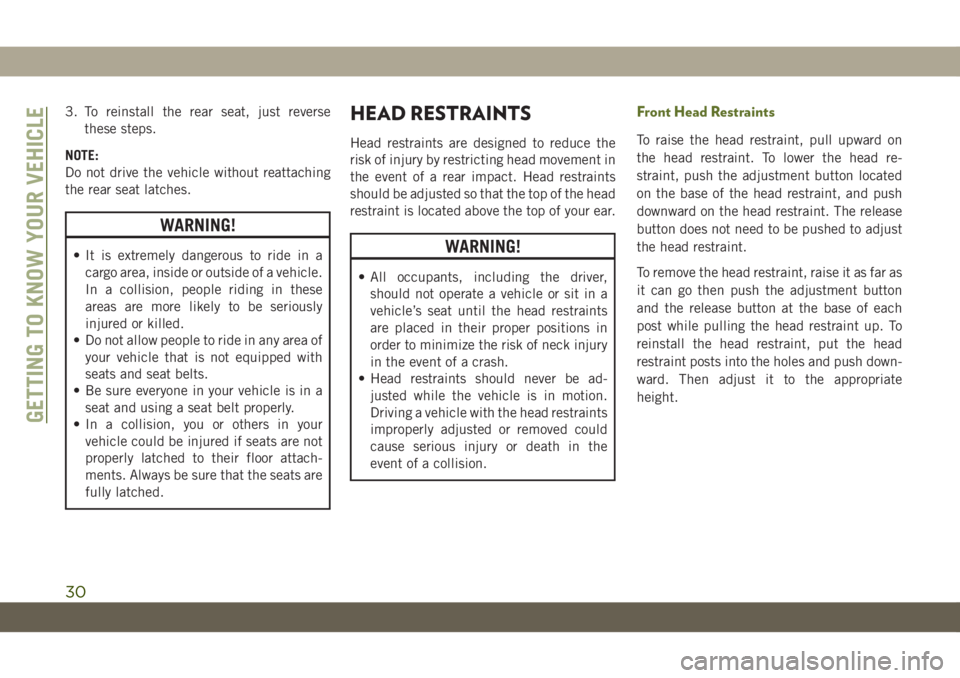
3. To reinstall the rear seat, just reverse
these steps.
NOTE:
Do not drive the vehicle without reattaching
the rear seat latches.
WARNING!
• It is extremely dangerous to ride in a
cargo area, inside or outside of a vehicle.
In a collision, people riding in these
areas are more likely to be seriously
injured or killed.
• Do not allow people to ride in any area of
your vehicle that is not equipped with
seats and seat belts.
• Be sure everyone in your vehicle is in a
seat and using a seat belt properly.
• In a collision, you or others in your
vehicle could be injured if seats are not
properly latched to their floor attach-
ments. Always be sure that the seats are
fully latched.
HEAD RESTRAINTS
Head restraints are designed to reduce the
risk of injury by restricting head movement in
the event of a rear impact. Head restraints
should be adjusted so that the top of the head
restraint is located above the top of your ear.
WARNING!
• All occupants, including the driver,
should not operate a vehicle or sit in a
vehicle’s seat until the head restraints
are placed in their proper positions in
order to minimize the risk of neck injury
in the event of a crash.
• Head restraints should never be ad-
justed while the vehicle is in motion.
Driving a vehicle with the head restraints
improperly adjusted or removed could
cause serious injury or death in the
event of a collision.
Front Head Restraints
To raise the head restraint, pull upward on
the head restraint. To lower the head re-
straint, push the adjustment button located
on the base of the head restraint, and push
downward on the head restraint. The release
button does not need to be pushed to adjust
the head restraint.
To remove the head restraint, raise it as far as
it can go then push the adjustment button
and the release button at the base of each
post while pulling the head restraint up. To
reinstall the head restraint, put the head
restraint posts into the holes and push down-
ward. Then adjust it to the appropriate
height.
GETTING TO KNOW YOUR VEHICLE
30
Page 104 of 348
If a rear seat passenger unbuckles a seat belt
while the vehicle is travelling, the warning
sequence will start again and the Rear Seat
Belt Reminder Light for that position will
change from green to red. This will alert the
driver to stop the vehicle until the rear seat
passenger buckles the seat belt again. All
rear seat BeltAlert lights will remain illumi-
nated for approximately 60 seconds (if
equipped with Rear Seat BeltAlert).
The Belt Reminder light will indicate if a rear
seat is not occupied and the seat belt is unbuck-
led
. If the rear seat is removed (for vehicles
with a removable rear seat) the Belt Reminder
light will illuminate two dashes
.
Driver and Front Passenger BeltAlert can be
activated or deactivated by an authorized
dealer. Rear Seat BeltAlert cannot be deacti-
vated. FCA US LLC does not recommend
deactivating BeltAlert.
NOTE:
If Front BeltAlert has been deactivated, the
Front Seat Belt Reminder Light will turn on
and remain on until the driver and outboard
front seat passenger seat belts are buckled.
Lap/Shoulder Belts
All seating positions in your vehicle are
equipped with lap/shoulder belts.
The seat belt webbing retractor will lock only
during very sudden stops or collisions. This
feature allows the shoulder part of the seat
belt to move freely with you under normal
conditions. However, in a collision the seat
belt will lock and reduce your risk of striking
the inside of the vehicle or being thrown out
of the vehicle.
WARNING!
• Relying on the air bags alone could lead
to more severe injuries in a collision. The
air bags work with your seat belt to
restrain you properly. In some collisions,
the air bags won’t deploy at all. Always
wear your seat belt even though you have
air bags.
• In a collision, you and your passengers
can suffer much greater injuries if you
are not properly buckled up. You can
strike the interior of your vehicle or other
passengers, or you can be thrown out of
WARNING!
the vehicle. Always be sure you and
others in your vehicle are buckled up
properly.
• It is dangerous to ride in a cargo area,
inside or outside of a vehicle. In a colli-
sion, people riding in these areas are
more likely to be seriously injured or
killed.
• Do not allow people to ride in any area of
your vehicle that is not equipped with
seats and seat belts.
• Be sure everyone in your vehicle is in a
seat and using a seat belt properly. Oc-
cupants, including the driver, should al-
ways wear their seat belts whether or not
an air bag is also provided at their seat-
ing position to minimize the risk of se-
vere injury or death in the event of a
crash.
• Wearing your seat belt incorrectly could
make your injuries in a collision much
worse. You might suffer internal injuries,
or you could even slide out of the seat
belt. Follow these instructions to wear
SAFETY
102
Page 135 of 348
1. Loosen the adjusters on the lower connec-
tors and on the tether strap of the child
seat so that you can more easily attach the
connectors to the vehicle anchorages.
2. Place the child seat between the lower
anchorages for that seating position. For
some second row seats, you may need to
recline the seat and / or raise the head
restraint (if adjustable) to get a better fit.
If the rear seat can be moved forward and
rearward in the vehicle, you may wish to
move it to its rear-most position to make
room for the child seat. You may also move
the front seat forward to allow more room
for the child seat.
3. Attach the connectors of the child re-
straint to the lower anchorages in the
selected seating position.
4. If the child restraint has a tether strap,
connect it to the top tether anchorage.
See the section “Installing Child Re-
straints Using the Top Tether Anchorage”
for directions to attach a tether anchor.5. Tighten all of the straps as you push the
child restraint rearward and downward
into the seat. Remove slack in the straps
according to the child restraint manufac-
turer’s instructions.
6. Test that the child restraint is installed
tightly by pulling back and forth on the
child seat at the belt path. It should not
move more than 25 mm in any direction.
WARNING!
• Improper installation of a child restraint
to the ISOFIX anchorages can lead to
failure of the restraint. The child could
be badly injured or killed. Follow the
child restraint manufacturer’s directions
exactly when installing an infant or child
restraint.
• Child restraint anchorages are designed
to withstand only those loads imposed
by correctly-fitted child restraints. Un-
der no circumstances are they to be used
for adult seat belts, harnesses, or for
attaching other items or equipment to
the vehicle.
WARNING!
• Install the child restraint system when
the vehicle is stationary. The ISOFIX
child restraint system is correctly fixed
to the brackets when you hear the click.
Installing Child Restraints Using The Top
Tether Anchorage:
1. Look behind the seating position where
you plan to install the child restraint to
find the tether anchorage. You may need
to move the seat forward to provide better
access to the tether anchorage. If there is
no top tether anchorage for that seating
position, move the child restraint to an-
other position in the vehicle if one is
available.
2. Route the tether strap to provide the most
direct path for the strap between the an-
chor and the child seat. If your vehicle is
equipped with adjustable rear head re-
straints, raise the head restraint, and
where possible, route the tether strap un-
der the head restraint and between the
133
Page 136 of 348
two posts. If not possible, lower the head
restraint and pass the tether strap around
the outboard side of the head restraint.
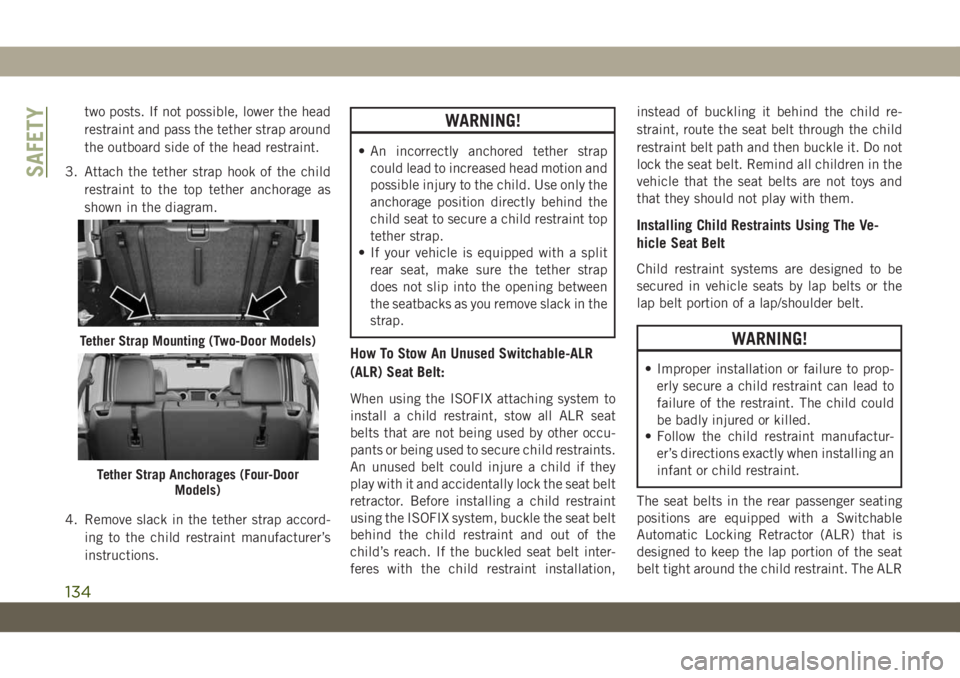
3. Attach the tether strap hook of the child
restraint to the top tether anchorage as
shown in the diagram.
4. Remove slack in the tether strap accord-
ing to the child restraint manufacturer’s
instructions.WARNING!
• An incorrectly anchored tether strap
could lead to increased head motion and
possible injury to the child. Use only the
anchorage position directly behind the
child seat to secure a child restraint top
tether strap.
• If your vehicle is equipped with a split
rear seat, make sure the tether strap
does not slip into the opening between
the seatbacks as you remove slack in the
strap.
How To Stow An Unused Switchable-ALR
(ALR) Seat Belt:
When using the ISOFIX attaching system to
install a child restraint, stow all ALR seat
belts that are not being used by other occu-
pants or being used to secure child restraints.
An unused belt could injure a child if they
play with it and accidentally lock the seat belt
retractor. Before installing a child restraint
using the ISOFIX system, buckle the seat belt
behind the child restraint and out of the
child’s reach. If the buckled seat belt inter-
feres with the child restraint installation,instead of buckling it behind the child re-
straint, route the seat belt through the child
restraint belt path and then buckle it. Do not
lock the seat belt. Remind all children in the
vehicle that the seat belts are not toys and
that they should not play with them.
Installing Child Restraints Using The Ve-
hicle Seat Belt
Child restraint systems are designed to be
secured in vehicle seats by lap belts or the
lap belt portion of a lap/shoulder belt.
WARNING!
• Improper installation or failure to prop-
erly secure a child restraint can lead to
failure of the restraint. The child could
be badly injured or killed.
• Follow the child restraint manufactur-
er’s directions exactly when installing an
infant or child restraint.
The seat belts in the rear passenger seating
positions are equipped with a Switchable
Automatic Locking Retractor (ALR) that is
designed to keep the lap portion of the seat
belt tight around the child restraint. The ALR
Tether Strap Mounting (Two-Door Models)
Tether Strap Anchorages (Four-Door
Models)
SAFETY
134
Page 244 of 348
Care Of Fabric Top Windows
Your vehicle's fabric top has pliable plastic
windows which can be scratched unless spe-
cial care is taken by following these direc-
tions:
• Never use a dry cloth to remove dust. In-
stead,use a microfiber towel or soft cotton
cloth moistened with cold or warm, clean
water, and wipe across the window, not up
and down.It removes fine scratches to im-
prove visibility and provides UV protection
to help prevent yellowing.
• When washing,never use hot wateror any-
thing stronger than a mild soap. Never use
solvents such as alcohol or harsh cleaning
agents.
• Always rinse thoroughly with cold water,
then wipe with a soft and slightly moist,
clean cloth.
• When removing frost, snow or ice,never use
a scraper or de-icing chemicals.Use warm
water only if you must clean the window
quickly.•
Debris (sand, mud/dirt, dust, or salt) from
off-road driving will have an impact on plas-
tic retainer operation. Even normal on-road
driving and vehicle washing will eventually
impact window plastic retainer operation. To
maintain ease of use of the window plastic
retainers, each window plastic retainer
should be cleaned and lubricated regularly.
Clean them with a mild soap solution and a
small brush. Cleaning products are available
through an authorized dealer.
• Never paste stickers, gummed labels or any
tape to the windows. Adhesives are hard to
remove and may damage the windows.
INTERIORS
Seats And Fabric Parts
Use a specific product to clean fabric uphol-
stery and carpeting.
WARNING!
Do not use volatile solvents for cleaning
purposes. Many are potentially flam-
mable, and if used in closed areas they
may cause respiratory harm.
Seat Belt Maintenance
Do not bleach, dye or clean the belts with
chemical solvents or abrasive cleaners. This
will weaken the fabric. Sun damage can also
weaken the fabric.
If the belts need cleaning, use a mild soap
solution or lukewarm water. Do not remove
the belts from the vehicle to wash them. Dry
with a soft cloth.
Replace the belts if they appear frayed or
worn or if the buckles do not work properly.
WARNING!
A frayed or torn belt could rip apart in a
collision and leave you with no protection.
Inspect the belt system periodically,
checking for cuts, frays, or loose parts.
Damaged parts must be replaced immedi-
ately. Do not disassemble or modify the
system. Seat belt assemblies must be re-
placed after a collision if they have been
damaged (i.e., bent retractor, torn web-
bing, etc.).SERVICING AND MAINTENANCE
242
Page 245 of 348
Plastic And Coated Parts
Use a specific product to clean vinyl
upholstery.
CAUTION!
• Direct contact of air fresheners, insect
repellents, suntan lotions, or hand sani-
tizers to the plastic, painted, or deco-
rated surfaces of the interior may cause
permanent damage. Wipe away immedi-
ately.
• Damage caused by these type of prod-
ucts may not be covered by your New
Vehicle Limited Warranty.
Cleaning Plastic Instrument Cluster Lenses
The lenses in front of the instruments in this
vehicle are molded in clear plastic. When
cleaning the lenses, care must be taken to
avoid scratching the plastic.1. Clean with a wet soft cloth. A mild soap
solution may be used, but do not use high
alcohol content or abrasive cleaners. If
soap is used, wipe clean with a clean
damp cloth.
2. Dry with a soft cloth.
Leather Parts
Your leather upholstery can be best preserved
by regular cleaning with a damp soft cloth.
Small particles of dirt can act as an abrasive
and damage the leather upholstery and
should be removed promptly with a damp
cloth. Care should be taken to avoid soaking
your leather upholstery with any liquid.
Please do not use polishes, oils, cleaning
fluids, solvents, detergents, or ammonia-
based cleaners to clean your leather uphol-
stery. Application of a leather conditioner is
not required to maintain the original condi-
tion.
NOTE:
If equipped with light colored leather, it tends
to show any foreign material, dirt, and fabric
dye transfer more so than darker colors. The
leather is designed for easy cleaning.
CAUTION!
Do not use Alcohol and Alcohol-based
and/or Ketone based cleaning products to
clean leather seats, as damage to the seat
may result.
Glass Surfaces
All glass surfaces should be cleaned on a
regular basis with any commercial
household-type glass cleaner. Never use an
abrasive type cleaner. Use caution when
cleaning the inside rear window equipped
with electric defrosters or windows equipped
with radio antennas. Do not use scrapers or
other sharp instruments that may scratch the
elements.
When cleaning the rear view mirror, spray
cleaner on the towel or cloth that you are
using. Do not spray cleaner directly on the
mirror.
243