tow JEEP WRANGLER 2DOORS 2021 Owner handbook (in English)
[x] Cancel search | Manufacturer: JEEP, Model Year: 2021, Model line: WRANGLER 2DOORS, Model: JEEP WRANGLER 2DOORS 2021Pages: 330, PDF Size: 9.16 MB
Page 101 of 330
99
Enhanced Seat Belt Use Reminder System
(BeltAlert)
Front Seat and Second Row BeltAlert (If
Equipped) BeltAlert is a feature intended to remind
the driver and outboard front seat passenger
to buckle their seat belts. The BeltAlert
feature is active whenever the ignition switch
is in the START or ON/RUN position.
Initial Indication
If the driver is unbuckled when the ignition
switch is first in the START or ON/RUN posi -
tion, a chime will signal for a few seconds. If
the driver or outboard front seat passenger is
unbuckled when the ignition switch is first in
the START or ON/RUN position, the respec -
tive Seat Belt Reminder Light will turn solid
red and remain red until the seat belt is
buckled. The respective Seat Belt Reminder
Light will turn solid green once the seat belt
is buckled. After the driver and outboard
front seat passenger have buckled their seat
belts all Seat Belt Reminder Lights will turn
off. The outboard front passenger seat
BeltAlert is not active when the outboard
front passenger seat is unoccupied. BeltAlert Warning Sequence
The BeltAlert warning sequence is activated
when the vehicle is moving above a specified
vehicle speed range and the driver or
outboard front seat passenger is unbuckled
(the outboard front passenger seat BeltAlert
is not active when the outboard front
passenger seat is unoccupied). The BeltAlert
warning sequence starts by blinking the
respective Seat Belt Reminder Light and
sounding an intermittent chime. Once the
BeltAlert warning sequence has completed,
the Seat Belt Reminder Light will remain
solid red until the driver and outboard front
seat passenger are buckled. The BeltAlert
warning sequence may repeat based on
vehicle speed until the driver and occupied
outboard front seat passenger seat belts are
buckled. The driver should instruct all occu
-
pants to buckle their seat belts.
Change of Status
If the driver or outboard front seat passenger
unbuckles their seat belt while the vehicle is
traveling, the BeltAlert warning sequence
will begin until the seat belts are buckled
again. The outboard front passenger seat BeltAlert
is not active when the outboard front
passenger seat is unoccupied. BeltAlert may
be triggered when an animal or other items
are placed on the outboard front passenger
seat or when the seat is folded flat (if
equipped). It is recommended that pets be
restrained in the rear seat (if equipped) in
pet harnesses or pet carriers that are secured
by seat belts, and cargo is properly stowed.
Rear Seat BeltAlert (If Equipped)
Rear Seat BeltAlert shows the driver whether
the seat belts in the rear seat are buckled or
unbuckled (if equipped with Rear Seat
BeltAlert). When the ignition switch is in the
START or ON/RUN position, a Seat Belt
Reminder Light located in the upper right
corner of the instrument cluster turns on for
each second row seat position (if equipped
with Rear Seat BeltAlert). The Rear BeltAlert
warning sequence is activated when the
vehicle is moving above a specified vehicle
speed range.
If a second row seat belt is buckled, the Rear
BeltAlert Reminder light for that seating
position will illuminate solid green. If a rear
seat passenger is not wearing the seat belt,
the BeltAlert warning sequence will start (if
2020_JEEP_JL_WRANGLER_UG_RHD_UK.book Page 99
Page 104 of 330
SAFETY
102
Lap/Shoulder Belt Operating Instructions
1. Enter the vehicle and close the door. Sitback and adjust the seat.
2. The seat belt latch plate is above the back of the front seat, and next to your
arm in the rear seat (for vehicles
equipped with a rear seat). Grasp the
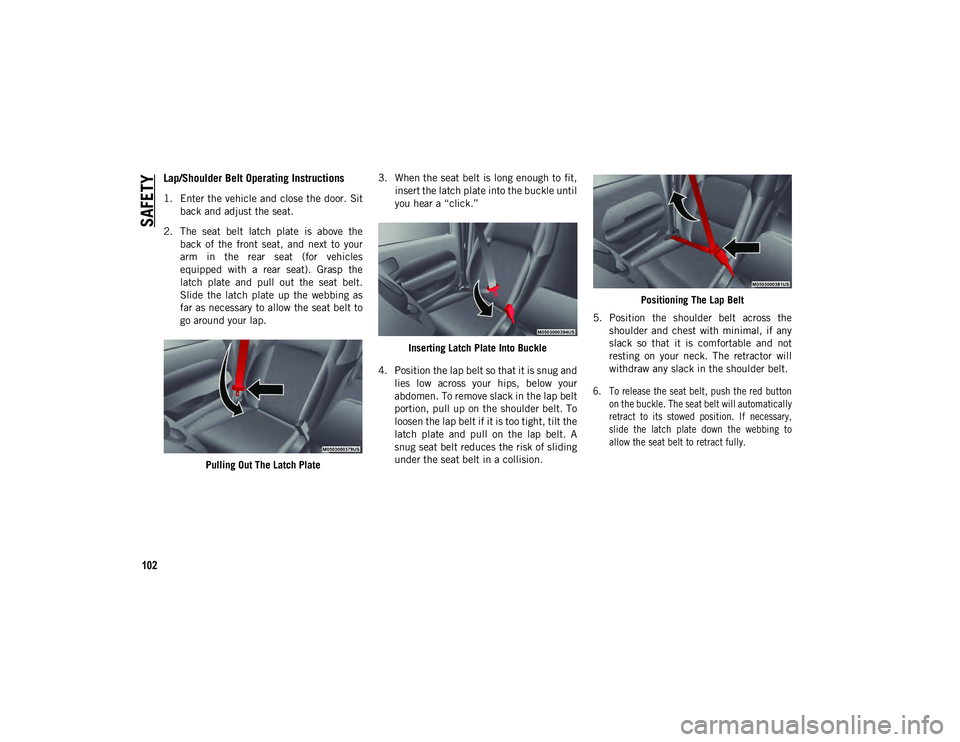
latch plate and pull out the seat belt.
Slide the latch plate up the webbing as
far as necessary to allow the seat belt to
go around your lap.
Pulling Out The Latch Plate 3. When the seat belt is long enough to fit,
insert the latch plate into the buckle until
you hear a “click.”
Inserting Latch Plate Into Buckle
4. Position the lap belt so that it is snug and lies low across your hips, below your
abdomen. To remove slack in the lap belt
portion, pull up on the shoulder belt. To
loosen the lap belt if it is too tight, tilt the
latch plate and pull on the lap belt. A
snug seat belt reduces the risk of sliding
under the seat belt in a collision. Positioning The Lap Belt
5. Position the shoulder belt across the shoulder and chest with minimal, if any
slack so that it is comfortable and not
resting on your neck. The retractor will
withdraw any slack in the shoulder belt.
6. To release the seat belt, push the red button on the buckle. The seat belt will automatically
retract to its stowed position. If necessary,
slide the latch plate down the webbing to
allow the seat belt to retract fully.
2020_JEEP_JL_WRANGLER_UG_RHD_UK.book Page 102
Page 139 of 330
137
(Continued)
Periodic Safety Checks You Should Make
Outside The Vehicle
Tires
Examine tires for excessive tread wear and uneven
wear patterns. Check for stones, nails, glass, or
other objects lodged in the tread or sidewall.
Inspect the tread for cuts and cracks. Inspect side-
walls for cuts, cracks, and bulges. Check the wheel
nuts for tightness. Check the tires (including spare)
for proper cold inflation pressure.
Lights
Have someone observe the operation of brake
lights and exterior lights while you work the
controls. Check turn signal and high beam indi -
cator lights on the instrument panel.
Door Latches
Check for proper closing, latching, and
locking.
Fluid Leaks
Check area under vehicle after overnight
parking for fuel, coolant, oil, or other fluid
leaks. Also, if gasoline fumes are detected or
if fuel, or brake fluid leaks are suspected, the
cause should be located and corrected
immediately.
ALWAYS REMOVE THE EXISTING
FLOOR MAT FROM THE VEHICLE
before installing any other floor mat.
NEVER install or stack an additional
floor mat on top of an existing floor mat.
ONLY install floor mats designed to fit
your vehicle. NEVER install a floor mat
that cannot be properly attached and
secured to your vehicle. If a floor mat
needs to be replaced, only use a FCA
approved floor mat for the specific make,
model, and year of your vehicle.
ONLY use the driver’s side floor mat on
the driver’s side floor area. To check for
interference, with the vehicle properly
parked with the engine off, fully depress
the accelerator, the brake, and the
clutch pedal (if present) to check for
interference. If your floor mat interferes
with the operation of any pedal, or is not
secure to the floor, remove the floor mat
from the vehicle and place the floor mat
in your trunk.
ONLY use the passenger’s side floor mat
on the passenger’s side floor area.
WARNING! (Continued)
ALWAYS make sure objects cannot fall
or slide into the driver’s side floor area
when the vehicle is moving. Objects can
become trapped under accelerator,
brake, or clutch pedals and could cause
a loss of vehicle control.
NEVER place any objects under the floor
mat (e.g., towels, keys, etc.). These
objects could change the position of the
floor mat and may cause interference
with the accelerator, brake, or clutch
pedals.
If the vehicle carpet has been removed
and re-installed, always properly attach
carpet to the floor and check the floor
mat fasteners are secure to the vehicle
carpet. Fully depress each pedal to
check for interference with the acceler -
ator, brake, or clutch pedals then
re-install the floor mats.
It is recommended to only use mild soap
and water to clean your floor mats. After
cleaning, always check your floor mat
has been properly installed and is
secured to your vehicle using the floor
mat fasteners by lightly pulling mat.
WARNING! (Continued)
2020_JEEP_JL_WRANGLER_UG_RHD_UK.book Page 137
Page 147 of 330
145
Eight–Speed Automatic Transmission
Your vehicle is equipped with a fuel efficient
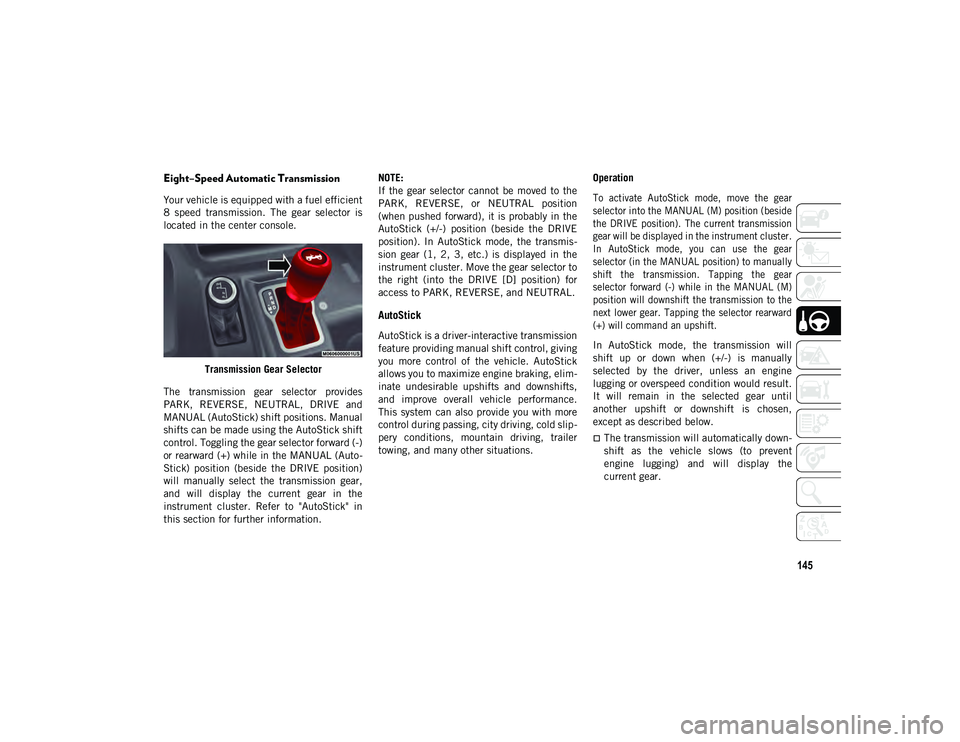
8 speed transmission. The gear selector is
located in the center console.Transmission Gear Selector
The transmission gear selector provides
PARK, REVERSE, NEUTRAL, DRIVE and
MANUAL (AutoStick) shift positions. Manual
shifts can be made using the AutoStick shift
control. Toggling the gear selector forward (-)
or rearward (+) while in the MANUAL (Auto -
Stick) position (beside the DRIVE position)
will manually select the transmission gear,
and will display the current gear in the
instrument cluster. Refer to "AutoStick" in
this section for further information. NOTE:
If the gear selector cannot be moved to the
PARK, REVERSE, or NEUTRAL position
(when pushed forward), it is probably in the
AutoStick (+/-) position (beside the DRIVE
position). In AutoStick mode, the transmis
-
sion gear (1, 2, 3, etc.) is displayed in the
instrument cluster. Move the gear selector to
the right (into the DRIVE [D] position) for
access to PARK, REVERSE, and NEUTRAL.
AutoStick
AutoStick is a driver-interactive transmission
feature providing manual shift control, giving
you more control of the vehicle. AutoStick
allows you to maximize engine braking, elim -
inate undesirable upshifts and downshifts,
and improve overall vehicle performance.
This system can also provide you with more
control during passing, city driving, cold slip -
pery conditions, mountain driving, trailer
towing, and many other situations. Operation
To activate AutoStick mode, move the gear
selector into the MANUAL (M) position (beside
the DRIVE position). The current transmission
gear will be displayed in the instrument cluster.
In AutoStick mode, you can use the gear
selector (in the MANUAL position) to manually
shift the transmission. Tapping the gear
selector forward (-) while in the MANUAL (M)
position will downshift the transmission to the
next lower gear. Tapping the selector rearward
(+) will command an upshift.
In AutoStick mode, the transmission will
shift up or down when (+/-) is manually
selected by the driver, unless an engine
lugging or overspeed condition would result.
It will remain in the selected gear until
another upshift or downshift is chosen,
except as described below.
The transmission will automatically down
-
shift as the vehicle slows (to prevent
engine lugging) and will display the
current gear.
2020_JEEP_JL_WRANGLER_UG_RHD_UK.book Page 145
Page 149 of 330
147
4H
Four-Wheel Drive High Range — This range
maximizes torque to the front driveshaft,
forcing the front and rear wheels to rotate at
the same speed. This range provides addi-
tional traction for loose, slippery road
surfaces only.
NEUTRAL (N)
Neutral — This range disengages both the
front and rear driveshafts from the power -
train. To be used for flat towing behind
another vehicle.
Refer to “Recreational Towing” in this
chapter for further information. 4L
Four-Wheel Drive Low Range — This range
provides low speed four-wheel drive. It maxi
-
mizes torque to the front driveshaft, forcing
the front and rear wheels to rotate at the
same speed. This range provides additional
traction and maximum pulling power for
loose, slippery road surfaces only. Do not
exceed 25 mph (40 km/h).
The transfer case is intended to be driven in
the 2H position for normal street and
highway conditions, such as hard-surfaced
roads.
In the event that additional traction is
required, the transfer case 4H and 4L posi -
tions can be used to lock the front and rear
driveshafts together, forcing the front and
rear wheels to rotate at the same speed. The
4H and 4L positions are intended for loose,
slippery road surfaces only and not intended
for normal driving. Driving in the 4H and 4L
positions on hard-surfaced roads will cause
increased tire wear and damage to the drive -
line components. Refer to “Shifting Proce -
dures” in this section for further information
on shifting into 4H or 4L. The instrument cluster alerts the driver that
the vehicle is in four-wheel drive, and the
front and rear driveshafts are locked
together. The light will illuminate when the
transfer case is shifted into the 4H position.
When operating your vehicle in 4L, the
engine speed will be approximately three
times (four times for Rubicon models) that of
the 2H or 4H positions at a given road speed.
Take care not to overspeed the engine.
Proper operation of four-wheel drive vehicles
depends on tires of equal size, type, and
circumference on each wheel. Any difference
will adversely affect shifting and cause
damage to the transfer case.
Because four-wheel drive provides improved
traction, there is a tendency to exceed safe
turning and stopping speeds. Do not go
faster than road conditions permit.
Shifting Procedures
2H To 4H Or 4H To 2H
Shifting between 2H and 4H can be made
with the vehicle stopped or in motion. The
preferred shifting speed would be 0 to
45 mph (72 km/h). With the vehicle in
motion, the transfer case will engage/disen
-
WARNING!
You or others could be injured or killed if
you leave the vehicle unattended with the
transfer case in the NEUTRAL (N) position
without first fully engaging the parking
brake. The transfer case NEUTRAL (N)
position disengages both the front and rear
driveshafts from the powertrain, and will
allow the vehicle to roll, even if the
automatic transmission is in PARK. The
parking brake should always be applied
when the driver is not in the vehicle.
2020_JEEP_JL_WRANGLER_UG_RHD_UK.book Page 147
Page 151 of 330
149
For additional information on the appropriate
use of each transfer case mode position, see
the information below:
2H
Two-Wheel Drive High Range — This range is
for normal street and highway driving on dry,
hard surfaced roads.
4H AUTO
Four-Wheel Drive Auto High Range — This
range sends power to the front wheels. The
four-wheel drive system will be automatically
engaged when the vehicle senses a loss of
traction. Additional traction for varying road
conditions.
4H PT
Four-Wheel Drive Part Time High Range —
This range maximizes torque to the front
driveshaft, forcing the front and rear wheels
to rotate at the same speed. This range
provides additional traction for loose, slip-
pery road surfaces only. NEUTRAL (N)
Neutral — This range disengages both the
front and rear driveshafts from the power
-
train. To be used for flat towing behind
another vehicle.
Refer to “Recreational Towing” in this
chapter for further information. 4L
Four-Wheel Drive Low Range — This range
provides low speed four-wheel drive. It maxi
-
mizes torque to the front driveshaft, forcing
the front and rear wheels to rotate at the
same speed. This range provides additional
traction and maximum pulling power for
loose, slippery road surfaces only. Do not
exceed 25 mph (40 km/h).
This transfer case is designed to be driven in
the 2H mode or 4H AUTO mode for normal
street and highway conditions on dry hard
surfaced roads. Driving the vehicle in 2H will
have greater fuel economy benefits as the
front axle is not engaged in 2H.
For variable driving conditions, the 4H AUTO
mode can be used. In this mode, the front
axle is engaged, but the vehicle's power is
sent to the rear wheels. Four-wheel drive will
be automatically engaged when the vehicle
senses a loss of traction. Because the front
axle is engaged, this mode will result in lower
fuel economy than the 2H mode.
WARNING!
You or others could be injured or killed if
you leave the vehicle unattended with the
transfer case in the NEUTRAL (N) position
without first fully engaging the parking
brake. The transfer case NEUTRAL (N)
position disengages both the front and rear
driveshafts from the powertrain, and will
allow the vehicle to roll, even if the
automatic transmission is in PARK. The
parking brake should always be applied
when the driver is not in the vehicle.
2020_JEEP_JL_WRANGLER_UG_RHD_UK.book Page 149
Page 164 of 330
STARTING AND OPERATING
162
The ParkSense switch LED will be on when
ParkSense is disabled or requires service.
The ParkSense switch LED will be off when
the system is enabled. If the ParkSense
switch is pushed, and requires service, the
ParkSense switch LED will blink momen-
tarily, and then the LED will be on.
ParkSense System Usage Precautions
NOTE:
Ensure that the rear bumper is free of
snow, ice, mud, dirt and debris to keep the
ParkSense system operating properly.
Jackhammers, large trucks, and other
vibrations could affect the performance of
ParkSense.
When you turn ParkSense off, the instru -
ment cluster display will read “PARK -
SENSE OFF.” Furthermore, once you turn
ParkSense off, it remains off until you turn
it on again, even if you cycle the ignition.
ParkSense, when on, will reduce the
volume of the radio when it is sounding a
tone.
Clean the ParkSense sensors regularly,
taking care not to scratch or damage them.
The sensors must not be covered with ice,
snow, slush, mud, dirt or debris. Failure to
do so can result in the system not working
properly. The ParkSense system might not
detect an obstacle behind the fascia/
bumper, or it could provide a false indica-
tion that an obstacle is behind the fascia/
bumper.
Use the ParkSense switch to turn the
ParkSense system off if objects such as
bicycle carriers, trailer hitches, etc. are
placed within 12 inches (30 cm) from the
rear fascia/bumper. Failure to do so can
result in the system misinterpreting a
close object as a sensor problem, causing
the “PARKSENSE UNAVAILABLE
SERVICE REQUIRED” message to be
displayed in the instrument cluster
display.
WARNING!
Drivers must be careful when backing up
even when using ParkSense. Always
check carefully behind your vehicle, look
behind you, and be sure to check for
pedestrians, animals, other vehicles,
obstructions, and blind spots before
backing up. You are responsible for
safety and must continue to pay atten -
tion to your surroundings. Failure to do
so can result in serious injury or death.
Before using ParkSense, it is strongly
recommended that the ball mount and
hitch ball assembly is disconnected from
the vehicle when the vehicle is not used
for towing. Failure to do so can result in
injury or damage to vehicles or obstacles
because the hitch ball will be much
closer to the obstacle than the rear fascia
when the loudspeaker sounds the contin -
uous tone. Also, the sensors could detect
the ball mount and hitch ball assembly,
depending on its size and shape, giving
a false indication that an obstacle is
behind the vehicle.
2020_JEEP_JL_WRANGLER_UG_RHD_UK.book Page 162
Page 169 of 330
167
(Continued)
(Continued)
placed within 30 cm from the rear fascia/
bumper. Failure to do so can result in the
system misinterpreting a close obstacle as
a sensor problem, causing the “PARK
-
SENSE UNAVAILABLE SERVICE
REQUIRED” message to appear in the
instrument cluster display.
ParkSense should be disabled when the
swing gate is in the open position. An open
swing gate could provide a false indication
that an obstacle is behind the vehicle.
PARKVIEW REAR BACK UP
CAMERA — IF EQUIPPED
The ParkView Rear Back Up Camera allows
you to see an on-screen image of the rear
surroundings of your vehicle whenever the
gear selector is put into REVERSE. The
image will be displayed in the touchscreen
display along with a caution note to “check
entire surroundings” across the top of the
screen. After five seconds this note will
disappear. The ParkView camera is located
on the rear of the vehicle in the center of the
spare tire. WARNING!
Drivers must be careful when backing up
even when using ParkSense. Always
check carefully behind your vehicle, look
behind you, and be sure to check for
pedestrians, animals, other vehicles,
obstructions, and blind spots before
backing up. You are responsible for
safety and must continue to pay atten -
tion to your surroundings. Failure to do
so can result in serious injury or death.
Before using ParkSense, it is strongly
recommended that the ball mount and
hitch ball assembly is disconnected from
the vehicle when the vehicle is not used
for towing. Failure to do so can result in
injury or damage to vehicles or obstacles
because the hitch ball will be much
closer to the obstacle than the rear fascia
when the loudspeaker sounds the contin -
uous tone. Also, the sensors could detect
the ball mount and hitch ball assembly,
depending on its size and shape, giving
a false indication that an obstacle is
behind the vehicle.
CAUTION!
ParkSense is only a parking aid and it is
unable to recognize every obstacle,
including small obstacles. Parking curbs
might be temporarily detected or not
detected at all. Obstacles located above
or below the sensors will not be detected
when they are in close proximity.
WARNING! (Continued)
The vehicle must be driven slowly when
using ParkSense in order to be able to
stop in time when an obstacle is
detected. It is recommended that the
driver looks over his/her shoulder when
using ParkSense.
CAUTION! (Continued)
2020_JEEP_JL_WRANGLER_UG_RHD_UK.book Page 167
Page 177 of 330
175
Curb Weight
The curb weight of a vehicle is defined as the
total weight of the vehicle with all fluids,
including vehicle fuel, at full capacity condi-
tions, and with no occupants or cargo loaded
into the vehicle. The front and rear curb
weight values are determined by weighing
your vehicle on a commercial scale before
any occupants or cargo are added.
Loading
The actual total weight and the weight of the
front and rear of your vehicle at the ground
can best be determined by weighing it when
it is loaded and ready for operation. The entire vehicle should first be weighed on
a commercial scale to ensure that the GVWR
has not been exceeded. The weight on the
front and rear of the vehicle should then be
determined separately to be sure that the
load is properly distributed over the front and
rear axle. Weighing the vehicle may show
that the GAWR of either the front or rear
axles has been exceeded but the total load is
within the specified GVWR. If so, weight
must be shifted from front to rear or rear to
front as appropriate until the specified
weight limitations are met. Store the heavier
items down low and be sure that the weight
is distributed equally. Stow all loose items
securely before driving.Improper weight distributions can have an
adverse effect on the way your vehicle steers
and handles and the way the brakes operate.
TRAILER TOWING
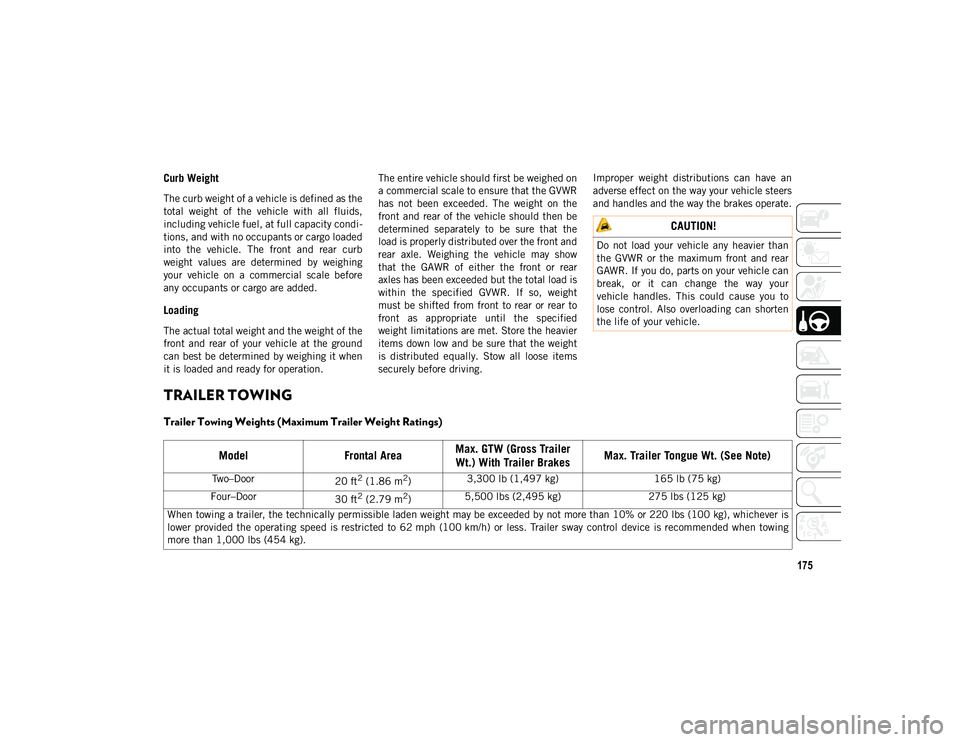
Trailer Towing Weights (Maximum Trailer Weight Ratings)
CAUTION!
Do not load your vehicle any heavier than
the GVWR or the maximum front and rear
GAWR. If you do, parts on your vehicle can
break, or it can change the way your
vehicle handles. This could cause you to
lose control. Also overloading can shorten
the life of your vehicle.
Model
Frontal AreaMax. GTW (Gross Trailer
Wt.) With Trailer Brakes Max. Trailer Tongue Wt. (See Note)
Two–Door
20 ft2 (1.86 m2)3,300 lb (1,497 kg)
165 lb (75 kg)
Four–Door 30 ft
2 (2.79 m2)5,500 lbs (2,495 kg)
275 lbs (125 kg)
When towing a trailer, the technically permissible laden weight may be exceeded by not more than 10% or 220 lbs (100 kg), whichever is
lower provided the operating speed is restricted to 62 mph (100 km/h) or less. Trailer sway control device is recommended when towing
more than 1,000 lbs (454 kg).
2020_JEEP_JL_WRANGLER_UG_RHD_UK.book Page 175
Page 178 of 330
STARTING AND OPERATING
176
(Continued)
(Continued)
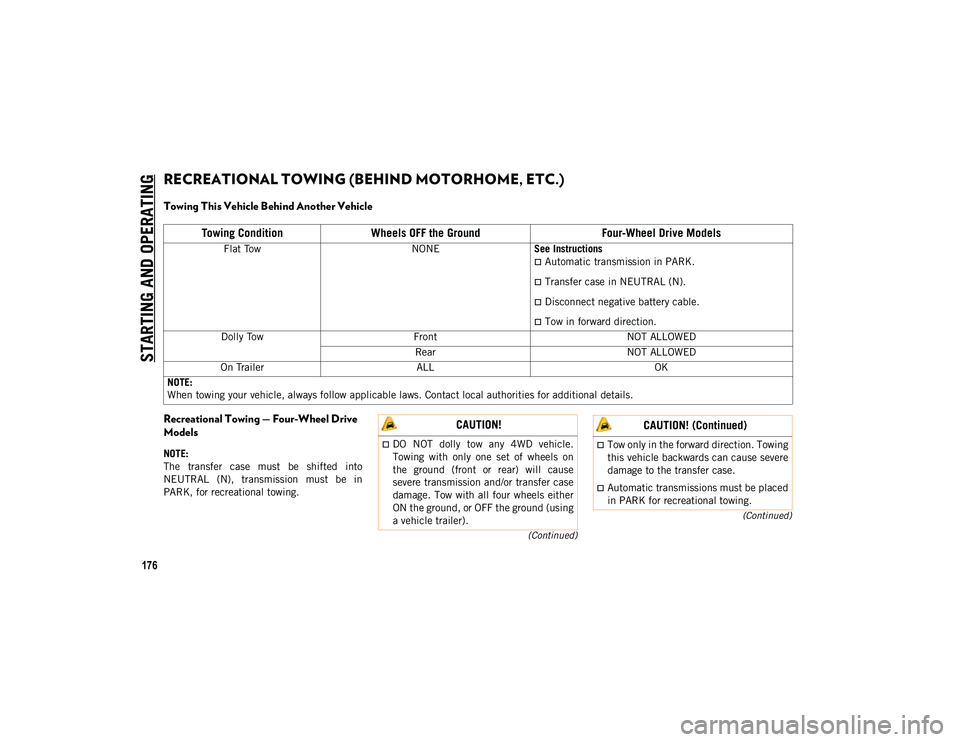
RECREATIONAL TOWING (BEHIND MOTORHOME, ETC.)
Towing This Vehicle Behind Another Vehicle
Recreational Towing — Four-Wheel Drive
Models
NOTE:
The transfer case must be shifted into
NEUTRAL (N), transmission must be in
PARK, for recreational towing.
Towing Condition Wheels OFF the Ground Four-Wheel Drive Models
Flat TowNONESee Instructions
Automatic transmission in PARK.
Transfer case in NEUTRAL (N).
Disconnect negative battery cable.
Tow in forward direction.
Dolly Tow Front NOT ALLOWED
Rear NOT ALLOWED
On Trailer ALL OK
NOTE:
When towing your vehicle, always follow applicable laws. Contact local authorities for additional details.
CAUTION!
DO NOT dolly tow any 4WD vehicle.
Towing with only one set of wheels on
the ground (front or rear) will cause
severe transmission and/or transfer case
damage. Tow with all four wheels either
ON the ground, or OFF the ground (using
a vehicle trailer).Tow only in the forward direction. Towing
this vehicle backwards can cause severe
damage to the transfer case.
Automatic transmissions must be placed
in PARK for recreational towing.
CAUTION! (Continued)
2020_JEEP_JL_WRANGLER_UG_RHD_UK.book Page 176