stop start JEEP WRANGLER UNLIMITED 2018 Owner handbook (in English)
[x] Cancel search | Manufacturer: JEEP, Model Year: 2018, Model line: WRANGLER UNLIMITED, Model: JEEP WRANGLER UNLIMITED 2018Pages: 348, PDF Size: 6.5 MB
Page 121 of 348
• As the air bags deflate, you may see some
smoke-like particles. The particles are a
normal by-product of the process that gen-
erates the non-toxic gas used for air bag
inflation. These airborne particles may irri-
tate the skin, eyes, nose, or throat. If you
have skin or eye irritation, rinse the area
with cool water. For nose or throat irritation,
move to fresh air. If the irritation continues,
see your doctor. If these particles settle on
your clothing, follow the garment manufac-
turer’s instructions for cleaning.
Do not drive your vehicle after the air bags
have deployed. If you are involved in another
collision, the air bags will not be in place to
protect you.
WARNING!
Deployed air bags and seat belt preten-
sioners cannot protect you in another col-
lision. Have the air bags, seat belt preten-
sioners, and the seat belt retractor
assemblies replaced by an authorized
dealer immediately. Also, have the Occu-
pant Restraint Controller System serviced
as well.NOTE:
• Air bag covers may not be obvious in the
interior trim, but they will open during air
bag deployment.
• After any collision, the vehicle should be
taken to an authorized dealer immediately.
Enhanced Accident Response System
In the event of an impact, if the communica-
tion network remains intact, and the power
remains intact, depending on the nature of
the event, the ORC will determine whether to
have the Enhanced Accident Response Sys-
tem perform the following functions:
• Cut off fuel to the engine (If Equipped)
• Cut off battery power to the electric motor
(If Equipped)
• Flash hazard lights as long as the battery
has power
• Turn on the interior lights, which remain on
as long as the battery has power or for 15
minutes from the intervention of the En-
hanced Accident Response System.
• Unlock the power door locks.Your vehicle may also be designed to perform
any of these other functions in response to
the Enhanced Accident Response System:
• Turn off the Fuel Filter Heater, Turn off the
HVAC Blower Motor, Close the HVAC Circu-
lation Door
• Cut off battery power to the:
– Engine
– Electric Motor (if equipped)
– Electric power steering
– Brake booster
– Electric park brake
– Automatic transmission gear selector
– Horn
– Front wiper
– Headlamp washer pump
NOTE:
After an accident, remember to cycle the
ignition to the STOP (OFF/LOCK) position
and remove the key from the ignition switch
to avoid draining the battery. Carefully check
the vehicle for fuel leaks in the engine com-
partment and on the ground near the engine
compartment and fuel tank before resetting
the system and starting the engine. If there
are no fuel leaks or damage to the vehicle
119
Page 143 of 348
STARTING AND OPERATING
STARTING THE ENGINE.......142
Normal Starting — Gasoline Engine . . .142
Normal Starting — Diesel Engine. . . .145
ENGINE BREAK-IN RECOMMENDA-
TIONS....................146
AUTOMATIC TRANSMISSION . . .147
Ignition Park Interlock...........148
Brake/Transmission Shift Interlock
System....................148
Eight–Speed Automatic Transmission . .148
FOUR–WHEEL DRIVE OPERA-
TION.....................150
Four-Position Transfer Case........150
Five-Position Transfer Case........153
Trac-Lok Rear Axle — If Equipped . . .155
Axle Lock (Tru-Lok) — Rubicon Models
.........................156
Electronic Sway Bar Disconnect — If
Equipped...................156
STOP/START SYSTEM — AUTOMATIC
TRANSMISSION (IF EQUIPPED)
. .157
Automatic Mode...............158
Possible Reasons The Engine Does Not
Autostop...................158
To Start The Engine While In Autostop
Mode.....................159
To Manually Turn Off The Stop/Start
System....................159
To Manually Turn On The Stop/Start
System....................160
System Malfunction............160
SPEED CONTROL...........160
To Activate..................161
To Set A Desired Speed..........161
To Vary The Speed Setting.........161
To Accelerate For Passing.........162
To Resume Speed.............162
To Deactivate................162
PARKSENSE REAR PARK ASSIST —
IF EQUIPPED...............163
ParkSense Sensors.............163
Enabling And Disabling ParkSense . . .163
ParkSense System Usage Precautions . .163
PARKVIEW REAR BACK UP CAM-
ERA — IF EQUIPPED..........165
REFUELING THE VEHICLE.....166
Fuel Filler Cap...............166
Loose Fuel Filler Cap Message......167
REFUELING THE VEHICLE — DIE-
SEL......................167
Adblue (UREA) — If Equipped......168
TRAILER TOWING...........171
Trailer Towing Weights (Maximum Trailer
Weight Ratings)...............171
RECREATIONAL TOWING (BEHIND
MOTORHOME, ETC.).........171
Towing This Vehicle Behind Another
Vehicle....................171
Recreational Towing — Four-Wheel Drive
Models....................172
STARTING AND OPERATING
141
Page 144 of 348
STARTING THE ENGINE
Before starting your vehicle, adjust your seat,
adjust both inside and outside mirrors, and
fasten your seat belts.
WARNING!
• When exiting the vehicle, always remove
the key fob from the vehicle and lock
your vehicle.
• Never leave children alone in a vehicle,
or with access to an unlocked vehicle.
• Allowing children to be in a vehicle un-
attended is dangerous for a number of
reasons. A child or others could be seri-
ously or fatally injured. Children should
be warned not to touch the parking
brake, brake pedal or the transmission
gear selector.
• Do not leave the key fob in or near the
vehicle, or in a location accessible to
children, and do not leave the ignition of
a vehicle equipped with Keyless Enter-
N-Go in the ACC or ON/RUN mode. A
child could operate power windows,
other controls, or move the vehicle.
WARNING!
• Do not leave children or animals inside
parked vehicles in hot weather. Interior
heat build-up may cause serious injury
or death.
Normal Starting — Gasoline Engine
To Turn On The Engine Using The ENGINE
START/STOP Button
1. The transmission must be in PARK or
NEUTRAL.
2. Press and hold the brake pedal while
pushing the ENGINE START/STOP button
once.
3. The system takes over and attempts to
start the vehicle. If the vehicle fails to
start, the starter will disengage automati-
cally after 10 seconds.
4. If you wish to stop the cranking of the
engine prior to the engine starting, push
the button again.NOTE:
Normal starting of either a cold or a warm
engine is obtained without pumping or press-
ing the accelerator pedal.
To Turn Off The Engine Using ENGINE START/
STOP Button
1. Place the gear selector in PARK, then
push and release the ENGINE START/
STOP button.
2. The ignition will return to the OFF mode.
3. If the gear selector is not in PARK (with
vehicle stopped) and the ENGINE START/
STOP button is pushed once, the trans-
mission will automatically select PARK
and the engine will turn off, however the
ignition will remain in the ACC mode
(NOT the OFF mode). Never leave a ve-
hicle out of the PARK position, or it could
roll.
4. If the gear selector is in NEUTRAL, and
the vehicle speed is below 5 mph
(8 km/h), pushing the START/STOP but-
ton once will turn the engine off. The
ignition will remain in the ACC mode.
STARTING AND OPERATING
142
Page 145 of 348
5. If the vehicle speed is above 5 mph
(8 km/h), the ENGINE START/STOP but-
ton must be held for two seconds (or three
short pushes in a row) to turn the engine
off. The ignition will remain in the ACC
mode (NOT the OFF mode) if the engine is
turned off when the transmission is not in
PARK.
NOTE:
The system will automatically time out and
the ignition will cycle to the OFF mode after
30 minutes of inactivity if the ignition is left
in the ACC or RUN (engine not running) mode
and the transmission is in PARK.
ENGINE START/STOP Button Functions — With
Driver’s Foot OFF The Brake Pedal (In PARK Or
NEUTRAL Position)
The ENGINE START/STOP button operates
similar to an ignition switch. It has three
modes: OFF, ACC, and RUN. To change the
ignition modes without starting the vehicle
and use the accessories, follow these steps:
1. Starting with the ignition in the OFF
mode,2. Push the ENGINE START/STOP button
once to place the ignition to the ACC
mode (instrument cluster will display
“ACC”),
3. Push the ENGINE START/STOP button a
second time to place the ignition to the
RUN mode (instrument cluster will dis-
play “ON/RUN”),
4. Push the ENGINE START/STOP button a
third time to return the ignition to the OFF
mode (instrument cluster will display
“OFF”).
AutoPark
AutoPark is a supplemental feature to assist
in placing the vehicle in PARK should the
situations on the following pages occur. It is a
back up system and should not be relied upon
as the primary method by which the driver
shifts the vehicle into PARK.
The conditions under which AutoPark will
engage are outlined on the following pages.
WARNING!
• Driver inattention could lead to failure to
place the vehicle in PARK. ALWAYS DO
A VISUAL CHECK that your vehicle is in
PARK by verifying that a solid (not blink-
ing) “P” is indicated in the instrument
cluster display and on the gear selector.
If the "P" indicator is blinking, your ve-
hicle is not in PARK. As an added pre-
caution, always apply the parking brake
when exiting the vehicle.
• AutoPark is a supplemental feature. It is
not designed to replace the need to shift
your vehicle into PARK. It is a back up
system and should not be relied upon as
the primary method by which the driver
shifts the vehicle into PARK.
If the vehicle is not in PARK and the driver turns
off the engine, the vehicle may AutoPark.
AutoPark will engage when all of these con-
ditions are met:
• Vehicle is equipped with an 8-speed trans-
mission
143
Page 148 of 348
Stopping the Engine
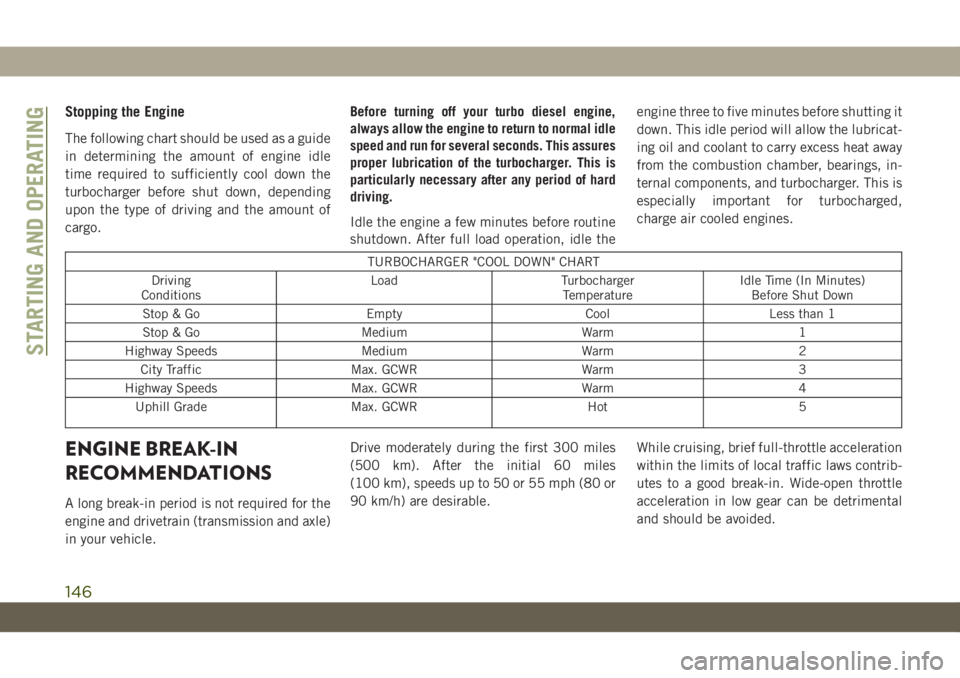
The following chart should be used as a guide
in determining the amount of engine idle
time required to sufficiently cool down the
turbocharger before shut down, depending
upon the type of driving and the amount of
cargo.Before turning off your turbo diesel engine,
always allow the engine to return to normal idle
speed and run for several seconds. This assures
proper lubrication of the turbocharger. This is
particularly necessary after any period of hard
driving.
Idle the engine a few minutes before routine
shutdown. After full load operation, idle theengine three to five minutes before shutting it
down. This idle period will allow the lubricat-
ing oil and coolant to carry excess heat away
from the combustion chamber, bearings, in-
ternal components, and turbocharger. This is
especially important for turbocharged,
charge air cooled engines.
TURBOCHARGER "COOL DOWN" CHART
Driving
ConditionsLoad Turbocharger
TemperatureIdle Time (In Minutes)
Before Shut Down
Stop & Go Empty Cool Less than 1
Stop & Go Medium Warm 1
Highway Speeds Medium Warm 2
City Traffic Max. GCWR Warm 3
Highway Speeds Max. GCWR Warm 4
Uphill Grade Max. GCWR Hot 5
ENGINE BREAK-IN
RECOMMENDATIONS
A long break-in period is not required for the
engine and drivetrain (transmission and axle)
in your vehicle.Drive moderately during the first 300 miles
(500 km). After the initial 60 miles
(100 km), speeds up to 50 or 55 mph (80 or
90 km/h) are desirable.While cruising, brief full-throttle acceleration
within the limits of local traffic laws contrib-
utes to a good break-in. Wide-open throttle
acceleration in low gear can be detrimental
and should be avoided.
STARTING AND OPERATING
146
Page 150 of 348
WARNING!
could accelerate quickly forward or in
reverse. You could lose control of the
vehicle and hit someone or something.
Only shift into gear when the engine is
idling normally and your foot is firmly
pressing the brake pedal.
• Unintended movement of a vehicle
could injure those in or near the vehicle.
As with all vehicles, you should never
exit a vehicle while the engine is run-
ning. Before exiting a vehicle, always
come to a complete stop, then apply the
parking brake, shift the transmission
into PARK, and turn the ignition OFF.
When the ignition is in the OFF mode,
the transmission is locked in PARK, se-
curing the vehicle against unwanted
movement.
• When exiting the vehicle, always make
sure the ignition is in the OFF mode,
remove the key fob from the vehicle, and
lock the vehicle.
• Never leave children alone in a vehicle,
or with access to an unlocked vehicle.
Allowing children to be in a vehicle un-
WARNING!
attended is dangerous for a number of
reasons. A child or others could be seri-
ously or fatally injured. Children should
be warned not to touch the parking
brake, brake pedal or the transmission
gear selector.
• Do not leave the key fob in or near the
vehicle (or in a location accessible to
children), and do not leave the ignition
in the ACC or ON/RUN mode. A child
could operate power windows, other con-
trols, or move the vehicle.
Ignition Park Interlock
This vehicle is equipped with an Ignition Park
Interlock which requires the transmission to
be in PARK before the ignition can be turned
to the OFF mode. This helps the driver avoid
inadvertently leaving the vehicle without
placing the transmission in PARK. This sys-
tem also locks the transmission in PARK
whenever the ignition is in the OFF mode.NOTE:
The transmission is NOT locked in PARK
when the ignition is in the ACC mode (even
though the engine will be off). Ensure that
the transmission is in PARK, and the ignition
isOFF(not in ACC mode) before exiting the
vehicle.
Brake/Transmission Shift Interlock
System
This vehicle is equipped with a Brake Trans-
mission Shift Interlock system (BTSI) that
holds the transmission gear selector in PARK
unless the brakes are applied. To shift the
transmission out of PARK, the engine must
be running and the brake pedal must be
pressed. The brake pedal must also be
pressed to shift from NEUTRAL into DRIVE or
REVERSE when the vehicle is stopped or
moving at low speeds.
Eight–Speed Automatic Transmission
Your vehicle is equipped with a fuel efficient
8 speed transmission. The gear selector is
located in the center console.
STARTING AND OPERATING
148
Page 152 of 348
• You can start out, from a stop, in first or
second gear (or third gear, in 4LO range).
Tapping (+) (at a stop) will allow starting in
second gear. Starting out in second or third
gear can be helpful in snowy or icy condi-
tions.
• If a requested downshift would cause the
engine to over-speed, that shift will not
occur.
• The system will ignore attempts to upshift
at too low of a vehicle speed.
• Holding the gear selector in the (-) position
will downshift the transmission to the low-
est gear possible at the current speed.
• Transmission shifting will be more notice-
able when AutoStick is enabled.
• The system may revert to automatic shift
mode if a fault or overheat condition is
detected.
NOTE:
When Hill Descent Control is enabled,
AutoStick is not active.To disengage AutoStick mode, return the gear
selector to the DRIVE position. You can shift
in or out of the AutoStick position at any time
without taking your foot off the accelerator
pedal.
WARNING!
Do not downshift for additional engine
braking on a slippery surface. The drive
wheels could lose their grip and the ve-
hicle could skid, causing a collision or
personal injury.
FOUR–WHEEL DRIVE
OPERATION
WARNING!
Failure to engage a transfer case position
completely can cause transfer case dam-
age or loss of power and vehicle control.
You could have a collision. Do not drive the
vehicle unless the transfer case is fully
engaged.
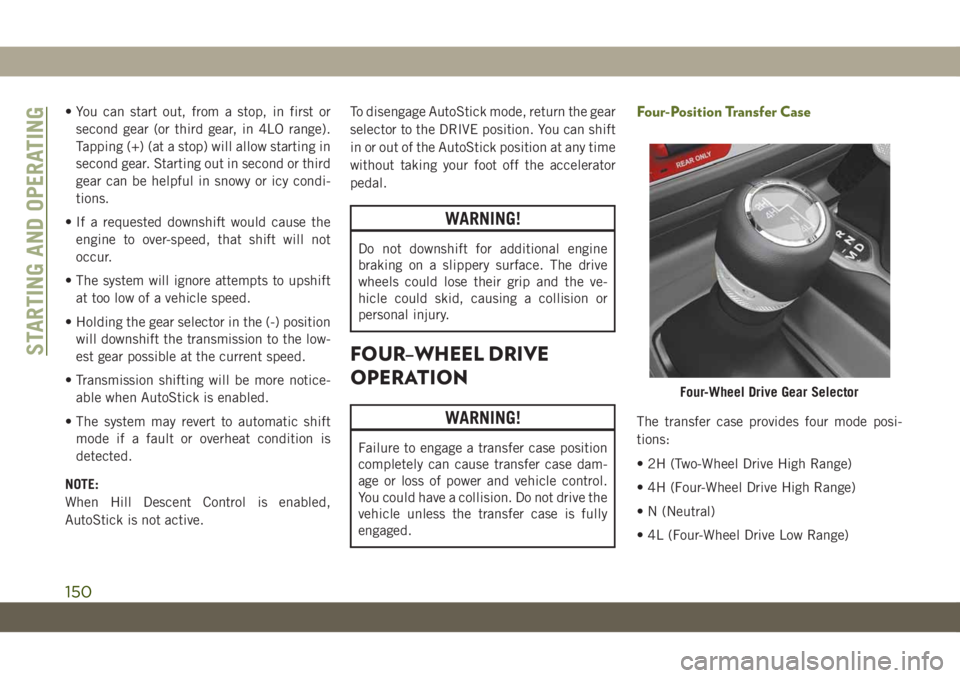
Four-Position Transfer Case
The transfer case provides four mode posi-
tions:
• 2H (Two-Wheel Drive High Range)
• 4H (Four-Wheel Drive High Range)
• N (Neutral)
• 4L (Four-Wheel Drive Low Range)
Four-Wheel Drive Gear Selector
STARTING AND OPERATING
150
Page 154 of 348
Proper operation of four-wheel drive vehicles
depends on tires of equal size, type, and
circumference on each wheel. Any difference
will adversely affect shifting and cause dam-
age to the transfer case.
Because four-wheel drive provides improved
traction, there is a tendency to exceed safe
turning and stopping speeds. Do not go faster
than road conditions permit.
Shifting Procedures
2H To 4H Or 4H To 2H
Shifting between 2H and 4H can be made
with the vehicle stopped or in motion. The
preferred shifting speed would be 0 to
45 mph (72 km/h). With the vehicle in mo-
tion, the transfer case will engage/disengage
faster if you momentarily release the accel-
erator pedal after completing the shift. Do
not accelerate while shifting the transfer
case. Apply a constant force when shifting
the transfer case lever.NOTE:
• Do not attempt to make a shift while only
the front or rear wheels are spinning. The
front and rear driveshaft speeds must be
equal for the shift to take place. Shifting
while only the front or rear wheels are
spinning can cause damage to the transfer
case.
• Delayed shifts out of four-wheel drive may
be experienced due to uneven tire wear, low
or uneven tire pressures, excessive vehicle
loading, or cold temperatures.
• Shifting effort will increase with speed, this
is normal.
During cold weather, you may experience
increased effort in shifting until the transfer
case fluid warms up. This is normal.
4H To 4L Or 4L To 4H
With the vehicle rolling at 2 to 3 mph (3 to
5 km/h), shift the transmission into NEU-
TRAL (N). While the vehicle is coasting at
2 to 3 mph (3 to 5 km/h), shift the transfer
case lever firmly to the desired position. Donot pause with the transfer case in N (Neu-
tral). Once the shift is completed, place the
transmission into DRIVE.
NOTE:
Shifting into or out of 4L is possible with the
vehicle completely stopped; however, diffi-
culty may occur due to the mating teeth not
being properly aligned. Several attempts may
be required for clutch teeth alignment and
shift completion to occur. The preferred
method is with the vehicle rolling at 2 to
3 mph (3 to 5 km/h). Avoid attempting to
engage or disengage 4L with the vehicle
moving faster than 2 to 3 mph (3 to 5 km/h).
WARNING!
Failure to engage a transfer case position
completely can cause transfer case dam-
age or loss of power and vehicle control.
You could have a collision. Do not drive the
vehicle unless the transfer case is fully
engaged.
STARTING AND OPERATING
152
Page 156 of 348
speed. This range provides additional trac-
tion and maximum pulling power for loose,
slippery road surfaces only. Do not exceed
25 mph (40 km/h).
This transfer case is designed to be driven in
the two-wheel drive position (2WD) or four-
wheel drive position (4WD AUTO) for normal
street and highway conditions on dry hard
surfaced roads. Driving the vehicle in 2WD
will have greater fuel economy benefits as the
front axle is not engaged in 2WD.
For variable driving conditions, the 4WD
AUTO mode can be used. In this mode, the
front axle is engaged, but the vehicle's power
is sent to the rear wheels. Four-wheel drive
will be automatically engaged when the ve-
hicle senses a loss of traction. Because the
front axle is engaged, this mode will result in
lower fuel economy than the 2WD mode.
In the event that additional traction is re-
quired, the transfer case 4H and 4L positions
can be used to lock the front and rear drive-
shafts together, forcing the front and rear
wheels to rotate at the same speed. The 4H
and 4L positions are intended for loose, slip-
pery road surfaces only and not intended fornormal driving. Driving in the 4H and 4L
positions on hard-surfaced roads will cause
increased tire wear and damage to the drive-
line components. Refer to “Shifting Proce-
dures” in this section for further information
on shifting into 4H or 4L.
The instrument cluster alerts the driver that
the vehicle is in four-wheel drive, and the
front and rear driveshafts are locked together.
The light will illuminate when the transfer
case is shifted into the 4H position.
When operating your vehicle in 4L, the en-
gine speed will be approximately three times
(four times for Rubicon models) that of the
2H or 4H positions at a given road speed.
Take care not to overspeed the engine.
Proper operation of four-wheel drive vehicles
depends on tires of equal size, type, and
circumference on each wheel. Any difference
will adversely affect shifting and cause dam-
age to the transfer case.
Because four-wheel drive provides improved
traction, there is a tendency to exceed safe
turning and stopping speeds. Do not go faster
than road conditions permit.Shifting Procedures
2H To 4H Auto Or 4H Auto To 2H
Shifting between 2H and 4H Auto can be
made with the vehicle stopped or in motion.
The preferred shifting speed would be 0 to
45 mph (72 km/h). With the vehicle in mo-
tion, the transfer case will engage/disengage
faster if you momentarily release the accel-
erator pedal after completing the shift. Do
not accelerate while shifting the transfer
case. Apply a constant force when shifting
the transfer case lever.
2H/4H Auto To 4H Part Time Or 4H Part Time
To 2H/4H Auto
Shifting between 2H/4H AUTO to 4H PART
TIME can be made with the vehicle stopped
or in motion. The preferred shifting speed
would be 0 to 45 mph (72 km/h). With the
vehicle in motion, the transfer case will
engage/disengage faster if you momentarily
release the accelerator pedal after complet-
ing the shift. Do not accelerate while shifting
the transfer case. Apply a constant force
when shifting the transfer case lever.
STARTING AND OPERATING
154
Page 159 of 348
Push the SWAY BAR switch to activate the
system. Push the switch again to deactivate
the system. The “Sway Bar Indicator Light”
(located in the instrument cluster) will illumi-
nate when the bar is disconnected. The
“Sway Bar Indicator Light” will flash during
activation transition, or when activation con-
ditions are not met. The stabilizer/sway bar
should remain in on-road mode during nor-
mal driving conditions.
WARNING!
Ensure the stabilizer/sway bar is recon-
nected before driving on hard surfaced
roads or at speeds above 18 mph
(29 km/h); a disconnected stabilizer/sway
bar may contribute to the loss of vehicle
control, which could result in serious in-
jury. Under certain circumstances, the
front stabilizer/sway bar enhances vehicle
stability and assists with vehicle control.
The system monitors vehicle speed and
will attempt to reconnect the stabilizer/
sway bar at speeds over 18 mph
(29 km/h). This is indicated by a flashing
or solid “Sway Bar Indicator Light.” Once
WARNING!
vehicle speed is reduced below 14 mph
(22 km/h), the system will once again
attempt to return to off-road mode.
To disconnect the stabilizer/sway bar, shift to
either 4H or 4L and push the SWAY BAR
switch to obtain the off-road position. Refer
to “Four-Wheel Drive Operation” in this sec-
tion for further information. The “Sway Bar
Indicator Light” will flash until the stabilizer/
sway bar has been fully disconnected.
NOTE:
The stabilizer/sway bar may be torque locked
due to left and right suspension height differ-
ences. This condition is due to driving sur-
face differences or vehicle loading. In order
for the stabilizer/sway bar to disconnect/
reconnect, the right and left halves of the bar
must be aligned. This alignment may require
that the vehicle be driven onto level ground or
rocked from side to side.
To return to on-road mode, push the SWAY
BAR switch again.
WARNING!
If the stabilizer/sway bar will not return to
on-road mode, the “Sway Bar Indicator
Light” will flash in the instrument cluster
and vehicle stability may be reduced. Do
not attempt to drive the vehicle over
18 mph (29 km/h). Driving faster than
18 mph (29 km/h) with a disconnected
stabilizer/sway bar may contribute to the
loss of vehicle control, which could result
in serious injury.
STOP/START SYSTEM —
AUTOMATIC
TRANSMISSION (IF
EQUIPPED)
The Stop/Start function is developed to re-
duce fuel consumption. The system will stop
the engine automatically during a vehicle
stop if the required conditions are met. Re-
leasing the brake pedal or pressing the accel-
erator pedal will automatically re-start the
engine.
157