fold seats JEEP WRANGLER UNLIMITED 2018 Owner handbook (in English)
[x] Cancel search | Manufacturer: JEEP, Model Year: 2018, Model line: WRANGLER UNLIMITED, Model: JEEP WRANGLER UNLIMITED 2018Pages: 348, PDF Size: 6.5 MB
Page 13 of 348
GETTING TO KNOW YOUR VEHICLE
KEYS .....................13
KeyFob.....................13
IGNITION SWITCH............15
Keyless Enter-N-Go — Ignition.......15
REMOTE STARTING SYSTEM — IF
EQUIPPED.................16
How To Use Remote Start..........16
To Enter Remote Start Mode........17
VEHICLE SECURITY ALARM — IF
EQUIPPED..................17
To Arm The System.............17
To Disarm The System............18
DOORS....................18
Keyless Enter-N-Go — Passive Entry (If
Equipped)...................18
Child-Protection Door Lock System — Rear
Doors......................21
Front Door Removal.............22
Rear Door Removal (Four-Door Models) . .24
SEATS ....................26
Heated Seats — If Equipped........26Front Passenger Easy Entry Seat — Two
Door Models..................27
60/40 Split Folding Rear Seat — Four Door
Models.....................28
Fold And Tumble Rear Seat — Two Door
Models.....................29
HEAD RESTRAINTS...........30
Front Head Restraints............30
Rear Head Restraints — Two Door
Models.....................31
Rear Head Restraints — Four Door
Models.....................32
STEERING WHEEL............33
Tilt/Telescoping Steering Column......33
Heated Steering Wheel — If Equipped . .34
MIRRORS..................35
Heated Mirrors — If Equipped.......35
EXTERIOR LIGHTS...........35
Headlight Switch...............35
Daytime Running Lights — If Equipped .35
High/Low Beam Switch...........35
Flash-To-Pass.................36Automatic Headlights — If Equipped . . .36
Front And Rear Fog Lights — If
Equipped...................36
Turn Signals..................36
Lane Change Assist — If Equipped....37
Lights-On Reminder.............37
Headlight Leveling System — If
Equipped...................37
WINDSHIELD WIPERS AND WASH-
ERS ......................37
Windshield Wiper Operation.........38
CLIMATE CONTROLS..........39
Automatic Climate Controls Overview . . .39
Climate Control Functions..........44
Automatic Temperature Control (ATC) — If
Equipped....................44
Operating Tips................45
POWER WINDOWS — IF
EQUIPPED.................46
Auto-Down Feature..............46
Wind Buffeting................47
GETTING TO KNOW YOUR VEHICLE
11
Page 30 of 348
To return the seat to a sitting position, fold
the seatback upright until it locks and push
the seat rearward until the track locks.
NOTE:
• The front passenger seats have a track
memory, which returns the seat to its origi-
nal position.
• The recline strap and easy entry lever
should not be used during the automatic
returning of the seat to its sitting position.
60/40 Split Folding Rear Seat — Four Door
Models
To provide additional storage area, each rear
seat can be folded flat to allow for extended
cargo space.
NOTE:
• Be sure that the front seats are fully upright
and positioned forward. This will allow the
rear seat to fold down easily.
• The center head restraints must be in the
lowest position to avoid contact with the
center console when folding the seat.
WARNING!
• It is extremely dangerous to ride in a
cargo area, inside or outside of a vehicle.
In a collision, people riding in these
areas are more likely to be seriously
injured or killed.
• Do not allow people to ride in any area of
your vehicle that is not equipped with
seats and seat belts.
• Be sure everyone in your vehicle is in a
seat and using a seat belt properly.
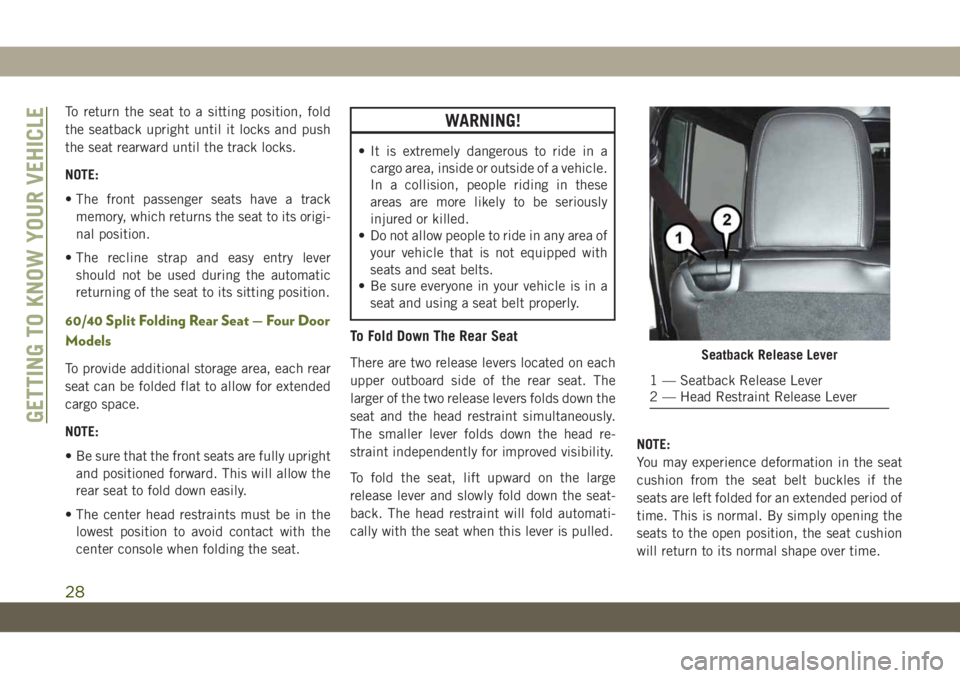
To Fold Down The Rear Seat
There are two release levers located on each
upper outboard side of the rear seat. The
larger of the two release levers folds down the
seat and the head restraint simultaneously.
The smaller lever folds down the head re-
straint independently for improved visibility.
To fold the seat, lift upward on the large
release lever and slowly fold down the seat-
back. The head restraint will fold automati-
cally with the seat when this lever is pulled.NOTE:
You may experience deformation in the seat
cushion from the seat belt buckles if the
seats are left folded for an extended period of
time. This is normal. By simply opening the
seats to the open position, the seat cushion
will return to its normal shape over time.Seatback Release Lever
1 — Seatback Release Lever
2 — Head Restraint Release Lever
GETTING TO KNOW YOUR VEHICLE
28
Page 31 of 348
To Raise The Rear Seat
Raise the seatback and lock it into place.
Then, raise the head restraint until it locks
into place. If interference from the cargo area
prevents the seatback from fully locking, you
will have difficulty returning the seat to its
proper position.
WARNING!
Be certain that the seatback is securely
locked into position. If the seatback is not
securely locked into position the seat will
not provide the proper stability for child
seats and/or passengers. An improperly
latched seat could cause serious injury.
Fold And Tumble Rear Seat — Two Door
Models
NOTE:
• Prior to folding the rear seat, it may be
necessary to reposition the front seats.
• Be sure that the front seats are fully upright
and positioned forward. This will allow the
rear seat to fold down easily.Folding The Rear Seat
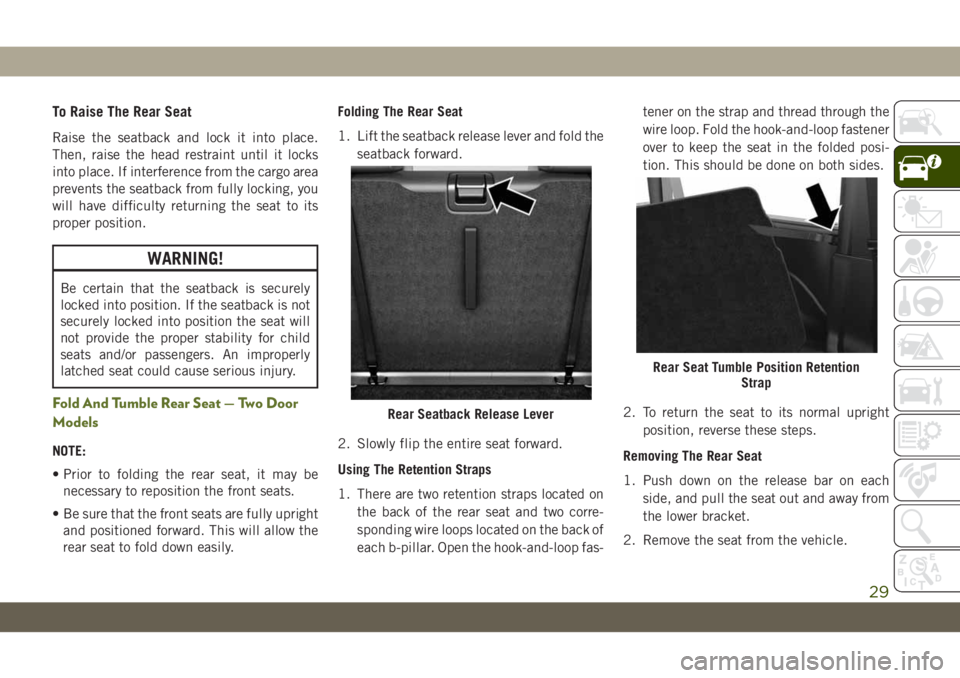
1. Lift the seatback release lever and fold the
seatback forward.
2. Slowly flip the entire seat forward.
Using The Retention Straps
1. There are two retention straps located on
the back of the rear seat and two corre-
sponding wire loops located on the back of
each b-pillar. Open the hook-and-loop fas-tener on the strap and thread through the
wire loop. Fold the hook-and-loop fastener
over to keep the seat in the folded posi-
tion. This should be done on both sides.
2. To return the seat to its normal upright
position, reverse these steps.
Removing The Rear Seat
1. Push down on the release bar on each
side, and pull the seat out and away from
the lower bracket.
2. Remove the seat from the vehicle.
Rear Seatback Release Lever
Rear Seat Tumble Position Retention
Strap
29
Page 107 of 348
Lap/Shoulder Belt Untwisting Procedure
Use the following procedure to untwist a
twisted lap/shoulder belt.
1. Position the latch plate as close as pos-
sible to the anchor point.
2. At about 6 to 12 inches (15 to 30 cm)
above the latch plate, grasp and twist the
seat belt webbing 180 degrees to create a
fold that begins immediately above the
latch plate.
3. Slide the latch plate upward over the
folded webbing. The folded webbing must
enter the slot at the top of the latch plate.
4. Continue to slide the latch plate up until it
clears the folded webbing and the seat
belt is no longer twisted.
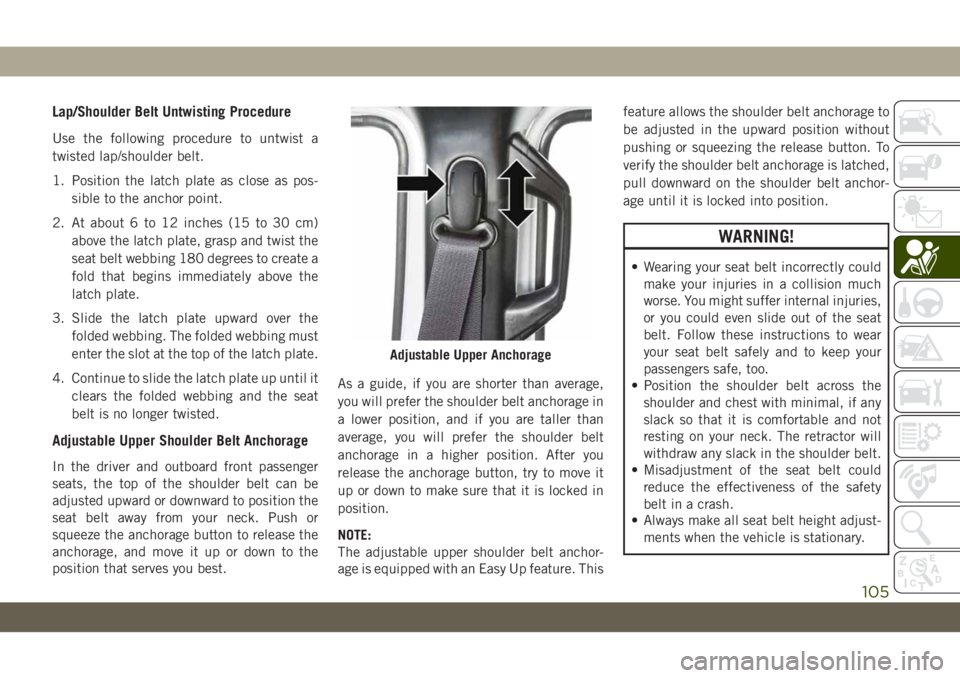
Adjustable Upper Shoulder Belt Anchorage
In the driver and outboard front passenger
seats, the top of the shoulder belt can be
adjusted upward or downward to position the
seat belt away from your neck. Push or
squeeze the anchorage button to release the
anchorage, and move it up or down to the
position that serves you best.As a guide, if you are shorter than average,
you will prefer the shoulder belt anchorage in
a lower position, and if you are taller than
average, you will prefer the shoulder belt
anchorage in a higher position. After you
release the anchorage button, try to move it
up or down to make sure that it is locked in
position.
NOTE:
The adjustable upper shoulder belt anchor-
age is equipped with an Easy Up feature. Thisfeature allows the shoulder belt anchorage to
be adjusted in the upward position without
pushing or squeezing the release button. To
verify the shoulder belt anchorage is latched,
pull downward on the shoulder belt anchor-
age until it is locked into position.
WARNING!
• Wearing your seat belt incorrectly could
make your injuries in a collision much
worse. You might suffer internal injuries,
or you could even slide out of the seat
belt. Follow these instructions to wear
your seat belt safely and to keep your
passengers safe, too.
• Position the shoulder belt across the
shoulder and chest with minimal, if any
slack so that it is comfortable and not
resting on your neck. The retractor will
withdraw any slack in the shoulder belt.
• Misadjustment of the seat belt could
reduce the effectiveness of the safety
belt in a crash.
• Always make all seat belt height adjust-
ments when the vehicle is stationary.
Adjustable Upper Anchorage
105
Page 120 of 348

WARNING!
inflate, even if they are in an infant or
child restraint.
• Seat belts (and child restraints where
appropriate) are necessary for your pro-
tection in all collisions. They also help
keep you in position, away from an in-
flating Side Air Bag. To get the best
protection from the Side Air Bags, occu-
pants must wear their seat belts properly
and sit upright with their backs against
the seats. Children must be properly
restrained in a child restraint or booster
seat that is appropriate for the size of the
child.
WARNING!
• Side Air Bags need room to inflate. Do
not lean against the door or window. Sit
upright in the center of the seat.
• Being too close to the Side Air Bags
during deployment could cause you to
be severely injured or killed.
• Relying on the Side Air Bags alone could
lead to more severe injuries in a colli-
WARNING!
sion. The Side Air Bags work with your
seat belt to restrain you properly. In
some collisions, Side Air Bags won’t
deploy at all. Always wear your seat belt
even though you have Side Air Bags.
NOTE:
Air bag covers may not be obvious in the
interior trim, but they will open during air bag
deployment.
Air Bag System Components
NOTE:
The Occupant Restraint Controller (ORC)
monitors the internal circuits and intercon-
necting wiring associated with electrical Air
Bag System Components listed below:
• Occupant Restraint Controller (ORC)
• Air Bag Warning Light
• Steering Wheel and Column
• Instrument Panel
• Knee Impact Bolsters
• Driver and Front Passenger Air Bags• Seat Belt Buckle Switch
• Supplemental Side Air Bags
• Front and Side Impact Sensors
• Seat Belt Pretensioners
If A Deployment Occurs
The front air bags are designed to deflate
immediately after deployment.
NOTE:
Front and/or side air bags will not deploy in
all collisions. This does not mean something
is wrong with the air bag system.
If you do have a collision which deploys the
air bags, any or all of the following may occur:
• The air bag material may sometimes cause
abrasions and/or skin reddening to the oc-
cupants as the air bags deploy and unfold.
The abrasions are similar to friction rope
burns or those you might get sliding along a
carpet or gymnasium floor. They are not
caused by contact with chemicals. They are
not permanent and normally heal quickly.
However, if you haven’t healed significantly
within a few days, or if you have any blis-
tering, see your doctor immediately.
SAFETY
118
Page 339 of 348
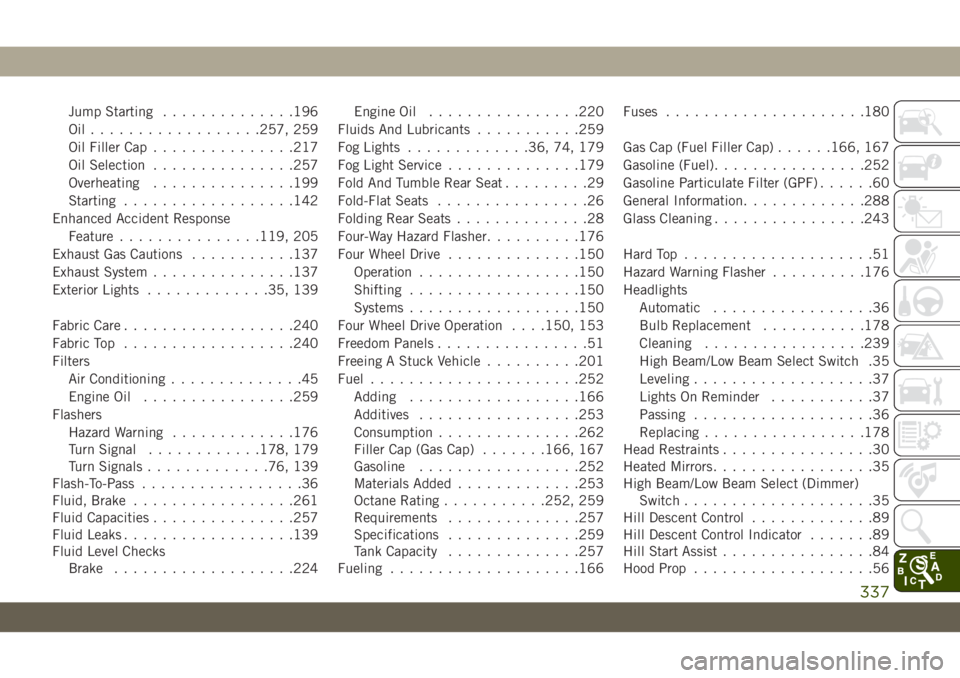
Jump Starting..............196
Oil..................257, 259
Oil Filler Cap...............217
Oil Selection...............257
Overheating...............199
Starting..................142
Enhanced Accident Response
Feature...............119, 205
Exhaust Gas Cautions...........137
Exhaust System...............137
Exterior Lights.............35, 139
Fabric Care..................240
Fabric Top..................240
Filters
Air Conditioning..............45
Engine Oil................259
Flashers
Hazard Warning.............176
Turn Signal............178, 179
Turn Signals.............76, 139
Flash-To-Pass.................36
Fluid, Brake.................261
Fluid Capacities...............257
Fluid Leaks..................139
Fluid Level Checks
Brake...................224Engine Oil................220
Fluids And Lubricants...........259
Fog Lights.............36, 74, 179
Fog Light Service..............179
Fold And Tumble Rear Seat.........29
Fold-Flat Seats................26
Folding Rear Seats..............28
Four-Way Hazard Flasher..........176
Four Wheel Drive..............150
Operation.................150
Shifting..................150
Systems..................150
Four Wheel Drive Operation
. . . .150, 153
Freedom Panels................51
Freeing A Stuck Vehicle..........201
Fuel......................252
Adding..................166
Additives.................253
Consumption...............262
Filler Cap (Gas Cap).......166, 167
Gasoline.................252
Materials Added.............253
Octane Rating...........252, 259
Requirements..............257
Specifications..............259
Tank Capacity..............257
Fueling....................166Fuses.....................180
Gas Cap (Fuel Filler Cap)......166, 167
Gasoline (Fuel)................252
Gasoline Particulate Filter (GPF)......60
General Information.............288
Glass Cleaning................243
Hard Top....................51
Hazard Warning Flasher..........176
Headlights
Automatic.................36
Bulb Replacement...........178
Cleaning.................239
High Beam/Low Beam Select Switch .35
Leveling...................37
Lights On Reminder...........37
Passing...................36
Replacing.................178
Head Restraints................30
Heated Mirrors.................35
High Beam/Low Beam Select (Dimmer)
Switch....................35
Hill Descent Control.............89
Hill Descent Control Indicator.......89
Hill Start Assist................84
Hood Prop...................56
337
Page 342 of 348
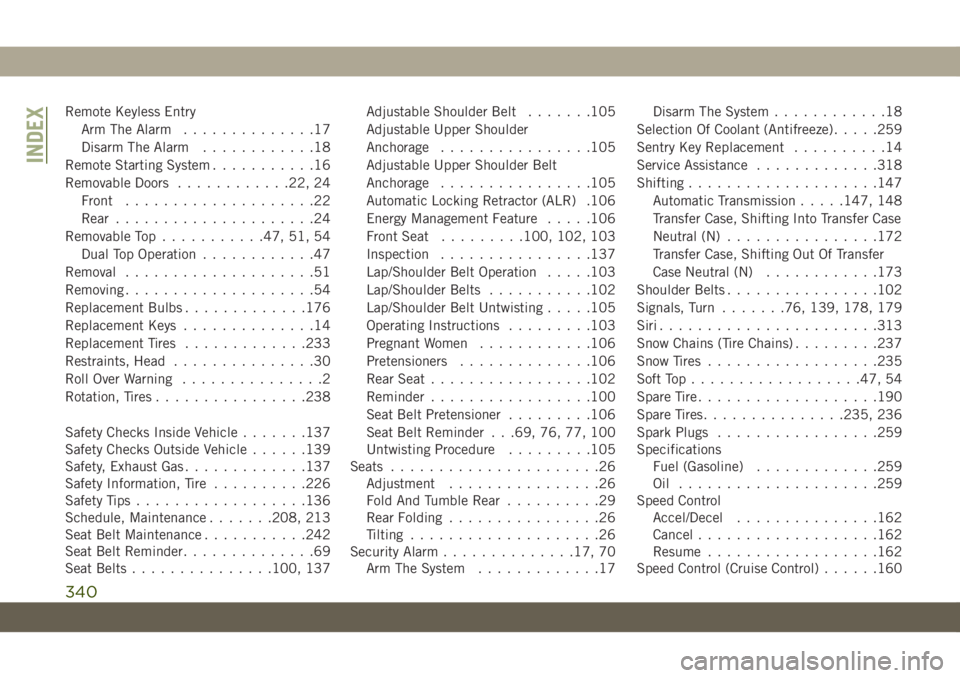
Remote Keyless Entry
Arm The Alarm..............17
Disarm The Alarm............18
Remote Starting System...........16
Removable Doors............22, 24
Front....................22
Rear.....................24
Removable Top...........47, 51, 54
Dual Top Operation............47
Removal....................51
Removing....................54
Replacement Bulbs.............176
Replacement Keys..............14
Replacement Tires.............233
Restraints, Head...............30
Roll Over Warning...............2
Rotation, Tires................238
Safety Checks Inside Vehicle.......137
Safety Checks Outside Vehicle......139
Safety, Exhaust Gas.............137
Safety Information, Tire..........226
Safety Tips..................136
Schedule, Maintenance.......208, 213
Seat Belt Maintenance...........242
Seat Belt Reminder..............69
Seat Belts...............100, 137Adjustable Shoulder Belt.......105
Adjustable Upper Shoulder
Anchorage................105
Adjustable Upper Shoulder Belt
Anchorage................105
Automatic Locking Retractor (ALR) .106
Energy Management Feature.....106
Front Seat.........100, 102, 103
Inspection................137
Lap/Shoulder Belt Operation.....103
Lap/Shoulder Belts...........102
Lap/Shoulder Belt Untwisting.....105
Operating Instructions.........103
Pregnant Women............106
Pretensioners..............106
Rear Seat
.................102
Reminder.................100
Seat Belt Pretensioner.........106
Seat Belt Reminder . . .69, 76, 77, 100
Untwisting Procedure.........105
Seats......................26
Adjustment................26
Fold And Tumble Rear..........29
Rear Folding................26
Tilting....................26
Security Alarm..............17, 70
Arm The System.............17Disarm The System............18
Selection Of Coolant (Antifreeze).....259
Sentry Key Replacement..........14
Service Assistance.............318
Shifting....................147
Automatic Transmission.....147, 148
Transfer Case, Shifting Into Transfer Case
Neutral (N)................172
Transfer Case, Shifting Out Of Transfer
Case Neutral (N)............173
Shoulder Belts................102
Signals, Turn.......76, 139, 178, 179
Siri.......................313
Snow Chains (Tire Chains).........237
Snow Tires..................235
Soft Top..................47, 54
Spare Tire...................190
Spare Tires...............235, 236
Spark Plugs.................259
Specifications
Fuel (Gasoline).............259
Oil .....................259
Speed Control
Accel/Decel...............162
Cancel...................162
Resume..................162
Speed Control (Cruise Control)......160
INDEX
340