radio controls JEEP WRANGLER UNLIMITED 2018 Owner handbook (in English)
[x] Cancel search | Manufacturer: JEEP, Model Year: 2018, Model line: WRANGLER UNLIMITED, Model: JEEP WRANGLER UNLIMITED 2018Pages: 348, PDF Size: 6.5 MB
Page 10 of 348
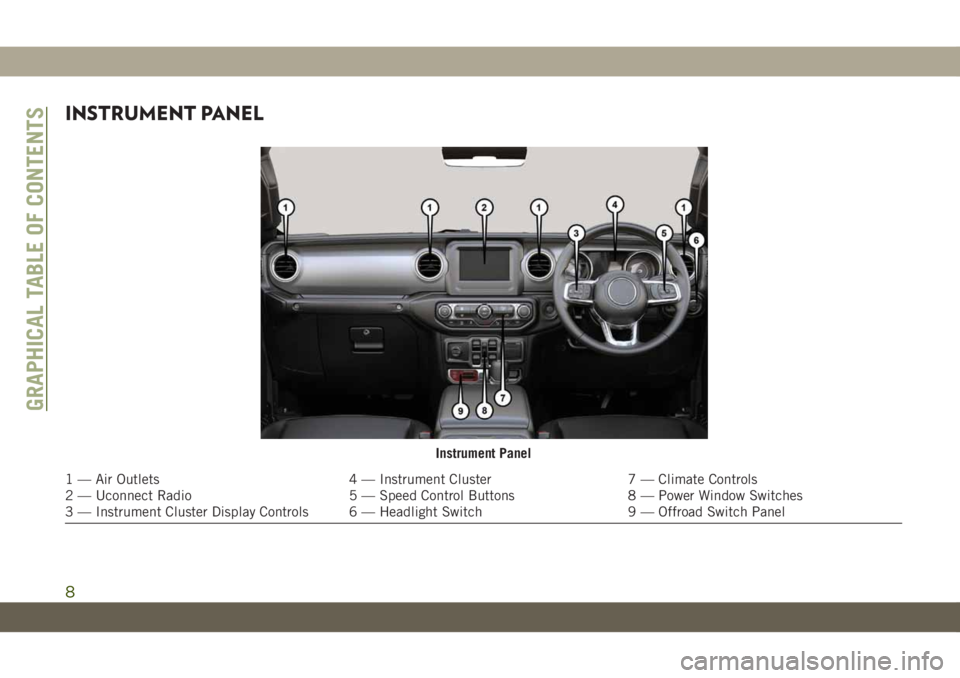
INSTRUMENT PANEL
Instrument Panel
1 — Air Outlets 4 — Instrument Cluster 7 — Climate Controls
2 — Uconnect Radio 5 — Speed Control Buttons 8 — Power Window Switches
3 — Instrument Cluster Display Controls 6 — Headlight Switch 9 — Offroad Switch Panel
GRAPHICAL TABLE OF CONTENTS
8
Page 41 of 348
Rotate the switch upward to the first detent
position for intermittent operation and to the
second detent for continuous rear wiper op-
eration.
Push the wiper lever toward the instrument
panel to activate the rear washer. The washer
pump and wiper will continue to operate as
long as the lever is held.
If the rear wiper is operating when the igni-
tion is placed in the OFF position, the wiper
will automatically return to the “park” posi-
tion. When the vehicle is restarted, the wiper
will resume function at whichever position
the switch is set at.CLIMATE CONTROLS
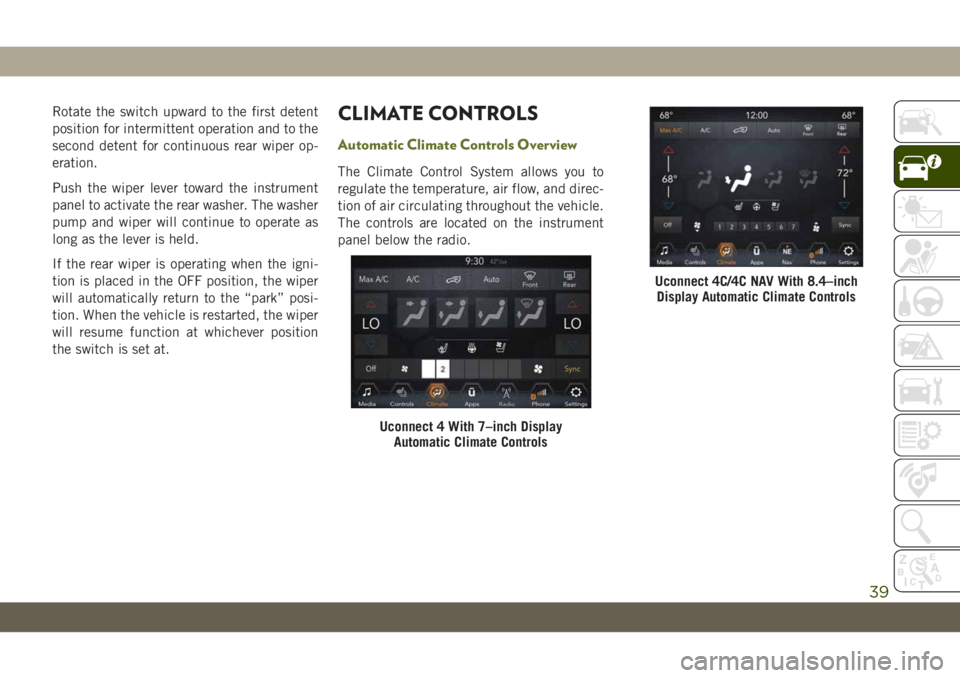
Automatic Climate Controls Overview
The Climate Control System allows you to
regulate the temperature, air flow, and direc-
tion of air circulating throughout the vehicle.
The controls are located on the instrument
panel below the radio.
Uconnect 4 With 7–inch Display
Automatic Climate Controls
Uconnect 4C/4C NAV With 8.4–inch
Display Automatic Climate Controls
39
Page 267 of 348
MULTIMEDIA
CYBERSECURITY...........267
UCONNECT 3 WITH 5–INCH DIS-
PLAY — IF EQUIPPED........268
Uconnect 3 With 5–inch Display At A
Glance.....................268
Clock Setting................269
Audio Setting................269
Radio Operation..............270
Voice Text Reply (Not Compatible With
iPhone)....................270
Apps — If Equipped............271
UCONNECT 4 WITH 7-INCH DIS-
PLAY.....................272
Uconnect 4 At A Glance.........272
Drag & Drop Menu Bar...........273
Radio.....................274
Android Auto — If Equipped.......275
Apple CarPlay Integration — If
Equipped...................276
Apps — If Equipped............277
UCONNECT 4C/4C NAV WITH
8.4-INCH DISPLAY..........278
Uconnect 4C/4C NAV At A Glance . . .278
Drag & Drop Menu Bar...........279
Radio.....................280
Android Auto — If Equipped.......281
Apple CarPlay Integration — If
Equipped...................285
Apps — If Equipped............287
UCONNECT SETTINGS.......288
TIPS CONTROLS AND GENERAL
INFORMATION.............288
Steering Wheel Audio Controls......288
Reception Conditions............289
Care And Maintenance...........289
Anti-Theft Protection............289
AUX/USB/MP3 CONTROL — IF
EQUIPPED.................289
NAVIGATION — IF EQUIPPED. . .292
Changing The Navigation Voice Prompt
Volume....................292
Finding Points Of Interest........294
Finding A Place By Spelling The
Name.....................294One-Step Voice Destination Entry. . . .294
Setting Your Home Location.......294
Home.....................294
Adding A Stop................296
Taking A Detour...............296
Map Update.................296
UCONNECT PHONE.........297
Uconnect Phone (Bluetooth Hands Free
Calling)....................297
Pairing (Wirelessly Connecting) Your Mobile
Phone To The Uconnect System.....300
Common Phone Commands
(Examples)..................304
Mute (Or Unmute) Microphone During
Call......................304
Transfer Ongoing Call Between Handset And
Vehicle....................304
Phonebook..................304
Voice Command Tips............304
Changing The Volume...........305
Using Do Not Disturb...........305
Incoming Text Messages.........305
MULTIMEDIA
265
Page 277 of 348
WARNING!
ALWAYS drive safely with your hands on
the wheel. You have full responsibility and
assume all risks related to the use of the
Uconnect features and applications in this
vehicle. Only use Uconnect when it is safe
to do so. Failure to do so may result in an
accident involving serious injury or death.
• To access the Radio mode, press the “Ra-
dio” button on the touchscreen.
Selecting Radio Stations
• Press the desired radio band (AM, FM or
DAB) button on the touchscreen.
Seek Up/Seek Down
• Press the Seek up or down arrow buttons on
the touchscreen for less than two seconds
to seek through radio stations.
• Press and hold either arrow button on the
touchscreen for more than two seconds to
bypass stations without stopping. The radio
will stop at the next listenable station once
the arrow button on the touchscreen is
released.Direct Tune
• Tune directly to a radio station by pressing
the “Tune” button on the screen, and en-
tering the desired station number.
Store Radio Presets Manually
Your radio can store 36 total preset stations,
12 presets per band (AM, FM and DAB). They
are shown at the top of your radio screen. To
see the 12 preset stations per band, press the
arrow button on the touchscreen at the top
right of the screen to toggle between the two
sets of six presets.
To store a radio preset manually, follow the
steps below:
1. Tune to the desired station.
2. Press and hold the desired numbered but-
ton on the touchscreen for more than two
seconds or until you hear a confirmation
beep.
Android Auto — If Equipped
NOTE:
Feature availability depends on your carrier
and mobile phone manufacturer. Some
Android Auto features may or may not be
available in every region and/or language.
Android Auto is a feature of your Uconnect
system, and your Android 5.0 Lollipop, or
higher, powered smartphone with a data plan,
that allows you to project your smartphone
and a number of its apps onto the touch-
screen radio display. Android Auto automati-
cally brings you useful information, and orga-
nizes it into simple cards that appear just
when they are needed. Android Auto can be
used with Google's best-in-class speech tech-
nology, the steering wheel controls, the knobs
and buttons on your radio faceplate, and the
radio display’s touchscreen to control many
of your apps. To use Android Auto follow the
following steps:
1. Download the Android Auto app from the
Google Play store on your Android-
powered smartphone.
275
Page 279 of 348
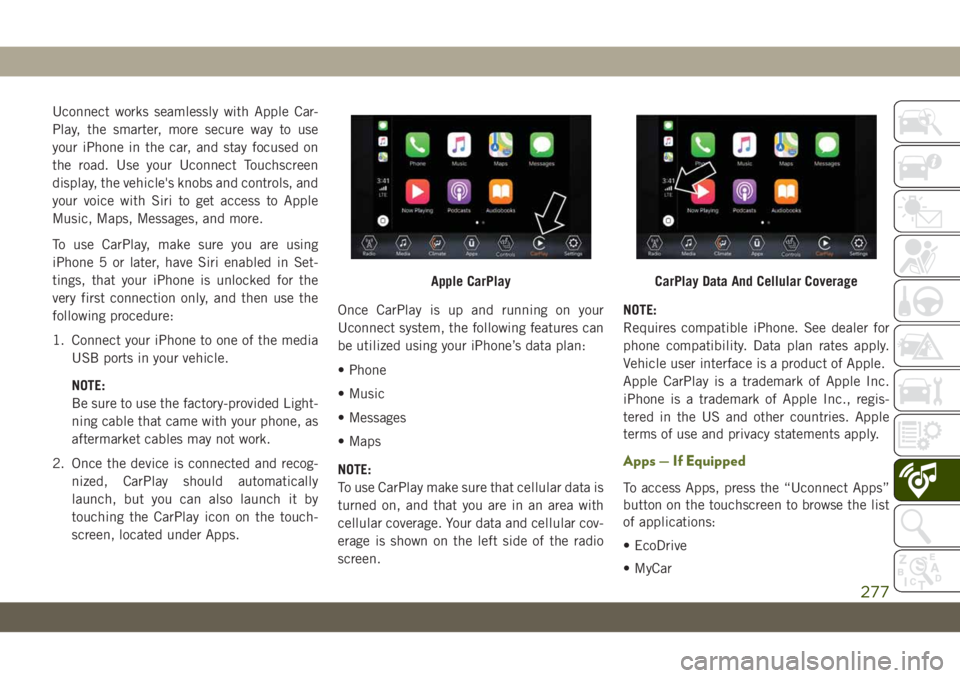
Uconnect works seamlessly with Apple Car-
Play, the smarter, more secure way to use
your iPhone in the car, and stay focused on
the road. Use your Uconnect Touchscreen
display, the vehicle's knobs and controls, and
your voice with Siri to get access to Apple
Music, Maps, Messages, and more.
To use CarPlay, make sure you are using
iPhone 5 or later, have Siri enabled in Set-
tings, that your iPhone is unlocked for the
very first connection only, and then use the
following procedure:
1. Connect your iPhone to one of the media
USB ports in your vehicle.
NOTE:
Be sure to use the factory-provided Light-
ning cable that came with your phone, as
aftermarket cables may not work.
2. Once the device is connected and recog-
nized, CarPlay should automatically
launch, but you can also launch it by
touching the CarPlay icon on the touch-
screen, located under Apps.Once CarPlay is up and running on your
Uconnect system, the following features can
be utilized using your iPhone’s data plan:
• Phone
• Music
• Messages
• Maps
NOTE:
To use CarPlay make sure that cellular data is
turned on, and that you are in an area with
cellular coverage. Your data and cellular cov-
erage is shown on the left side of the radio
screen.NOTE:
Requires compatible iPhone. See dealer for
phone compatibility. Data plan rates apply.
Vehicle user interface is a product of Apple.
Apple CarPlay is a trademark of Apple Inc.
iPhone is a trademark of Apple Inc., regis-
tered in the US and other countries. Apple
terms of use and privacy statements apply.
Apps — If Equipped
To access Apps, press the “Uconnect Apps”
button on the touchscreen to browse the list
of applications:
• EcoDrive
• MyCar
Apple CarPlayCarPlay Data And Cellular Coverage
277
Page 283 of 348
WARNING!
ALWAYS drive safely with your hands on
the wheel. You have full responsibility and
assume all risks related to the use of the
Uconnect features and applications in this
vehicle. Only use Uconnect when it is safe
to do so. Failure to do so may result in an
accident involving serious injury or death.
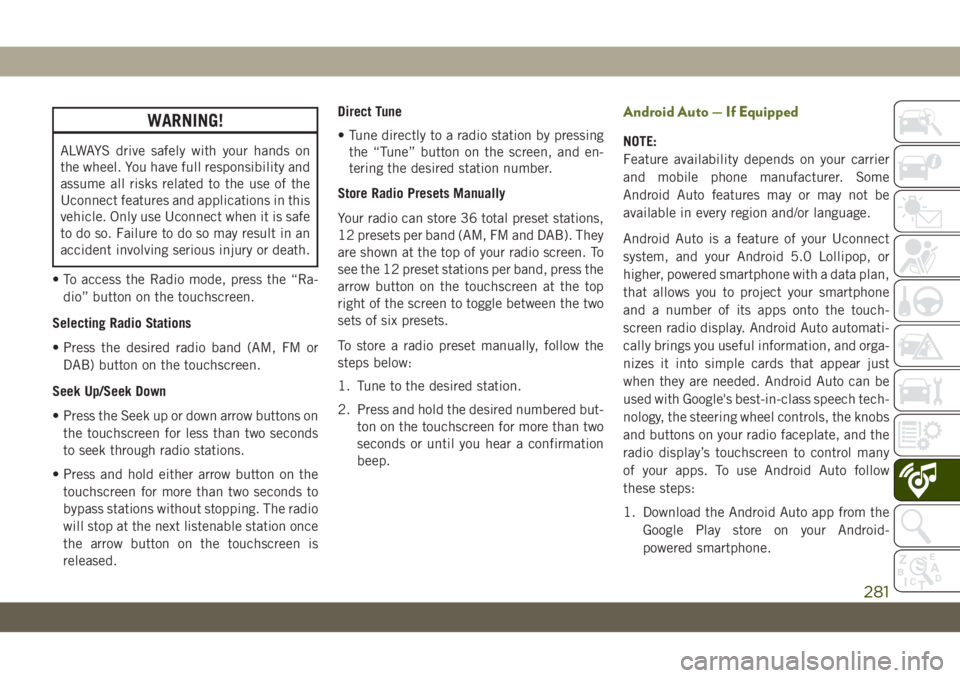
• To access the Radio mode, press the “Ra-
dio” button on the touchscreen.
Selecting Radio Stations
• Press the desired radio band (AM, FM or
DAB) button on the touchscreen.
Seek Up/Seek Down
• Press the Seek up or down arrow buttons on
the touchscreen for less than two seconds
to seek through radio stations.
• Press and hold either arrow button on the
touchscreen for more than two seconds to
bypass stations without stopping. The radio
will stop at the next listenable station once
the arrow button on the touchscreen is
released.Direct Tune
• Tune directly to a radio station by pressing
the “Tune” button on the screen, and en-
tering the desired station number.
Store Radio Presets Manually
Your radio can store 36 total preset stations,
12 presets per band (AM, FM and DAB). They
are shown at the top of your radio screen. To
see the 12 preset stations per band, press the
arrow button on the touchscreen at the top
right of the screen to toggle between the two
sets of six presets.
To store a radio preset manually, follow the
steps below:
1. Tune to the desired station.
2. Press and hold the desired numbered but-
ton on the touchscreen for more than two
seconds or until you hear a confirmation
beep.
Android Auto — If Equipped
NOTE:
Feature availability depends on your carrier
and mobile phone manufacturer. Some
Android Auto features may or may not be
available in every region and/or language.
Android Auto is a feature of your Uconnect
system, and your Android 5.0 Lollipop, or
higher, powered smartphone with a data plan,
that allows you to project your smartphone
and a number of its apps onto the touch-
screen radio display. Android Auto automati-
cally brings you useful information, and orga-
nizes it into simple cards that appear just
when they are needed. Android Auto can be
used with Google's best-in-class speech tech-
nology, the steering wheel controls, the knobs
and buttons on your radio faceplate, and the
radio display’s touchscreen to control many
of your apps. To use Android Auto follow
these steps:
1. Download the Android Auto app from the
Google Play store on your Android-
powered smartphone.
281
Page 287 of 348
Apple CarPlay Integration — If Equipped
NOTE:
Feature availability depends on your carrier
and mobile phone manufacturer. Some Apple
CarPlay features may or may not be available
in every region and/or language.
Uconnect works seamlessly with Apple Car-
Play, the smarter, more secure way to use
your iPhone in the car, and stay focused on
the road. Use your Uconnect Touchscreen
display, the vehicle's knobs and controls, and
your voice with Siri to get access to Apple
Music, Maps, Messages, and more.
To use CarPlay, make sure you are using
iPhone 5 or later, have Siri enabled in Set-
tings, that your iPhone is unlocked for the
very first connection only, and then use the
following procedure:
1. Connect your iPhone to one of the media
USB ports in your vehicle.
NOTE:
Be sure to use the factory-provided Light-
ning cable that came with your phone, as
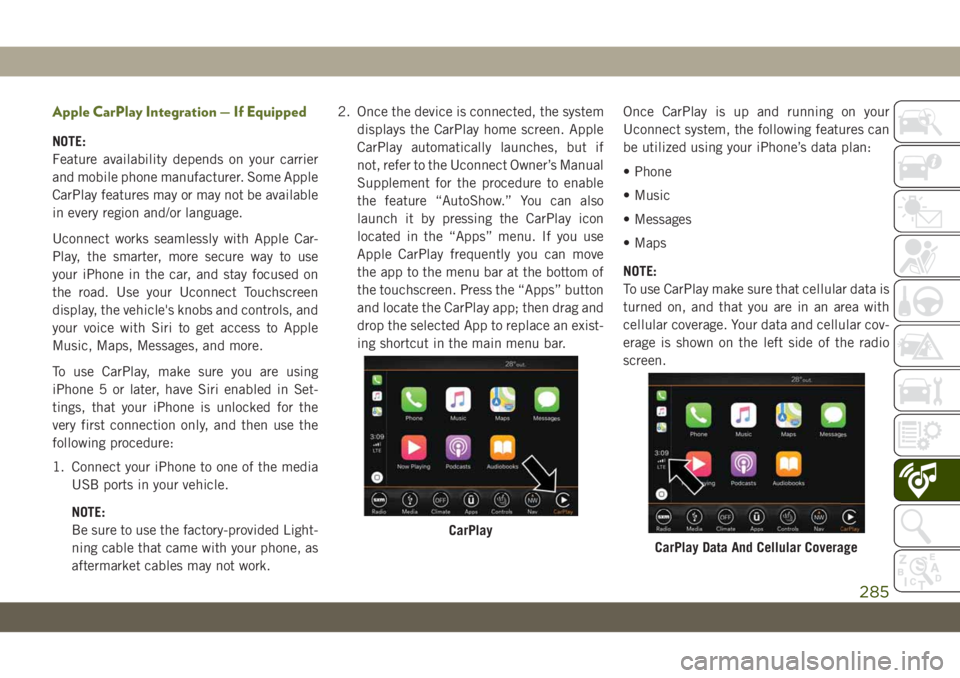
aftermarket cables may not work.2. Once the device is connected, the system
displays the CarPlay home screen. Apple
CarPlay automatically launches, but if
not, refer to the Uconnect Owner’s Manual
Supplement for the procedure to enable
the feature “AutoShow.” You can also
launch it by pressing the CarPlay icon
located in the “Apps” menu. If you use
Apple CarPlay frequently you can move
the app to the menu bar at the bottom of
the touchscreen. Press the “Apps” button
and locate the CarPlay app; then drag and
drop the selected App to replace an exist-
ing shortcut in the main menu bar.Once CarPlay is up and running on your
Uconnect system, the following features can
be utilized using your iPhone’s data plan:
• Phone
• Music
• Messages
• Maps
NOTE:
To use CarPlay make sure that cellular data is
turned on, and that you are in an area with
cellular coverage. Your data and cellular cov-
erage is shown on the left side of the radio
screen.
CarPlay
CarPlay Data And Cellular Coverage
285
Page 290 of 348
UCONNECT SETTINGS
The Uconnect system allows you to access
Customer Programmable feature settings
such as Language, Display, Units, Voice,
Clock, Camera, Safety & Driving Assistance,
Mirrors & Wipers, Lights, Doors & Locks,
Auto-On Comfort, AUX Switches, Engine Off
Options, Compass Settings, Audio, Phone/
Bluetooth, Radio Setup, Restore Settings,
and System Information through buttons on
the touchscreen.
Push the SETTINGS button (Uconnect 3), or
press the “Apps” button (Uconnect 4 or
4C/4C NAV) located near the bottom of the
touchscreen, then press the “Settings” but-
ton on the touchscreen to access the Settings
screen. When making a selection, scroll up or
down until the preferred setting is high-
lighted, then press the preferred setting until
a check-mark appears next to the setting,
showing that setting has been selected. The
following feature settings are available:
• Language • Auto-On Comfort
• Display • AUX Switches
• Units • Engine Off Options• Voice • Compass — If
Equipped
• Clock • Audio
• Camera — If
Equipped• Phone/Bluetooth
• Safety & Driving As-
sistance• Radio Setup
• Mirrors & Wipers —
If Equipped• Restore Settings
• Lights • Clear Personal Data
• Doors & Locks • System Information
NOTE:
Depending on the vehicles options, feature
settings may vary.
Refer to “Uconnect Settings” in “Multime-
dia” in your Owner’s Manual for further infor-
mation.
TIPS CONTROLS AND
GENERAL INFORMATION
Steering Wheel Audio Controls
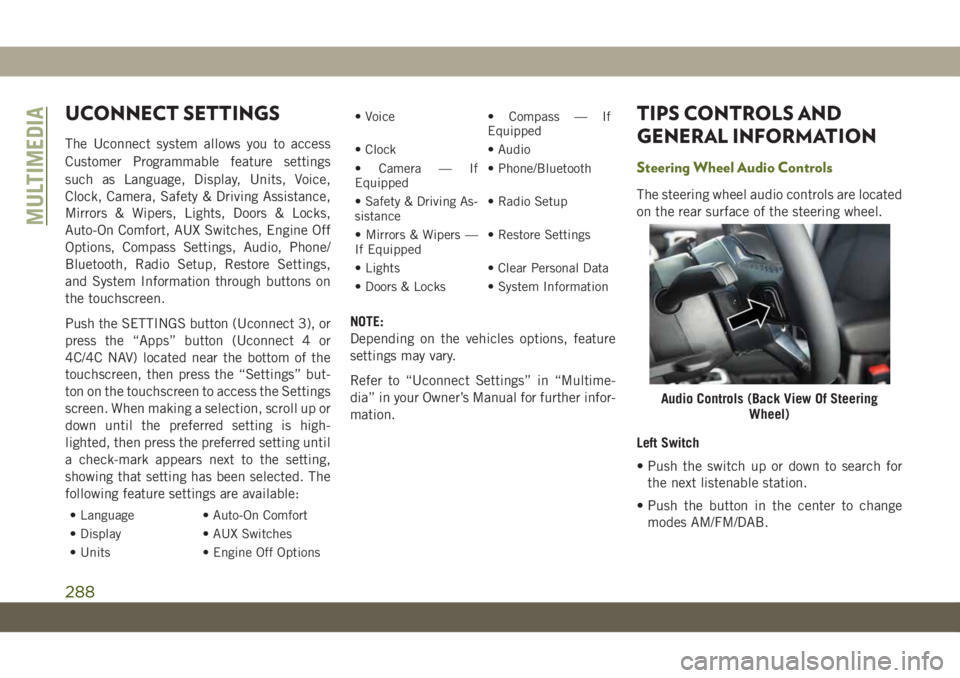
The steering wheel audio controls are located
on the rear surface of the steering wheel.
Left Switch
• Push the switch up or down to search for
the next listenable station.
• Push the button in the center to change
modes AM/FM/DAB.
Audio Controls (Back View Of Steering
Wheel)
MULTIMEDIA
288
Page 291 of 348
Right Switch
• Push the switch up or down to increase or
decrease the volume.
• Push the button in the center to mute the
radio.
Reception Conditions
Reception conditions change constantly
while driving. Reception may be interfered
with by the presence of mountains, buildings
or bridges, especially when you are far away
from the broadcaster.
The volume may be increased when receiving
traffic alerts and news.
Care And Maintenance
Observe the following precautions to ensure
the system is fully operational:
• The display lens should not come into con-
tact with pointed or rigid objects which
could damage its surface; use a soft, dry,
anti-static cloth to clean and do not press.• Never use alcohol, gas and derivatives to
clean the display lens.
• Prevent any liquid from entering the sys-
tem: this could damage it beyond repair.
Anti-Theft Protection
The system is equipped with an anti-theft
protection system based on the exchange of
information with the electronic control unit
(Body Computer) on the vehicle. This guaran-
tees maximum safety.
If the check has a positive outcome, the
system will start to operate. See an autho-
rized dealer for further information.
AUX/USB/MP3 CONTROL —
IF EQUIPPED
The Media Hub is located on the Instrument
Panel, below the Climate Controls. Behind
the Media Hub access door contains one AUXport, a Type C USB Port and one standard
USB Port. Both USB Ports allow you to play
music from iPod/MP3 players or USB devices
through your vehicle’s sound system.
The Smart Charging USB ports provide power
to your device up to an hour after the vehicle
is turned off.
NOTE:
• The Type C USB port is the primary media
port for the radio. Two devices can be
plugged in at the same time and both ports
provide charging capabilities, but only one
port can transfer data to the head unit at a
time.
• Both ports share a single data connection.
However, the user cannot switch between
Type A or Type C.
289