ECU JEEP WRANGLER UNLIMITED 2020 Owner handbook (in English)
[x] Cancel search | Manufacturer: JEEP, Model Year: 2020, Model line: WRANGLER UNLIMITED, Model: JEEP WRANGLER UNLIMITED 2020Pages: 330, PDF Size: 9.16 MB
Page 24 of 330
GETTING TO KNOW YOUR VEHICLE
22
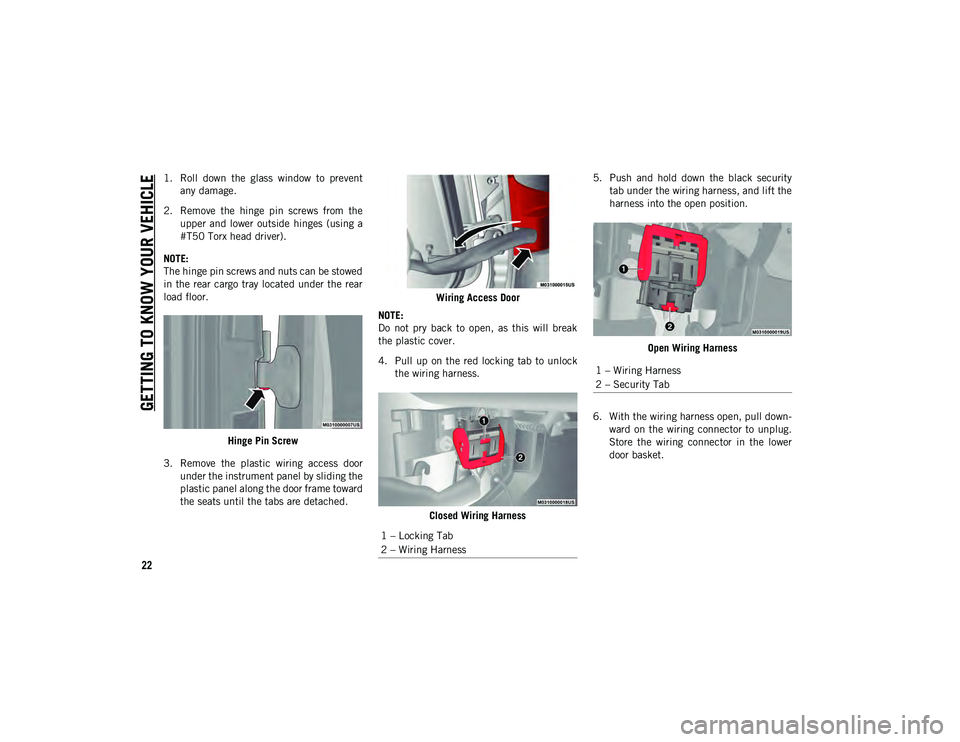
1. Roll down the glass window to preventany damage.
2. Remove the hinge pin screws from the upper and lower outside hinges (using a
#T50 Torx head driver).
NOTE:
The hinge pin screws and nuts can be stowed
in the rear cargo tray located under the rear
load floor.
Hinge Pin Screw
3. Remove the plastic wiring access door under the instrument panel by sliding the
plastic panel along the door frame toward
the seats until the tabs are detached. Wiring Access Door
NOTE:
Do not pry back to open, as this will break
the plastic cover.
4. Pull up on the red locking tab to unlock the wiring harness.
Closed Wiring Harness 5. Push and hold down the black security
tab under the wiring harness, and lift the
harness into the open position.
Open Wiring Harness
6. With the wiring harness open, pull down -
ward on the wiring connector to unplug.
Store the wiring connector in the lower
door basket.
1 – Locking Tab
2 – Wiring Harness
1 – Wiring Harness
2 – Security Tab
2020_JEEP_JL_WRANGLER_UG_RHD_UK.book Page 22
Page 29 of 330
27
time. This is normal. By simply opening the
seats to the open position, the seat cushion
will return to its normal shape over time.
To Raise The Rear Seat
Raise the seatback and lock it into place.
Then, raise the head restraint until it locks
into place. If interference from the cargo
area prevents the seatback from fully
locking, you will have difficulty returning the
seat to its proper position.
Fold And Tumble Rear Seat — Two Door
Models
NOTE:
Prior to folding the rear seat, it may be
necessary to reposition the front seats.
Be sure that the front seats are fully
upright and positioned forward. This will
allow the rear seat to fold down easily.
Folding The Rear Seat
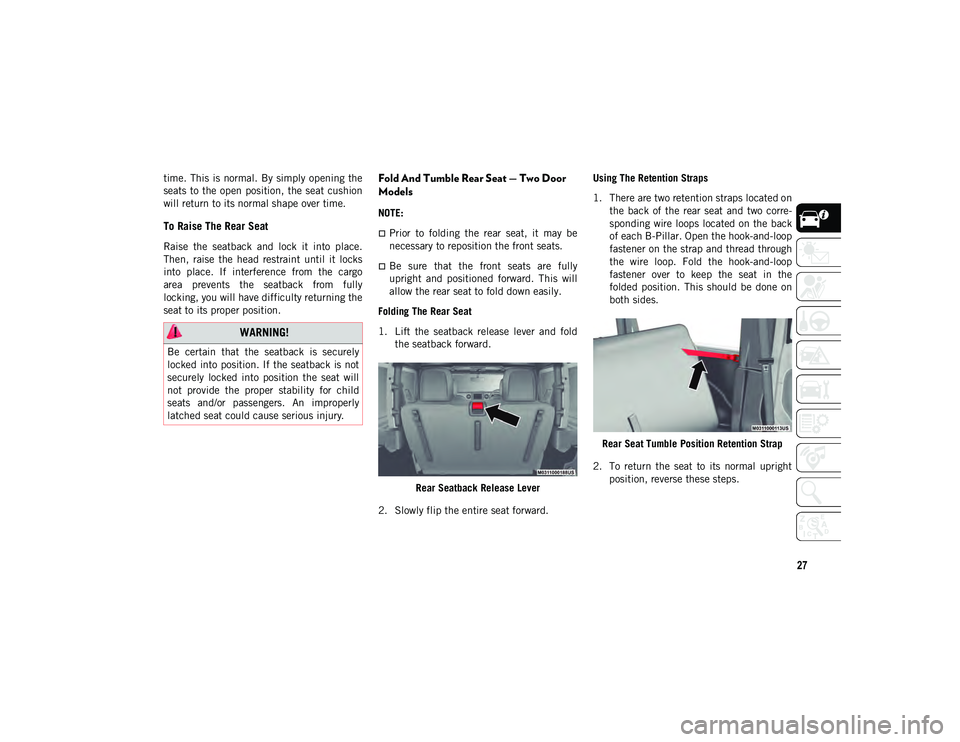
1. Lift the seatback release lever and fold the seatback forward.
Rear Seatback Release Lever
2. Slowly flip the entire seat forward. Using The Retention Straps
1. There are two retention straps located on
the back of the rear seat and two corre -
sponding wire loops located on the back
of each B-Pillar. Open the hook-and-loop
fastener on the strap and thread through
the wire loop. Fold the hook-and-loop
fastener over to keep the seat in the
folded position. This should be done on
both sides.
Rear Seat Tumble Position Retention Strap
2. To return the seat to its normal upright position, reverse these steps.
WARNING!
Be certain that the seatback is securely
locked into position. If the seatback is not
securely locked into position the seat will
not provide the proper stability for child
seats and/or passengers. An improperly
latched seat could cause serious injury.
2020_JEEP_JL_WRANGLER_UG_RHD_UK.book Page 27
Page 31 of 330
29
(Continued)
Front Head RestraintNOTE:
Do not reposition the head restraint 180
degrees to the incorrect position in an
attempt to gain additional clearance to the
back of the head.
Rear Head Restraints — Two Door Models
The rear seat is equipped with non-adjust
-
able, but foldable head restraints.
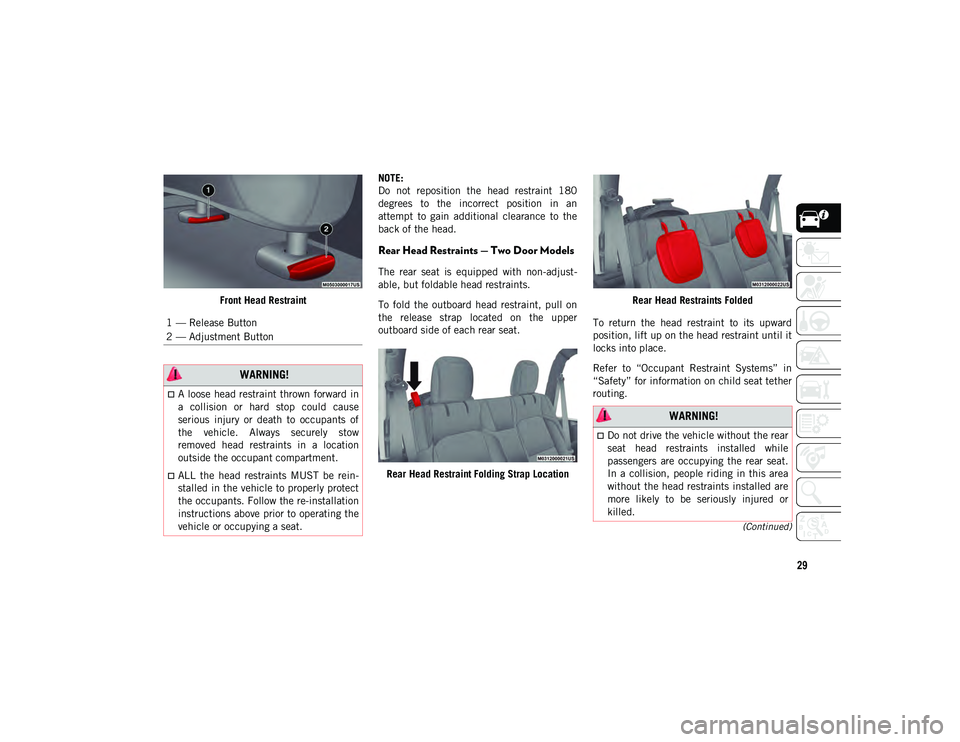
To fold the outboard head restraint, pull on
the release strap located on the upper
outboard side of each rear seat.
Rear Head Restraint Folding Strap Location Rear Head Restraints Folded
To return the head restraint to its upward
position, lift up on the head restraint until it
locks into place.
Refer to “Occupant Restraint Systems” in
“Safety” for information on child seat tether
routing.
1 — Release Button
2 — Adjustment Button
WARNING!
A loose head restraint thrown forward in
a collision or hard stop could cause
serious injury or death to occupants of
the vehicle. Always securely stow
removed head restraints in a location
outside the occupant compartment.
ALL the head restraints MUST be rein
-
stalled in the vehicle to properly protect
the occupants. Follow the re-installation
instructions above prior to operating the
vehicle or occupying a seat.
WARNING!
Do not drive the vehicle without the rear
seat head restraints installed while
passengers are occupying the rear seat.
In a collision, people riding in this area
without the head restraints installed are
more likely to be seriously injured or
killed.
2020_JEEP_JL_WRANGLER_UG_RHD_UK.book Page 29
Page 32 of 330
GETTING TO KNOW YOUR VEHICLE
30
Rear Head Restraints — Four Door Models
The rear seat is equipped with nonadjust-
able, but foldable, outboard head restraints,
as well as an adjustable, removable center
head restraint.
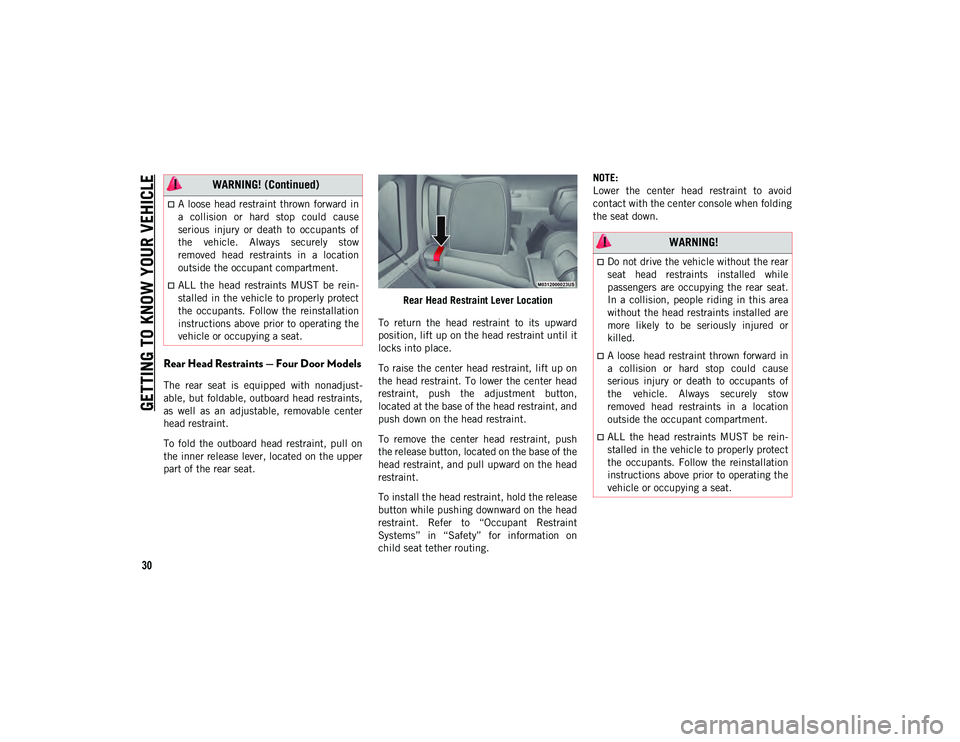
To fold the outboard head restraint, pull on
the inner release lever, located on the upper
part of the rear seat. Rear Head Restraint Lever Location
To return the head restraint to its upward
position, lift up on the head restraint until it
locks into place.
To raise the center head restraint, lift up on
the head restraint. To lower the center head
restraint, push the adjustment button,
located at the base of the head restraint, and
push down on the head restraint.
To remove the center head restraint, push
the release button, located on the base of the
head restraint, and pull upward on the head
restraint.
To install the head restraint, hold the release
button while pushing downward on the head
restraint. Refer to “Occupant Restraint
Systems” in “Safety” for information on
child seat tether routing. NOTE:
Lower the center head restraint to avoid
contact with the center console when folding
the seat down.
A loose head restraint thrown forward in
a collision or hard stop could cause
serious injury or death to occupants of
the vehicle. Always securely stow
removed head restraints in a location
outside the occupant compartment.
ALL the head restraints MUST be rein
-
stalled in the vehicle to properly protect
the occupants. Follow the reinstallation
instructions above prior to operating the
vehicle or occupying a seat.
WARNING! (Continued)
WARNING!
Do not drive the vehicle without the rear
seat head restraints installed while
passengers are occupying the rear seat.
In a collision, people riding in this area
without the head restraints installed are
more likely to be seriously injured or
killed.
A loose head restraint thrown forward in
a collision or hard stop could cause
serious injury or death to occupants of
the vehicle. Always securely stow
removed head restraints in a location
outside the occupant compartment.
ALL the head restraints MUST be rein -
stalled in the vehicle to properly protect
the occupants. Follow the reinstallation
instructions above prior to operating the
vehicle or occupying a seat.
2020_JEEP_JL_WRANGLER_UG_RHD_UK.book Page 30
Page 50 of 330
GETTING TO KNOW YOUR VEHICLE
48
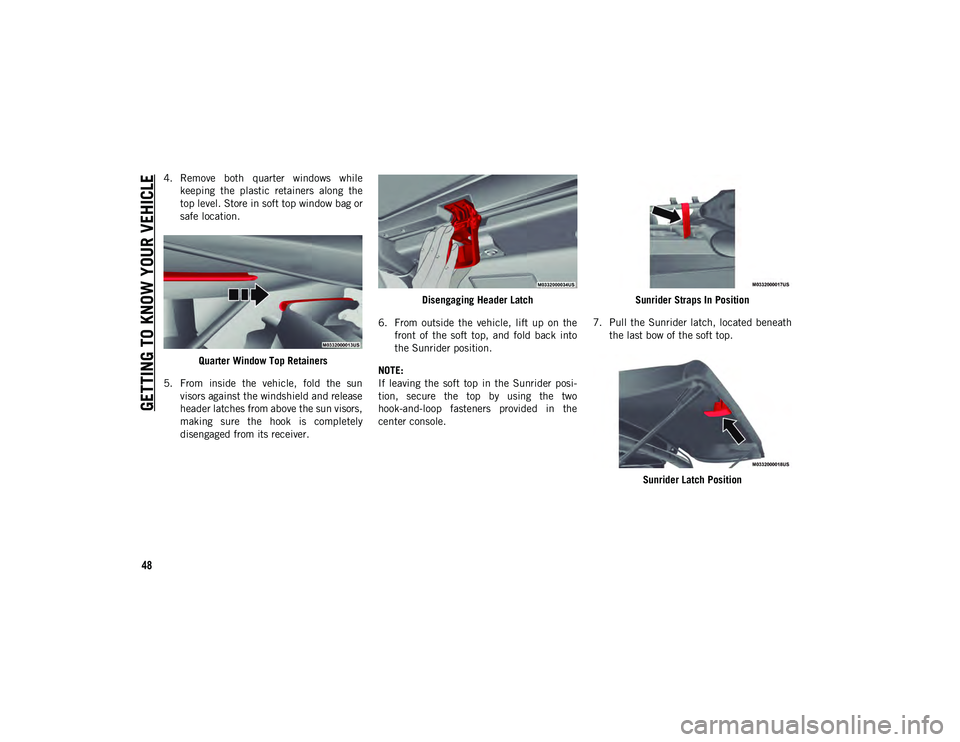
4. Remove both quarter windows whilekeeping the plastic retainers along the
top level. Store in soft top window bag or
safe location.
Quarter Window Top Retainers
5. From inside the vehicle, fold the sun visors against the windshield and release
header latches from above the sun visors,
making sure the hook is completely
disengaged from its receiver. Disengaging Header Latch
6. From outside the vehicle, lift up on the front of the soft top, and fold back into
the Sunrider position.
NOTE:
If leaving the soft top in the Sunrider posi -
tion, secure the top by using the two
hook-and-loop fasteners provided in the
center console. Sunrider Straps In Position
7. Pull the Sunrider latch, located beneath the last bow of the soft top.
Sunrider Latch Position
2020_JEEP_JL_WRANGLER_UG_RHD_UK.book Page 48
Page 51 of 330
49
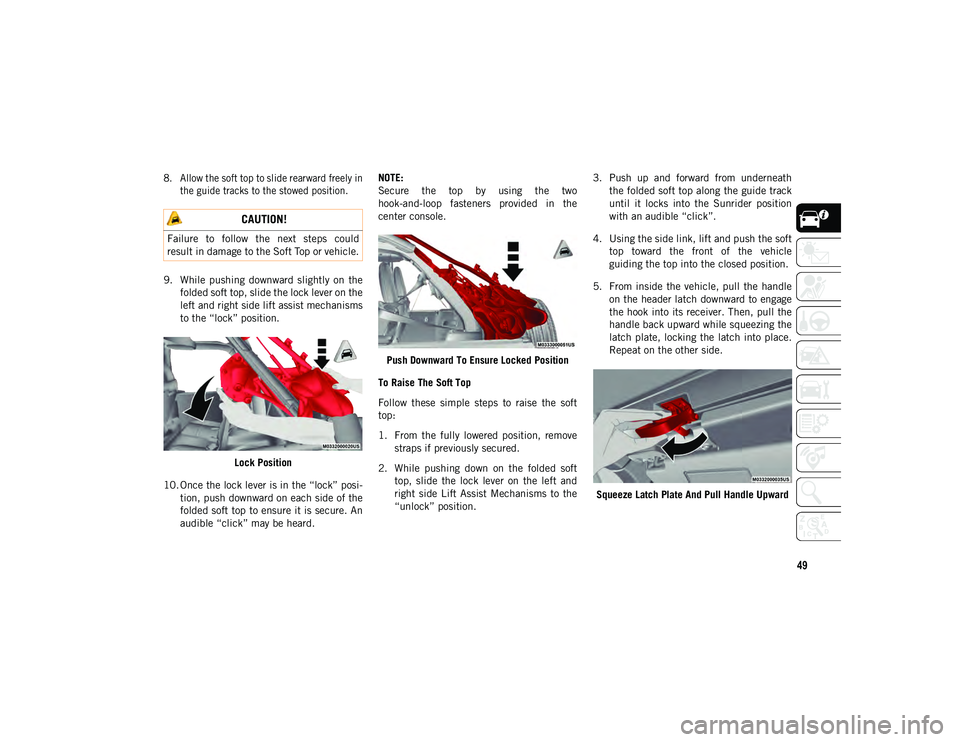
8. Allow the soft top to slide rearward freely inthe guide tracks to the stowed position.
9. While pushing downward slightly on the folded soft top, slide the lock lever on the
left and right side lift assist mechanisms
to the “lock” position.
Lock Position
10. Once the lock lever is in the “lock” posi -
tion, push downward on each side of the
folded soft top to ensure it is secure. An
audible “click” may be heard. NOTE:
Secure the top by using the two
hook-and-loop fasteners provided in the
center console.
Push Downward To Ensure Locked Position
To Raise The Soft Top
Follow these simple steps to raise the soft
top:
1. From the fully lowered position, remove straps if previously secured.
2. While pushing down on the folded soft top, slide the lock lever on the left and
right side Lift Assist Mechanisms to the
“unlock” position. 3. Push up and forward from underneath
the folded soft top along the guide track
until it locks into the Sunrider position
with an audible “click”.
4. Using the side link, lift and push the soft top toward the front of the vehicle
guiding the top into the closed position.
5. From inside the vehicle, pull the handle on the header latch downward to engage
the hook into its receiver. Then, pull the
handle back upward while squeezing the
latch plate, locking the latch into place.
Repeat on the other side.
Squeeze Latch Plate And Pull Handle Upward
CAUTION!
Failure to follow the next steps could
result in damage to the Soft Top or vehicle.
2020_JEEP_JL_WRANGLER_UG_RHD_UK.book Page 49
Page 52 of 330
GETTING TO KNOW YOUR VEHICLE
50
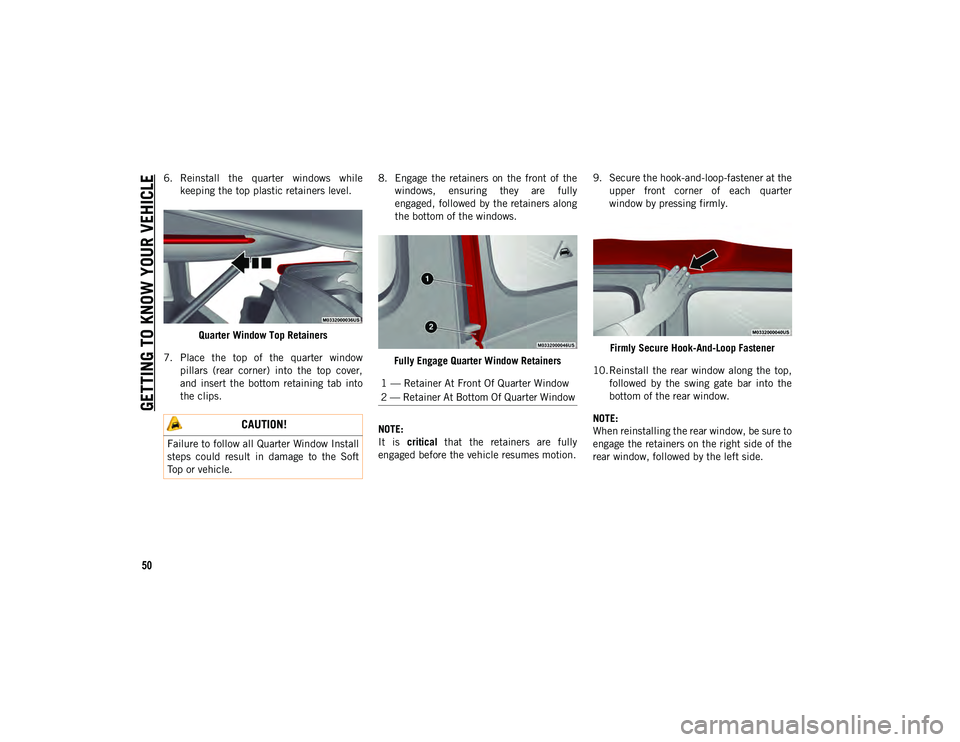
6. Reinstall the quarter windows whilekeeping the top plastic retainers level.
Quarter Window Top Retainers
7. Place the top of the quarter window pillars (rear corner) into the top cover,
and insert the bottom retaining tab into
the clips. 8. Engage the retainers on the front of the
windows, ensuring they are fully
engaged, followed by the retainers along
the bottom of the windows.
Fully Engage Quarter Window Retainers
NOTE:
It is critical that the retainers are fully
engaged before the vehicle resumes motion. 9. Secure the hook-and-loop-fastener at the
upper front corner of each quarter
window by pressing firmly.
Firmly Secure Hook-And-Loop Fastener
10. Reinstall the rear window along the top, followed by the swing gate bar into the
bottom of the rear window.
NOTE:
When reinstalling the rear window, be sure to
engage the retainers on the right side of the
rear window, followed by the left side.
CAUTION!
Failure to follow all Quarter Window Install
steps could result in damage to the Soft
Top or vehicle.
1 — Retainer At Front Of Quarter Window
2 — Retainer At Bottom Of Quarter Window
2020_JEEP_JL_WRANGLER_UG_RHD_UK.book Page 50
Page 53 of 330
51
Freedom Top And Hard Top
To Remove Freedom Top Panels
NOTE:
The left side panel must be removed before
removing the right side panel.
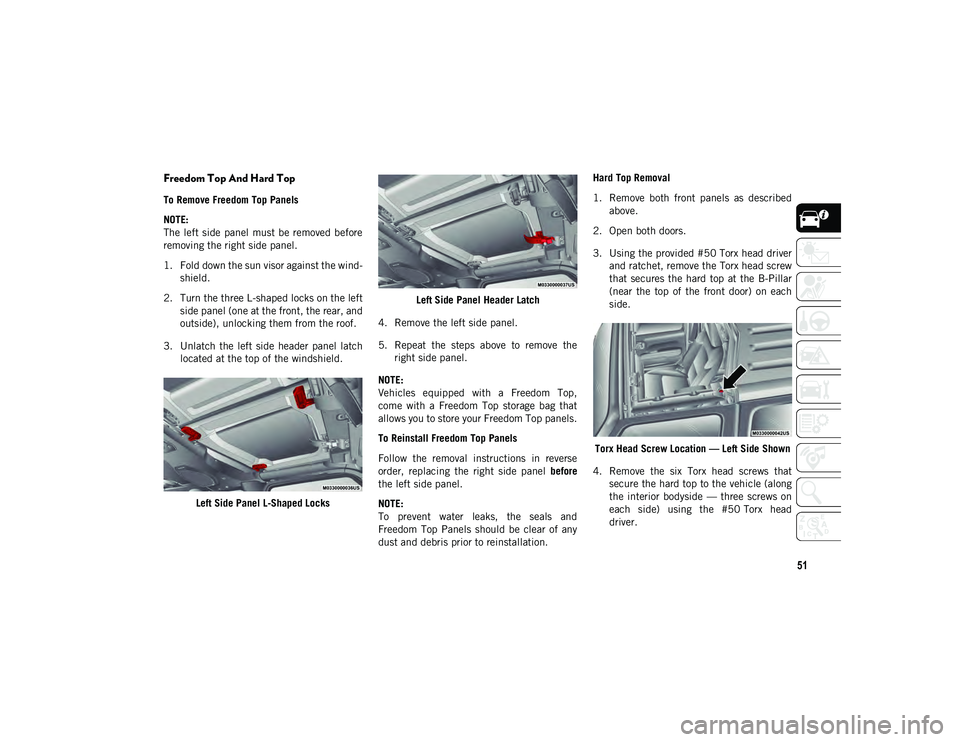
1. Fold down the sun visor against the wind-
shield.
2. Turn the three L-shaped locks on the left side panel (one at the front, the rear, and
outside), unlocking them from the roof.
3. Unlatch the left side header panel latch located at the top of the windshield.
Left Side Panel L-Shaped Locks Left Side Panel Header Latch
4. Remove the left side panel.
5. Repeat the steps above to remove the right side panel.
NOTE:
Vehicles equipped with a Freedom Top,
come with a Freedom Top storage bag that
allows you to store your Freedom Top panels.
To Reinstall Freedom Top Panels
Follow the removal instructions in reverse
order, replacing the right side panel before
the left side panel.
NOTE:
To prevent water leaks, the seals and
Freedom Top Panels should be clear of any
dust and debris prior to reinstallation. Hard Top Removal
1. Remove both front panels as described
above.
2. Open both doors.
3. Using the provided #50 Torx head driver and ratchet, remove the Torx head screw
that secures the hard top at the B-Pillar
(near the top of the front door) on each
side.
Torx Head Screw Location — Left Side Shown
4. Remove the six Torx head screws that secure the hard top to the vehicle (along
the interior bodyside — three screws on
each side) using the #50 Torx head
driver.
2020_JEEP_JL_WRANGLER_UG_RHD_UK.book Page 51
Page 56 of 330
GETTING TO KNOW YOUR VEHICLE
54
(Continued)
NOTE:
A slight pause in audio may be heard when
opening and closing the Power Sliding Top
as a result of the Uconnect system switching
between Power Top Closed and Power Top
Open audio modes.
Opening The Power Top
Express Mode
Push the open switch and release it within
one-half second. The power top will open
automatically to the open position. This is
called “Express Open”. During Express Open
operation, any movement of the switch will
stop the power top.
Manual Mode
To open the power top manually, push and
hold the open switch. The power top will stop
automatically at the open position. Any
release of the switch will stop the movement.
The power top will remain in a partially
opened position until the switch is pushed
and held again.
Closing The Power Top
Express Mode
Push the close switch and release it within
one-half second. The power top will close
fully and stop automatically. This is called
“Express Close”. During Express Close oper-
ation, any movement of the switch will stop
the power top.
Manual Mode
To close the power top manually, push and
hold the close switch. The power top will
move forward and automatically stop at the
fully closed position. Any release of the
switch will stop the movement. The power
top will remain in a partially closed position
until the switch is pushed and held again.
Pinch Protect Feature
This feature will detect an obstruction in the
opening of the power top during Express
Close operation. If an obstruction in the path
of the power top is detected, the power top
will automatically retract. Remove the
obstruction if this occurs. Next, push the
close switch and release to Express Close.
WARNING!
Never leave children unattended in a
vehicle, or with access to an unlocked
vehicle. Never leave the key fob in or
near the vehicle, or in a location acces-
sible to children. Do not leave the igni -
tion of a vehicle equipped with Keyless
Enter-N-Go in the ACC or ON/RUN
mode. Occupants, particularly unat -
tended children, can become entrapped
by the power top while operating the
power top switch. Such entrapment may
result in serious injury or death.
In a collision, there is a greater risk of
being thrown from a vehicle with an open
power top. You could also be seriously
injured or killed. Always fasten your seat
belt properly and make sure all passen -
gers are also properly secured.
Do not allow small children to operate
the power top. Never allow your fingers,
other body parts, or any object, to project
through the power top opening. Injury
may result.
WARNING! (Continued)
2020_JEEP_JL_WRANGLER_UG_RHD_UK.book Page 54
Page 57 of 330
55
NOTE:
The Power Sliding Top may reverse motion
if closing during a severe headwind. If this
occurs, push the Power Sliding Top switch
again to close the top completely.
If three consecutive power top close
attempts result in Pinch Protect reversals,
Pinch Protect will disable and the power
top must be closed in Manual Mode.
HOOD
Opening The Hood
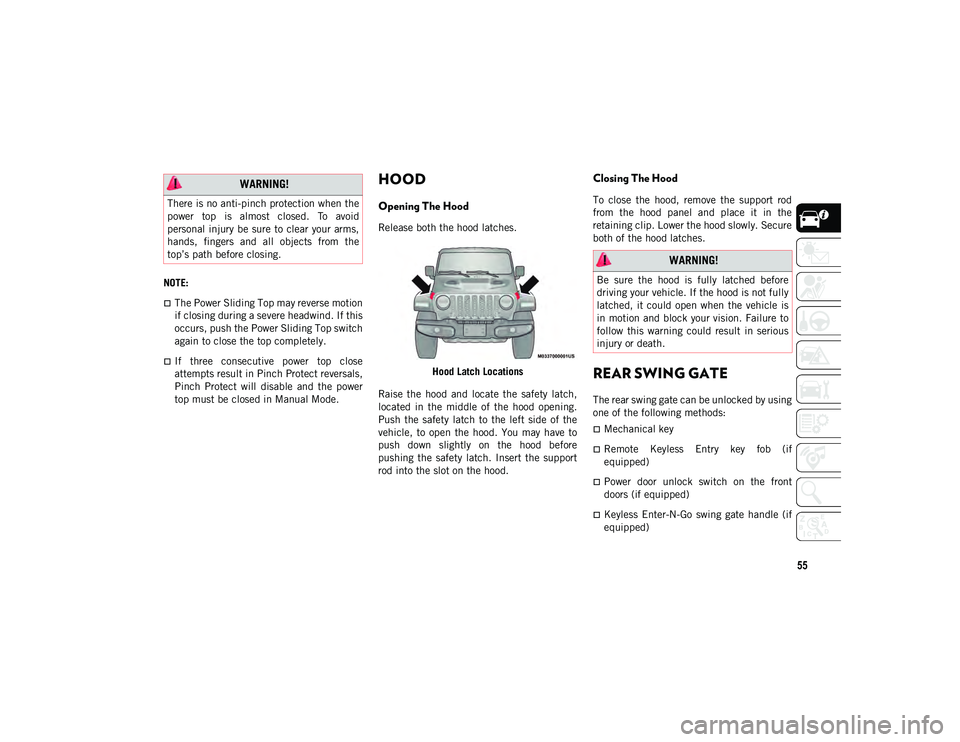
Release both the hood latches.Hood Latch Locations
Raise the hood and locate the safety latch,
located in the middle of the hood opening.
Push the safety latch to the left side of the
vehicle, to open the hood. You may have to
push down slightly on the hood before
pushing the safety latch. Insert the support
rod into the slot on the hood.
Closing The Hood
To close the hood, remove the support rod
from the hood panel and place it in the
retaining clip. Lower the hood slowly. Secure
both of the hood latches.
REAR SWING GATE
The rear swing gate can be unlocked by using
one of the following methods:
Mechanical key
Remote Keyless Entry key fob (if
equipped)
Power door unlock switch on the front
doors (if equipped)
Keyless Enter-N-Go swing gate handle (if
equipped)
WARNING!
There is no anti-pinch protection when the
power top is almost closed. To avoid
personal injury be sure to clear your arms,
hands, fingers and all objects from the
top’s path before closing.
WARNING!
Be sure the hood is fully latched before
driving your vehicle. If the hood is not fully
latched, it could open when the vehicle is
in motion and block your vision. Failure to
follow this warning could result in serious
injury or death.
2020_JEEP_JL_WRANGLER_UG_RHD_UK.book Page 55