steering JEEP WRANGLER UNLIMITED 2020 Owner handbook (in English)
[x] Cancel search | Manufacturer: JEEP, Model Year: 2020, Model line: WRANGLER UNLIMITED, Model: JEEP WRANGLER UNLIMITED 2020Pages: 330, PDF Size: 9.16 MB
Page 185 of 330
183
(Continued)
Center High Mounted Stop Lamp (CHMSL)
Please see an authorized dealer for service.
License Plate Lamps
1. Reach under the vehicle to access theback of the lamp.
2. Firmly grasp the bulb by the two latch features and squeeze them together to
unlock the bulb from the back of the
lamp housing.
Rear Fog Lamp
NOTE:
We advise referring to an authorized dealer
for service.
1. Reach under the vehicle to access theback of the fog lamp.
2. Disconnect the wire harness connector from the fog lamp connector receptacle.
3. Rotate the socket a quarter turn counter -
clockwise, then remove it from the
housing.
4. Pull the bulb straight out from the keyed opening in the housing and then connect
the replacement bulb and reassemble.
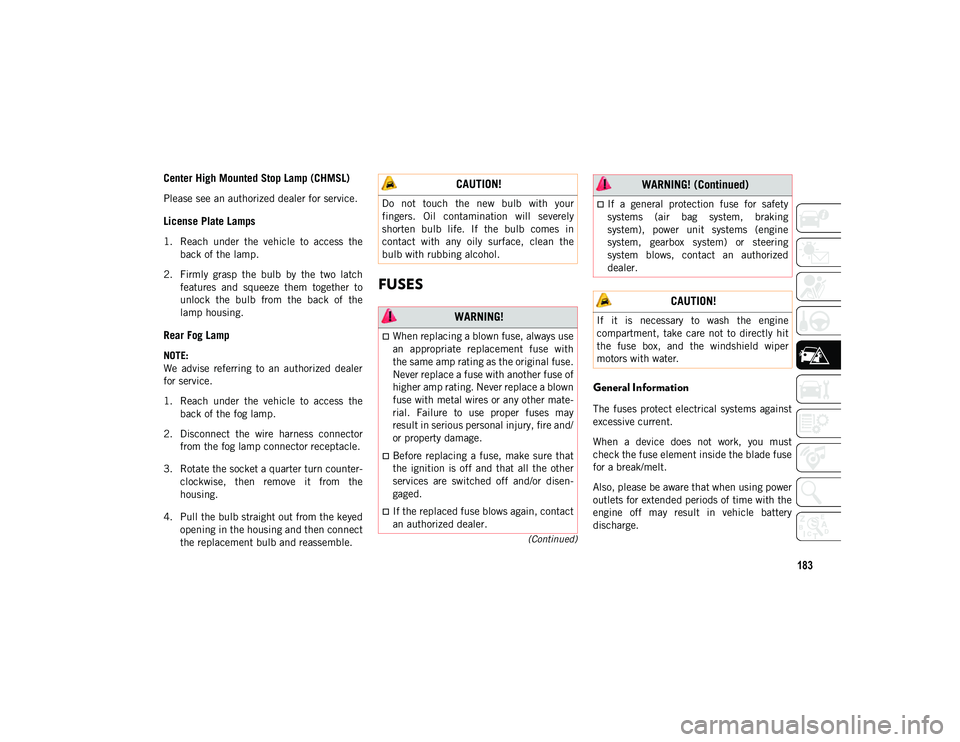
FUSES
General Information
The fuses protect electrical systems against
excessive current.
When a device does not work, you must
check the fuse element inside the blade fuse
for a break/melt.
Also, please be aware that when using power
outlets for extended periods of time with the
engine off may result in vehicle battery
discharge.
CAUTION!
Do not touch the new bulb with your
fingers. Oil contamination will severely
shorten bulb life. If the bulb comes in
contact with any oily surface, clean the
bulb with rubbing alcohol.
WARNING!
When replacing a blown fuse, always use
an appropriate replacement fuse with
the same amp rating as the original fuse.
Never replace a fuse with another fuse of
higher amp rating. Never replace a blown
fuse with metal wires or any other mate-
rial. Failure to use proper fuses may
result in serious personal injury, fire and/
or property damage.
Before replacing a fuse, make sure that
the ignition is off and that all the other
services are switched off and/or disen -
gaged.
If the replaced fuse blows again, contact
an authorized dealer.
If a general protection fuse for safety
systems (air bag system, braking
system), power unit systems (engine
system, gearbox system) or steering
system blows, contact an authorized
dealer.
CAUTION!
If it is necessary to wash the engine
compartment, take care not to directly hit
the fuse box, and the windshield wiper
motors with water.
WARNING! (Continued)
2020_JEEP_JL_WRANGLER_UG_RHD_UK.book Page 183
Page 187 of 330
185
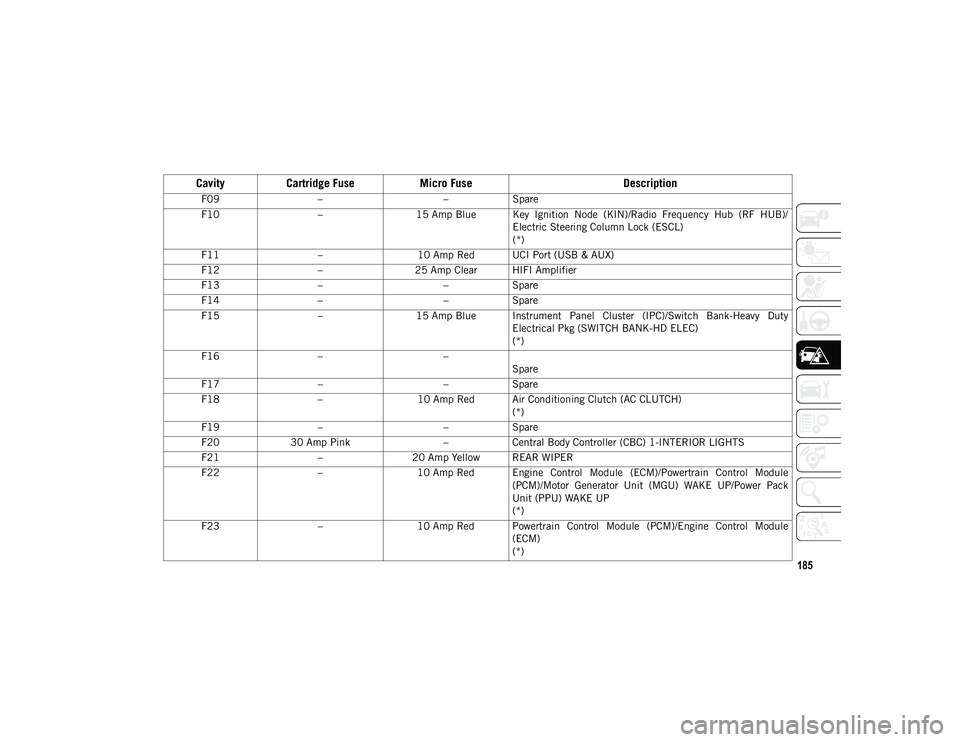
F09– –Spare
F10 –15 Amp Blue Key Ignition Node (KIN)/Radio Frequency Hub (RF HUB)/
Electric Steering Column Lock (ESCL)
(*)
F11 –10 Amp Red UCI Port (USB & AUX)
F12 –25 Amp Clear HIFI Amplifier
F13 – –Spare
F14 – –Spare
F15 –15 Amp Blue Instrument Panel Cluster (IPC)/Switch Bank-Heavy Duty
Electrical Pkg (SWITCH BANK-HD ELEC)
(*)
F16 – –
Spare
F17 – –Spare
F18 –10 Amp Red Air Conditioning Clutch (AC CLUTCH)
(*)
F19 – –Spare
F20 30 Amp Pink –Central Body Controller (CBC) 1-INTERIOR LIGHTS
F21 –20 Amp Yellow REAR WIPER
F22 –10 Amp Red Engine Control Module (ECM)/Powertrain Control Module
(PCM)/Motor Generator Unit (MGU) WAKE UP/Power Pack
Unit (PPU) WAKE UP
(*)
F23 –10 Amp Red Powertrain Control Module (PCM)/Engine Control Module
(ECM)
(*)
CavityCartridge Fuse Micro Fuse Description
2020_JEEP_JL_WRANGLER_UG_RHD_UK.book Page 185
Page 188 of 330
IN CASE OF EMERGENCY
186
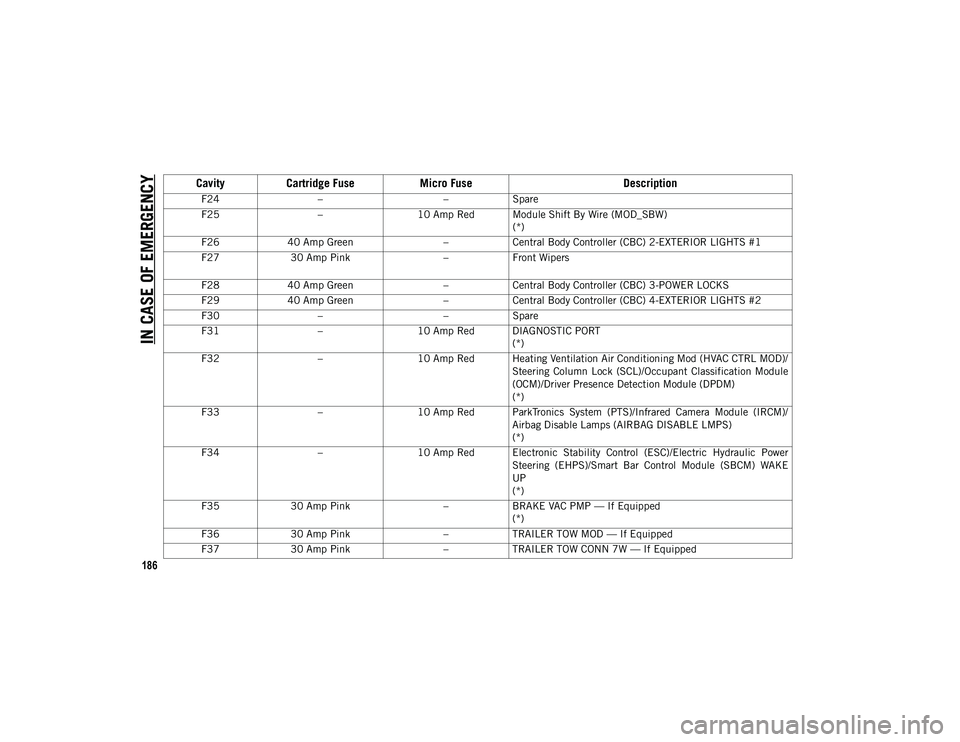
F24– –Spare
F25 –10 Amp Red Module Shift By Wire (MOD_SBW)
(*)
F26 40 Amp Green –Central Body Controller (CBC) 2-EXTERIOR LIGHTS #1
F27 30 Amp Pink –
Front Wipers
F28 40 Amp Green –Central Body Controller (CBC) 3-POWER LOCKS
F29 40 Amp Green –Central Body Controller (CBC) 4-EXTERIOR LIGHTS #2
F30 – –Spare
F31 –10 Amp Red DIAGNOSTIC PORT
(*)
F32 –10 Amp Red Heating Ventilation Air Conditioning Mod (HVAC CTRL MOD)/
Steering Column Lock (SCL)/Occupant Classification Module
(OCM)/Driver Presence Detection Module (DPDM)
(*)
F33 –10 Amp Red ParkTronics System (PTS)/Infrared Camera Module (IRCM)/
Airbag Disable Lamps (AIRBAG DISABLE LMPS)
(*)
F34 –10 Amp Red Electronic Stability Control (ESC)/Electric Hydraulic Power
Steering (EHPS)/Smart Bar Control Module (SBCM) WAKE
UP
(*)
F35 30 Amp Pink –BRAKE VAC PMP — If Equipped
(*)
F36 30 Amp Pink –TRAILER TOW MOD — If Equipped
F37 30 Amp Pink –TRAILER TOW CONN 7W — If Equipped
Cavity Cartridge Fuse Micro Fuse Description
2020_JEEP_JL_WRANGLER_UG_RHD_UK.book Page 186
Page 190 of 330
IN CASE OF EMERGENCY
188
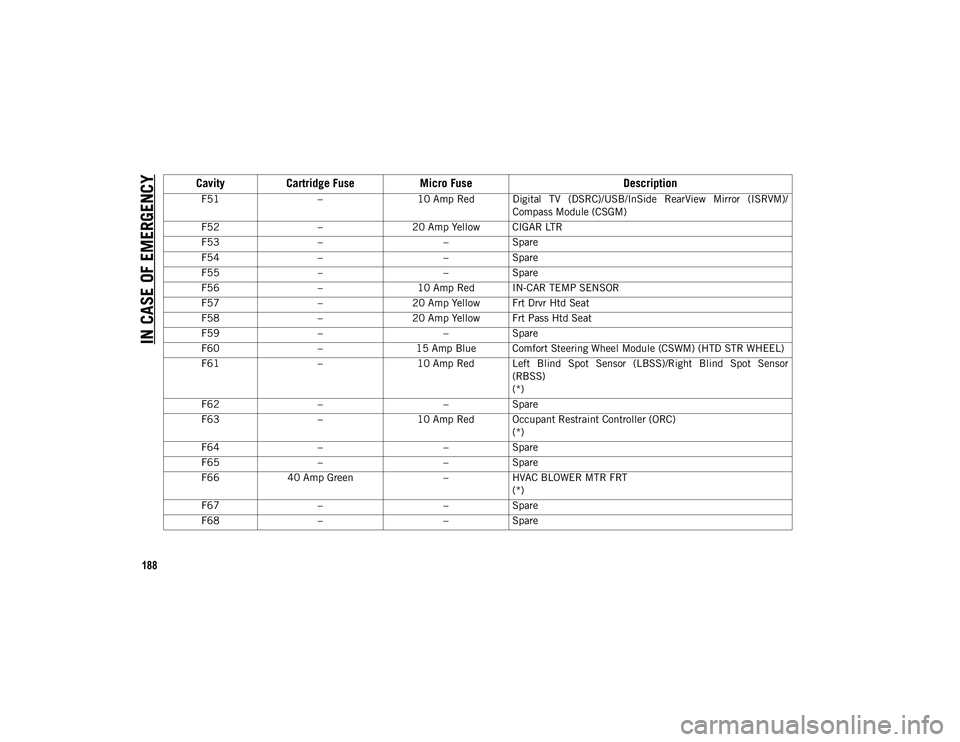
F51–10 Amp Red Digital TV (DSRC)/USB/InSide RearView Mirror (ISRVM)/
Compass Module (CSGM)
F52 –20 Amp Yellow CIGAR LTR
F53 – –Spare
F54 – –Spare
F55 – –Spare
F56 –10 Amp Red IN-CAR TEMP SENSOR
F57 –20 Amp Yellow Frt Drvr Htd Seat
F58 –20 Amp Yellow Frt Pass Htd Seat
F59 – –Spare
F60 –15 Amp Blue Comfort Steering Wheel Module (CSWM) (HTD STR WHEEL)
F61 –10 Amp Red Left Blind Spot Sensor (LBSS)/Right Blind Spot Sensor
(RBSS)
(*)
F62 – –Spare
F63 –10 Amp Red Occupant Restraint Controller (ORC)
(*)
F64 – –Spare
F65 – –Spare
F66 40 Amp Green –HVAC BLOWER MTR FRT
(*)
F67 – –Spare
F68 – –Spare
Cavity Cartridge Fuse Micro Fuse Description
2020_JEEP_JL_WRANGLER_UG_RHD_UK.book Page 188
Page 192 of 330
IN CASE OF EMERGENCY
190
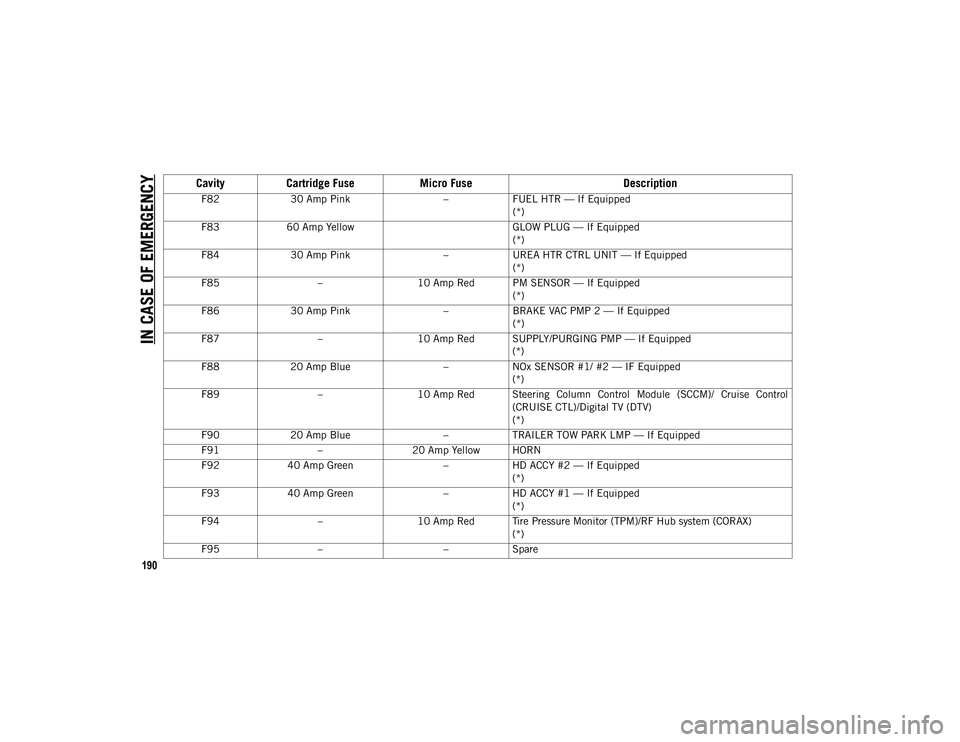
F8230 Amp Pink –FUEL HTR — If Equipped
(*)
F83 60 Amp Yellow GLOW PLUG — If Equipped
(*)
F84 30 Amp Pink –UREA HTR CTRL UNIT — If Equipped
(*)
F85 –10 Amp Red PM SENSOR — If Equipped
(*)
F86 30 Amp Pink –BRAKE VAC PMP 2 — If Equipped
(*)
F87 –10 Amp Red SUPPLY/PURGING PMP — If Equipped
(*)
F88 20 Amp Blue –NOx SENSOR #1/ #2 — IF Equipped
(*)
F89 –10 Amp Red Steering Column Control Module (SCCM)/ Cruise Control
(CRUISE CTL)/Digital TV (DTV)
(*)
F90 20 Amp Blue –TRAILER TOW PARK LMP — If Equipped
F91 –20 Amp Yellow HORN
F92 40 Amp Green –HD ACCY #2 — If Equipped
(*)
F93 40 Amp Green –HD ACCY #1 — If Equipped
(*)
F94 –10 Amp Red Tire Pressure Monitor (TPM)/RF Hub system (CORAX)
(*)
F95 – –Spare
Cavity Cartridge Fuse Micro Fuse Description
2020_JEEP_JL_WRANGLER_UG_RHD_UK.book Page 190
Page 208 of 330
IN CASE OF EMERGENCY
206
(Continued)
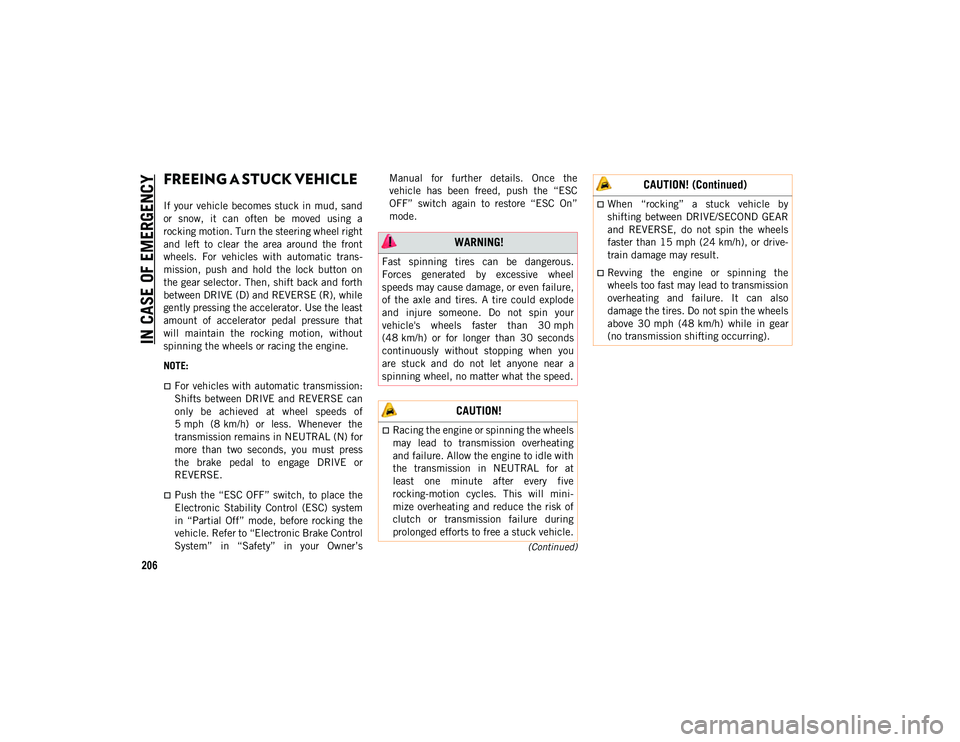
FREEING A STUCK VEHICLE
If your vehicle becomes stuck in mud, sand
or snow, it can often be moved using a
rocking motion. Turn the steering wheel right
and left to clear the area around the front
wheels. For vehicles with automatic trans-
mission, push and hold the lock button on
the gear selector. Then, shift back and forth
between DRIVE (D) and REVERSE (R), while
gently pressing the accelerator. Use the least
amount of accelerator pedal pressure that
will maintain the rocking motion, without
spinning the wheels or racing the engine.
NOTE:
For vehicles with automatic transmission:
Shifts between DRIVE and REVERSE can
only be achieved at wheel speeds of
5 mph (8 km/h) or less. Whenever the
transmission remains in NEUTRAL (N) for
more than two seconds, you must press
the brake pedal to engage DRIVE or
REVERSE.
Push the “ESC OFF” switch, to place the
Electronic Stability Control (ESC) system
in “Partial Off” mode, before rocking the
vehicle. Refer to “Electronic Brake Control
System” in “Safety” in your Owner’s Manual for further details. Once the
vehicle has been freed, push the “ESC
OFF” switch again to restore “ESC On”
mode.
WARNING!
Fast spinning tires can be dangerous.
Forces generated by excessive wheel
speeds may cause damage, or even failure,
of the axle and tires. A tire could explode
and injure someone. Do not spin your
vehicle's wheels faster than 30 mph
(48 km/h) or for longer than 30 seconds
continuously without stopping when you
are stuck and do not let anyone near a
spinning wheel, no matter what the speed.
CAUTION!
Racing the engine or spinning the wheels
may lead to transmission overheating
and failure. Allow the engine to idle with
the transmission in NEUTRAL for at
least one minute after every five
rocking-motion cycles. This will mini
-
mize overheating and reduce the risk of
clutch or transmission failure during
prolonged efforts to free a stuck vehicle.
When “rocking” a stuck vehicle by
shifting between DRIVE/SECOND GEAR
and REVERSE, do not spin the wheels
faster than 15 mph (24 km/h), or drive -
train damage may result.
Revving the engine or spinning the
wheels too fast may lead to transmission
overheating and failure. It can also
damage the tires. Do not spin the wheels
above 30 mph (48 km/h) while in gear
(no transmission shifting occurring).
CAUTION! (Continued)
2020_JEEP_JL_WRANGLER_UG_RHD_UK.book Page 206
Page 209 of 330
207(Continued)
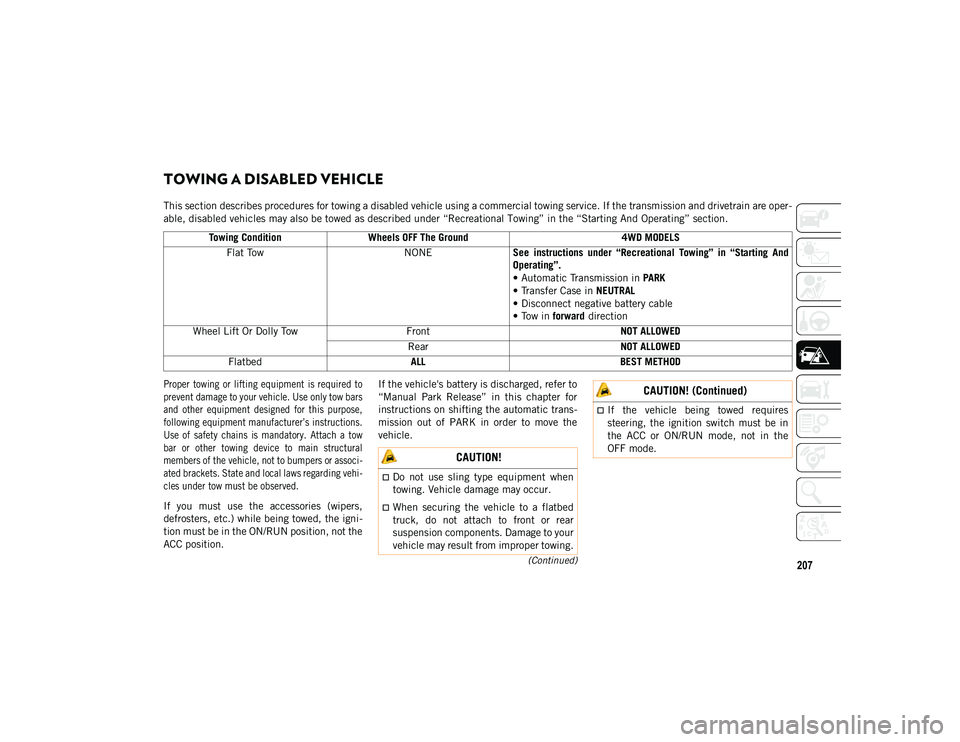
TOWING A DISABLED VEHICLE
This section describes procedures for towing a disabled vehicle using a commercial towing service. If the transmission and drivetrain are oper-
able, disabled vehicles may also be towed as described under “Recreational Towing” in the “Starting And Operating” section.
Proper towing or lifting equipment is required to
prevent damage to your vehicle. Use only tow bars
and other equipment designed for this purpose,
following equipment manufacturer’s instructions.
Use of safety chains is mandatory. Attach a tow
bar or other towing device to main structural
members of the vehicle, not to bumpers or associ -
ated brackets. State and local laws regarding vehi -
cles under tow must be observed.
If you must use the accessories (wipers,
defrosters, etc.) while being towed, the igni -
tion must be in the ON/RUN position, not the
ACC position. If the vehicle's battery is discharged, refer to
“Manual Park Release” in this chapter for
instructions on shifting the automatic trans
-
mission out of PARK in order to move the
vehicle.
Towing Condition
Wheels OFF The Ground 4WD MODELS
Flat Tow NONESee instructions under “Recreational Towing” in “Starting And
Operating”.
• Automatic Transmission in PARK
• Transfer Case in NEUTRAL
• Disconnect negative battery cable
• Tow in forward direction
Wheel Lift Or Dolly Tow Front NOT ALLOWED
Rear NOT ALLOWED
Flatbed ALL BEST METHOD
CAUTION!
Do not use sling type equipment when
towing. Vehicle damage may occur.
When securing the vehicle to a flatbed
truck, do not attach to front or rear
suspension components. Damage to your
vehicle may result from improper towing.
If the vehicle being towed requires
steering, the ignition switch must be in
the ACC or ON/RUN mode, not in the
OFF mode.
CAUTION! (Continued)
2020_JEEP_JL_WRANGLER_UG_RHD_UK.book Page 207
Page 211 of 330
209
(Continued)
NOTE:
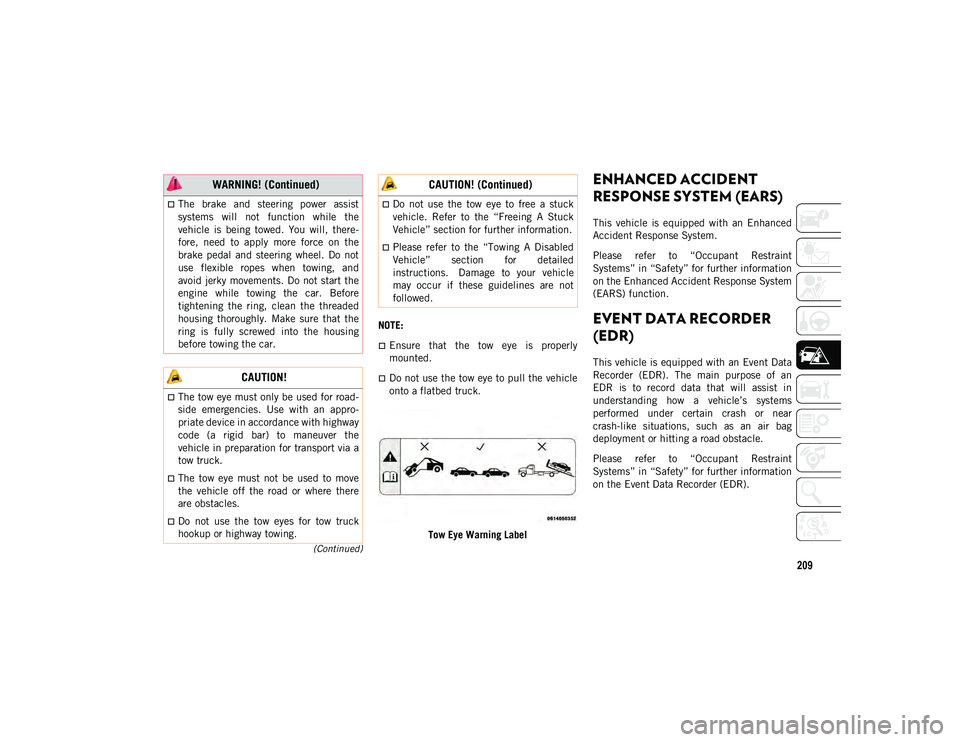
Ensure that the tow eye is properly
mounted.
Do not use the tow eye to pull the vehicle
onto a flatbed truck.Tow Eye Warning Label
ENHANCED ACCIDENT
RESPONSE SYSTEM (EARS)
This vehicle is equipped with an Enhanced
Accident Response System.
Please refer to “Occupant Restraint
Systems” in “Safety” for further information
on the Enhanced Accident Response System
(EARS) function.
EVENT DATA RECORDER
(EDR)
This vehicle is equipped with an Event Data
Recorder (EDR). The main purpose of an
EDR is to record data that will assist in
understanding how a vehicle’s systems
performed under certain crash or near
crash-like situations, such as an air bag
deployment or hitting a road obstacle.
Please refer to “Occupant Restraint
Systems” in “Safety” for further information
on the Event Data Recorder (EDR).
The brake and steering power assist
systems will not function while the
vehicle is being towed. You will, there-
fore, need to apply more force on the
brake pedal and steering wheel. Do not
use flexible ropes when towing, and
avoid jerky movements. Do not start the
engine while towing the car. Before
tightening the ring, clean the threaded
housing thoroughly. Make sure that the
ring is fully screwed into the housing
before towing the car.
CAUTION!
The tow eye must only be used for road -
side emergencies. Use with an appro-
priate device in accordance with highway
code (a rigid bar) to maneuver the
vehicle in preparation for transport via a
tow truck.
The tow eye must not be used to move
the vehicle off the road or where there
are obstacles.
Do not use the tow eyes for tow truck
hookup or highway towing.
WARNING! (Continued)
Do not use the tow eye to free a stuck
vehicle. Refer to the “Freeing A Stuck
Vehicle” section for further information.
Please refer to the “Towing A Disabled
Vehicle” section for detailed
instructions. Damage to your vehicle
may occur if these guidelines are not
followed.
CAUTION! (Continued)
2020_JEEP_JL_WRANGLER_UG_RHD_UK.book Page 209
Page 213 of 330
211
Once A Month Or Before A Long Trip
Check the engine oil level about five
minutes after a fully warmed engine is
shut off. Checking the oil level while the
vehicle is on level ground will improve the
accuracy of the oil level reading. Add oil
only when the level is at or below the ADD
or MIN mark.
Check the windshield washer solvent and
add if required.
Check tire pressure and look for unusual
wear or damage. Rotate tires at the first
sign of irregular wear.
Inspect the battery and clean and tighten
the terminals as required.
Check the fluid levels of coolant reservoir,
brake master cylinder and power steering
and fill as needed.
Check all lights and other electrical items
for correct operation.At Each Oil Change
Change the engine oil filter.
Inspect the brake hoses and lines.
Inspect the CV/Universal joints.
Check tire pressure and look for unusual
wear or damage. Rotate tires at the first
sign of irregular wear, even if it occurs
before the oil indicator system turns on.
Required Maintenance Intervals
Refer to the Maintenance Plan on the
following pages for the required maintenance
intervals.
Maintenance Plan
NOTE:
Once you have carried out the last interven -
tion in the table, continue with the sched -
uled servicing, maintaining the frequency
indicated in the plan by marking each oper -
ation with a dot or dedicated note. Simply
restarting the maintenance from the start of
the plan may cause the allowed interval to be
exceeded for some operations.
CAUTION!
Failure to perform the required
maintenance items may result in damage
to the vehicle.
2020_JEEP_JL_WRANGLER_UG_RHD_UK.book Page 211
Page 223 of 330
221
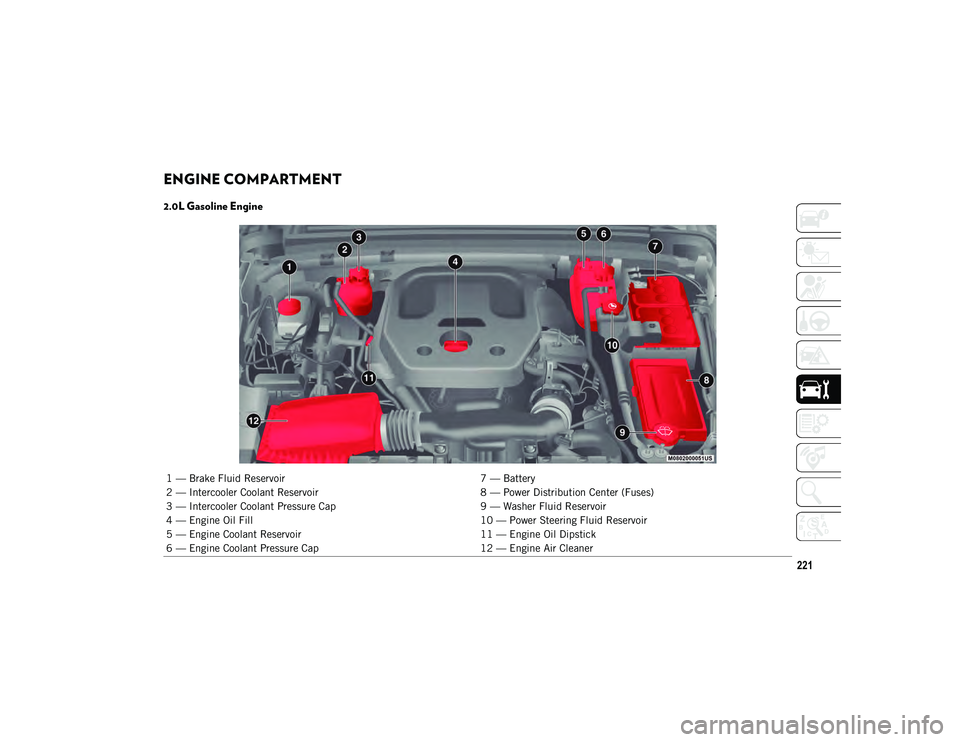
ENGINE COMPARTMENT
2.0L Gasoline Engine
1 — Brake Fluid Reservoir7 — Battery
2 — Intercooler Coolant Reservoir 8 — Power Distribution Center (Fuses)
3 — Intercooler Coolant Pressure Cap 9 — Washer Fluid Reservoir
4 — Engine Oil Fill 10 — Power Steering Fluid Reservoir
5 — Engine Coolant Reservoir 11 — Engine Oil Dipstick
6 — Engine Coolant Pressure Cap 12 — Engine Air Cleaner
2020_JEEP_JL_WRANGLER_UG_RHD_UK.book Page 221