clock JEEP WRANGLER UNLIMITED 2020 Owner handbook (in English)
[x] Cancel search | Manufacturer: JEEP, Model Year: 2020, Model line: WRANGLER UNLIMITED, Model: JEEP WRANGLER UNLIMITED 2020Pages: 330, PDF Size: 9.16 MB
Page 10 of 330
8
TECHNICAL SPECIFICATIONS
VEHICLE IDENTIFICATION NUMBER ...... 247
WHEEL AND TIRE TORQUE
SPECIFICATIONS .................................. 247
Torque Specifications ................... 247
WHEELS .............................................. 248
WEIGHTS ............................................ 248FUEL REQUIREMENTS —
GASOLINE ENGINE ............................... 248
2.0L Engine ................................. 248
3.6L Engine ................................. 249
Materials Added To Fuel................ 249
Fuel Icon Identification Compliant
To EN16942................................ 249
FUEL REQUIREMENTS —
DIESEL ENGINE .................................... 251
Fuel Icon Identification Compliant
To EN16942................................ 251
FLUID CAPACITIES ............................... 253 FLUIDS AND LUBRICANTS ..................... 254
Engine......................................... 254
Chassis ....................................... 257
FUEL CONSUMPTION AND
CO
2 EMISSIONS ..................................258
MOPAR ACCESSORIES .........................258
Authentic Accessories And Jeep
Performance Parts By Mopar ......... 258
MULTIMEDIA
UCONNECT SYSTEMS ..........................260
CYBERSECURITY .................................260
UCONNECT 3 WITH 5-INCH DISPLAY —
IF EQUIPPED ........................................261
Uconnect 3 With 5-inch Display
At A Glance ................................. 261 Clock Setting .............................. 261
Audio Setting............................... 261
Radio Operation .......................... 262
UCONNECT 4 WITH 7-INCH
DISPLAY .............................................263
Uconnect 4 At A Glance .............. 263
Drag & Drop Menu Bar ................. 264
Radio ......................................... 265
Android Auto™ ............................ 266
Apple CarPlay® Integration ........... 267
Apps — If Equipped ..................... 268
UCONNECT 4/4 NAV WITH 8.4-INCH
DISPLAY ..............................................268
Uconnect 4/4 NAV At A Glance .....268
Drag & Drop Menu Bar ..................269
Radio ..........................................270
Android Auto™ — If Equipped ......271
Apple CarPlay® Integration —
If Equipped ..................................274 Apps — If Equipped......................277
UCONNECT SETTINGS ..........................277OFF-ROAD PAGES — IF EQUIPPED .........277
Off-Road Pages Status Bar ............278
Drivetrain ....................................278
Pitch & Roll ................................279
Accessory Gauge ..........................279
STEERING WHEEL AUDIO CONTROLS .....279
Radio Operation ............................280
Media Mode .................................280
AUX/USB/MP3 CONTROL.......................280
2020_JEEP_JL_WRANGLER_UG_RHD_UK.book Page 8
Page 34 of 330
GETTING TO KNOW YOUR VEHICLE
32
EXTERIOR LIGHTS
Headlight Switch
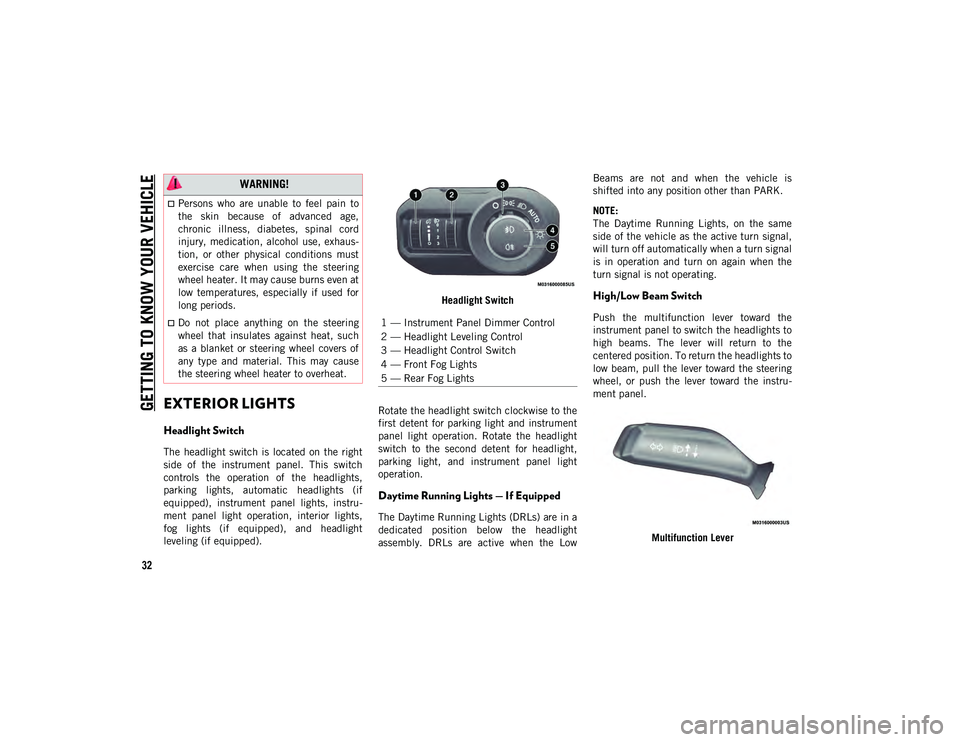
The headlight switch is located on the right
side of the instrument panel. This switch
controls the operation of the headlights,
parking lights, automatic headlights (if
equipped), instrument panel lights, instru-
ment panel light operation, interior lights,
fog lights (if equipped), and headlight
leveling (if equipped). Headlight Switch
Rotate the headlight switch clockwise to the
first detent for parking light and instrument
panel light operation. Rotate the headlight
switch to the second detent for headlight,
parking light, and instrument panel light
operation.
Daytime Running Lights — If Equipped
The Daytime Running Lights (DRLs) are in a
dedicated position below the headlight
assembly. DRLs are active when the Low Beams are not and when the vehicle is
shifted into any position other than PARK.
NOTE:
The Daytime Running Lights, on the same
side of the vehicle as the active turn signal,
will turn off automatically when a turn signal
is in operation and turn on again when the
turn signal is not operating.
High/Low Beam Switch
Push the multifunction lever toward the
instrument panel to switch the headlights to
high beams. The lever will return to the
centered position. To return the headlights to
low beam, pull the lever toward the steering
wheel, or push the lever toward the instru
-
ment panel.
Multifunction Lever
WARNING!
Persons who are unable to feel pain to
the skin because of advanced age,
chronic illness, diabetes, spinal cord
injury, medication, alcohol use, exhaus-
tion, or other physical conditions must
exercise care when using the steering
wheel heater. It may cause burns even at
low temperatures, especially if used for
long periods.
Do not place anything on the steering
wheel that insulates against heat, such
as a blanket or steering wheel covers of
any type and material. This may cause
the steering wheel heater to overheat.1 — Instrument Panel Dimmer Control
2 — Headlight Leveling Control
3 — Headlight Control Switch
4 — Front Fog Lights
5 — Rear Fog Lights
2020_JEEP_JL_WRANGLER_UG_RHD_UK.book Page 32
Page 35 of 330
33
Automatic High Beam — If Equipped
The Automatic High Beam Headlamp Control
system provides increased forward lighting at
night by automating high beam control
through the use of a digital camera mounted
on the vehicle’s header. This camera detects
vehicle specific light and automatically
switches from high beams to low beams until
the approaching vehicle is out of view.
NOTE:
The Automatic High Beam Headlamp
Control can be turned on or off by selecting
“ON” under “Auto High Beam” within your
Uconnect settings, as well as turning the
headlight switch to the AUTO position and
placing the multifunction lever in the high
beam position. Refer to “Uconnect Settings”
in “Multimedia” in the Owner’s Manual for
further information.
Broken, muddy, or obstructed headlights
and taillights of vehicles in the field of
view will cause headlights to remain on
longer (closer to the vehicle). Also, dirt,
film, and other obstructions on the wind-
shield or camera lens will cause the
system to function improperly.
Flash-To-Pass
You can signal another vehicle with your
headlights by lightly pulling the multifunc -
tion lever toward you. This will cause the
high beam headlights to turn on, and remain
on, until the lever is released.
Automatic Headlights — If Equipped
This system automatically turns the head -
lights on or off according to ambient light
levels. To turn the system on, rotate the
headlight switch clockwise to the last detent
for automatic headlight operation. When the
system is on, the headlight time delay
feature is also on. This means the headlights
will stay on for up to 90 seconds after you
place the ignition into the OFF position. To
turn the automatic system off, move the
headlight switch out of the AUTO position.
NOTE:
The engine must be running before the head -
lights will come on in the automatic mode.
Front And Rear Fog Lights — If Equipped
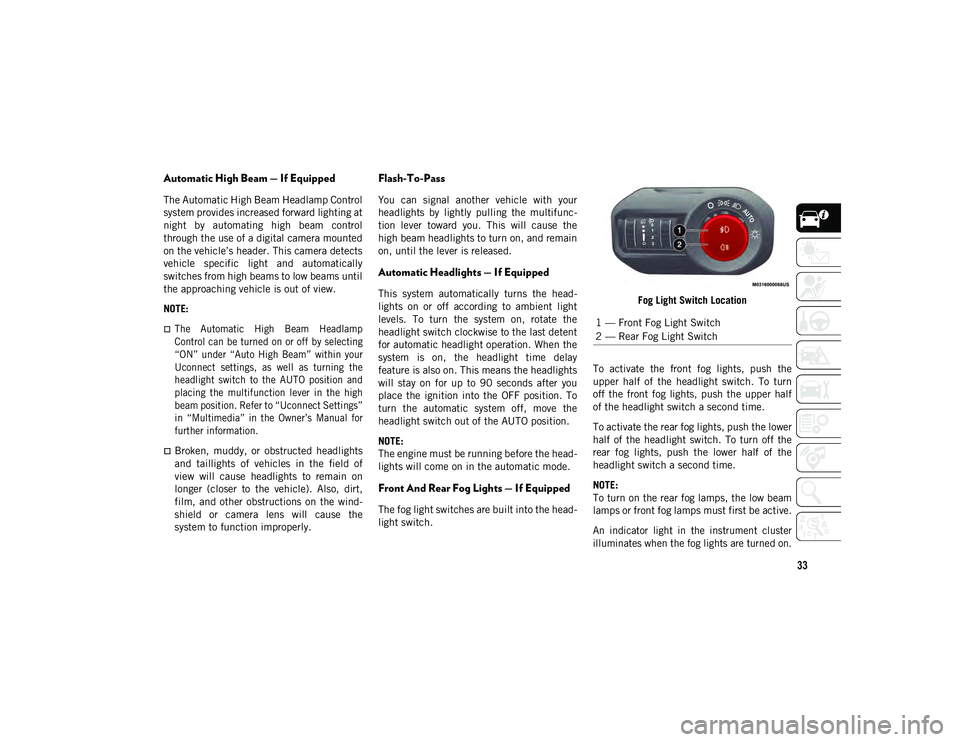
The fog light switches are built into the head -
light switch. Fog Light Switch Location
To activate the front fog lights, push the
upper half of the headlight switch. To turn
off the front fog lights, push the upper half
of the headlight switch a second time.
To activate the rear fog lights, push the lower
half of the headlight switch. To turn off the
rear fog lights, push the lower half of the
headlight switch a second time.
NOTE:
To turn on the rear fog lamps, the low beam
lamps or front fog lamps must first be active.
An indicator light in the instrument cluster
illuminates when the fog lights are turned on.
1 — Front Fog Light Switch
2 — Rear Fog Light Switch
2020_JEEP_JL_WRANGLER_UG_RHD_UK.book Page 33
Page 43 of 330
41
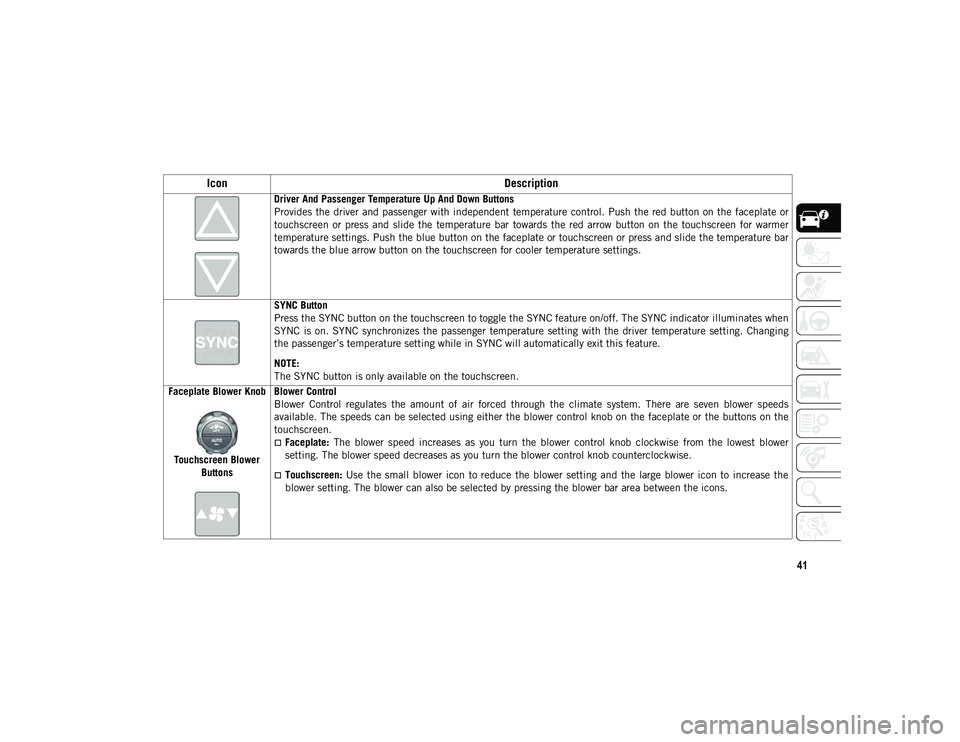
Driver And Passenger Temperature Up And Down Buttons
Provides the driver and passenger with independent temperature control. Push the red button on the faceplate or
touchscreen or press and slide the temperature bar towards the red arrow button on the touchscreen for warmer
temperature settings. Push the blue button on the faceplate or touchscreen or press and slide the temperature bar
towards the blue arrow button on the touchscreen for cooler temperature settings.
SYNC Button
Press the SYNC button on the touchscreen to toggle the SYNC feature on/off. The SYNC indicator illuminates when
SYNC is on. SYNC synchronizes the passenger temperature setting with the driver temperature setting. Changing
the passenger’s temperature setting while in SYNC will automatically exit this feature.
NOTE:
The SYNC button is only available on the touchscreen.
Faceplate Blower Knob
Touchscreen Blower Buttons Blower Control
Blower Control regulates the amount of air forced through the climate system. There are seven blower speeds
available. The speeds can be selected using either the blower control knob on the faceplate or the buttons on the
touchscreen.
Faceplate:
The blower speed increases as you turn the blower control knob clockwise from the lowest blower
setting. The blower speed decreases as you turn the blower control knob counterclockwise.
Touchscreen: Use the small blower icon to reduce the blower setting and the large blower icon to increase the
blower setting. The blower can also be selected by pressing the blower bar area between the icons.
Icon Description
2020_JEEP_JL_WRANGLER_UG_RHD_UK.book Page 41
Page 175 of 330
173
Operations After Refilling
Proceed as follows:
Fit the cap back on the AdBlue® (UREA)
filler by turning it clockwise and screwing
it completely.
Place the ignition in RUN (it is not neces-
sary to start the engine).
Wait for the indication on the instrument
panel to switch off before moving the car.
The indication may stay on for a few seconds
to approximately half a minute. If the engine
is started and the car is moved, the indica-
tion will remain on for longer. This will not
compromise engine operation.
If the AdBlue® (UREA) was topped up
when the tank was empty, wait for
2 minutes before starting the engine.
NOTE:
If AdBlue® (UREA) is spilled out of the
filler neck, clean up well the area and
proceed to filling up again. If the liquid
crystallizes, eliminate it with a sponge and
warm water.
DO NOT EXCEED THE MAXIMUM LEVEL:
this could cause damage to the reservoir.
AdBlue® (UREA) freezes at under 12°F
(-11°C). Although the system is designed
to operate below the freezing point of the
AdBlue® (UREA), it is advisable not to fill
the tank beyond the maximum level
because if the AdBlue® (UREA) freezes
the system can be damaged. Follow the
instructions in this section.
If the AdBlue® (UREA) is spilled on
painted surfaces or aluminum, immedi -
ately clean the area with water and use
absorbent material to collect the fluid that
has been spilled on the ground.
Do not try to start the engine if AdBlue®
(UREA) was accidentally added to the
diesel fuel tank, this can result in serious
engine damage, contact an authorized
dealer.
Do not add additives or other fluids to
AdBlue® (UREA), doing so could damage
the system.
The use of non-conforming or degraded
AdBlue® (UREA) may lead to indications
appearing on the instrument panel display
refer to “Warning Lights And Messages” in
the “Getting To Know Your Instrument
Panel” for further information.
Never pour AdBlue® (UREA) into another
container: it could be contaminated.
If the AdBlue® (UREA) runs out, see refer
to “Warning Lights And Messages” in the
“Getting To Know Your Instrument Panel”
for further information to continue using
the car normally.
2020_JEEP_JL_WRANGLER_UG_RHD_UK.book Page 173
Page 183 of 330
181
Bulb Replacement
NOTE:
Lens fogging can occur under certain atmo-
spheric conditions. This will usually clear as
atmospheric conditions change to allow the
condensation to change back into a vapor.
Turning the lamps on will usually accelerate
the clearing process.
Halogen Headlamps
NOTE:
We advise referring to an authorized dealer
for service.
1. Open hood and support using prop rod.
2. Remove the front grille. Turn the retainers along the top a quarter turn
counterclockwise and remove.
3. Pull the bottom of the grille away starting at one side and working toward the other.
4. Remove the three screws holding the headlamp to the vehicle.
5. Remove lamp from the vehicle.
6. Remove the lamp from the collar. 7. Grasp the bulb and turn a quarter turn
counterclockwise.
8. Pull the bulb from the housing.
9. Push connector locking tab to the unlock position.
10. Remove connector from bulb.
11. Push connector onto new bulb base, and push the connector locking tab to the
lock position.
12. Reinstall bulb housing. Rotate the bulb a quarter turn clockwise.
Front Park/Turn Signal
NOTE:
We advise referring to an authorized dealer
for service.
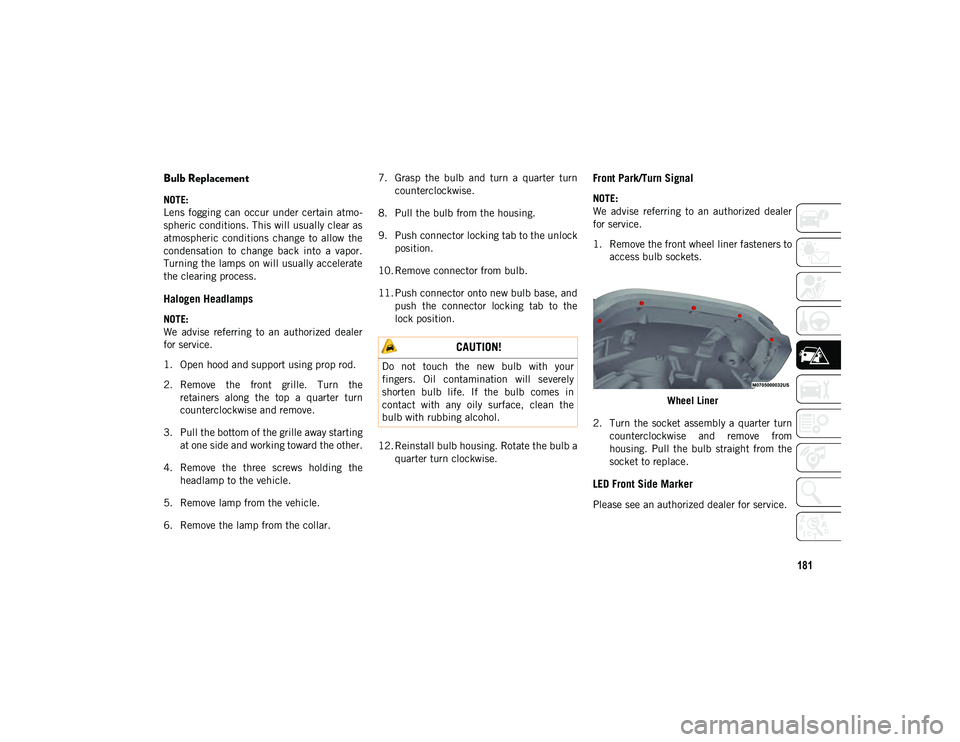
1. Remove the front wheel liner fasteners toaccess bulb sockets.
Wheel Liner
2. Turn the socket assembly a quarter turn counterclockwise and remove from
housing. Pull the bulb straight from the
socket to replace.
LED Front Side Marker
Please see an authorized dealer for service.
CAUTION!
Do not touch the new bulb with your
fingers. Oil contamination will severely
shorten bulb life. If the bulb comes in
contact with any oily surface, clean the
bulb with rubbing alcohol.
2020_JEEP_JL_WRANGLER_UG_RHD_UK.book Page 181
Page 184 of 330
IN CASE OF EMERGENCY
182
Halogen Front Fog Lamp
NOTE:
We advise referring to an authorized dealer
for service.
1. Reach under the vehicle to access theback of the front fog lamp.
2. Disconnect the wire harness connector from the front fog lamp connector recep -
tacle.
3. Firmly grasp the bulb by the two latch features and squeeze them together to
unlock the bulb from the back of the
front fog lamp housing.
4. Pull the bulb straight out from the keyed opening in the housing and then connect
the replacement bulb. LED Front Fog Lamp
Please see an authorized dealer for service.
Rear Tail, Stop, Turn Signal, And Backup
Lamp
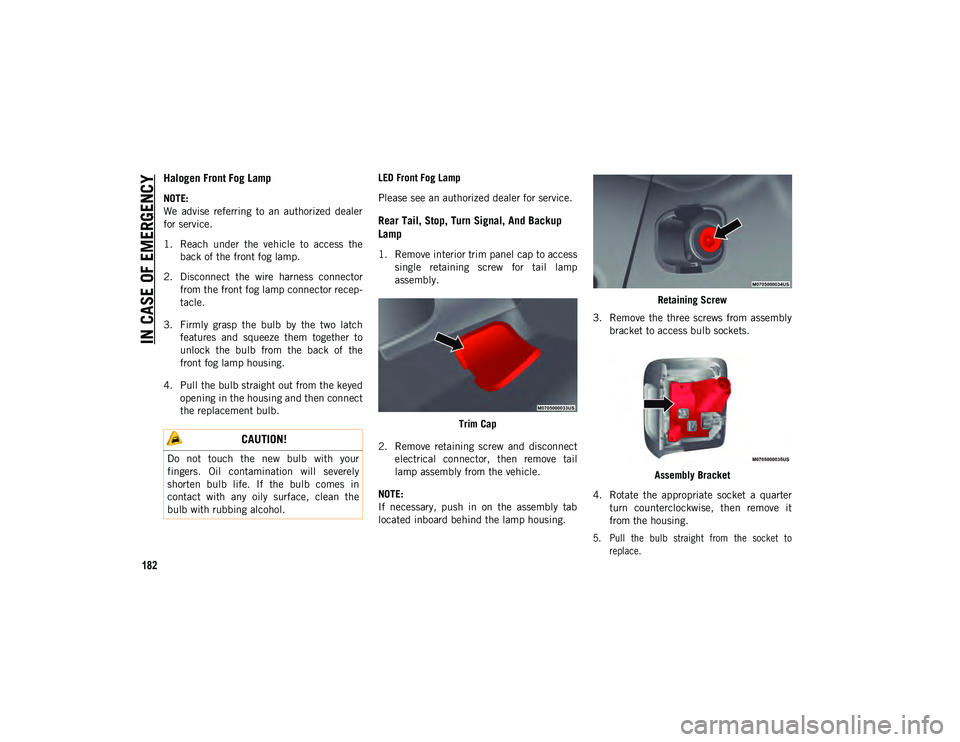
1. Remove interior trim panel cap to access
single retaining screw for tail lamp
assembly.
Trim Cap
2. Remove retaining screw and disconnect electrical connector, then remove tail
lamp assembly from the vehicle.
NOTE:
If necessary, push in on the assembly tab
located inboard behind the lamp housing. Retaining Screw
3. Remove the three screws from assembly bracket to access bulb sockets.
Assembly Bracket
4. Rotate the appropriate socket a quarter turn counterclockwise, then remove it
from the housing.
5. Pull the bulb straight from the socket to replace.
CAUTION!
Do not touch the new bulb with your
fingers. Oil contamination will severely
shorten bulb life. If the bulb comes in
contact with any oily surface, clean the
bulb with rubbing alcohol.
2020_JEEP_JL_WRANGLER_UG_RHD_UK.book Page 182
Page 185 of 330
183
(Continued)
Center High Mounted Stop Lamp (CHMSL)
Please see an authorized dealer for service.
License Plate Lamps
1. Reach under the vehicle to access theback of the lamp.
2. Firmly grasp the bulb by the two latch features and squeeze them together to
unlock the bulb from the back of the
lamp housing.
Rear Fog Lamp
NOTE:
We advise referring to an authorized dealer
for service.
1. Reach under the vehicle to access theback of the fog lamp.
2. Disconnect the wire harness connector from the fog lamp connector receptacle.
3. Rotate the socket a quarter turn counter -
clockwise, then remove it from the
housing.
4. Pull the bulb straight out from the keyed opening in the housing and then connect
the replacement bulb and reassemble.
FUSES
General Information
The fuses protect electrical systems against
excessive current.
When a device does not work, you must
check the fuse element inside the blade fuse
for a break/melt.
Also, please be aware that when using power
outlets for extended periods of time with the
engine off may result in vehicle battery
discharge.
CAUTION!
Do not touch the new bulb with your
fingers. Oil contamination will severely
shorten bulb life. If the bulb comes in
contact with any oily surface, clean the
bulb with rubbing alcohol.
WARNING!
When replacing a blown fuse, always use
an appropriate replacement fuse with
the same amp rating as the original fuse.
Never replace a fuse with another fuse of
higher amp rating. Never replace a blown
fuse with metal wires or any other mate-
rial. Failure to use proper fuses may
result in serious personal injury, fire and/
or property damage.
Before replacing a fuse, make sure that
the ignition is off and that all the other
services are switched off and/or disen -
gaged.
If the replaced fuse blows again, contact
an authorized dealer.
If a general protection fuse for safety
systems (air bag system, braking
system), power unit systems (engine
system, gearbox system) or steering
system blows, contact an authorized
dealer.
CAUTION!
If it is necessary to wash the engine
compartment, take care not to directly hit
the fuse box, and the windshield wiper
motors with water.
WARNING! (Continued)
2020_JEEP_JL_WRANGLER_UG_RHD_UK.book Page 183
Page 195 of 330
193
Jack Location
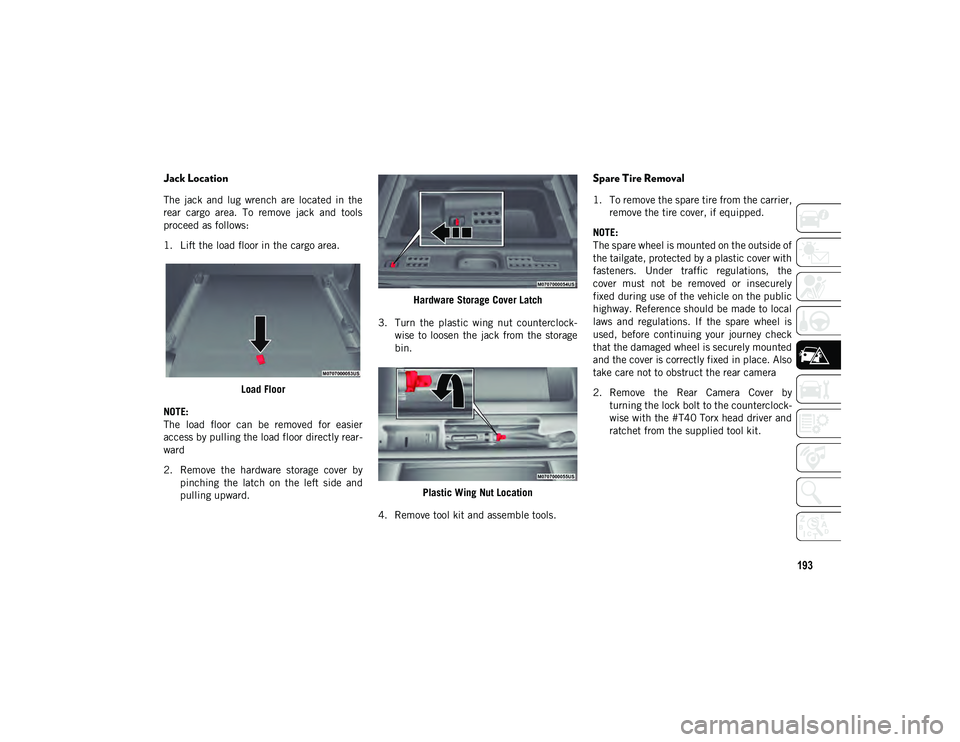
The jack and lug wrench are located in the
rear cargo area. To remove jack and tools
proceed as follows:
1. Lift the load floor in the cargo area.Load Floor
NOTE:
The load floor can be removed for easier
access by pulling the load floor directly rear -
ward
2. Remove the hardware storage cover by pinching the latch on the left side and
pulling upward. Hardware Storage Cover Latch
3. Turn the plastic wing nut counterclock -
wise to loosen the jack from the storage
bin.
Plastic Wing Nut Location
4. Remove tool kit and assemble tools.
Spare Tire Removal
1. To remove the spare tire from the carrier, remove the tire cover, if equipped.
NOTE:
The spare wheel is mounted on the outside of
the tailgate, protected by a plastic cover with
fasteners. Under traffic regulations, the
cover must not be removed or insecurely
fixed during use of the vehicle on the public
highway. Reference should be made to local
laws and regulations. If the spare wheel is
used, before continuing your journey check
that the damaged wheel is securely mounted
and the cover is correctly fixed in place. Also
take care not to obstruct the rear camera
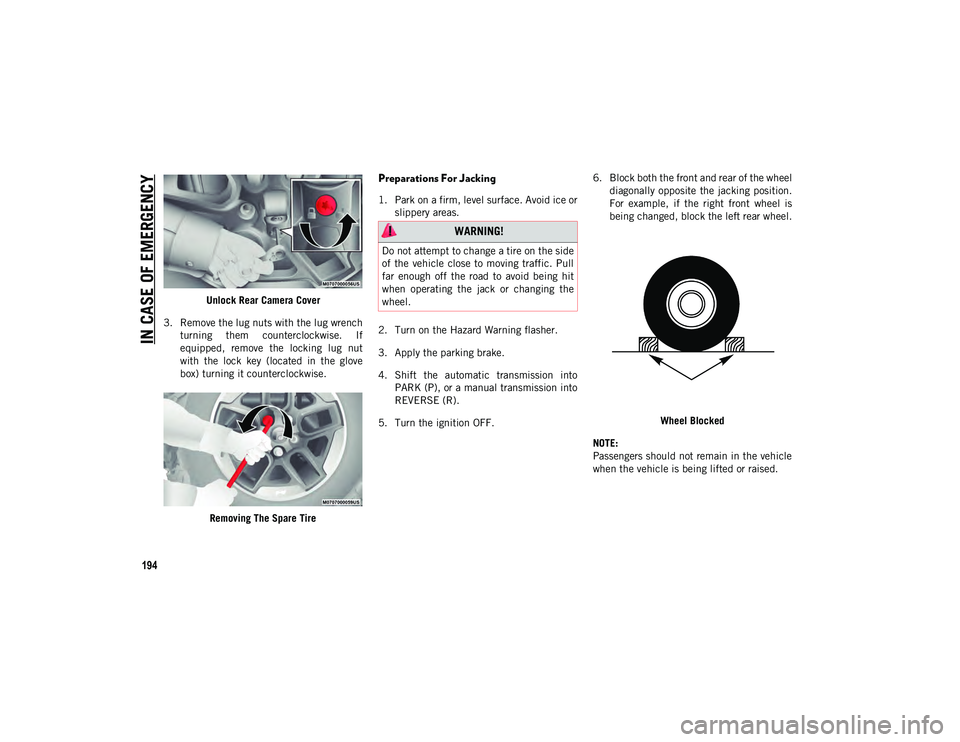
2. Remove the Rear Camera Cover by turning the lock bolt to the counterclock -
wise with the #T40 Torx head driver and
ratchet from the supplied tool kit.
2020_JEEP_JL_WRANGLER_UG_RHD_UK.book Page 193
Page 196 of 330
IN CASE OF EMERGENCY
194
Unlock Rear Camera Cover
3. Remove the lug nuts with the lug wrench turning them counterclockwise. If
equipped, remove the locking lug nut
with the lock key (located in the glove
box) turning it counterclockwise.
Removing The Spare Tire
Preparations For Jacking
1. Park on a firm, level surface. Avoid ice orslippery areas.
2. Turn on the Hazard Warning flasher.
3. Apply the parking brake.
4. Shift the automatic transmission into PARK (P), or a manual transmission into
REVERSE (R).
5. Turn the ignition OFF. 6. Block both the front and rear of the wheel
diagonally opposite the jacking position.
For example, if the right front wheel is
being changed, block the left rear wheel.
Wheel Blocked
NOTE:
Passengers should not remain in the vehicle
when the vehicle is being lifted or raised.
WARNING!
Do not attempt to change a tire on the side
of the vehicle close to moving traffic. Pull
far enough off the road to avoid being hit
when operating the jack or changing the
wheel.
2020_JEEP_JL_WRANGLER_UG_RHD_UK.book Page 194