steering wheel JEEP WRANGLER UNLIMITED 2021 Owner handbook (in English)
[x] Cancel search | Manufacturer: JEEP, Model Year: 2021, Model line: WRANGLER UNLIMITED, Model: JEEP WRANGLER UNLIMITED 2021Pages: 330, PDF Size: 9.16 MB
Page 3 of 330
1
WELCOME FROM FCA
Congratulations on selecting your new FCA
vehicle. Be assured that it represents preci-
sion workmanship, distinctive styling, and
high quality.
ALWAYS drive safely and pay attention to the
road. ALWAYS drive safely with your hands
on the steering wheel. You have full respon -
sibility and assume all risks related to the
use of the features and applications in this
vehicle. Only use the features and applica -
tions when it is safe to do so. Failure to do so
may result in an accident involving serious
injury or death.
This guide illustrates and describes the oper -
ation of features and equipment that are
either standard or optional on this vehicle.
This guide may also include a description of
features and equipment that are no longer
available or were not ordered on this vehicle.
Please disregard any features and equipment
described in this guide that are not available
on this vehicle. FCA reserves the right to
make changes in design and specifications
and/or make additions to or improvements to
its products without imposing any obligation
upon itself to install them on products previ -
ously manufactured. This User Guide has been prepared to help
you quickly become acquainted with the
important features of your vehicle. It
contains most things you will need to operate
and maintain the vehicle, including emer
-
gency information.
When it comes to service, remember that an
authorized dealer knows your Jeep® vehicle
best, has factory-trained technicians and
genuine MOPAR® parts, and cares about
your satisfaction.
HOW TO FIND YOUR
OWNER’S MANUAL ONLINE
This guide has been prepared as a reference
item to help you quickly become acquainted
with the most important features and
processes of your vehicle. It contains most
things you will need to operate and maintain
the vehicle, including emergency informa -
tion and procedures.
This User Guide is not a replacement for the full
Owner’s Manual, and does not fully cover every
operation and procedure possible with your
vehicle. For more detailed descriptions of the topics
discussed in this User Guide, as well as
information covering features and processes
not covered in this User Guide, the full
vehicle Owner’s Manual can be accessed for
free online in a printer-friendly PDF format.
To get the full Owner’s Manual or applicable
supplement for your vehicle, follow the appro
-
priate web address below:
www.mopar.eu/owner or alternatively, to
access this information, go to the website at
http://aftersales.fiat.com/elum/.
FCA is committed to protecting our environ -
ment and natural resources. By converting
from paper to electronic delivery for the
majority of the user information for your
vehicle, together we greatly reduce the
demand for tree-based products and lessen
the stress on our environment.
2020_JEEP_JL_WRANGLER_UG_RHD_UK.book Page 1
Page 6 of 330
4
WELCOME FROM FCA
HOW TO FIND YOUR OWNER’S MANUAL
ONLINE ................................................... 1
HOW TO USE THIS MANUAL
HOW TO USE THIS MANUAL ..................... 2
Essential Information ........................ 2
Symbols .......................................... 2
ROLLOVER WARNING ............................... 2
WARNINGS AND CAUTIONS ..................... 2
VEHICLE MODIFICATIONS/ALTERATIONS .... 2
GETTING TO KNOW YOUR VEHICLE
KEYS ................................................... 11
Key Fob ......................................... 11
IGNITION SWITCH .................................. 12
Keyless Enter-N-Go — Ignition ........ 12
REMOTE STARTING SYSTEM —
IF EQUIPPED .......................................... 14
How To Use Remote Start ............... 14
To Enter Remote Start Mode............ 15
VEHICLE SECURITY ALARM —
IF EQUIPPED ......................................... 15
To Arm The System ....................... 15
To Disarm The System ................... 15
PREMIUM VEHICLE SECURITY ALARM —
IF EQUIPPED .........................................16
To Arm The System ........................ 16
To Disarm The System .................... 17
Security System Manual Override..... 17
DOORS ................................................. 18
Keyless Enter-N-Go — Passive Entry
(If Equipped) ................................ 18 Child-Protection Door Lock System —
Rear Doors..................................... 20 Front Door Removal ........................ 21
Rear Door Removal
(Four-Door Models) ........................ 23
SEATS................................................... 24
Heated Seats — If Equipped ........... 25
Front Passenger Easy Entry Seat —
Two Door Models ............................ 26 60/40 Split Folding Rear Seat —
Four Door Models ........................... 26 Fold And Tumble Rear Seat —
Two Door Models ............................ 27
HEAD RESTRAINTS.................................28
Front Head Restraints ..................... 28
Rear Head Restraints — Two Door
Models .......................................... 29 Rear Head Restraints — Four Door
Models .......................................... 30
STEERING WHEEL ..................................31
Tilt/Telescoping Steering Column .....31
Heated Steering Wheel —
If Equipped ....................................31
EXTERIOR LIGHTS ..................................32
Headlight Switch ............................32
Daytime Running Lights —
If Equipped ...................................32 High/Low Beam Switch....................32
Automatic High Beam —
If Equipped ....................................33 Flash-To-Pass .................................33
Automatic Headlights —
If Equipped ...................................33 Front And Rear Fog Lights —
If Equipped ....................................33 Turn Signals ...................................34
Lights-On Reminder ........................34
Headlight Leveling System — If
Equipped ......................................34
WINDSHIELD WIPERS AND WASHERS......35
Windshield Wiper Operation .............35
CLIMATE CONTROLS ...............................36
Automatic Climate Controls Overview ....37
Climate Control Functions................44
Automatic Temperature Control (ATC) —
If Equipped ....................................44 Operating Tips ...............................45
2020_JEEP_JL_WRANGLER_UG_RHD_UK.book Page 4
Page 10 of 330
8
TECHNICAL SPECIFICATIONS
VEHICLE IDENTIFICATION NUMBER ...... 247
WHEEL AND TIRE TORQUE
SPECIFICATIONS .................................. 247
Torque Specifications ................... 247
WHEELS .............................................. 248
WEIGHTS ............................................ 248FUEL REQUIREMENTS —
GASOLINE ENGINE ............................... 248
2.0L Engine ................................. 248
3.6L Engine ................................. 249
Materials Added To Fuel................ 249
Fuel Icon Identification Compliant
To EN16942................................ 249
FUEL REQUIREMENTS —
DIESEL ENGINE .................................... 251
Fuel Icon Identification Compliant
To EN16942................................ 251
FLUID CAPACITIES ............................... 253 FLUIDS AND LUBRICANTS ..................... 254
Engine......................................... 254
Chassis ....................................... 257
FUEL CONSUMPTION AND
CO
2 EMISSIONS ..................................258
MOPAR ACCESSORIES .........................258
Authentic Accessories And Jeep
Performance Parts By Mopar ......... 258
MULTIMEDIA
UCONNECT SYSTEMS ..........................260
CYBERSECURITY .................................260
UCONNECT 3 WITH 5-INCH DISPLAY —
IF EQUIPPED ........................................261
Uconnect 3 With 5-inch Display
At A Glance ................................. 261 Clock Setting .............................. 261
Audio Setting............................... 261
Radio Operation .......................... 262
UCONNECT 4 WITH 7-INCH
DISPLAY .............................................263
Uconnect 4 At A Glance .............. 263
Drag & Drop Menu Bar ................. 264
Radio ......................................... 265
Android Auto™ ............................ 266
Apple CarPlay® Integration ........... 267
Apps — If Equipped ..................... 268
UCONNECT 4/4 NAV WITH 8.4-INCH
DISPLAY ..............................................268
Uconnect 4/4 NAV At A Glance .....268
Drag & Drop Menu Bar ..................269
Radio ..........................................270
Android Auto™ — If Equipped ......271
Apple CarPlay® Integration —
If Equipped ..................................274 Apps — If Equipped......................277
UCONNECT SETTINGS ..........................277OFF-ROAD PAGES — IF EQUIPPED .........277
Off-Road Pages Status Bar ............278
Drivetrain ....................................278
Pitch & Roll ................................279
Accessory Gauge ..........................279
STEERING WHEEL AUDIO CONTROLS .....279
Radio Operation ............................280
Media Mode .................................280
AUX/USB/MP3 CONTROL.......................280
2020_JEEP_JL_WRANGLER_UG_RHD_UK.book Page 8
Page 16 of 330
GETTING TO KNOW YOUR VEHICLE
14
REMOTE STARTING
SYSTEM — IF EQUIPPED
This system uses the key fob to
start the engine conveniently from
outside the vehicle while still main-
taining security. The system has a
range of 328 ft (100 m).
The Remote Starting System also activates
the Climate Control, vented seats (if
equipped) in temperatures above 80°F
(26.7°C), the heated seats (if equipped), and
heated steering wheel (if equipped) in
temperatures below 40°F (4.4°C). Refer to
“Heated Seats” in “Getting To Know Your
Vehicle” in the Owner’s Manual for further
information.
NOTE:
The vehicle must be equipped with an
automatic transmission to be equipped
with Remote Start.
Obstructions between the vehicle and key
fob may reduce this range.
How To Use Remote Start
Push the Remote Start button on the key
fob twice within five seconds. Pushing the
Remote Start button a third time shuts the
engine off.
To drive the vehicle, push the unlock
button, and place the ignition in the ON/
RUN position.
With remote start, the engine will only run
for 15 minutes (timeout) unless the igni -
tion key is placed in the ON/RUN position.
The vehicle must be started with the key
after two consecutive timeouts.
All of the following conditions must be met
before the engine will remote start:
Gear Selector in PARK
Doors closed
Hood closed
Swing Gate closed
Hazard switch off
Brake switch inactive (brake pedal not
pushed)
Battery at an acceptable charge level
System not disabled from previous remote
start event
Vehicle alarm system indicator flashing
Ignition in STOP/OFF position
Fuel level meets minimum requirement
All removable doors must not be removed
Malfunction indicator light not illuminated
WARNING!
Do not start or run an engine in a closed
garage or confined area. Exhaust gas
contains Carbon Monoxide (CO) which is
odorless and colorless. Carbon Monoxide
is poisonous and can cause serious
injury or death when inhaled.
Keep key fobs away from children. Oper -
ation of the Remote Start System,
windows, door locks or other controls
could cause serious injury or death.
2020_JEEP_JL_WRANGLER_UG_RHD_UK.book Page 14
Page 33 of 330
31
STEERING WHEEL
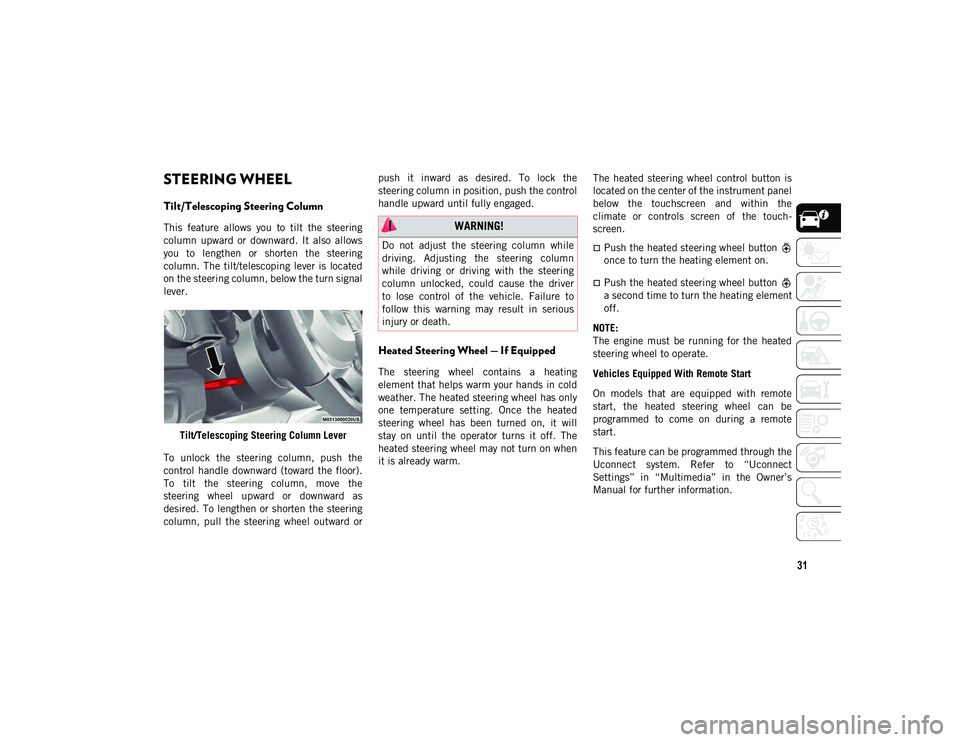
Tilt/Telescoping Steering Column
This feature allows you to tilt the steering
column upward or downward. It also allows
you to lengthen or shorten the steering
column. The tilt/telescoping lever is located
on the steering column, below the turn signal
lever.Tilt/Telescoping Steering Column Lever
To unlock the steering column, push the
control handle downward (toward the floor).
To tilt the steering column, move the
steering wheel upward or downward as
desired. To lengthen or shorten the steering
column, pull the steering wheel outward or push it inward as desired. To lock the
steering column in position, push the control
handle upward until fully engaged.
Heated Steering Wheel — If Equipped
The steering wheel contains a heating
element that helps warm your hands in cold
weather. The heated steering wheel has only
one temperature setting. Once the heated
steering wheel has been turned on, it will
stay on until the operator turns it off. The
heated steering wheel may not turn on when
it is already warm.
The heated steering wheel control button is
located on the center of the instrument panel
below the touchscreen and within the
climate or controls screen of the touch
-
screen.
Push the heated steering wheel button
once to turn the heating element on.
Push the heated steering wheel button
a second time to turn the heating element
off.
NOTE:
The engine must be running for the heated
steering wheel to operate.
Vehicles Equipped With Remote Start
On models that are equipped with remote
start, the heated steering wheel can be
programmed to come on during a remote
start.
This feature can be programmed through the
Uconnect system. Refer to “Uconnect
Settings” in “Multimedia” in the Owner’s
Manual for further information.
WARNING!
Do not adjust the steering column while
driving. Adjusting the steering column
while driving or driving with the steering
column unlocked, could cause the driver
to lose control of the vehicle. Failure to
follow this warning may result in serious
injury or death.
2020_JEEP_JL_WRANGLER_UG_RHD_UK.book Page 31
Page 34 of 330
GETTING TO KNOW YOUR VEHICLE
32
EXTERIOR LIGHTS
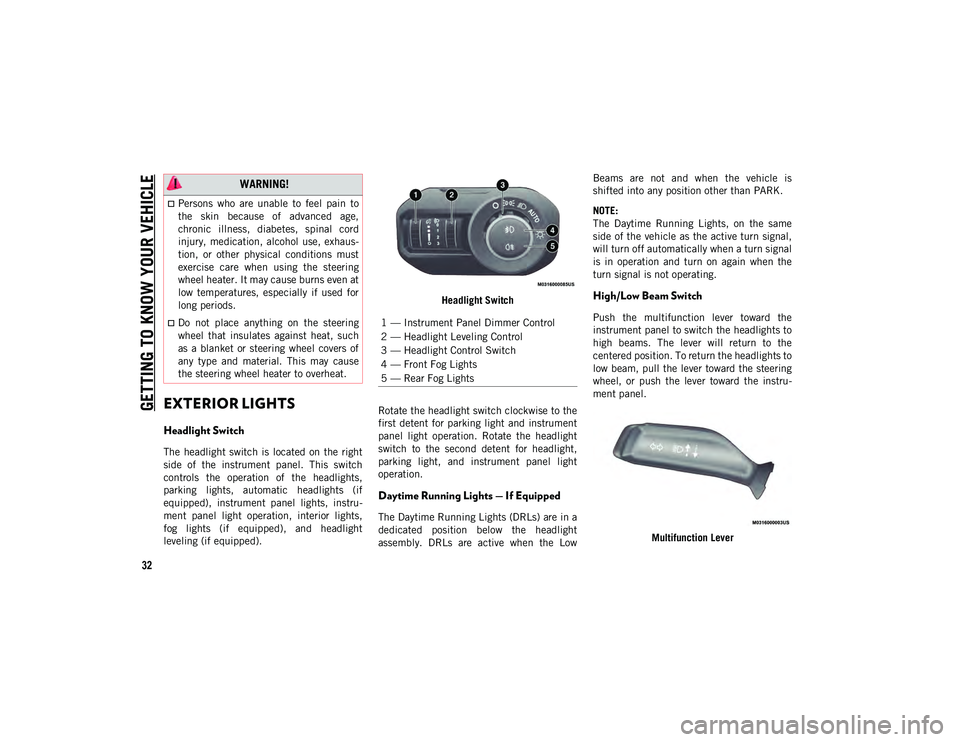
Headlight Switch
The headlight switch is located on the right
side of the instrument panel. This switch
controls the operation of the headlights,
parking lights, automatic headlights (if
equipped), instrument panel lights, instru-
ment panel light operation, interior lights,
fog lights (if equipped), and headlight
leveling (if equipped). Headlight Switch
Rotate the headlight switch clockwise to the
first detent for parking light and instrument
panel light operation. Rotate the headlight
switch to the second detent for headlight,
parking light, and instrument panel light
operation.
Daytime Running Lights — If Equipped
The Daytime Running Lights (DRLs) are in a
dedicated position below the headlight
assembly. DRLs are active when the Low Beams are not and when the vehicle is
shifted into any position other than PARK.
NOTE:
The Daytime Running Lights, on the same
side of the vehicle as the active turn signal,
will turn off automatically when a turn signal
is in operation and turn on again when the
turn signal is not operating.
High/Low Beam Switch
Push the multifunction lever toward the
instrument panel to switch the headlights to
high beams. The lever will return to the
centered position. To return the headlights to
low beam, pull the lever toward the steering
wheel, or push the lever toward the instru
-
ment panel.
Multifunction Lever
WARNING!
Persons who are unable to feel pain to
the skin because of advanced age,
chronic illness, diabetes, spinal cord
injury, medication, alcohol use, exhaus-
tion, or other physical conditions must
exercise care when using the steering
wheel heater. It may cause burns even at
low temperatures, especially if used for
long periods.
Do not place anything on the steering
wheel that insulates against heat, such
as a blanket or steering wheel covers of
any type and material. This may cause
the steering wheel heater to overheat.1 — Instrument Panel Dimmer Control
2 — Headlight Leveling Control
3 — Headlight Control Switch
4 — Front Fog Lights
5 — Rear Fog Lights
2020_JEEP_JL_WRANGLER_UG_RHD_UK.book Page 32
Page 62 of 330
60
GETTING TO KNOW YOUR INSTRUMENT PANEL
INSTRUMENT CLUSTER
DISPLAY
Your vehicle may be equipped with an instru-
ment cluster display, which offers useful
information to the driver. With the ignition in
the STOP/OFF mode, opening/closing of a
door will activate the display for viewing, and
display the total miles, or kilometers, in the
odometer. Your instrument cluster display is
designed to display important information
about your vehicle’s systems and features.
Using a driver interactive display located on
the instrument panel, your instrument
cluster display can show how systems are
working and give warnings when they aren’t.
The steering wheel mounted controls allow
you to scroll through and enter the main
menus and submenus. You can access the
specific information you want and make
selections and adjustments.
Instrument Cluster Display Location And
Controls
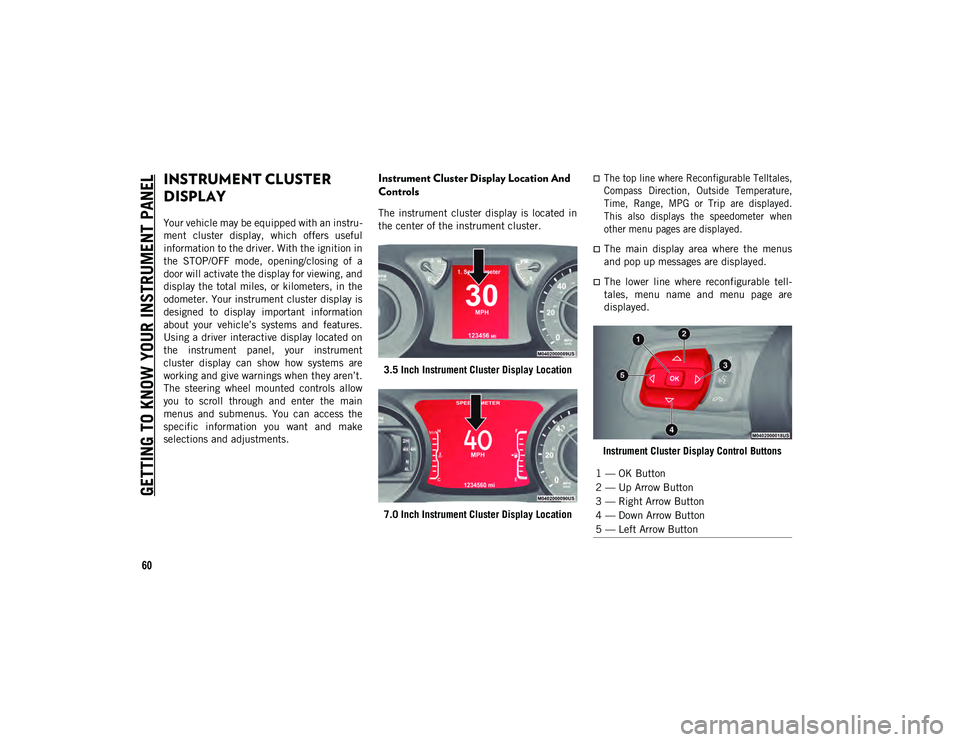
The instrument cluster display is located in
the center of the instrument cluster.
3.5 Inch Instrument Cluster Display Location
7.0 Inch Instrument Cluster Display Location
The top line where Reconfigurable Telltales,
Compass Direction, Outside Temperature,
Time, Range, MPG or Trip are displayed.
This also displays the speedometer when
other menu pages are displayed.
The main display area where the menus
and pop up messages are displayed.
The lower line where reconfigurable tell -
tales, menu name and menu page are
displayed.
Instrument Cluster Display Control Buttons
1 — OK Button
2 — Up Arrow Button
3 — Right Arrow Button
4 — Down Arrow Button
5 — Left Arrow Button
2020_JEEP_JL_WRANGLER_UG_RHD_UK.book Page 60
Page 73 of 330
71
Should one or more tires be in the condition
mentioned above, the display will show the
indications corresponding to each tire.
Each tire, including the spare (if provided),
should be checked monthly when cold and
inflated to the inflation pressure recom-
mended by the vehicle manufacturer on the
vehicle placard or tire inflation pressure
label. If your vehicle has tires of a different
size than the size indicated on the vehicle
placard or tire inflation pressure label, you
should determine the proper tire inflation
pressure for those tires.
As an added safety feature, your vehicle has
been equipped with a Tire Pressure Moni -
toring System (TPMS) that illuminates a low
tire pressure telltale when one or more of
your tires is significantly under-inflated.
Accordingly, when the low tire pressure tell -tale illuminates, you should stop and check
your tires as soon as possible, and inflate
them to the proper pressure. Driving on a
significantly under-inflated tire causes the
tire to overheat and can lead to tire failure.
Under-inflation also reduces fuel efficiency
and tire tread life, and may affect the
vehicle’s handling and stopping ability.
Please note that the TPMS is not a substitute
for proper tire maintenance, and it is the
driver’s responsibility to maintain correct tire
pressure, even if under-inflation has not
reached the level to trigger illumination of
the TPMS low tire pressure telltale.
Your vehicle has also been equipped with a
TPMS malfunction indicator to indicate
when the system is not operating properly.
The TPMS malfunction indicator is
combined with the low tire pressure telltale.
When the system detects a malfunction, the
telltale will flash for approximately one
minute and then remain continuously illumi
-
nated. This sequence will continue upon
subsequent vehicle start-ups as long as the
malfunction exists. When the malfunction
indicator is illuminated, the system may not
be able to detect or signal low tire pressure
as intended. TPMS malfunctions may occur
for a variety of reasons, including the instal -lation of replacement or alternate tires or
wheels on the vehicle that prevent the TPMS
from functioning properly. Always check the
TPMS malfunction telltale after replacing
one or more tires or wheels on your vehicle to
ensure that the replacement or alternate
tires and wheels allow the TPMS to continue
to function properly.
CAUTION!
Do not continue driving with one or more
flat tires as handling may be
compromised. Stop the vehicle, avoiding
sharp braking and steering. If a tire
puncture occurs, repair immediately using
the dedicated tire repair kit and contact an
authorized dealer as soon as possible.
CAUTION!
The TPMS has been optimized for the
original equipment tires and wheels.
TPMS pressures and warning have been
established for the tire size equipped on
your vehicle. Undesirable system operation
or sensor damage may result when using
replacement equipment that is not of the
same size, type, and/or style. Aftermarket
wheels can cause sensor damage. Using
aftermarket tire sealants may cause the
Tire Pressure Monitoring System (TPMS)
sensor to become inoperable. After using
an aftermarket tire sealant it is
recommended that you take your vehicle to
an authorized dealer to have your sensor
function checked.
2020_JEEP_JL_WRANGLER_UG_RHD_UK.book Page 71
Page 80 of 330
78
(Continued)
SAFETY
SAFETY FEATURES
Anti-Lock Brake System (ABS)
The Anti-Lock Brake System (ABS) provides
increased vehicle stability and brake perfor-
mance under most braking conditions. The
system automatically prevents wheel lock,
and enhances vehicle control during braking.
The ABS performs a self-check cycle to
ensure that the ABS is working properly each
time the vehicle is started and driven. During
this self-check, you may hear a slight
clicking sound as well as some related motor
noises.
ABS is activated during braking when the
system detects one or more wheels begin to
lock. Road conditions such as ice, snow,
gravel, bumps, railroad tracks, loose debris,
or panic stops may increase the likelihood of
ABS activation(s). You also may experience the following when
ABS activates:
The ABS motor noise (it may continue to
run for a short time after the stop)
The clicking sound of solenoid valves
Brake pedal pulsations
A slight drop of the brake pedal at the end
of the stop
These are all normal characteristics of ABS.
ABS is designed to function with the Original
Equipment Manufacturer (OEM) tires. Modi-
fication may result in degraded ABS perfor -
mance.
Anti-Lock Brake Warning Light
The yellow “Anti-Lock Brake Warning Light”
will turn on when the ignition is placed in the
ON/RUN mode and may stay on for as long
as four seconds.
WARNING!
The ABS contains sophisticated electronic
equipment that may be susceptible to inter -
ference caused by improperly installed or
high output radio transmitting equipment.
This interference can cause possible loss of
anti-lock braking capability. Installation of
such equipment should be performed by
qualified professionals.
Pumping of the Anti-Lock Brakes will
diminish their effectiveness and may
lead to a collision. Pumping makes the
stopping distance longer. Just press
firmly on your brake pedal when you
need to slow down or stop.
The ABS cannot prevent the natural laws
of physics from acting on the vehicle, nor
can it increase braking or steering effi -
ciency beyond that afforded by the
condition of the vehicle brakes and tires
or the traction afforded.
The ABS cannot prevent collisions,
including those resulting from excessive
speed in turns, following another vehicle
too closely, or hydroplaning.
The capabilities of an ABS equipped
vehicle must never be exploited in a
reckless or dangerous manner that could
jeopardize the user’s safety or the safety
of others.
WARNING! (Continued)
2020_JEEP_JL_WRANGLER_UG_RHD_UK.book Page 78
Page 82 of 330
SAFETY
80
Electronic Brake Force Distribution (EBD)
The Electronic Brake Force Distribution
(EBD) manages the distribution of the
braking torque between the front and rear
axles by limiting braking pressure to the rear
axle. This is done to prevent overslip of the
rear wheels to avoid vehicle instability, and
to prevent the rear axle from entering ABS
before the front axle.
Electronic Roll Mitigation (ERM)
Electronic Roll Mitigation (ERM) anticipates
the potential for wheel lift by monitoring the
driver’s steering wheel input and the speed
of the vehicle. When ERM determines that
the rate of change of the steering wheel
angle and vehicle’s speed are sufficient to
potentially cause wheel lift, it then applies
the appropriate brake and may also reduce
engine power to lessen the chance that
wheel lift will occur. ERM can only reduce
the chance of wheel lift occurring during
severe or evasive driving maneuvers; it
cannot prevent wheel lift due to other
factors, such as road conditions, leaving the
roadway, or striking objects or other vehicles.NOTE:
ERM is disabled anytime the ESC is in “Full
Off” mode (if equipped). Refer to “Electronic
Stability Control (ESC)” in this section for a
complete explanation of the available ESC
modes.
Electronic Stability Control (ESC)
Electronic Stability Control (ESC) enhances
directional control and stability of the
vehicle under various driving conditions.
ESC corrects for oversteering or under
-
steering of the vehicle by applying the brake
of the appropriate wheel(s) to assist in coun -teracting the oversteer or understeer condi
-
tion. Engine power may also be reduced to
help the vehicle maintain the desired path.
ESC uses sensors in the vehicle to determine
the vehicle path intended by the driver and
compares it to the actual path of the vehicle.
When the actual path does not match the
intended path, ESC applies the brake of the
appropriate wheel to assist in counteracting
the oversteer or understeer condition.
Oversteer — when the vehicle is turning
more than appropriate for the steering
wheel position.
Understeer — when the vehicle is turning
less than appropriate for the steering
wheel position.
The “ESC Activation/Malfunction Indicator
Light” located in the instrument cluster will
start to flash as soon as the ESC system
becomes active. The “ESC Activation/
Malfunction Indicator Light” also flashes
when the TCS is active. If the “ESC Activa -
tion/Malfunction Indicator Light” begins to
flash during acceleration, ease up on the
accelerator and apply as little throttle as
possible. Be sure to adapt your speed and
driving to the prevailing road conditions.
WARNING!
Many factors, such as vehicle loading,
road conditions and driving conditions,
influence the chance that wheel lift or
rollover may occur. ERM cannot prevent all
wheel lift or roll overs, especially those
that involve leaving the roadway or striking
objects or other vehicles. The capabilities
of an ERM-equipped vehicle must never
be exploited in a reckless or dangerous
manner which could jeopardize the user's
safety or the safety of others.
2020_JEEP_JL_WRANGLER_UG_RHD_UK.book Page 80