audio KIA Amanti 2008 1.G User Guide
[x] Cancel search | Manufacturer: KIA, Model Year: 2008, Model line: Amanti, Model: KIA Amanti 2008 1.GPages: 283, PDF Size: 20.47 MB
Page 115 of 283
3105
Knowing your vehicle
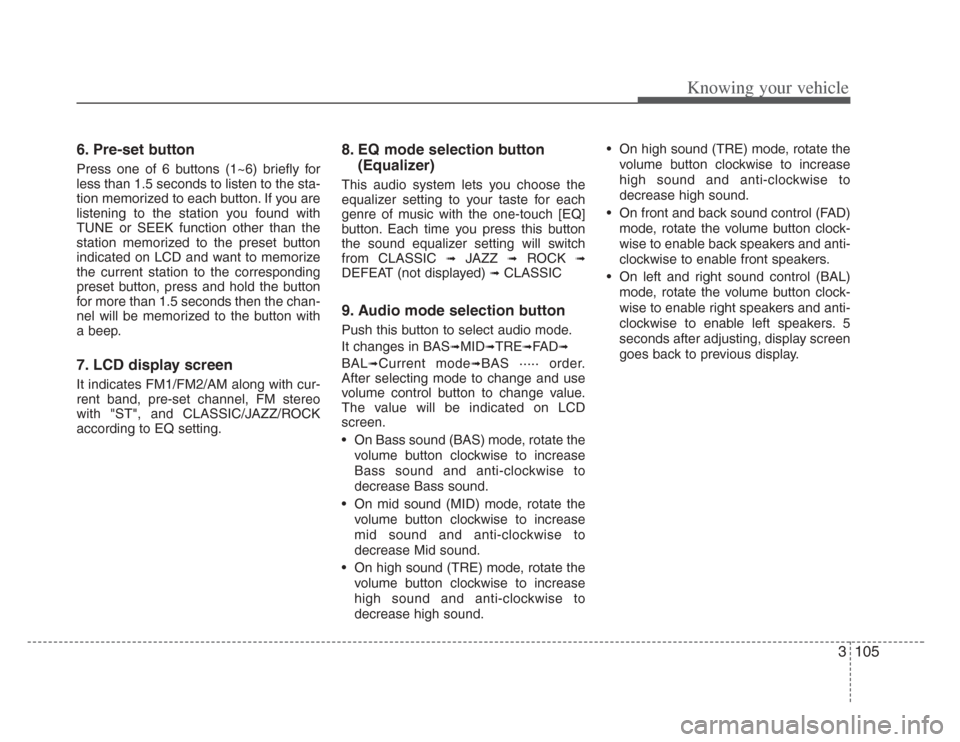
6. Pre-set button
Press one of 6 buttons (1~6) briefly for
less than 1.5 seconds to listen to the sta-
tion memorized to each button. If you are
listening to the station you found with
TUNE or SEEK function other than the
station memorized to the preset button
indicated on LCD and want to memorize
the current station to the corresponding
preset button, press and hold the button
for more than 1.5 seconds then the chan-
nel will be memorized to the button with
a beep.
7. LCD display screen
It indicates FM1/FM2/AM along with cur-
rent band, pre-set channel, FM stereo
with "ST", and CLASSIC/JAZZ/ROCK
according to EQ setting.
8. EQ mode selection button
(Equalizer)
This audio system lets you choose the
equalizer setting to your taste for each
genre of music with the one-touch [EQ]
button. Each time you press this button
the sound equalizer setting will switch
from CLASSIC
➟JAZZ ➟ROCK ➟
DEFEAT (not displayed) ➟CLASSIC
9. Audio mode selection button
Push this button to select audio mode.
It changes in BAS
➟MID➟TRE➟FA D➟
BAL➟Current mode➟BAS ····· order.
After selecting mode to change and use
volume control button to change value.
The value will be indicated on LCD
screen.
• On Bass sound (BAS) mode, rotate the
volume button clockwise to increase
Bass sound and anti-clockwise to
decrease Bass sound.
• On mid sound (MID) mode, rotate the volume button clockwise to increase
mid sound and anti-clockwise to
decrease Mid sound.
• On high sound (TRE) mode, rotate the volume button clockwise to increase
high sound and anti-clockwise to
decrease high sound. • On high sound (TRE) mode, rotate the
volume button clockwise to increase
high sound and anti-clockwise to
decrease high sound.
• On front and back sound control (FAD) mode, rotate the volume button clock-
wise to enable back speakers and anti-
clockwise to enable front speakers.
• On left and right sound control (BAL) mode, rotate the volume button clock-
wise to enable right speakers and anti-
clockwise to enable left speakers. 5
seconds after adjusting, display screen
goes back to previous display.
Page 120 of 283
Knowing your vehicle
1103
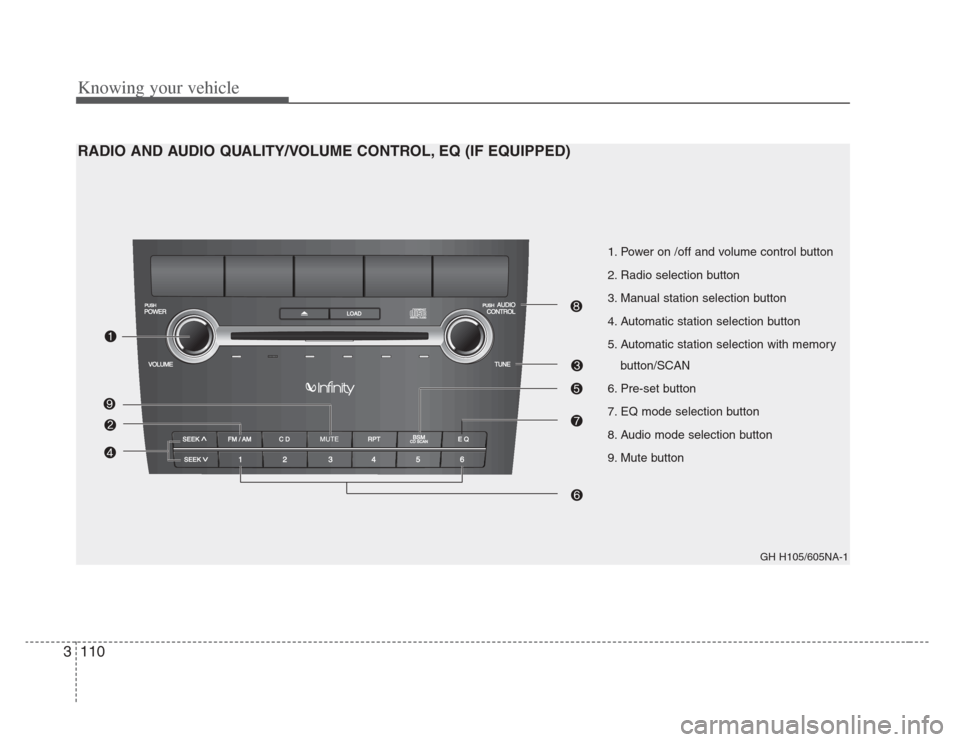
1. Power on /off and volume control button
2. Radio selection button
3. Manual station selection button
4. Automatic station selection button
5. Automatic station selection with memorybutton/SCAN
6. Pre-set button
7. EQ mode selection button
8. Audio mode selection button
9. Mute button
GH H105/605NA-1
RADIO AND AUDIO QUALITY/VOLUME CONTROL, EQ (IF EQUIPPED)
Page 122 of 283
Knowing your vehicle
1123
6. Pre-set button
Press one of 6 buttons (1~6) briefly for
less than 1.5 seconds to listen to the sta-
tion memorized to each button. If you are
listening to the station you found with
TUNE or SEEK function other than the
station memorized to the preset button
indicated on LCD and want to memorize
the current station to the corresponding
preset button, press and hold the button
for more than 1.5 seconds then the
channel will be memorized to the button
with a beep.
7. EQ mode selection button(Equalizer)
This audio system lets you choose the
equalizer setting to your taste for each
genre of music with the one-touch [EQ]
button. Each time you press this button
the sound equalizer setting will switch
from CLASSIC
➟JAZZ ➟ROCK ➟
DEFEAT (not displayed) ➟CLASSIC
8. Audio mode selection button
Push this button to select audio mode. It
changes in BAS
➟MID➟TRE➟FA D➟BAL
➟Current mode➟BAS ····· order. After
selecting mode to change and use vol-
ume control button to change value. The
value will be indicated on LCD screen.
• On Bass sound (BAS) mode, rotate the volume button clockwise to increase
Bass sound and anti-clockwise to
decrease Bass sound.
• On mid sound (MID) mode, rotate the volume button clockwise to increase
mid sound and anti-clockwise to
decrease Mid sound.
• On high sound (TRE) mode, rotate the volume button clockwise to increase
high sound and anti-clockwise to
decrease high sound.
• On high sound (TRE) mode, rotate the volume button clockwise to increase
high sound and anti-clockwise to
decrease high sound.
• On front and back sound control (FAD) mode, rotate the volume button clock-
wise to enable back speakers and anti-
clockwise to enable front speakers. • On left and right sound control (BAL)
mode, rotate the volume button clock-
wise to enable right speakers and anti-
clockwise to enable left speakers. 5
seconds after adjusting, display screen
goes back to previous display.
9. Mute button
Push [Mute] button to disable sound.
Push again or other button to enable
sound again.
Page 223 of 283
In case of an emergency
106
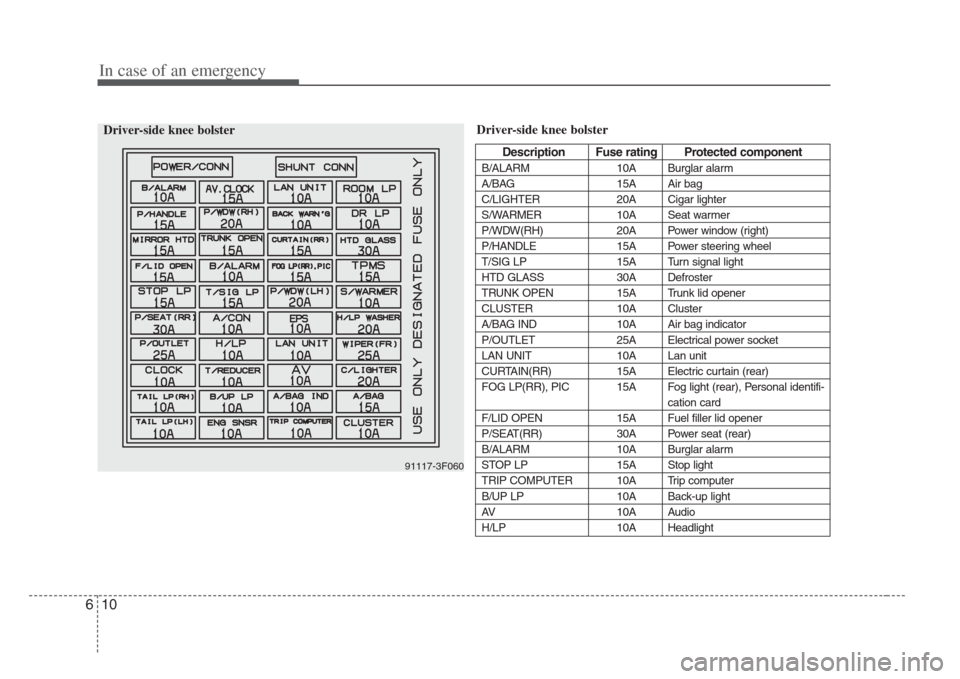
Driver-side knee bolster
Description Fus e rating Protected component
B/ALARM 10A Burglar alarm
A/BAG 15A Air bag
C/LIGHTER 20A Cigar lighter
S/WARMER 10A Seat warmer
P/WDW(RH) 20A Power window (right)
P/HANDLE 15A Power steering wheel
T/SIG LP 15A Turn signal light
HTD GLASS 30A Defroster
TRUNK OPEN 15A Trunk lid opener
CLUSTER 10A Cluster
A/BAG IND 10A Air bag indicator
P/OUTLET 25A Electrical power socket
LAN UNIT 10A Lan unit
CURTAIN(RR) 15A Electric curtain (rear)
FOG LP(RR), PIC 15A Fog light (rear), Personal identifi- cation card
F/LID OPEN 15A Fuel filler lid opener
P/SEAT(RR) 30A Power seat (rear)
B/ALARM 10A Burglar alarm
STOP LP 15A Stop light
TRIP COMPUTER 10A Trip computer
B/UP LP 10A Back-up light
AV 10A Audio
H/LP 10A Headlight
91117-3F060
Driver-side knee bolster
Page 224 of 283
611
In case of an emergency
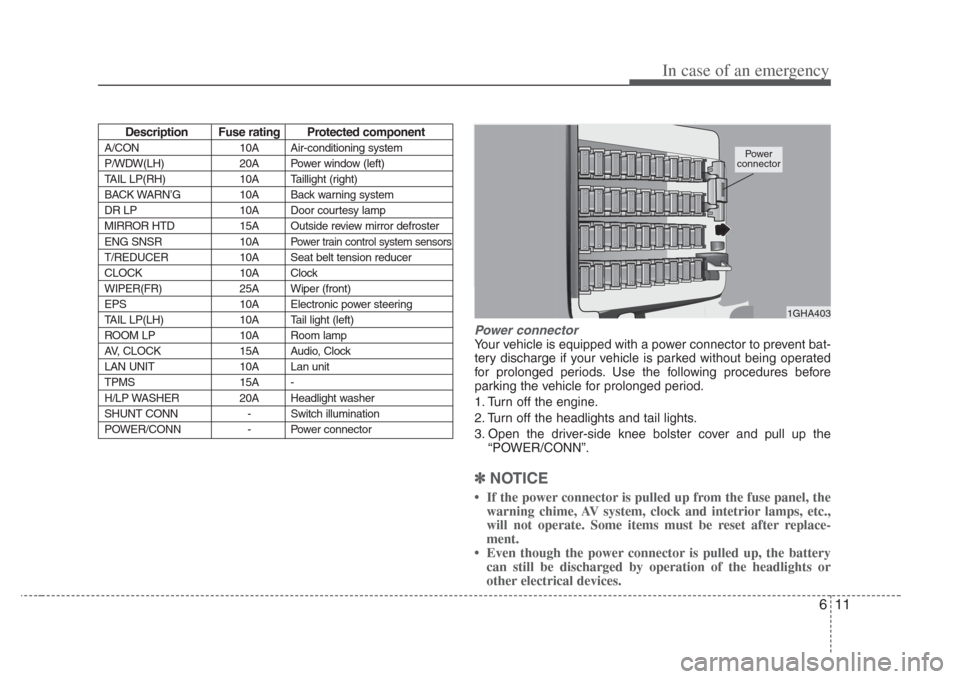
Power connector
Your vehicle is equipped with a power connector to prevent bat-
tery discharge if your vehicle is parked without being operated
for prolonged periods. Use the following procedures before
parking the vehicle for prolonged period.
1. Turn off the engine.
2. Turn off the headlights and tail lights.
3. Open the driver-side knee bolster cover and pull up the“POWER/CONN”.
✽NOTICE
If the power connector is pulled up from the fuse panel, the
warning chime, AV system, clock and intetrior lamps, etc.,
will not operate. Some items must be reset after replace-
ment.
Even though the power connector is pulled up, the battery can still be discharged by operation of the headlights or
other electrical devices.
Des cription Fus e rating Protected component
A/CON 10A Air-conditioning system
P/WDW(LH) 20A Power window (left)
TAIL LP(RH) 10A Taillight (right)
BACK WARN’G 10A Back warning system
DR LP 10A Door courtesy lamp
MIRROR HTD 15A Outside review mirror defroster
ENG SNSR 10A
Power train control system sensors
T/REDUCER10A Seat belt tension reducer
CLOCK 10A Clock
WIPER(FR) 25A Wiper (front)
EPS 10A Electronic power steering
TAIL LP(LH) 10A Tail light (left)
ROOM LP 10A Room lamp
AV, CLOCK 15A Audio, Clock
LAN UNIT 10A Lan unit
TPMS 15A -
H/LP WASHER 20A Headlight washer
SHUNT CONN - Switch illumination
POWER/CONN - Power connector
1GHA403
Power
connector
Page 258 of 283
723
Maintenance
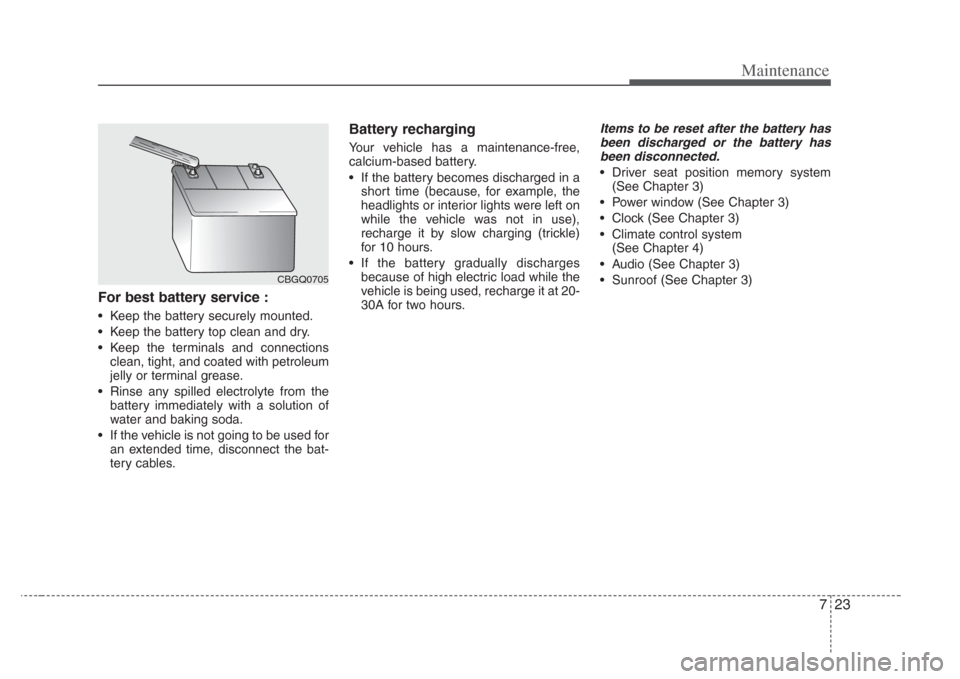
For best battery service :
• Keep the battery securely mounted.
• Keep the battery top clean and dry.
• Keep the terminals and connectionsclean, tight, and coated with petroleum
jelly or terminal grease.
• Rinse any spilled electrolyte from the battery immediately with a solution of
water and baking soda.
• If the vehicle is not going to be used for an extended time, disconnect the bat-
tery cables.
Battery recharging
Your vehicle has a maintenance-free,
calcium-based battery.
• If the battery becomes discharged in ashort time (because, for example, the
headlights or interior lights were left on
while the vehicle was not in use),
recharge it by slow charging (trickle)
for 10 hours.
• If the battery gradually discharges because of high electric load while the
vehicle is being used, recharge it at 20-
30A for two hours.
Items to be reset after the battery ha s
been discharged or the battery ha s
been disconnected.
• Driver seat position memory system (See Chapter 3)
• Power window (See Chapter 3)
• Clock (See Chapter 3)
• Climate control system (See Chapter 4)
• Audio (See Chapter 3)
• Sunroof (See Chapter 3)
CBGQ0705
Page 281 of 283
Index
29
Air bags-advanced supplemental restraint system ···3-52
Air cleaner ··················\
··················\
··················\
··············7-19
Antenna ··················\
··················\
··················\
··················\
·3-98
Audio remote control··················\
··················\
···············3-99
Audio systems ··················\
··················\
··················\
·······3-100
Automatic climate control system ··················\
············4-43
Automatic transaxle ··················\
··················\
·········4-5, 7-16
Battery··················\
··················\
··················\
··················\
···7-22
Before driving··················\
··················\
··················\
···········5-5
Brake system ··················\
··················\
··················\
··········4-10
Brakes ··················\
··················\
··················\
··················\
···7-14
Climate control air filter ··················\
··················\
·········7-19
Cruise control system ··················\
··················\
··············4-19
Defroster ··················\
··················\
··················\
·················4-41\
Door locks ··················\
··················\
··················\
·················3-9
Driver position memory system··················\
················3-28Electrical circuit protection ··················\
··················\
······6-5
Electronic stability control ··················\
··················\
······4-22
Emergency starting··················\
··················\
··················\
··6-3
Emission control system ··················\
··················\
············5-3
Engine compartment ··················\
··················\
········2-4, 7-10
Engine cooling system ··················\
··················\
·············7-12
Engine oil and oil filter ··················\
··················\
············7-11
Exterior care··················\
··················\
··················\
···········7-38
Fuel filler lid ··················\
··················\
··················\
···········3-81
Fuel requirements ··················\
··················\
··················\
····5-2
Gauges ··················\
··················\
··················\
··················\
···4-26
Hazard warning flasher ··················\
··················\
··········4-42
Homelink® wireless control system ··················\
·········5-25
Hood ··················\
··················\
··················\
··················\
······3-80
How to use this manual ··················\
··················\
·············1-2
If you have a flat tire ··················\
··················\
···············6-17
A
B
C
D
E
F
G
H
I