KIA Borrego 2010 1.G Owner's Manual
Manufacturer: KIA, Model Year: 2010, Model line: Borrego, Model: KIA Borrego 2010 1.GPages: 461, PDF Size: 12.25 MB
Page 361 of 461
563
Driving your vehicle
E150101AHMVehicle capacity weight:525 kg (1157 lbs.)
Vehicle capacity weight is the maxi-
mum combined weight of occupants
and cargo. If your vehicle is equipped
with a trailer, the combined weight
includes the tongue load.E150102AENSeating capacity:Total : 7 persons (Front seat : 2 persons, Rear seat : 5 persons)
Seating capacity is the maximum
number of occupants including a
driver, your vehicle may carry.
However, the seating capacity may
be reduced based upon the weight of
all of the occupants, and the weight
of the cargo being carried or towed.
Do not overload the vehicle as there
is a limit to the total weight, or load
limit including occupants and cargo,
the vehicle can carry.
VEHICLE LOAD LIMIT
OHM059047NOHM059048N
OHM059052NOHM059053N
E150100AUNTire and loading information label
The label located on the driver's door sill gives the original tire size, cold
tire pressures recommended for your vehicle, the number of people that
can be in your vehicle and vehicle capacity weight.
Page 362 of 461
Driving your vehicle64
5E150103AHMTowing capacity:
Without trailer brakes:
750 kg (1650 lbs)
With trailer brakes:
Towing capacity is the maximum
trailer weight including its cargo
weight, your vehicle can tow.
E150104AUNCargo capacity:The cargo capacity of your vehicle
will increase or decrease depending
on the weight and the number of
occupants and the tongue load, if
your vehicle is equipped with a trail-
er.
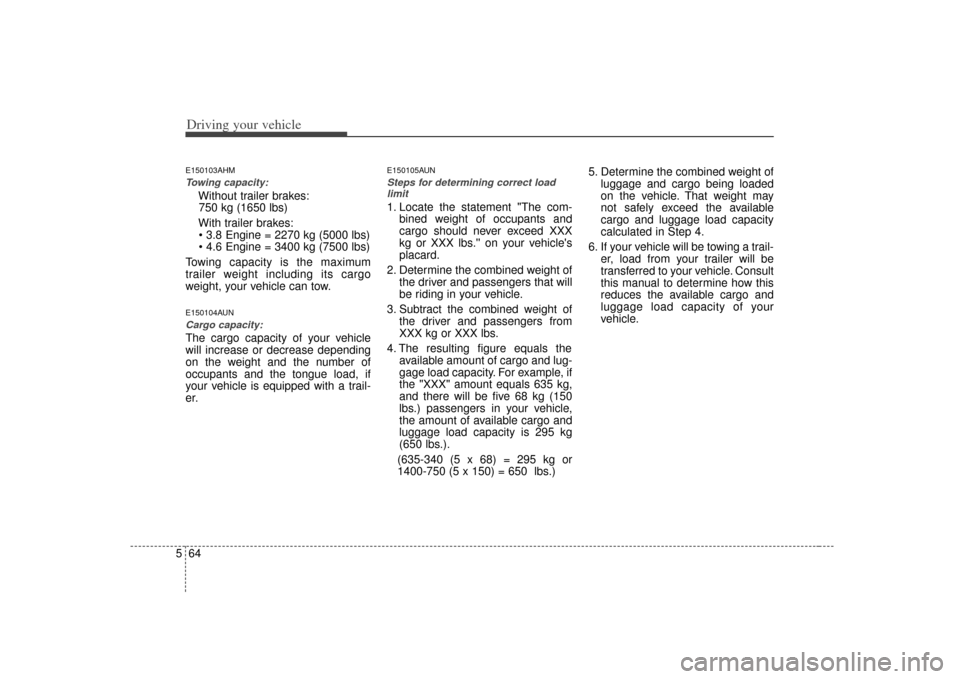
E150105AUNSteps for determining correct load limit1. Locate the statement "The com- bined weight of occupants and
cargo should never exceed XXX
kg or XXX lbs.'' on your vehicle's
placard.
2. Determine the combined weight of the driver and passengers that will
be riding in your vehicle.
3. Subtract the combined weight of the driver and passengers from
XXX kg or XXX lbs.
4. The resulting figure equals the available amount of cargo and lug-
gage load capacity. For example, if
the "XXX" amount equals 635 kg,
and there will be five 68 kg (150
lbs.) passengers in your vehicle,
the amount of available cargo and
luggage load capacity is 295 kg
(650 lbs.).
(635-340 (5 x 68) = 295 kg or
1400-750 (5 x 150) = 650 lbs.) 5. Determine the combined weight of
luggage and cargo being loaded
on the vehicle. That weight may
not safely exceed the available
cargo and luggage load capacity
calculated in Step 4.
6. If your vehicle will be towing a trail- er, load from your trailer will be
transferred to your vehicle. Consult
this manual to determine how this
reduces the available cargo and
luggage load capacity of your
vehicle.
Page 363 of 461
565
Driving your vehicle
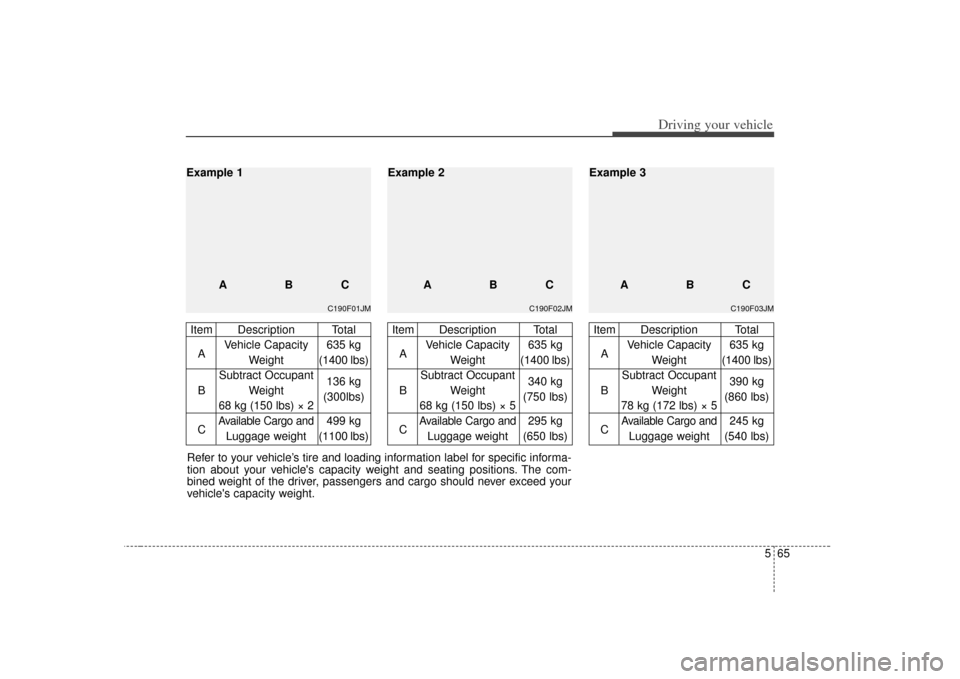
Refer to your vehicle’s tire and loading information label for specific informa-
tion about your vehicle's capacity weight and seating positions. The com-
bined weight of the driver, passengers and cargo should never exceed your
vehicle's capacity weight.
C190F01JM
Item Description TotalA Vehicle Capacity 635 kg
Weight (1400 lbs)
Subtract Occupant
B Weight 136 kg
68 kg (150 lbs) × 2 (
300lbs)
C
Available Cargo and
499 kg
Luggage weight (1100 lbs)
Example 1
ABC
C190F02JM
Item Description TotalA Vehicle Capacity 635 kg
Weight (1400 lbs)
Subtract Occupant
B Weight 340 kg
68 kg (150 lbs) × 5 (
750 lbs)
C
Available Cargo and
295 kg
Luggage weight (650 lbs)
ABC
Example 2
C190F03JM
Item Description Total
A Vehicle Capacity 635 kg
Weight (1400 lbs)
Subtract Occupant
B Weight 390 kg
78 kg (172 lbs) × 5 (860 lbs)
C
Available Cargo and
245 kg
Luggage weight (540 lbs)
ABC
Example 3
Page 364 of 461
Driving your vehicle66
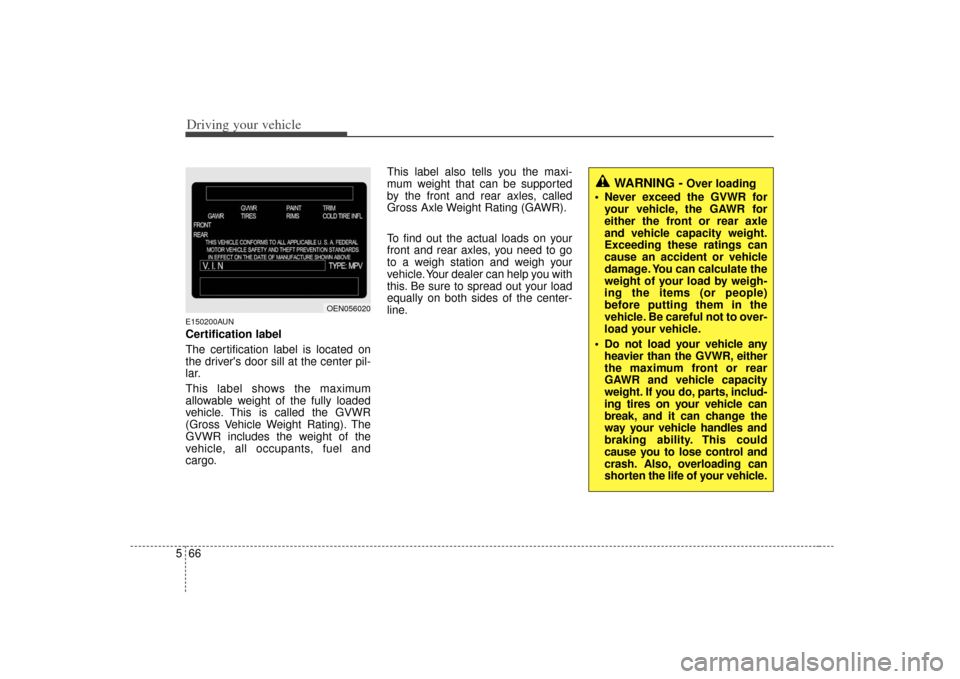
5E150200AUNCertification label
The certification label is located on
the driver's door sill at the center pil-
lar.
This label shows the maximum
allowable weight of the fully loaded
vehicle. This is called the GVWR
(Gross Vehicle Weight Rating). The
GVWR includes the weight of the
vehicle, all occupants, fuel and
cargo. This label also tells you the maxi-
mum weight that can be supported
by the front and rear axles, called
Gross Axle Weight Rating (GAWR).
To find out the actual loads on your
front and rear axles, you need to go
to a weigh station and weigh your
vehicle. Your dealer can help you with
this. Be sure to spread out your load
equally on both sides of the center-
line.
OEN056020
WARNING -
Over loading
Never exceed the GVWR for your vehicle, the GAWR for
either the front or rear axle
and vehicle capacity weight.
Exceeding these ratings can
cause an accident or vehicle
damage. You can calculate the
weight of your load by weigh-
ing the items (or people)
before putting them in the
vehicle. Be careful not to over-
load your vehicle.
Do not load your vehicle any heavier than the GVWR, either
the maximum front or rear
GAWR and vehicle capacity
weight. If you do, parts, includ-
ing tires on your vehicle can
break, and it can change the
way your vehicle handles and
braking ability. This could
cause you to lose control and
crash. Also, overloading can
shorten the life of your vehicle.
Page 365 of 461

567
Driving your vehicle
The label will help you decide how
much cargo and installed equipment
your vehicle can carry.
If you carry items inside your vehicle
- like suitcases, tools, packages, or
anything else - they are moving as
fast as the vehicle. If you have to stop
or turn quickly, or if there is a crash,
the items will keep going and can
cause an injury if they strike the driv-
er or a passenger.
WARNING
Overloading your vehicle cancause heat buildup in your
vehicle's tires and possible
tire failure that could lead to a
crash.
Overloading your vehicle can cause increased stopping dis-
tances that could lead to a
crash.
A crash resulting from poor handling vehicle damage, tire
failure, or increased stopping
distances could result in seri-
ous injury or death.
WARNING
- Loose cargo
Items you carry inside your
vehicle can strike and injure
occupants in a sudden stop or
turn, or in a crash.
Put items in the cargo area of your vehicle. Try to spread the
weight evenly.
Never stack items, like suit- cases, inside the vehicle
above the tops of the seats.
Do not leave an unsecured child restraint in your vehicle.
When you carry something inside the vehicle, secure it.
Do not drive with a seat folded down unless necessary.
CAUTION
Overloading your vehicle may
cause damage. Repairs wouldnot be covered by your warran-ty. Do not overload your vehicle.
Using heavier suspension com- ponents to get added durabilitymight not change your weightratings. Ask your dealer to helpyou load your vehicle the rightway.
Page 366 of 461
Driving your vehicle68
5E160000AUNThis section will guide you in the proper
loading of your vehicle and/or trailer, to
keep your loaded vehicle weight within its
design rating capability, with or without a
trailer. Properly loading your vehicle will
provide maximum return of the vehicle
design performance. Before loading your
vehicle, familiarize yourself with the fol-
lowing terms for determining your vehi-
cle's weight ratings, with or without a
trailer, from the vehicle's specifications
and the certification label:E160100AUNBase curb weight
This is the weight of the vehicle including
a full tank of fuel and all standard equip-
ment. It does not include passengers,
cargo, or optional equipment.E160200AUNVehicle curb weight
This is the weight of your new vehicle
when you picked it up from your dealer
plus any aftermarket equipment.
E160300AUNCargo weight
This figure includes all weight added to
the Base Curb Weight, including cargo
and optional equipment.E160400AUNGAW (Gross axle weight)
This is the total weight placed on each
axle (front and rear) - including vehicle
curb weight and all payload.E160500AUNGAWR (Gross axle weight rating)This is the maximum allowable weight
that can be carried by a single axle (front
or rear). These numbers are shown on
the certification label.
The total load on each axle must never
exceed its GAWR.E160600AUNGVW (Gross vehicle weight)
This is the Base Curb Weight plus actual
Cargo Weight plus passengers.
E160700AUN-EUGVWR (Gross vehicle weight rating)
This is the maximum allowable weight of
the fully loaded vehicle (including all
options, equipment, passengers and
cargo). The GVWR is shown on the cer-
tification label located on the driver’s
door sill.
VEHICLE WEIGHT
Page 367 of 461
6
Road warning / 6-2
In case of an emergency while driving / 6-2
If the engine will not start / 6-3
Emergency starting / 6-4
If the engine overheats / 6-6
Tire pressure monitoring system (TPMS) / 6-7
If you have a flat tire / 6-12
Towing / 6-20
What to do in an emergency
Page 368 of 461
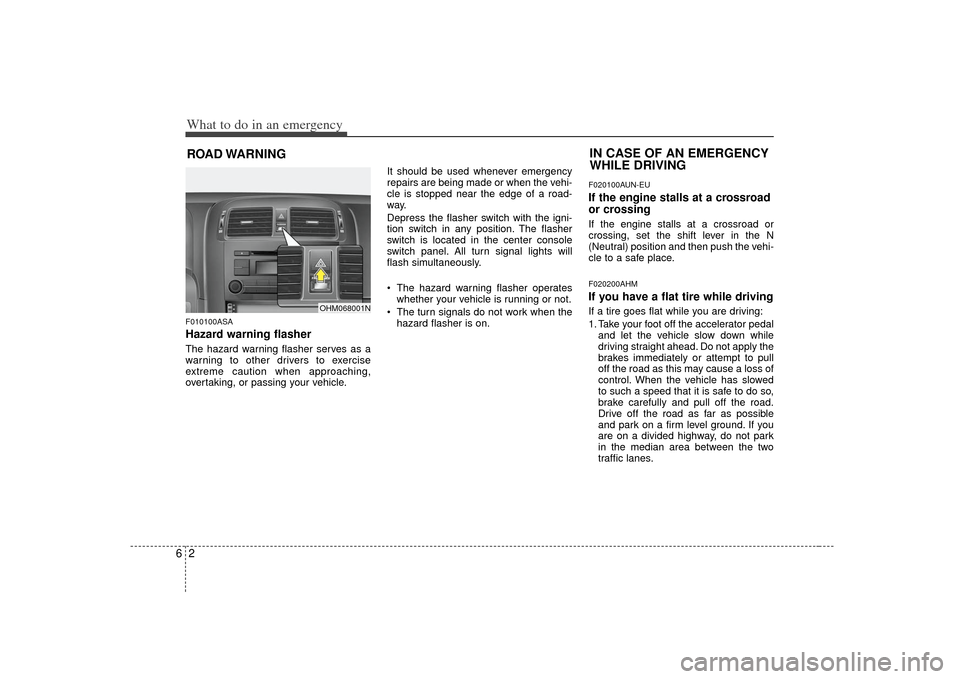
What to do in an emergency26ROAD WARNING F010100ASAHazard warning flasher The hazard warning flasher serves as a
warning to other drivers to exercise
extreme caution when approaching,
overtaking, or passing your vehicle.It should be used whenever emergency
repairs are being made or when the vehi-
cle is stopped near the edge of a road-
way.
Depress the flasher switch with the igni-
tion switch in any position. The flasher
switch is located in the center console
switch panel. All turn signal lights will
flash simultaneously.
• The hazard warning flasher operates
whether your vehicle is running or not.
The turn signals do not work when the hazard flasher is on.
F020100AUN-EUIf the engine stalls at a crossroad
or crossingIf the engine stalls at a crossroad or
crossing, set the shift lever in the N
(Neutral) position and then push the vehi-
cle to a safe place.F020200AHMIf you have a flat tire while drivingIf a tire goes flat while you are driving:
1. Take your foot off the accelerator pedaland let the vehicle slow down while
driving straight ahead. Do not apply the
brakes immediately or attempt to pull
off the road as this may cause a loss of
control. When the vehicle has slowed
to such a speed that it is safe to do so,
brake carefully and pull off the road.
Drive off the road as far as possible
and park on a firm level ground. If you
are on a divided highway, do not park
in the median area between the two
traffic lanes.IN CASE OF AN EMERGENCY
WHILE DRIVING
OHM068001N
Page 369 of 461
63
What to do in an emergency
2. When the vehicle is stopped, turn onyour emergency hazard flashers, set
the parking brake and put the trans-
mission in P (Park).
3. Have all passengers get out of the vehicle. Be sure they all get out on the
side of the car that is away from traffic.
4. When changing a flat tire, follow the instruction provided later in this sec-
tion.F020300AUNIf engine stalls while driving1. Reduce your speed gradually, keeping a straight line. Move cautiously off the
road to a safe place.
2. Turn on your emergency flashers.
3. Try to start the engine again. If your vehicle will not start, contact an
authorized KIA dealer or seek other
qualified assistance.
F030100AHMIf engine doesn't turn over or
turns over slowly1. If your car has an automatic transmis-sion, be sure the shift lever is in N
(Neutral) or P (Park) and the emer-
gency brake is set.
2. Check the battery connections to be sure they are clean and tight.
3. Turn on the interior light. If the light dims or goes out when you operate the
starter, the battery is discharged.
4. Check the starter connections to be sure they are securely tightened.
5. Do not push or pull the vehicle to start it. See instructions for "Jump starting".
F030200AHMIf engine turns over normally but
does not start1. Check the fuel level.
2. With the ignition switch in the LOCKposition, check all connectors at the
ignition coils and spark plugs.
Reconnect any that may be discon-
nected or loose.
3. Check the fuel line in the engine com- partment.
4. If the engine still does not start, call an authorized KIA dealer or seek other
qualified assistance.
IF THE ENGINE WILL NOT START
WARNING
If the engine will not start, do not
push or pull the car to start it. This
could result in a collision or cause
other damage. In addition, push or
pull starting may cause the catalyt-
ic converter to be overloaded and
create a fire hazard.
Page 370 of 461
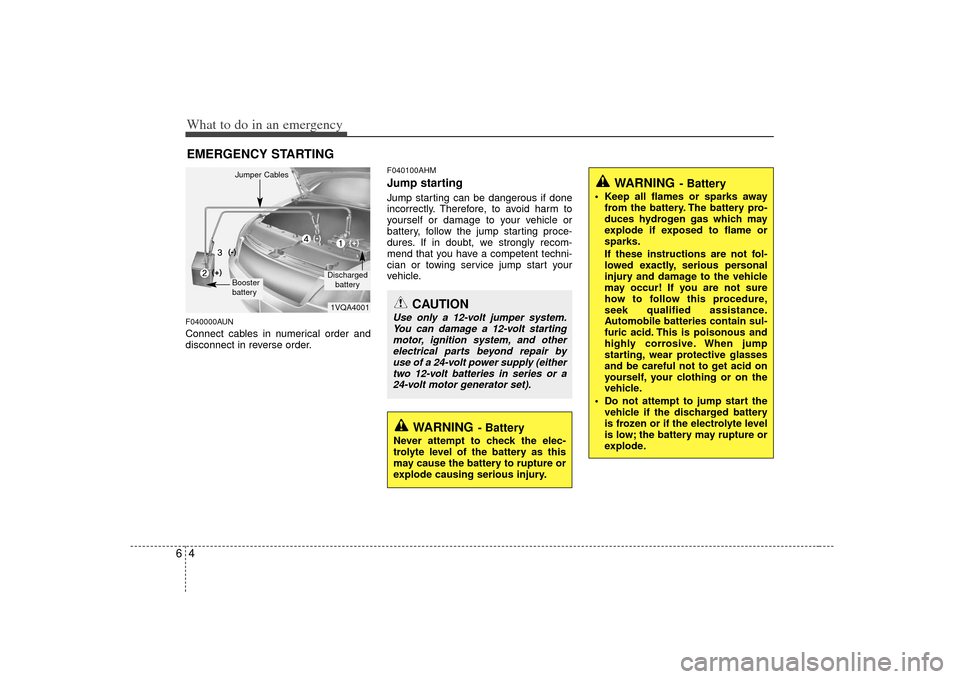
What to do in an emergency46EMERGENCY STARTINGF040000AUNConnect cables in numerical order and
disconnect in reverse order.
F040100AHMJump starting Jump starting can be dangerous if done
incorrectly. Therefore, to avoid harm to
yourself or damage to your vehicle or
battery, follow the jump starting proce-
dures. If in doubt, we strongly recom-
mend that you have a competent techni-
cian or towing service jump start your
vehicle.
CAUTION
Use only a 12-volt jumper system.You can damage a 12-volt startingmotor, ignition system, and other electrical parts beyond repair byuse of a 24-volt power supply (either two 12-volt batteries in series or a24-volt motor generator set).
WARNING
- Battery
• Keep all flames or sparks away from the battery. The battery pro-
duces hydrogen gas which may
explode if exposed to flame or
sparks.
If these instructions are not fol-
lowed exactly, serious personal
injury and damage to the vehicle
may occur! If you are not sure
how to follow this procedure,
seek qualified assistance.
Automobile batteries contain sul-
furic acid. This is poisonous and
highly corrosive. When jump
starting, wear protective glasses
and be careful not to get acid on
yourself, your clothing or on the
vehicle.
Do not attempt to jump start the vehicle if the discharged battery
is frozen or if the electrolyte level
is low; the battery may rupture or
explode.
WARNING
- Battery
Never attempt to check the elec-
trolyte level of the battery as this
may cause the battery to rupture or
explode causing serious injury.
1VQA4001Discharged
battery
Jumper CablesBooster
battery(-)
(+)
(+)
(-)