KIA Borrego 2011 1.G Owner's Manual
Manufacturer: KIA, Model Year: 2011, Model line: Borrego, Model: KIA Borrego 2011 1.GPages: 464, PDF Size: 12.57 MB
Page 211 of 464
4131
Features of your vehicle
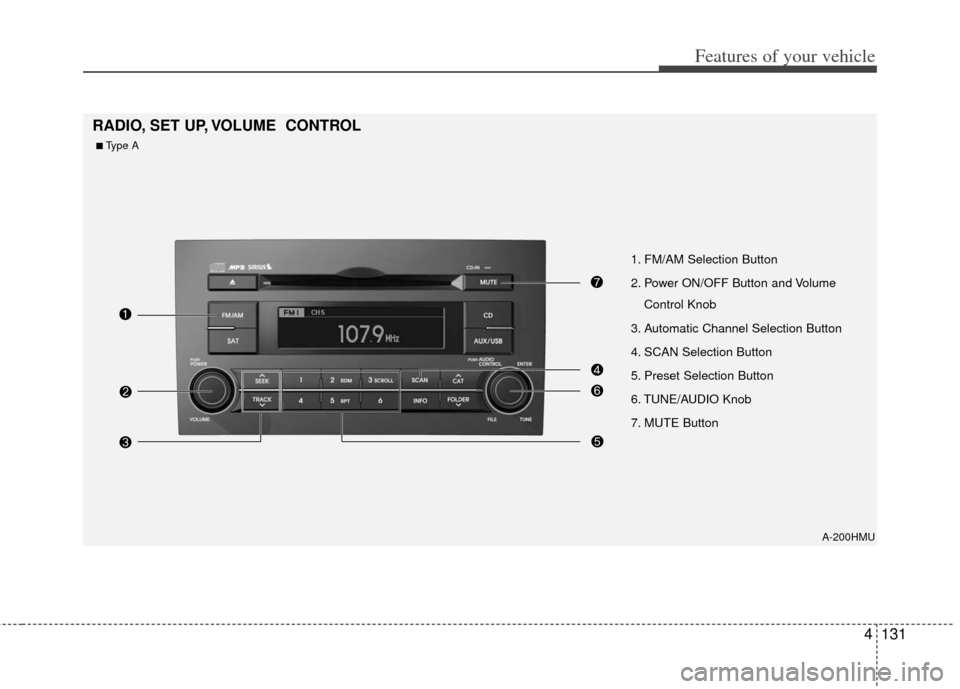
A-200HMU
1. FM/AM Selection Button
2. Power ON/OFF Button and VolumeControl Knob
3. Automatic Channel Selection Button
4. SCAN Selection Button
5. Preset Selection Button
6. TUNE/AUDIO Knob
7. MUTE Button
RADIO, SET UP, VOLUME CONTROL
■Type A
Page 212 of 464

Features of your vehicle
132
4
A-300HMU
1. FM/AM Selection Button
2. Power ON/OFF Button and Volume
Control Knob
3. Automatic Channel Selection Button
4. SCAN Selection Button
5. Preset Selection Button
6. TUNE/AUDIO Knob
■Type B
Page 213 of 464

4133
Features of your vehicle
A-350HMU
1. FM/AM Selection Button
2. Power ON/OFF Button and VolumeControl Knob
3. Automatic Channel Selection Button
4. SCAN Selection Button
5. Preset Selection Button
6. TUNE/AUDIO Knob
■Type C
Page 214 of 464
Features of your vehicle
134
4
How to Activate RADIO,
SET UP, VOLUME Control
1. FM/AM Selection Button The FM/AM button toggles between FM
and AM. Listed below are the paths as
the system switches from FM to AM and
back to FM.
FM/AM : FM1
➟FM2➟AM➟FM1...
FM : FM1
➟FM2➟FM1...
2. Power ON/OFF Button & Volume Control Knob
Turns the audio system on/off when
the ignition switch is on ACC or ON.
If the knob is turned clockwise/counter- clockwise, the volume will increase
/decrease.
3. Automatic Channel Selection Button
When the [TRACK ] is pressed, it
will automatically tune to the next lower
station.
When the [SEEK ] is pressed, it will automatically tune to the next higher
station.
4. SCAN Selection Button
When the button is pressed, it auto-matically scans the radio stations
upwards.
The SCAN feature steps through each station, starting from the initial station,
for ten seconds.
Press the [SCAN] button again to stop the scan feature and to listen to the
currently selected channel.
5. Preset Selection Button
Press [1]~[6] buttons less than 0.8 sec-ond to play the station saved in each
button.
Press [1]~[6] b utton more than 0.8 sec-
ond or longer to save the current station
to the respective button with a beep.
6. TUNE/AUDIO Knob
If the knob is turned clockwise/counter-
clockwise, the frequency will increase/
decrease.
(AM 10kHz, FM 200kHz)
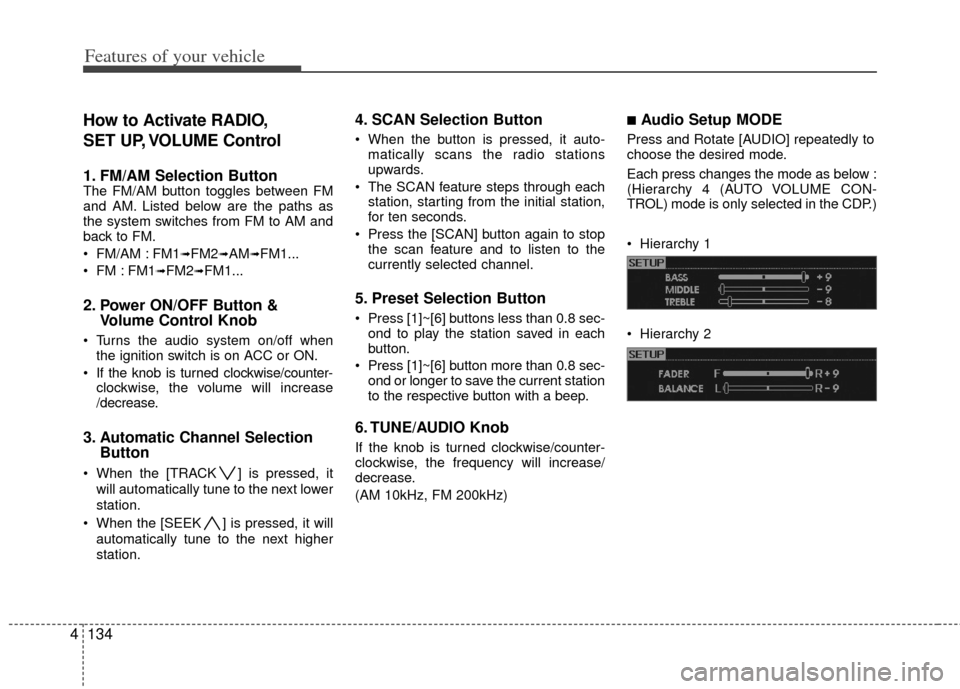
■Audio Setup MODE
Press and Rotate [AUDIO] repeatedly to
choose the desired mode.
Each press changes the mode as below :
(Hierarchy 4 (AUTO VOLUME CON-
TROL) mode is only selected in the CDP.)
Hierarchy 1
Hierarchy 2
Page 215 of 464
![KIA Borrego 2011 1.G Owners Manual 4135
Features of your vehicle
Hierarchy 3
Hierarchy 4
Hierarchy 5❈For example: To Adjusting FADER
Press [AUDIO] to activate SETUP mode, then Hierarchy 1 is selected.
Rotate [AUDIO], Hierarchy KIA Borrego 2011 1.G Owners Manual 4135
Features of your vehicle
Hierarchy 3
Hierarchy 4
Hierarchy 5❈For example: To Adjusting FADER
Press [AUDIO] to activate SETUP mode, then Hierarchy 1 is selected.
Rotate [AUDIO], Hierarchy](/img/2/2922/w960_2922-214.png)
4135
Features of your vehicle
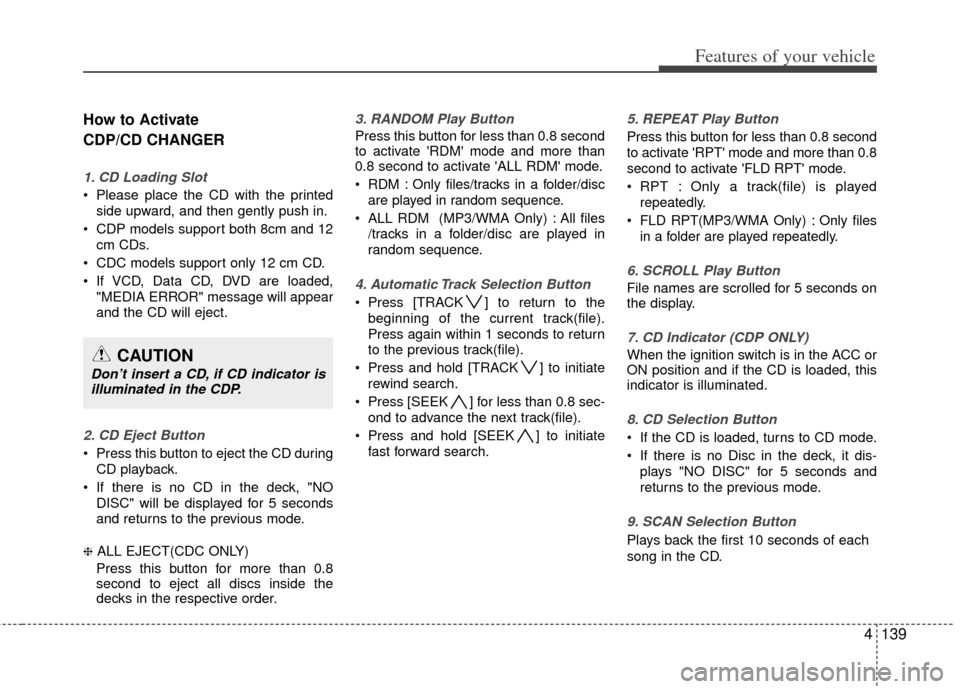
Hierarchy 3
Hierarchy 4
Hierarchy 5❈For example: To Adjusting FADER
Press [AUDIO] to activate SETUP mode, then Hierarchy 1 is selected.
Rotate [AUDIO], Hierarchy 2 is dis- played.
Press [AUDIO] to select the FADER control mode.
Rotate [AUDIO], to adjust the FADER level.
- If [AUDIO] is not pressed/rotated for 5 seconds after adjusting, the display
automatically returns to normal mode.
- Another adjusting mode can be used for same operation.
❈To Select "SIRIUS DISPLAY" mode
If "CAT/CH" or "ART/TITLE" is selected
in the SIRIUS DISPLAY mode, selected
mode will be displayed basically and
another display mode will be displayed
for 3 seconds automatically once.
7. MUTE Button (CDP ONLY)
Press [MUTE] to stop the sound and
"MUTE" is displayed on the LCD.
Page 216 of 464

Features of your vehicle
136
4
A-200HMU
1. CD Loading SLOT
2. CD Eject Button
3. RANDOM Play Button
4. Automatic Track Selection Button
5. REPEAT Play Button
6. SCROLL Play Button
7. CD Indicator
8. CD Selection Button
9. SCAN Play Button
10. Track(File) Search Knob and ENTER
Button
11. Folder search Button
12. INFORMATION Button
CDP
Page 217 of 464
4137
Features of your vehicle
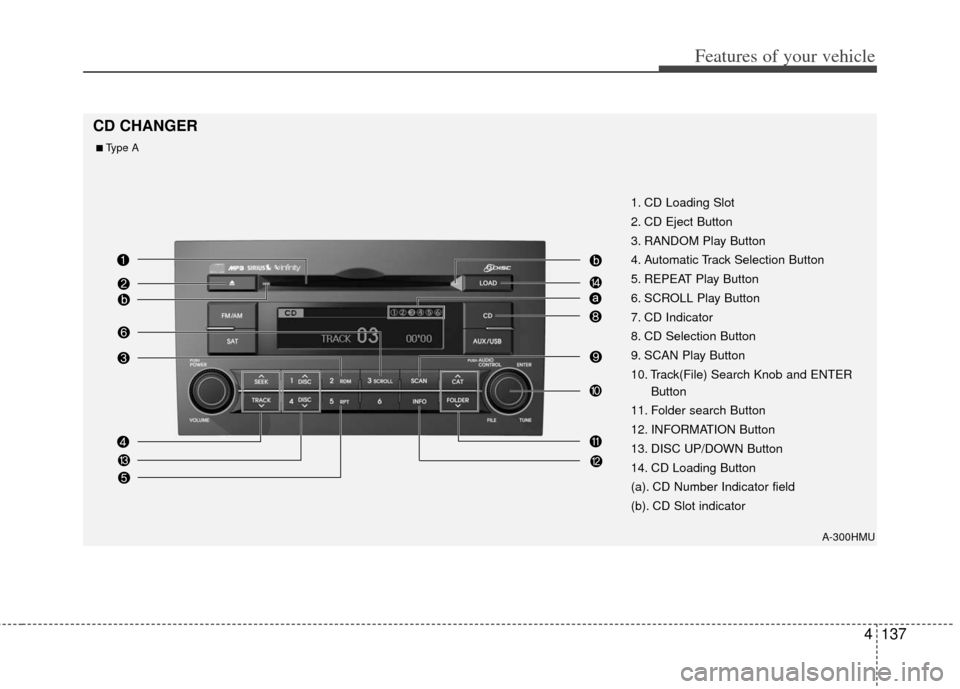
A-300HMU
1. CD Loading Slot
2. CD Eject Button
3. RANDOM Play Button
4. Automatic Track Selection Button
5. REPEAT Play Button
6. SCROLL Play Button
7. CD Indicator
8. CD Selection Button
9. SCAN Play Button
10. Track(File) Search Knob and ENTERButton
11. Folder search Button
12. INFORMATION Button
13. DISC UP/DOWN Button
14. CD Loading Button
(a). CD Number Indicator field
(b). CD Slot indicator
CD CHANGER
■Type A
Page 218 of 464

Features of your vehicle
138
4
1. CD Loading Slot
2. CD Eject Button
3. RANDOM Play Button
4. Automatic Track Selection Button
5. REPEAT Play Button
6. SCROLL Play Button
7. CD Indicator
8. CD Selection Button
9. SCAN Play Button
10. Track(File) Search Knob and ENTER
Button
11. FOLDER Search Button
12. INFORMATION Button
13. DISC UP/DOWN Button
14. CD Loading Button
(a). CD Number Indicator field
(b). CD Slot indicator
A-350HMU
■Type B
Page 219 of 464
4139
Features of your vehicle
How to Activate
CDP/CD CHANGER
1. CD Loading Slot
Please place the CD with the printedside upward, and then gently push in.
CDP models support both 8cm and 12 cm CDs.
CDC models support only 12 cm CD.
If VCD, Data CD, DVD are loaded, "MEDIA ERROR" message will appear
and the CD will eject.
2. CD Eject Button
Press this button to eject the CD duringCD playback.
If there is no CD in the deck, "NO DISC" will be displayed for 5 seconds
and returns to the previous mode.
❈ ALL EJECT(CDC ONLY)
Press this button for more than 0.8
second to eject all discs inside the
decks in the respective order.
3. RANDOM Play Button
Press this button for less than 0.8 second
to activate 'RDM' mode and more than
0.8 second to activate 'ALL RDM' mode.
RDM : Only files/tracks in a folder/disc are played in random sequence.
ALL RDM (MP3/WMA Only) : All files /tracks in a folder/disc are played in
random sequence.
4. Automatic Track Selection Button
Press [TRACK ] to return to thebeginning of the current track(file).
Press again within 1 seconds to return
to the previous track(file).
Press and hold [TRACK ] to initiate rewind search.
Press [SEEK ] for less than 0.8 sec- ond to advance the next track(file).
Press and hold [SEEK ] to initiate fast forward search.
5. REPEAT Play Button
Press this button for less than 0.8 second
to activate 'RPT' mode and more than 0.8
second to activate 'FLD RPT' mode.
RPT : Only a track(file) is playedrepeatedly.
FLD RPT(MP3/WMA Only) : Only files in a folder are played repeatedly.
6. SCROLL Play Button
File names are scrolled for 5 seconds on
the display.
7. CD Indicator (CDP ONLY)
When the ignition switch is in the ACC or
ON position and if the CD is loaded, this
indicator is illuminated.
8. CD Selection Button
If the CD is loaded, turns to CD mode.
If there is no Disc in the deck, it dis-plays "NO DISC" for 5 seconds and
returns to the previous mode.
9. SCAN Selection Button
Plays back the first 10 seconds of each
song in the CD.
CAUTION
Don’t insert a CD, if CD indicator isilluminated in the CDP.
Page 220 of 464
Features of your vehicle
140
4
10. Track (File) Search Knob and
ENTER Button
Turn this knob clockwise to display the
Track NO (File name) after the current
song.
Turn this button counterclockwise to display the Track NO (File Name)
before the current song.
To select the displayed song, press the button.
11. FOLDER Search Button
Folder name/File name (the first songin the folder) is moved up or down from
the currently playing folder.
To select the displayed folder, press ENTER (NO.10) button.
12. INFORMATION Button
Displays the information of the current CD
TRACK (FILE) as below when the button
is pressed each time.
CDDA : DISC TITLE
➟DISC ARTIST➟
TRACK TITLE➟TRACK ARTIST➟TOTAL
TRACK...
MP3/WMA : FILE NAME
➟TITLE➟
ARTIST➟ALBUM➟FOLDER NAME➟
TOTAL FILE...
13. DISC UP/DOWN Button (CDC ONLY)
Disc is moved up or down from the cur-
rently playing disc.
14. CD Loading Button (CDC ONLY)
How to load a CD
Press [LOAD] for less than 0.8 second.
An empty slot is selected and the CD
number indicator(a) blinks on the LCD.
After "WAIT" is displayed for a moment, "INSERT DISC(1~6)" is diplayed and
the CD slot indicator(b) blinks.
Insert a CD while the slot indicator blinks.
How to load CDs (ALL Load)
Press [LOAD] for more than 0.8 sec- ond.
An empty slot is selected and the CD number indicator (a) blinks on the LCD.
After "WAIT" is displayed for a moment, "INSERT DISC(1~6)" is
diplayed and the CD slot indicator (b)
blinks.
Insert a CD while the slot indicator blinks. After the CD is inserted, the rest of the
empty CD slots' number blink.
Repeat step 2 and 3 until all of the slots are loaded.CAUTION
Insert a CD only while "Insert Disc (1~6)" is displayed and theslot indicator blinks.
Don't insert two CDs for one oper- ation.