display KIA Borrego 2011 1.G Repair Manual
[x] Cancel search | Manufacturer: KIA, Model Year: 2011, Model line: Borrego, Model: KIA Borrego 2011 1.GPages: 464, PDF Size: 12.57 MB
Page 291 of 464
![KIA Borrego 2011 1.G Repair Manual 4211
Features of your vehicle
DVD mode
Starting DVD mode by use of Rearpanel
1. Press the [MODE] button on the REAR panel to display the MODE selection
screen.
2. If the key on the joystick located a KIA Borrego 2011 1.G Repair Manual 4211
Features of your vehicle
DVD mode
Starting DVD mode by use of Rearpanel
1. Press the [MODE] button on the REAR panel to display the MODE selection
screen.
2. If the key on the joystick located a](/img/2/2922/w960_2922-290.png)
4211
Features of your vehicle
DVD mode
Starting DVD mode by use of Rearpanel
1. Press the [MODE] button on the REAR panel to display the MODE selection
screen.
2. If the key on the joystick located at the far right-side of the REAR panel is
moved in any direction, the select area
will become displayed on the button of
the most recently operated mode.
3. While in mode selection screen, use the 4-direction keys on the REAR
panel to move the select area to DVDP
mode. If the joystick key is pressed,
the DVD already inserted in the DVD
PLAYER will begin playing.
4. The DVD title will begin playing.
✽ ✽ NOTICE
Understanding DVD titles.
Contents of DVD Title
The video and sound recorded on the
DVD are divided into titles and can be
recognized by their title numbers. Each
title is sub-divided into smaller units
called chapters and each chapter can be
recognized by the chapter number. The
title number and chapter number of the
current DVD title is displayed on the
upper side of the DVD operation menu
screen.
DVD region code
The DVD player and DVD discs are set
with region codes and can be played in
accordance to the sales region. If a disc
besides “Region Code 1(United States,
American region, Canada)” or “All-region
disc” is inserted, then a “Region Code
Error” screen will be displayed and disc
play will not be supported.
Color TV support
This device supports the NTSC color tel-
evision system. Other systems beside
NTSC are not supported.
DVD mode menu screen configura-
tion
1. Mode display
This displays that the current mode is
DVD mode of the DVD Player.
2. FAST FORWARD button
The current title can be fast forwarded.
Continue to press the button until the
desired chapter has been reached.
3. FAST REWIND button
The current title can be rewinded.
Continue to press the button until the
desired chapter has been reached.
4. CHAPTER DOWN button
Moves to the previous chapter.
5. CHAPTER UP button
Moves to the next chapter.
Page 292 of 464

Features of your vehicle
212
4
6. PLAY/PAUSE button
Pauses or replays the DVD.
7. SEARCH button
The desired title/chapter can be directly
selected by searching the chapters/titles.
Searches are not supported when the
initial logo video/menu is being dis-
played. Searches are possible only when
the video is playing.
8. MENU button
This is used to return to the initial menu
setup screen while a DVD title is playing.
9. TITLE button
For some types of DVD titles, there could
be several initial menu setup screens.
This is used to return to the root setup
menu screen.
10. TITLE number display
The current title number is displayed.
11. CHAPTER number display
The current chapter number is displayed. 12. Play time display
The play time of the current title is dis-
played.
13. SUBTITLE button
The subtitle can be set for DVD titles sup-
porting Multi-Subtitle function.
14. AUDIO button
The voice language can be set for DVD
titles supporting Multi-Language func-
tion.
15. ANGLE button
The angle can be set for DVD titles
encoded with the Multi-Angle function.
16. DVD setting button
Restores the initial DVD setup screen.
17. END button
The menu screen will be removed to dis-
play only the video.DVD mode setting
If the DVD setup button in the DVD mode
menu screen is pressed, the setup
screen as shown below will become dis-
played.
✽ ✽
NOTICE
The DVD setup screen is used not to
change the settings of the current DVD
title but to define the settings of the
DVD PLAYER. In order to apply the
modified valued, restart the current
DVD from the beginning.
The set values will not be applied in the
case of playing a DISC which does not
support the currently set language or
the current settings.
Page 293 of 464

4213
Features of your vehicle
Setting voice language
1. Press the voice language button in theDVD setup screen.
2. Select the desired voice language. If the OTHERS button is pressed, lan-
guages other than the ones displayed
can be directly inputted for selection.
3. If the OTHERS button is selected, the voice language code input screen will
be displayed. Input the desired code.
4. If a proper code is inputted, the DVD setup screen will be returned and dis-
play the set voice language.
5. Press the DONE button to complete the changes and replay from the
beginning.
Setting subtitle language
1. Press the subtitle language button inthe DVD setup screen.
2. Select the desired subtitle language. Press the OTHER button to set a differ-
ent subtitle. Press the SUBTITLE OFF
button to turn off the subtitle display.
3. The method of inputting subtitle lan- guage code is the same as the method
of inputting voice language code.
Setting menu language
1. Press the menu language button in theDVD setup screen.
2. Select the desired menu language. Press the OTHER button to display a
different menu language.
3. The method of inputting the menu lan- guage code is the same as the method
of inputting voice language code.
✽ ✽NOTICE
Please refer to the Language Code page
at the back of the user manual.
The set values will not be applied in the
case of playing a DISC which does not
support the currently set language or
the current settings.
Searching title/chapter
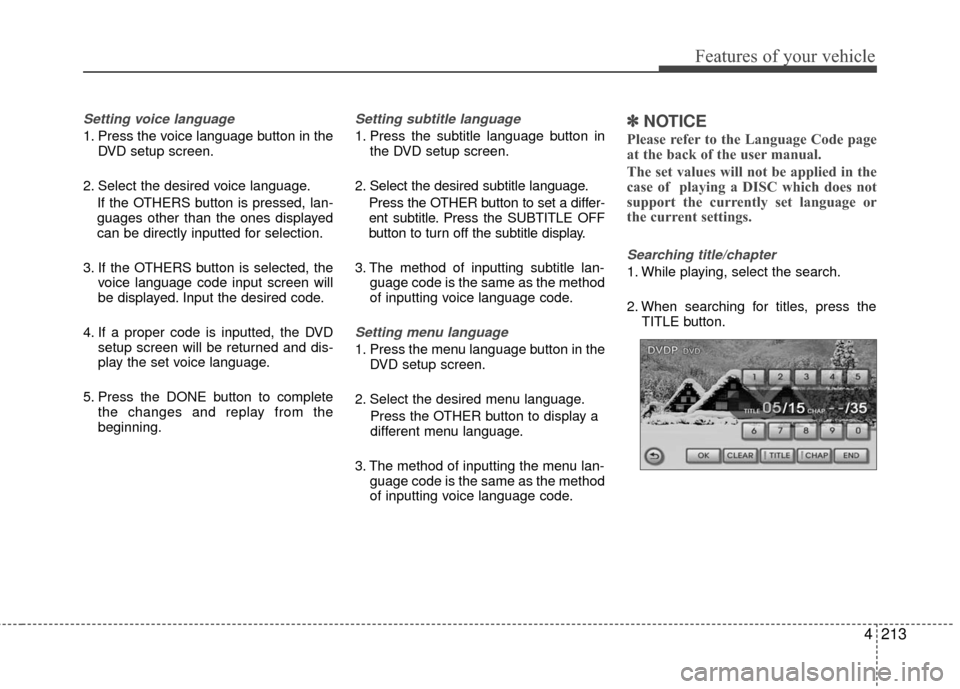
1. While playing, select the search.
2. When searching for titles, press the
TITLE button.
Page 294 of 464

Features of your vehicle
214
4
Using the Interactive Menu
1. Upon first playing a DVD title, a menu
screen will become displayed after the
initialization video.
While playing, press the menu button,
the AV [MENU] button on the REAR
panel or the [AV MENU] button on the
Remote Control to display the semi-
transparent AV MENU at the top of the
screen.
2. Select the desired menu by using the up/down & left/right direction keys or
the 4-direction joystick keys on the
Rear Panel or the 4-direction keys on
the Remote Control and press ENTER.
✽ ✽NOTICE
The menu will operate only in support-
ed DVD titles.
Page 295 of 464
![KIA Borrego 2011 1.G Repair Manual 4215
Features of your vehicle
USB mode
Starting USB mode by use of Rearpanel
1. Press the [MODE] button on the REAR panel to display the MODE selection
screen.
2. If the key on the joystick located a KIA Borrego 2011 1.G Repair Manual 4215
Features of your vehicle
USB mode
Starting USB mode by use of Rearpanel
1. Press the [MODE] button on the REAR panel to display the MODE selection
screen.
2. If the key on the joystick located a](/img/2/2922/w960_2922-294.png)
4215
Features of your vehicle
USB mode
Starting USB mode by use of Rearpanel
1. Press the [MODE] button on the REAR panel to display the MODE selection
screen.
2. If the key on the joystick located at the far right-side of the REAR panel is
moved in any direction, the select area
will become displayed on the button of
the most recently operated mode.
3. Select the AUX mode button.
4. Select the MUSIC button on the AUX mode screen.
5. The USB will begin playing.
✽ ✽ NOTICE
Refer to the MP3 mode section in
Chapter 5 for additional USB related
operational instructions.
iPod®mode
iPod®is a trademark of Apple Inc.
Starting iPod mode by use of Rear
panel
1. Press the [MODE] button on the REAR panel to display the MODE selection
screen.
2. If the key on the joystick located at the far right-side of the REAR panel is
moved in any direction, the select area
will become displayed on the button of
the most recently operated mode.
3. Select the AUX mode button.
4. Select the iPod button on the AUX mode screen.
5. The iPod will begin playing.
Page 297 of 464

4217
Features of your vehicle
AUX mode (auxiliary device input)
✽
✽NOTICE
The AUX1/AUX2 mode will operate only
when an auxiliary AUDIO & VIDEO
player (camcorder, vehicle VCR, etc.) is
connected and operating.
Starting AUX mode by use of Rear
panel
1. Press the [MODE] button on the REAR panel to display the MODE selection
screen.
2. If the key on the joystick located at the far right-side of the REAR panel is
moved in any direction, the select area
will become displayed on the button of
the most recently operated mode.
3. Select the AUX button.
4. Select the AUX1 or AUX2 button in the AUX mode screen.
5. The AUX1, AUX2 will begin playing.
✽ ✽ NOTICE
If the auxiliary device connector jack is
removed while in AUX mode, the previ-
ous mode will automatically be dis-
played.
Pressing the AUX1, AUX2 button while
the auxiliary device is not is not connect-
ed or with only the VIDEO jack connect-
ed will display a "The device is not prop-
erly connected" message.
CAUTION
1. Having the auxiliary cable con-
nected even when there is noauxiliary device can convert the device into AUX mode and causenoise.
Please make sure to remove the auxiliary cable when an auxiliary device is not being used.
2. Connecting an auxiliary device to the cigarette jack and playingthrough the screen of the device may cause an occurrence ofnoise.
If such noise occurs, remove the power cable from the cigarettejack.
Page 298 of 464

Features of your vehicle
218
4
Connecting an external VIDEO player
1. An auxiliary AUDIO & VIDEO player
(camcorder, vehicle VCR, etc.) can be
connected for viewing.
2. The AUX jack is positioned next to the POWER OUTLET on the backside of
the consol box located in between the
driver and passenger seat.✽ ✽NOTICE
1. Among the auxiliary VIDEO connec-
tor jacks, the yellow is for video, red is
for right-side audio, and white is for
left-side audio.
2. This device supports the NTSC color system. Other systems beside NTSC
will not be supported.
3. The recommended audio input stan-
dard for this device is max 1Vrms. Input
which exceeds this value may cause dete-
riorated sound quality.
Starting AUX mode by use of Rear remote control
1. When operating a different mode, pressing the [AUX] button on the
REAR Remote Control will display the
AUX screen corresponding to the con-
nected device. In addition, each time
the [AUX] button on the Remote
Control is pressed, the corresponding
AUX mode for the connected devices
will become displayed.
Page 314 of 464

513
Driving your vehicle
For smooth operation, depress the brakepedal when shifting from N (Neutral) to aforward or reverse gear.E060101AHM
Transmission ranges
The indicator in the instrument cluster
displays the shift lever position when the
ignition switch is in the ON position.
P (Park)
Always come to a complete stop before
shifting into P (Park). This position locks
the transmission and prevents the drive
wheels from rotating.
WARNING- Automatic transmission
Always check the surrounding
areas near your vehicle for peo-
ple, especially children, before
shifting the shift lever into D
(Drive) or R (Reverse).
Before leaving the driver’s seat, always make sure the shift lever
is in the P (Park) position; then
set the parking brake fully and
shut the engine off. Unexpected
and sudden vehicle movement
can occur if these precautions
are not followed in the order iden-
tified.
CAUTION
To avoid damage to your trans- mission, do not accelerate theengine in R (Reverse) or any for-ward gear position with thebrakes on.
When stopped on an incline, do not hold the vehicle with theengine power. Use the servicebrake or the parking brake.
Do not shift from N (Neutral) or P (Park) into D (Drive), or R(Reverse) when the engine isabove idle speed.
WARNING
Shifting into P (Park) while the vehicle is in motion will cause the
drive wheels to lock which will
cause you to lose control of the
vehicle.
Do not use the P (Park) position in place of the parking brake.
Always make sure the shift lever
is latched in the P (Park) position
and set the parking brake fully.
Never leave a child unattended in a vehicle.
Page 376 of 464

67
What to do in an emergency
TIRE PRESSURE MONITORING SYSTEM (TPMS)
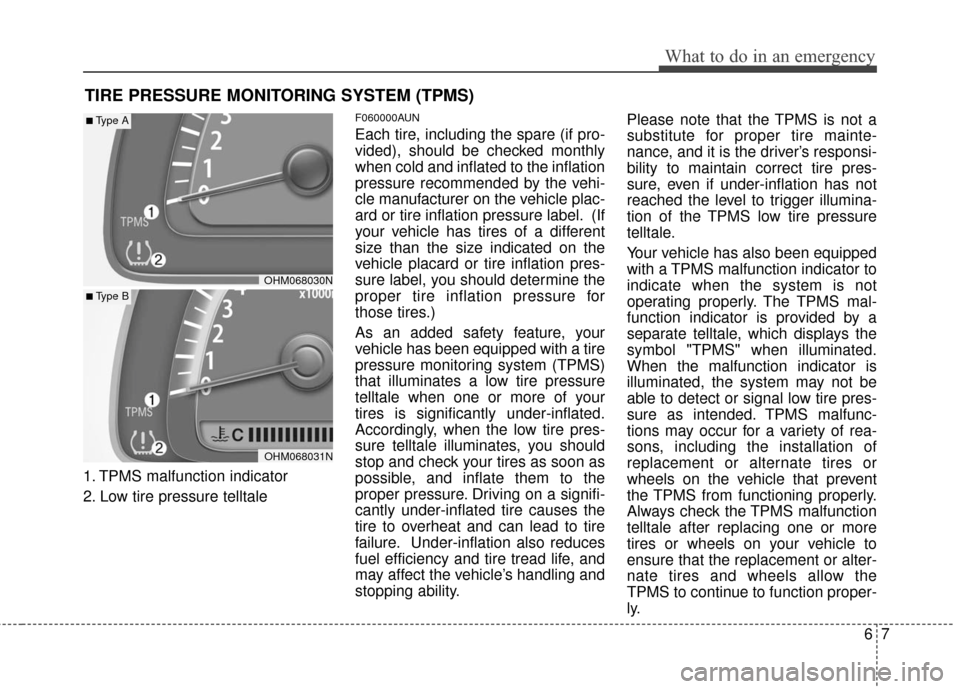
1. TPMS malfunction indicator
2. Low tire pressure telltale
F060000AUN
Each tire, including the spare (if pro-
vided), should be checked monthly
when cold and inflated to the inflation
pressure recommended by the vehi-
cle manufacturer on the vehicle plac-
ard or tire inflation pressure label. (If
your vehicle has tires of a different
size than the size indicated on the
vehicle placard or tire inflation pres-
sure label, you should determine the
proper tire inflation pressure for
those tires.)
As an added safety feature, your
vehicle has been equipped with a tire
pressure monitoring system (TPMS)
that illuminates a low tire pressure
telltale when one or more of your
tires is significantly under-inflated.
Accordingly, when the low tire pres-
sure telltale illuminates, you should
stop and check your tires as soon as
possible, and inflate them to the
proper pressure. Driving on a signifi-
cantly under-inflated tire causes the
tire to overheat and can lead to tire
failure. Under-inflation also reduces
fuel efficiency and tire tread life, and
may affect the vehicle’s handling and
stopping ability.Please note that the TPMS is not a
substitute for proper tire mainte-
nance, and it is the driver’s responsi-
bility to maintain correct tire pres-
sure, even if under-inflation has not
reached the level to trigger illumina-
tion of the TPMS low tire pressure
telltale.
Your vehicle has also been equipped
with a TPMS malfunction indicator to
indicate when the system is not
operating properly. The TPMS mal-
function indicator is provided by a
separate telltale, which displays the
symbol "TPMS" when illuminated.
When the malfunction indicator is
illuminated, the system may not be
able to detect or signal low tire pres-
sure as intended. TPMS malfunc-
tions may occur for a variety of rea-
sons, including the installation of
replacement or alternate tires or
wheels on the vehicle that prevent
the TPMS from functioning properly.
Always check the TPMS malfunction
telltale after replacing one or more
tires or wheels on your vehicle to
ensure that the replacement or alter-
nate tires and wheels allow the
TPMS to continue to function proper-
ly.
OHM068030N
OHM068031N
■Type A
■ Type B
Page 427 of 464

735
Maintenance
Wheel size designation
Wheels are also marked with impor-
tant information that you need if you
ever have to replace one. The follow-
ing explains what the letters and
numbers in the wheel size designa-
tion mean.
Example wheel size designation:
7.0JX17
7.0 - Rim width in inches.
J - Rim contour designation.
17 - Rim diameter in inches.
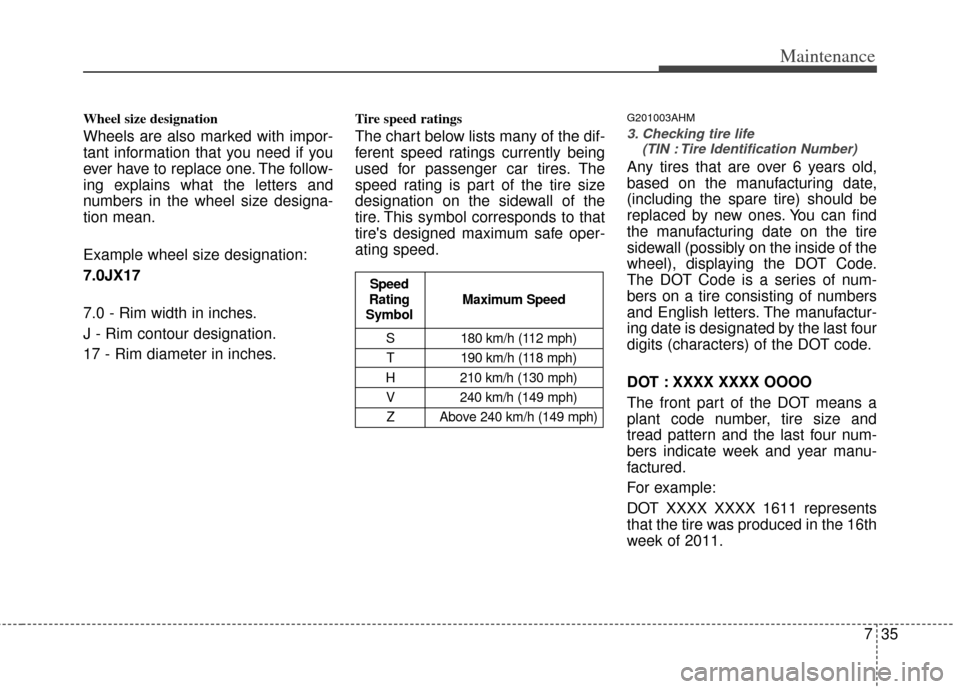
Tire speed ratings
The chart below lists many of the dif-
ferent speed ratings currently being
used for passenger car tires. The
speed rating is part of the tire size
designation on the sidewall of the
tire. This symbol corresponds to that
tire's designed maximum safe oper-
ating speed.
G201003AHM
3. Checking tire life (TIN : Tire Identification Number)
Any tires that are over 6 years old,
based on the manufacturing date,
(including the spare tire) should be
replaced by new ones. You can find
the manufacturing date on the tire
sidewall (possibly on the inside of the
wheel), displaying the DOT Code.
The DOT Code is a series of num-
bers on a tire consisting of numbers
and English letters. The manufactur-
ing date is designated by the last four
digits (characters) of the DOT code.
DOT : XXXX XXXX OOOO
The front part of the DOT means a
plant code number, tire size and
tread pattern and the last four num-
bers indicate week and year manu-
factured.
For example:
DOT XXXX XXXX 1611 represents
that the tire was produced in the 16th
week of 2011.
S 180 km/h (112 mph)
T 190 km/h (118 mph)
H 210 km/h (130 mph) V 240 km/h (149 mph)Z Above 240 km/h (149 mph)
Maximum Speed
Speed
Rating
Symbol