KIA CADENZA 2011 User Guide
Manufacturer: KIA, Model Year: 2011, Model line: CADENZA, Model: KIA CADENZA 2011Pages: 352, PDF Size: 28.17 MB
Page 11 of 352
23
Your vehicle at a glance
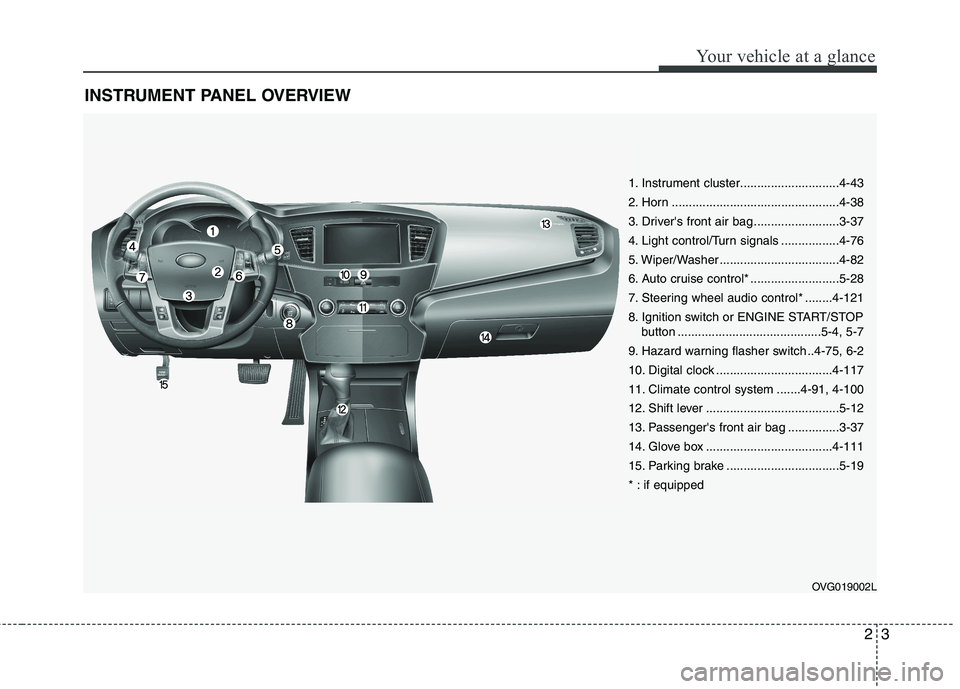
INSTRUMENT PANEL OVERVIEW
OVG019002L
1. Instrument cluster.............................4-43
2. Horn .................................................4-38
3. Driver's front air bag .........................3-37
4. Light control/Turn signals .................4-76
5. Wiper/Washer ...................................4-82
6. Auto cruise control* ..........................5-28
7. Steering wheel audio control* ........4-121
8. Ignition switch or ENGINE START/STOPbutton ..........................................5-4, 5-7
9. Hazard warning flasher switch ..4-75, 6-2
10. Digital clock ..................................4-117
11. Climate control system .......4-91, 4-100
12. Shift lever .......................................5-12
13. Passenger's front air bag ...............3-37
14. Glove box .....................................4-111
15. Parking brake .................................5-19
* : if equipped
Page 12 of 352
Your vehicle at a glance
4
2
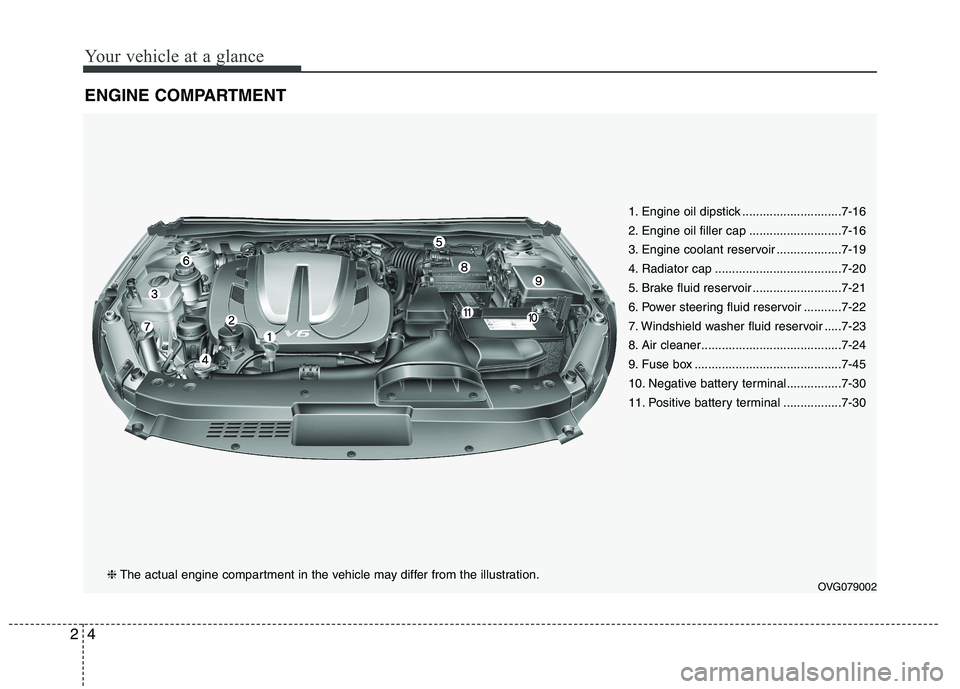
ENGINE COMPARTMENT
1. Engine oil dipstick .............................7-16
2. Engine oil filler cap ...........................7-16
3. Engine coolant reservoir ...................7-19
4. Radiator cap .....................................7-20
5. Brake fluid reservoir ..........................7-21
6. Power steering fluid reservoir ...........7-22
7. Windshield washer fluid reservoir .....7-23
8. Air cleaner.........................................7-24
9. Fuse box ...........................................7-45
10. Negative battery terminal................7-30
11. Positive battery terminal .................7-30
OVG079002
❈The actual engine compartment in the vehicle may differ from the illustration.
Page 13 of 352
3
Seats / 3-2
Seat belts / 3-15
Child restraint system / 3-25
Air bag - supplemental restraint system / 3-31
Safety features of your vehicle
Page 14 of 352
Safety features of your vehicle
2
3
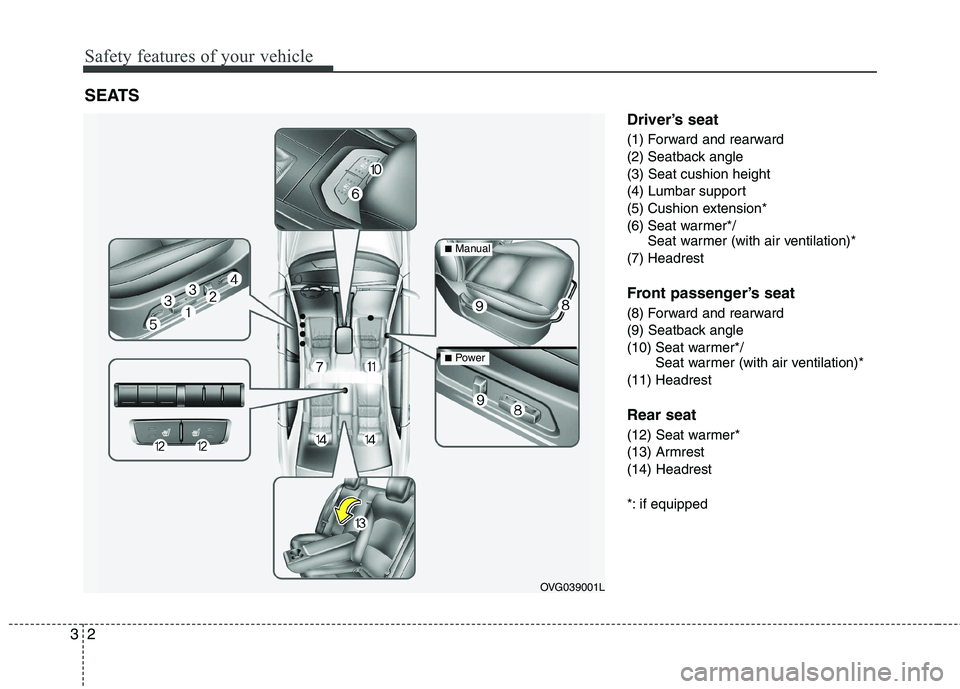
Driver’s seat
(1) Forward and rearward
(2) Seatback angle(3) Seat cushion height
(4) Lumbar support
(5) Cushion extension*
(6) Seat warmer*/
Seat warmer (with air ventilation)*
(7) Headrest
Front passenger’s seat
(8) Forward and rearward
(9) Seatback angle
(10) Seat warmer*/ Seat warmer (with air ventilation)*
(11) Headrest Rear seat
(12) Seat warmer*
(13) Armrest(14) Headrest
*: if equipped
SEATS
OVG039001L
■
Manual
■Power
Page 15 of 352
33
Safety features of your vehicle
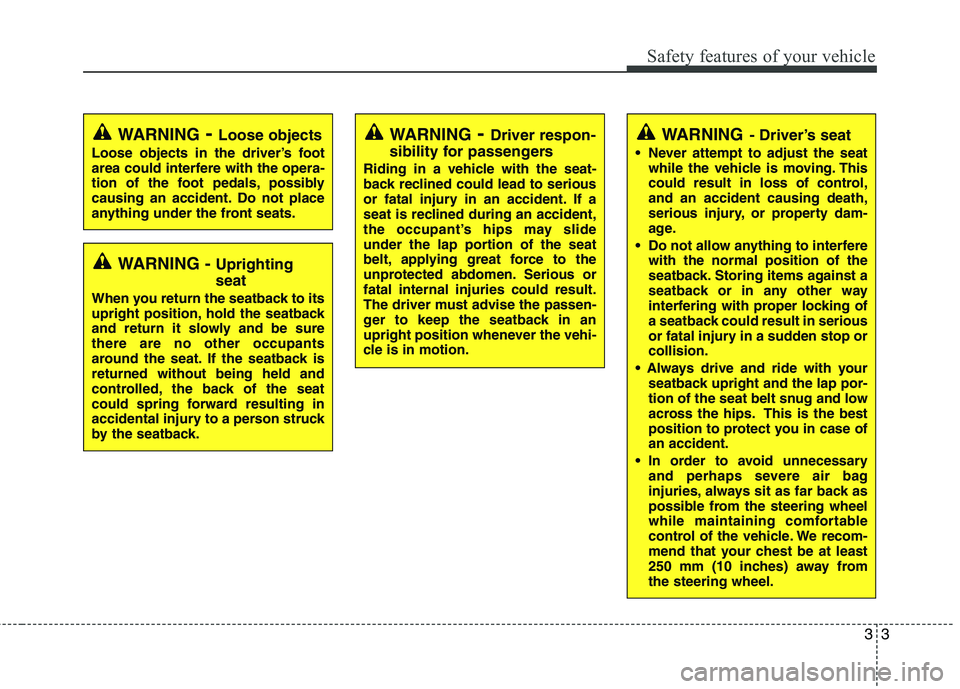
WARNING- Driver’s seat
Never attempt to adjust the seat while the vehicle is moving. This
could result in loss of control,and an accident causing death,
serious injury, or property dam-
age.
Do not allow anything to interfere with the normal position of the
seatback. Storing items against a
seatback or in any other way
interfering with proper locking of
a seatback could result in serious
or fatal injury in a sudden stop orcollision.
seatback upright and the lap por-
tion of the seat belt snug and low
across the hips. This is the best
position to protect you in case ofan accident.
In order to avoid unnecessary and perhaps severe air bag
injuries, always sit as far back as
possible from the steering wheel
while maintaining comfortable
control of the vehicle. We recom-
mend that your chest be at least
250 mm (10 inches) away fromthe steering wheel.WARNING - Loose objects
Loose objects in the driver’s foot
area could interfere with the opera-
tion of the foot pedals, possibly
causing an accident. Do not place
anything under the front seats.WARNING - Driver respon-
sibility for passengers
Riding in a vehicle with the seat-
back reclined could lead to serious
or fatal injury in an accident. If a
seat is reclined during an accident,
the occupant’s hips may slide
under the lap portion of the seat
belt, applying great force to the
unprotected abdomen. Serious orfatal internal injuries could result.
The driver must advise the passen-
ger to keep the seatback in an
upright position whenever the vehi-
cle is in motion.
WARNING - Uprighting seat
When you return the seatback to its
upright position, hold the seatback
and return it slowly and be surethere are no other occupants
around the seat. If the seatback isreturned without being held and
controlled, the back of the seat
could spring forward resulting in
accidental injury to a person struck
by the seatback.
Page 16 of 352
Safety features of your vehicle
4
3
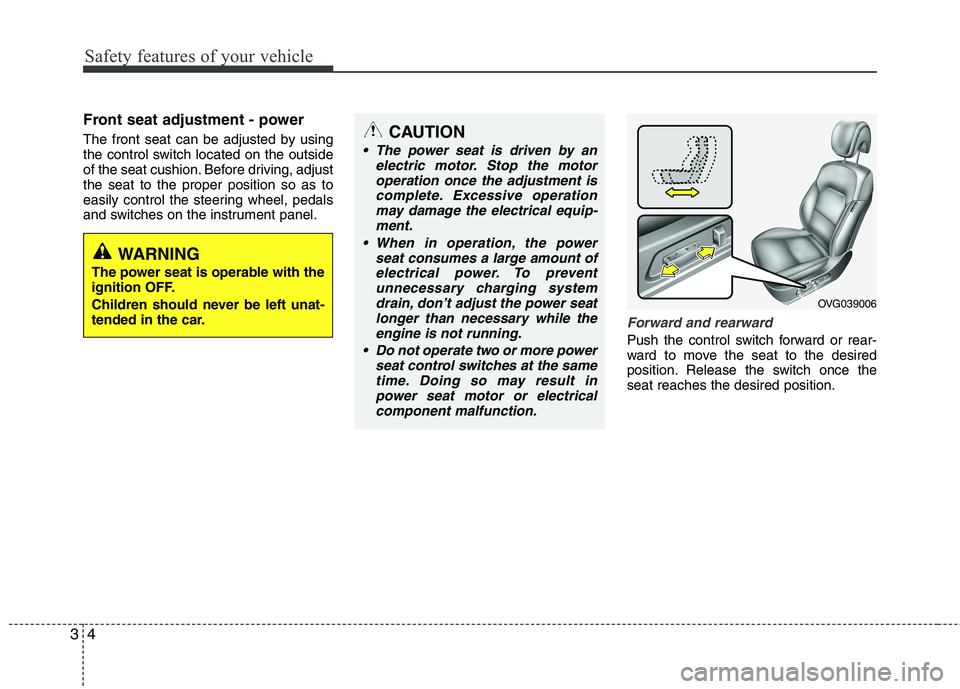
Front seat adjustment - power
The front seat can be adjusted by using
the control switch located on the outside
of the seat cushion. Before driving, adjustthe seat to the proper position so as to
easily control the steering wheel, pedals
and switches on the instrument panel.
Forward and rearward
Push the control switch forward or rear-
ward to move the seat to the desired
position. Release the switch once theseat reaches the desired position.
WARNING
The power seat is operable with the
ignition OFF.
Children should never be left unat-
tended in the car.
CAUTION
The power seat is driven by an electric motor. Stop the motor
operation once the adjustment is complete. Excessive operationmay damage the electrical equip- ment.
When in operation, the power seat consumes a large amount ofelectrical power. To preventunnecessary charging system
drain, don’t adjust the power seatlonger than necessary while theengine is not running.
Do not operate two or more power seat control switches at the same
time. Doing so may result inpower seat motor or electricalcomponent malfunction.
OVG039006
Page 17 of 352
35
Safety features of your vehicle
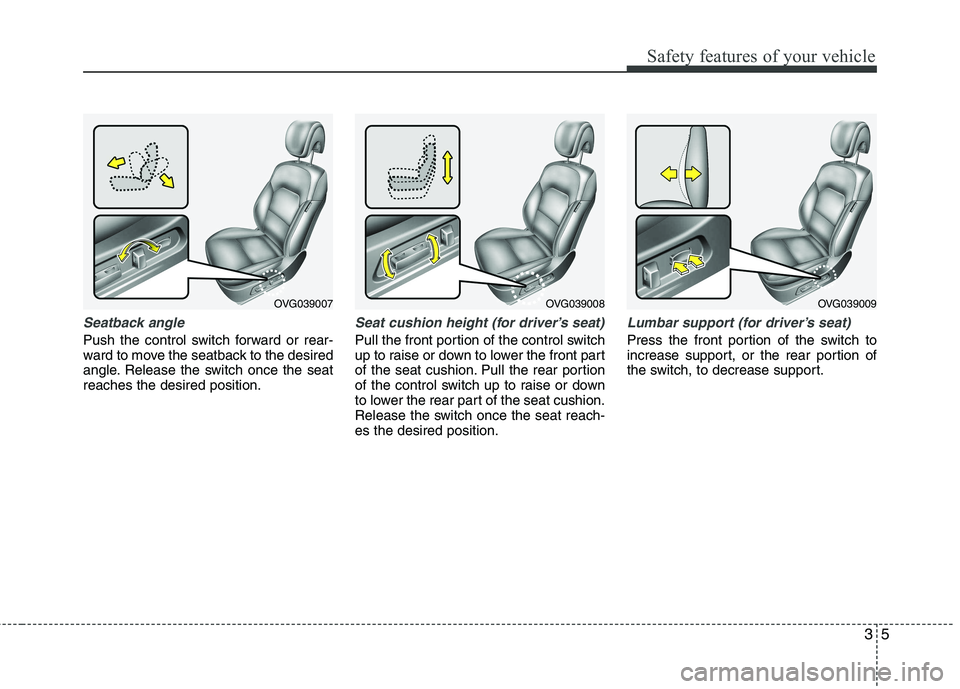
Seatback angle
Push the control switch forward or rear-
ward to move the seatback to the desired
angle. Release the switch once the seatreaches the desired position.
Seat cushion height (for driver’s seat)
Pull the front portion of the control switch
up to raise or down to lower the front part
of the seat cushion. Pull the rear portion
of the control switch up to raise or down
to lower the rear part of the seat cushion.
Release the switch once the seat reach-es the desired position.
Lumbar support (for driver’s seat)
Press the front portion of the switch to
increase support, or the rear portion of
the switch, to decrease support.
OVG039008
OVG039007OVG039009
Page 18 of 352
Safety features of your vehicle
6
3
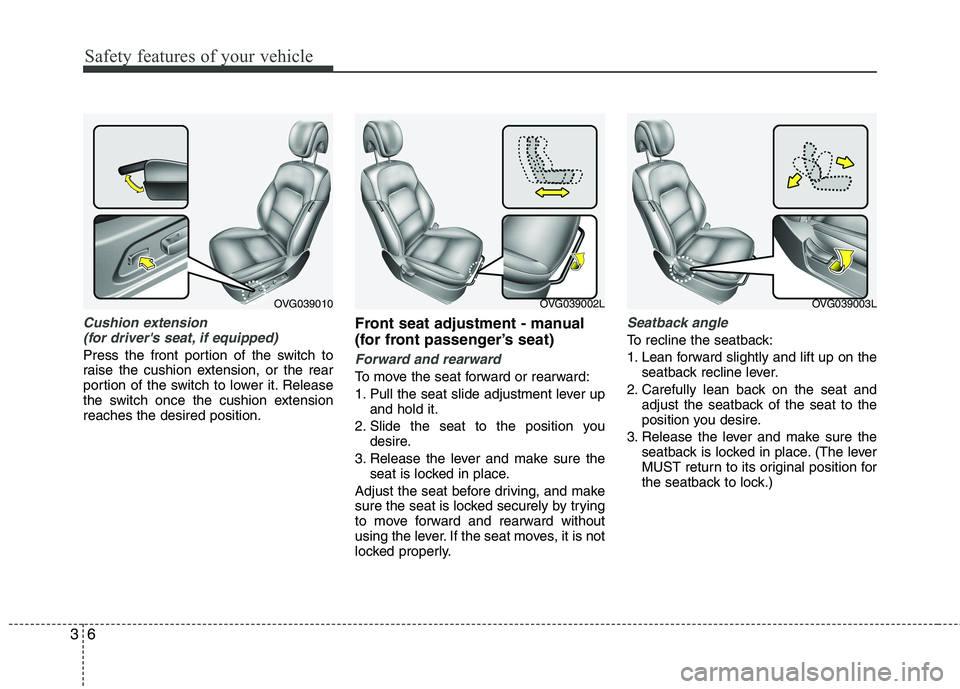
Cushion extension
(for driver's seat, if equipped)
Press the front portion of the switch to
raise the cushion extension, or the rear
portion of the switch to lower it. Release
the switch once the cushion extensionreaches the desired position. Front seat adjustment - manual
(for front passenger’s seat)Forward and rearward
To move the seat forward or rearward:
1. Pull the seat slide adjustment lever up
and hold it.
2. Slide the seat to the position you desire.
3. Release the lever and make sure the seat is locked in place.
Adjust the seat before driving, and make
sure the seat is locked securely by trying
to move forward and rearward without
using the lever. If the seat moves, it is not
locked properly.
Seatback angle
To recline the seatback:
1. Lean forward slightly and lift up on the seatback recline lever.
2. Carefully lean back on the seat and adjust the seatback of the seat to the
position you desire.
3. Release the lever and make sure the seatback is locked in place. (The lever
MUST return to its original position for
the seatback to lock.)
OVG039010OVG039002LOVG039003L
Page 19 of 352
37
Safety features of your vehicle
Headrest
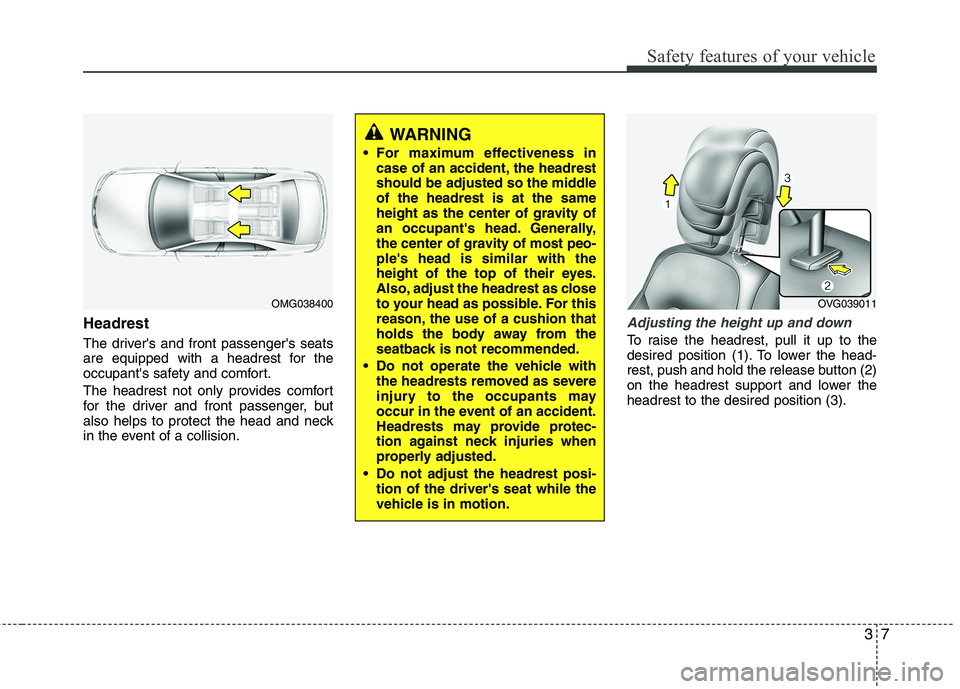
The driver's and front passenger's seats
are equipped with a headrest for the
occupant's safety and comfort.
The headrest not only provides comfort
for the driver and front passenger, but
also helps to protect the head and neck
in the event of a collision.Adjusting the height up and down
To raise the headrest, pull it up to the
desired position (1). To lower the head-
rest, push and hold the release button (2)
on the headrest support and lower theheadrest to the desired position (3).
OMG038400
WARNING
For maximum effectiveness in case of an accident, the headrest
should be adjusted so the middleof the headrest is at the same
height as the center of gravity of
an occupant's head. Generally,
the center of gravity of most peo-ple's head is similar with the
height of the top of their eyes.
Also, adjust the headrest as close
to your head as possible. For this
reason, the use of a cushion that
holds the body away from the
seatback is not recommended.
Do not operate the vehicle with the headrests removed as severe
injury to the occupants may
occur in the event of an accident.
Headrests may provide protec-
tion against neck injuries when
properly adjusted.
Do not adjust the headrest posi- tion of the driver's seat while the
vehicle is in motion.
OVG039011
Page 20 of 352
Safety features of your vehicle
8
3
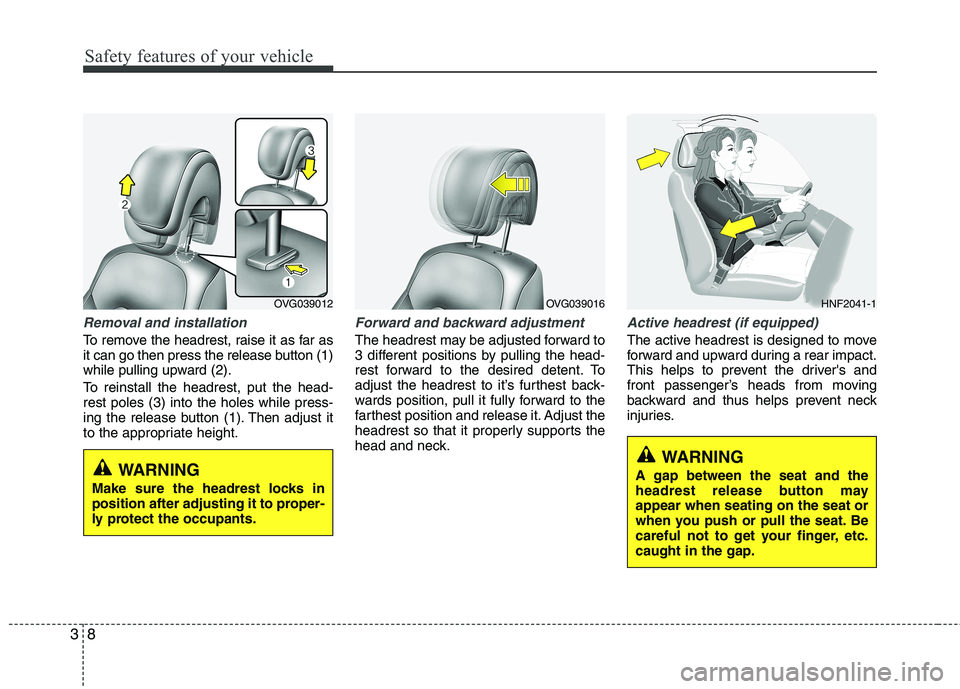
Removal and installation
To remove the headrest, raise it as far as
it can go then press the release button (1)
while pulling upward (2).
To reinstall the headrest, put the head- rest poles (3) into the holes while press-
ing the release button (1). Then adjust it
to the appropriate height.
Forward and backward adjustment
The headrest may be adjusted forward to
3 different positions by pulling the head-
rest forward to the desired detent. To
adjust the headrest to it’s furthest back-
wards position, pull it fully forward to the
farthest position and release it. Adjust the
headrest so that it properly supports the
head and neck.
Active headrest (if equipped)
The active headrest is designed to move
forward and upward during a rear impact.
This helps to prevent the driver's and
front passenger’s heads from moving
backward and thus helps prevent neck
injuries.
OVG039012OVG039016
WARNING
Make sure the headrest locks in
position after adjusting it to proper-
ly protect the occupants.WARNING
A gap between the seat and the
headrest release button mayappear when seating on the seat or
when you push or pull the seat. Be
careful not to get your finger, etc.caught in the gap.
HNF2041-1