lock KIA CADENZA 2011 Owners Manual
[x] Cancel search | Manufacturer: KIA, Model Year: 2011, Model line: CADENZA, Model: KIA CADENZA 2011Pages: 352, PDF Size: 28.17 MB
Page 7 of 352
Introduction
4
1
Use of MTBE
KIA recommends avoiding fuels contain-
ing MTBE (Methyl Tertiary Butyl Ether)
over 15.0% vol. (Oxygen Content 2.7%
weight) in your vehicle.
Fuel containing MTBE over 15.0% vol.
(Oxygen Content 2.7% weight) may
reduce vehicle performance and produce
vapor lock or hard starting.
Do not use methanol
Fuels containing methanol (wood alco-
hol) should not be used in your vehicle.
This type of fuel can reduce vehicle per-
formance and damage components ofthe fuel system.
Gasolines for cleaner air
To help contribute to cleaner air, KIA rec-
ommends that you use gasolines treated
with detergent additives, which help pre-
vent deposit formation in the engine.
These gasolines will help the engine run
cleaner and enhance performance of theEmission Control System.
Operation in foreign countries
If you are going to drive your vehicle in
another country, be sure to:
Observe all regulations regarding reg-
istration and insurance.
Determine that acceptable fuel is avail- able. No special break-in period is needed. By
following a few simple precautions for the
first 1,000 km (600 miles) you may add to
the performance, economy and life of
your vehicle.
Do not race the engine.
While driving, keep your engine speed
(rpm, or revolutions per minute)
between 2,000 rpm and 4,000 rpm.
Do not maintain a single speed for long periods of time, either fast or slow.
Varying engine speed is needed to
properly break-in the engine.
Avoid hard stops, except in emergen- cies, to allow the brakes to seat prop-
erly.
Don't let the engine idle longer than 3 minutes at one time.
Don't tow a trailer during the first 2,000
km (1,200 miles) of operation.
VEHICLE BREAK-IN PROCESS
CAUTION
Your New Vehicle Limited Warranty
may not cover damage to the fuelsystem and any performance prob-lems that are caused by the use offuels containing methanol or fuels
containing MTBE (Methyl TertiaryButyl Ether) over 15.0% vol. (Oxygen Content 2.7% weight.)
Page 10 of 352
Your vehicle at a glance
2
2
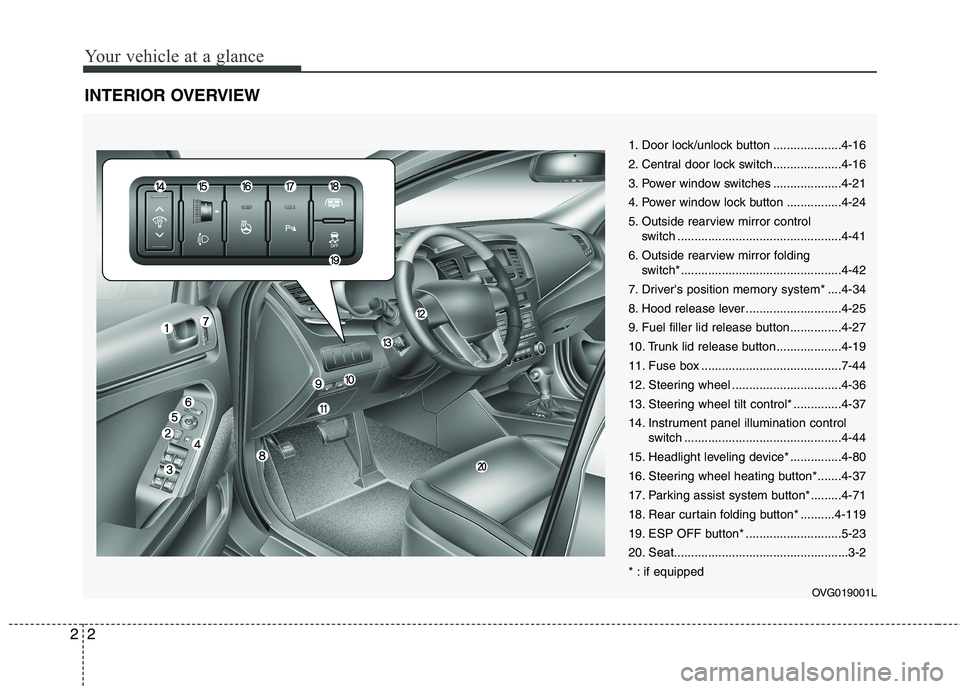
INTERIOR OVERVIEW
1. Door lock/unlock button ....................4-16
2. Central door lock switch....................4-16
3. Power window switches ....................4-21
4. Power window lock button ................4-24
5. Outside rearview mirror control
switch ................................................4-41
6. Outside rearview mirror folding switch*...............................................4-42
7. Driver's position memory system* ....4-34
8. Hood release lever ............................4-25
9. Fuel filler lid release button...............4-27
10. Trunk lid release button...................4-19
11. Fuse box .........................................7-44
12. Steering wheel ................................4-36
13. Steering wheel tilt control* ..............4-37
14. Instrument panel illumination control switch ..............................................4-44
15. Headlight leveling device* ...............4-80
16. Steering wheel heating button*.......4-37
17. Parking assist system button*.........4-71
18. Rear curtain folding button* ..........4-119
19. ESP OFF button* ............................5-23
20. Seat...................................................3-2
* : if equipped
OVG019001L
Page 11 of 352
23
Your vehicle at a glance
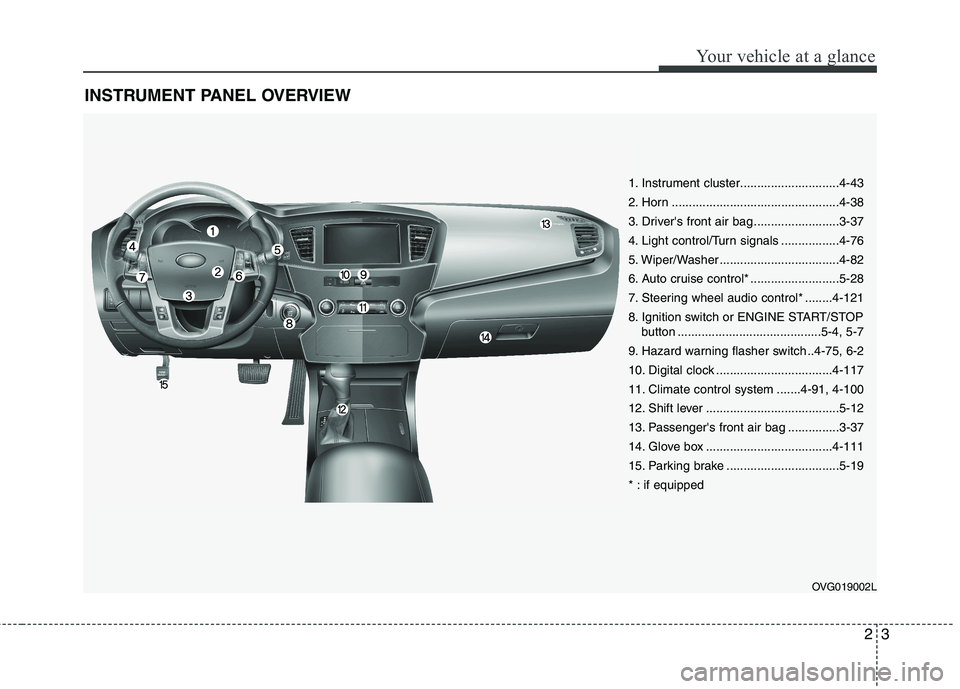
INSTRUMENT PANEL OVERVIEW
OVG019002L
1. Instrument cluster.............................4-43
2. Horn .................................................4-38
3. Driver's front air bag .........................3-37
4. Light control/Turn signals .................4-76
5. Wiper/Washer ...................................4-82
6. Auto cruise control* ..........................5-28
7. Steering wheel audio control* ........4-121
8. Ignition switch or ENGINE START/STOPbutton ..........................................5-4, 5-7
9. Hazard warning flasher switch ..4-75, 6-2
10. Digital clock ..................................4-117
11. Climate control system .......4-91, 4-100
12. Shift lever .......................................5-12
13. Passenger's front air bag ...............3-37
14. Glove box .....................................4-111
15. Parking brake .................................5-19
* : if equipped
Page 15 of 352
33
Safety features of your vehicle
WARNING- Driver’s seat
Never attempt to adjust the seat while the vehicle is moving. This
could result in loss of control,and an accident causing death,
serious injury, or property dam-
age.
Do not allow anything to interfere with the normal position of the
seatback. Storing items against a
seatback or in any other way
interfering with proper locking of
a seatback could result in serious
or fatal injury in a sudden stop orcollision.
seatback upright and the lap por-
tion of the seat belt snug and low
across the hips. This is the best
position to protect you in case ofan accident.
In order to avoid unnecessary and perhaps severe air bag
injuries, always sit as far back as
possible from the steering wheel
while maintaining comfortable
control of the vehicle. We recom-
mend that your chest be at least
250 mm (10 inches) away fromthe steering wheel.WARNING - Loose objects
Loose objects in the driver’s foot
area could interfere with the opera-
tion of the foot pedals, possibly
causing an accident. Do not place
anything under the front seats.WARNING - Driver respon-
sibility for passengers
Riding in a vehicle with the seat-
back reclined could lead to serious
or fatal injury in an accident. If a
seat is reclined during an accident,
the occupant’s hips may slide
under the lap portion of the seat
belt, applying great force to the
unprotected abdomen. Serious orfatal internal injuries could result.
The driver must advise the passen-
ger to keep the seatback in an
upright position whenever the vehi-
cle is in motion.
WARNING - Uprighting seat
When you return the seatback to its
upright position, hold the seatback
and return it slowly and be surethere are no other occupants
around the seat. If the seatback isreturned without being held and
controlled, the back of the seat
could spring forward resulting in
accidental injury to a person struck
by the seatback.
Page 18 of 352
Safety features of your vehicle
6
3
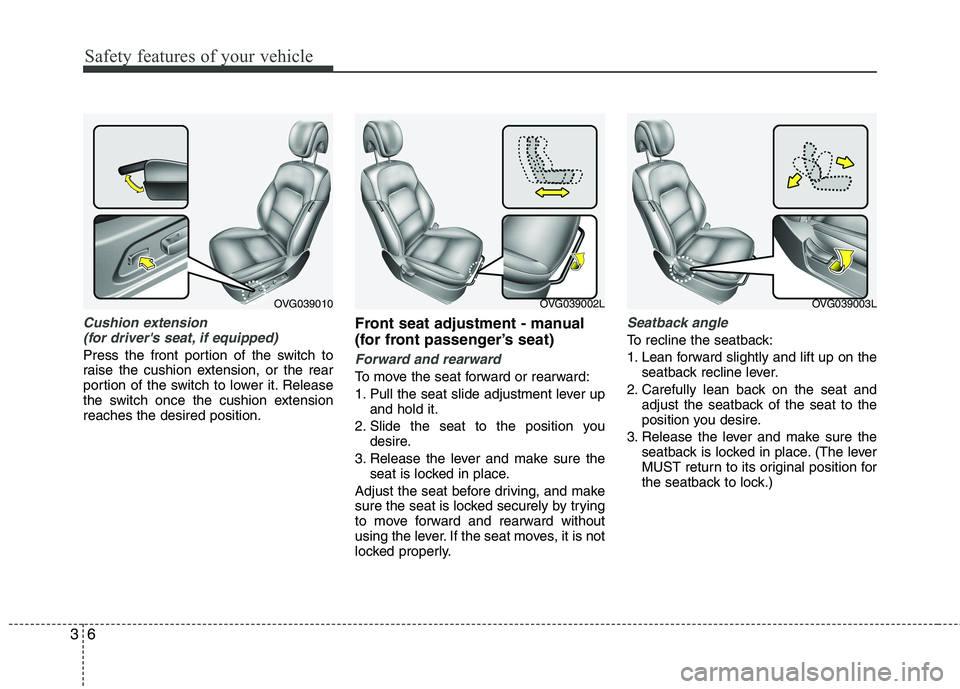
Cushion extension
(for driver's seat, if equipped)
Press the front portion of the switch to
raise the cushion extension, or the rear
portion of the switch to lower it. Release
the switch once the cushion extensionreaches the desired position. Front seat adjustment - manual
(for front passenger’s seat)Forward and rearward
To move the seat forward or rearward:
1. Pull the seat slide adjustment lever up
and hold it.
2. Slide the seat to the position you desire.
3. Release the lever and make sure the seat is locked in place.
Adjust the seat before driving, and make
sure the seat is locked securely by trying
to move forward and rearward without
using the lever. If the seat moves, it is not
locked properly.
Seatback angle
To recline the seatback:
1. Lean forward slightly and lift up on the seatback recline lever.
2. Carefully lean back on the seat and adjust the seatback of the seat to the
position you desire.
3. Release the lever and make sure the seatback is locked in place. (The lever
MUST return to its original position for
the seatback to lock.)
OVG039010OVG039002LOVG039003L
Page 20 of 352
Safety features of your vehicle
8
3
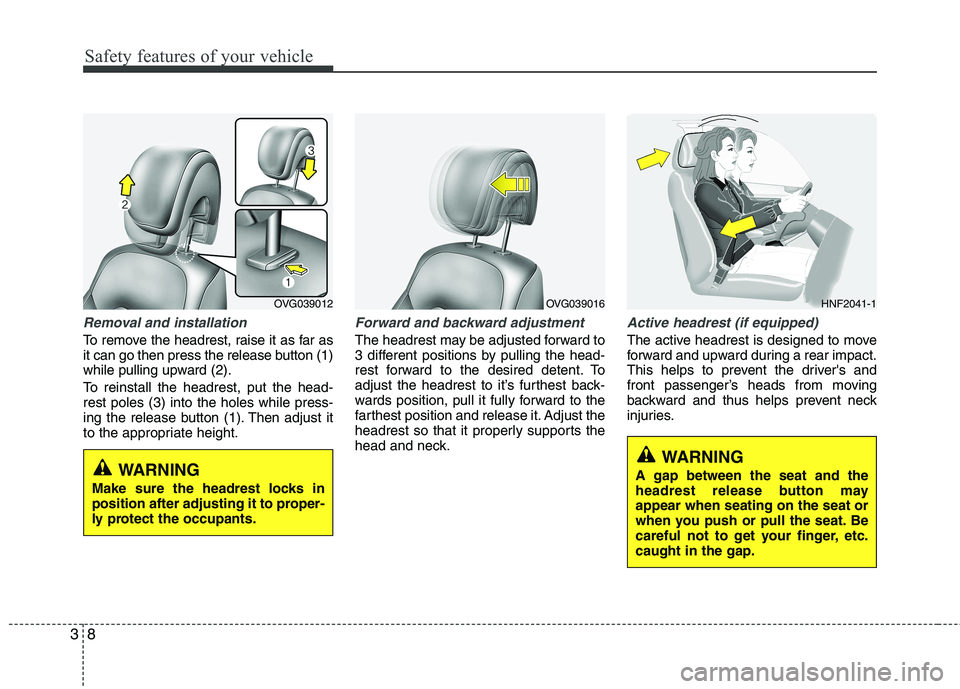
Removal and installation
To remove the headrest, raise it as far as
it can go then press the release button (1)
while pulling upward (2).
To reinstall the headrest, put the head- rest poles (3) into the holes while press-
ing the release button (1). Then adjust it
to the appropriate height.
Forward and backward adjustment
The headrest may be adjusted forward to
3 different positions by pulling the head-
rest forward to the desired detent. To
adjust the headrest to it’s furthest back-
wards position, pull it fully forward to the
farthest position and release it. Adjust the
headrest so that it properly supports the
head and neck.
Active headrest (if equipped)
The active headrest is designed to move
forward and upward during a rear impact.
This helps to prevent the driver's and
front passenger’s heads from moving
backward and thus helps prevent neck
injuries.
OVG039012OVG039016
WARNING
Make sure the headrest locks in
position after adjusting it to proper-
ly protect the occupants.WARNING
A gap between the seat and the
headrest release button mayappear when seating on the seat or
when you push or pull the seat. Be
careful not to get your finger, etc.caught in the gap.
HNF2041-1
Page 24 of 352
Safety features of your vehicle
12
3
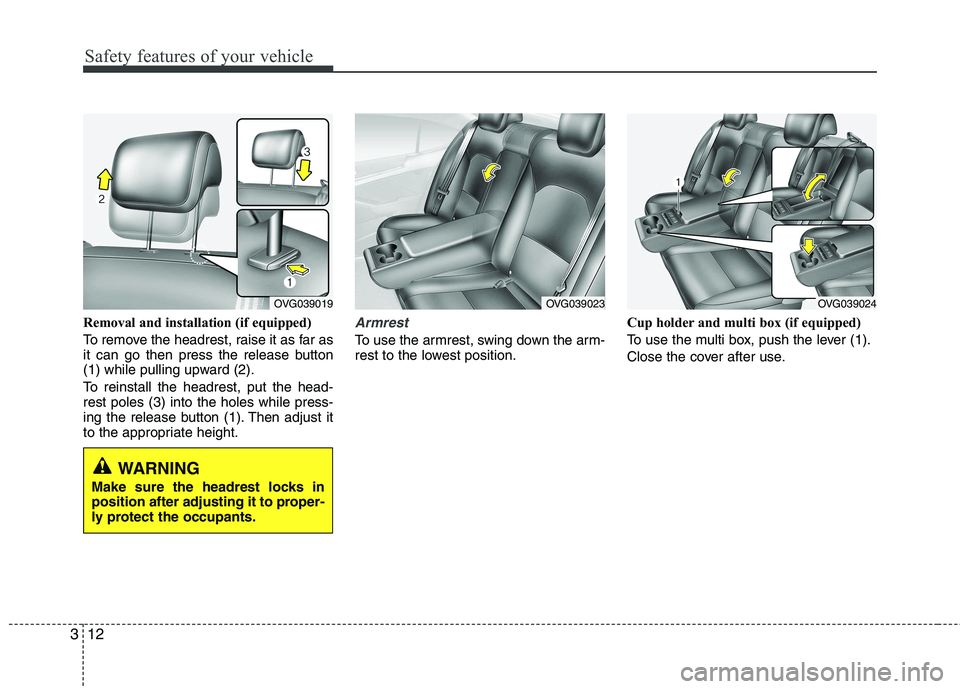
Removal and installation (if equipped)
To remove the headrest, raise it as far as
it can go then press the release button
(1) while pulling upward (2).
To reinstall the headrest, put the head- rest poles (3) into the holes while press-
ing the release button (1). Then adjust it
to the appropriate height.Armrest
To use the armrest, swing down the arm-
rest to the lowest position. Cup holder and multi box (if equipped)
To use the multi box, push the lever (1).
Close the cover after use.
WARNING
Make sure the headrest locks in
position after adjusting it to proper-
ly protect the occupants.
OVG039019OVG039023OVG039024
Page 28 of 352
Safety features of your vehicle
16
3
Seat belt warning
As a reminder to the driver, if the driver’s
seat belt is not fastened when the ignition
switch is ON or unfastened after the igni-
tion switch is ON, the seat belt warning
light will blink until the seat belt is fas-tened.
If the driver's seat belt is not fastened
when the ignition switch is ON or unfas-
tened after the ignition switch is ON, the
seat belt warning chime will sound for
approximately 6 seconds. At this time, if
the seat belt is fastened, the chime will
stop at once. (if equipped)
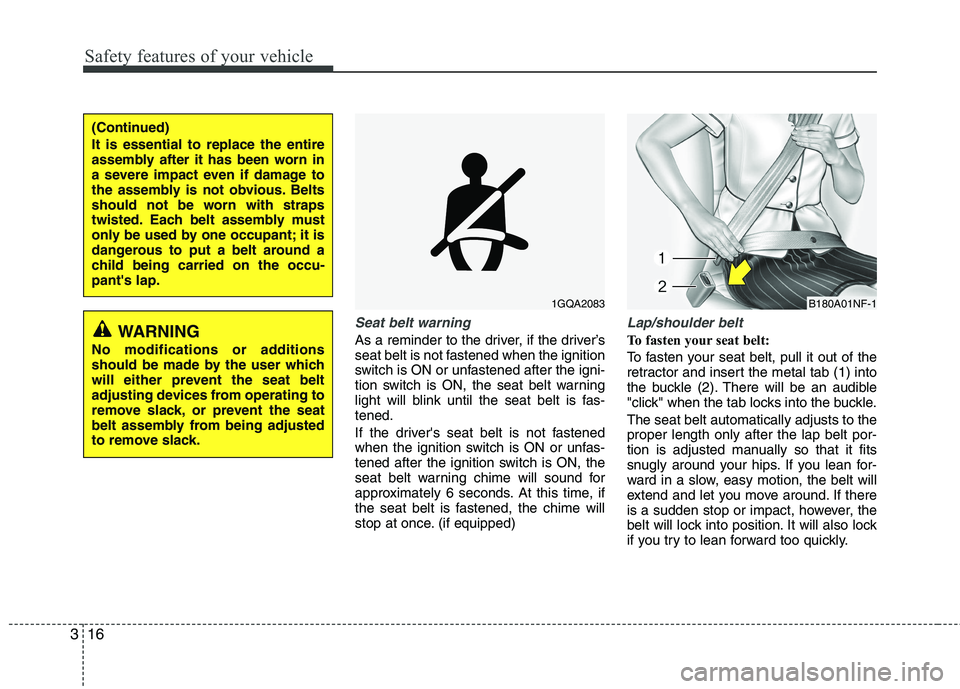
Lap/shoulder belt
To fasten your seat belt:
To fasten your seat belt, pull it out of the
retractor and insert the metal tab (1) into
the buckle (2). There will be an audible
"click" when the tab locks into the buckle. The seat belt automatically adjusts to the proper length only after the lap belt por-
tion is adjusted manually so that it fits
snugly around your hips. If you lean for-
ward in a slow, easy motion, the belt will
extend and let you move around. If there
is a sudden stop or impact, however, the
belt will lock into position. It will also lock
if you try to lean forward too quickly.
(Continued) It is essential to replace the entire
assembly after it has been worn in
a severe impact even if damage to
the assembly is not obvious. Belts
should not be worn with straps
twisted. Each belt assembly must
only be used by one occupant; it is
dangerous to put a belt around a
child being carried on the occu-pant's lap.
WARNING
No modifications or additions
should be made by the user which
will either prevent the seat belt
adjusting devices from operating to
remove slack, or prevent the seat
belt assembly from being adjusted
to remove slack.
1GQA2083B180A01NF-1
Page 29 of 352
317
Safety features of your vehicle
✽✽NOTICE
If you are not able to pull out the seat
belt from the retractor, firmly pull the
belt out and release it. After release, you
will be able to pull the belt out smooth-
ly.
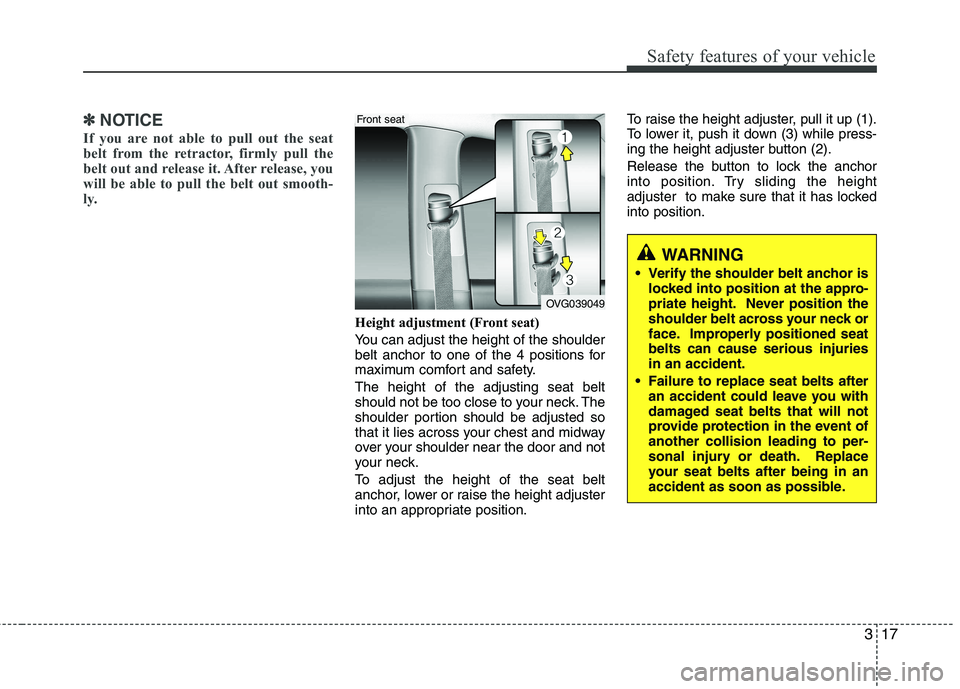
Height adjustment (Front seat)
You can adjust the height of the shoulder
belt anchor to one of the 4 positions for
maximum comfort and safety. The height of the adjusting seat belt
should not be too close to your neck. The
shoulder portion should be adjusted so
that it lies across your chest and midway
over your shoulder near the door and not
your neck.
To adjust the height of the seat belt
anchor, lower or raise the height adjuster
into an appropriate position. To raise the height adjuster, pull it up (1).
To lower it, push it down (3) while press-
ing the height adjuster button (2).
Release the button to lock the anchor
into position. Try sliding the height
adjuster to make sure that it has lockedinto position.
WARNING
Verify the shoulder belt anchor is locked into position at the appro-
priate height. Never position the
shoulder belt across your neck or
face. Improperly positioned seatbelts can cause serious injuriesin an accident.
Failure to replace seat belts after an accident could leave you with
damaged seat belts that will not
provide protection in the event ofanother collision leading to per-
sonal injury or death. Replace
your seat belts after being in an
accident as soon as possible.
OVG039049
Front seat
Page 30 of 352
Safety features of your vehicle
18
3
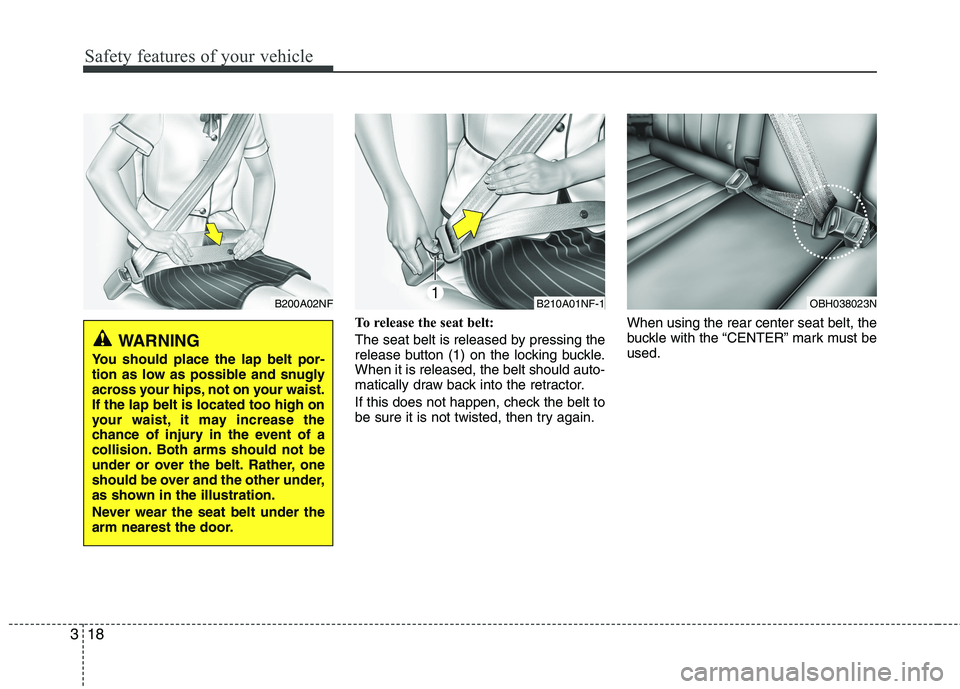
To release the seat belt:
The seat belt is released by pressing the
release button (1) on the locking buckle.When it is released, the belt should auto-
matically draw back into the retractor.
If this does not happen, check the belt to
be sure it is not twisted, then try again. When using the rear center seat belt, the
buckle with the “CENTER” mark must beused.
B200A02NF
WARNING
You should place the lap belt por-
tion as low as possible and snugly
across your hips, not on your waist.If the lap belt is located too high on
your waist, it may increase the
chance of injury in the event of a
collision. Both arms should not be
under or over the belt. Rather, one
should be over and the other under,
as shown in the illustration.
Never wear the seat belt under the
arm nearest the door.
B210A01NF-1OBH038023N