KIA Cadenza 2014 1.G Owner's Manual
Manufacturer: KIA, Model Year: 2014, Model line: Cadenza, Model: KIA Cadenza 2014 1.GPages: 415, PDF Size: 5.09 MB
Page 101 of 415
433
Features of your vehicle
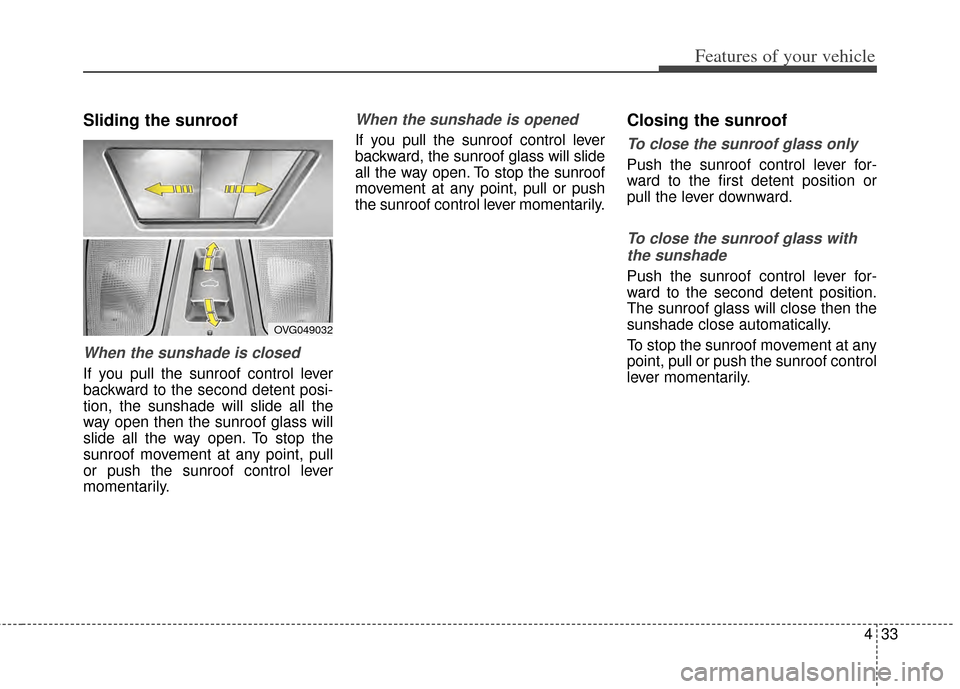
Sliding the sunroof
When the sunshade is closed
If you pull the sunroof control lever
backward to the second detent posi-
tion, the sunshade will slide all the
way open then the sunroof glass will
slide all the way open. To stop the
sunroof movement at any point, pull
or push the sunroof control lever
momentarily.
When the sunshade is opened
If you pull the sunroof control lever
backward, the sunroof glass will slide
all the way open. To stop the sunroof
movement at any point, pull or push
the sunroof control lever momentarily.
Closing the sunroof
To close the sunroof glass only
Push the sunroof control lever for-
ward to the first detent position or
pull the lever downward.
To close the sunroof glass withthe sunshade
Push the sunroof control lever for-
ward to the second detent position.
The sunroof glass will close then the
sunshade close automatically.
To stop the sunroof movement at any
point, pull or push the sunroof control
lever momentarily.
OVG049032
Page 102 of 415
Features of your vehicle
34
4
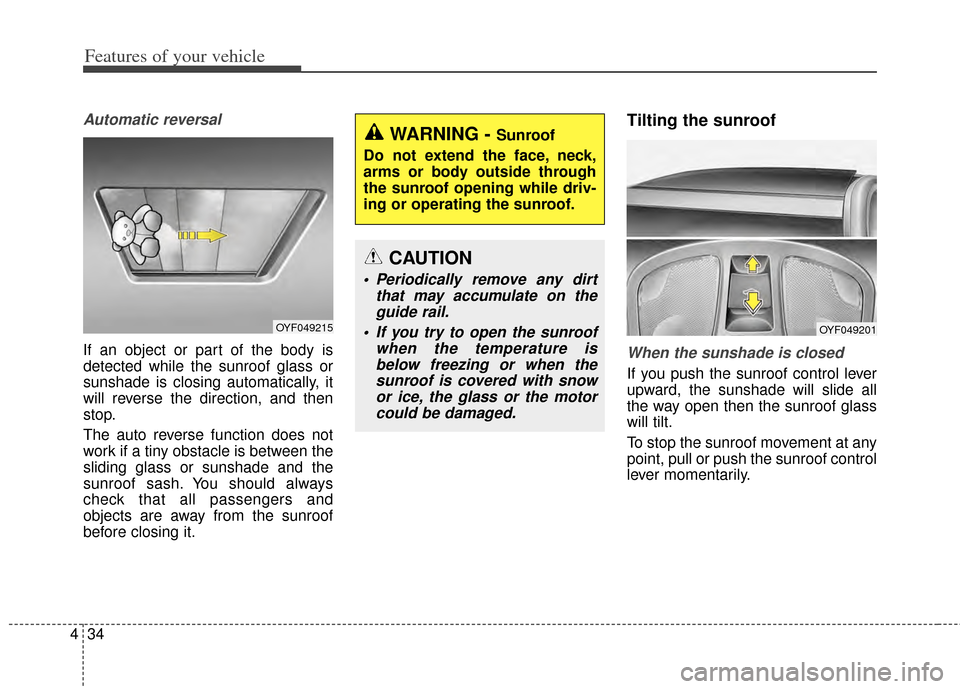
Automatic reversal
If an object or part of the body is
detected while the sunroof glass or
sunshade is closing automatically, it
will reverse the direction, and then
stop.
The auto reverse function does not
work if a tiny obstacle is between the
sliding glass or sunshade and the
sunroof sash. You should always
check that all passengers and
objects are away from the sunroof
before closing it.
Tilting the sunroof
When the sunshade is closed
If you push the sunroof control lever
upward, the sunshade will slide all
the way open then the sunroof glass
will tilt.
To stop the sunroof movement at any
point, pull or push the sunroof control
lever momentarily.
WARNING - Sunroof
Do not extend the face, neck,
arms or body outside through
the sunroof opening while driv-
ing or operating the sunroof.
CAUTION
Periodically remove any dirt that may accumulate on theguide rail.
If you try to open the sunroof when the temperature isbelow freezing or when thesunroof is covered with snowor ice, the glass or the motorcould be damaged.
OYF049215OYF049201
Page 103 of 415
435
Features of your vehicle
When the sunshade is opened
If you push the sunroof control lever
upward, the sunroof glass will tilt.
To stop the sunroof movement at any
point, pull or push the sunroof control
lever momentarily.
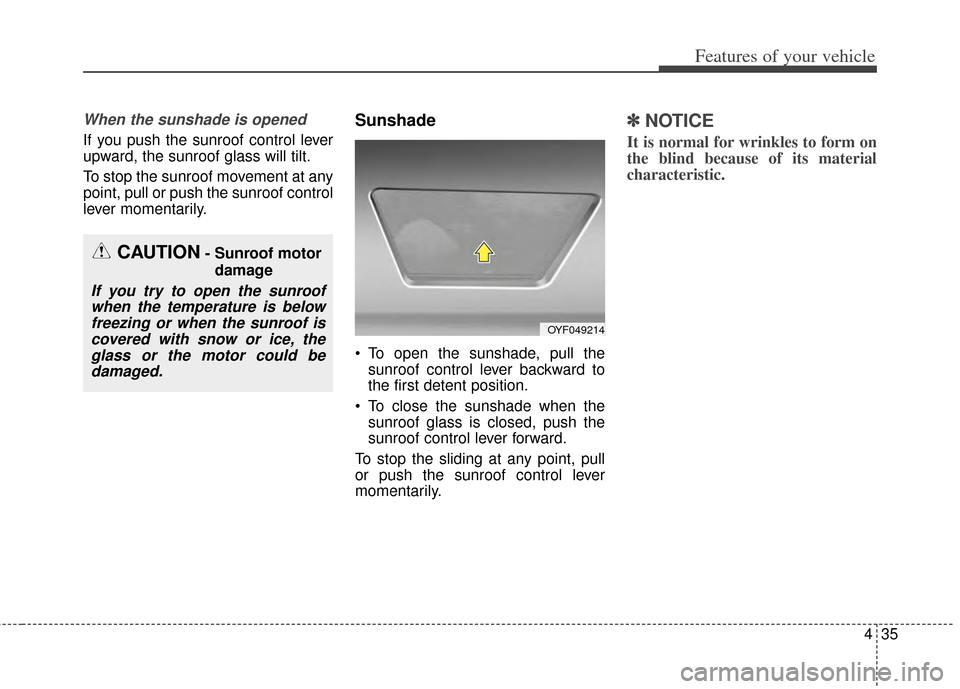
Sunshade
To open the sunshade, pull thesunroof control lever backward to
the first detent position.
To close the sunshade when the sunroof glass is closed, push the
sunroof control lever forward.
To stop the sliding at any point, pull
or push the sunroof control lever
momentarily.
✽ ✽ NOTICE
It is normal for wrinkles to form on
the blind because of its material
characteristic.
CAUTION- Sunroof motor
damage
If you try to open the sunroofwhen the temperature is belowfreezing or when the sunroof iscovered with snow or ice, theglass or the motor could bedamaged.
OYF049214
Page 104 of 415
Features of your vehicle
36
4
Resetting the sunroof
Whenever the vehicle battery is dis-
connected or discharged, or related
fuse is blown, you must reset your
sunroof system as follows:
1. Turn the ignition switch to the ON
position and close the sunroof
completely.
2. Release the control lever.
3. Push and hold the control lever for- ward (for more than 10 seconds)
until the sunroof tilts and slightly
moves. Then, release the lever.
4. Push the sunroof control lever for- ward in the direction of close until
the sunroof operates as follows:
SUNSHADE OPEN → TILT OPEN
→ SLIDE OPEN → SLIDE CLOSE
→ SUNSHADE CLOSE
Then, release the control lever. When this is complete, the sunroof
system is reset.
❈ For more detailed information,
contact an authorized Kia dealer.
✽ ✽
NOTICE
If the sunroof is not reset when the
vehicle battery is disconnected or
discharged, or related fuse is blown,
the sunroof may operate improperly.
Page 105 of 415
437
Features of your vehicle
STEERING WHEEL
Electric power steering (EPS)
Power steering uses the motor to
assist you in steering the vehicle. If
the engine is off or if the power steer-
ing system becomes inoperative, the
vehicle may still be steered, but it will
require increased steering effort.
The motor driven power steering is
controlled by the power steering con-
trol unit which senses the steering
wheel torque and vehicle speed to
command the motor.
The steering wheel becomes heavier
as the vehicle’s speed increases and
becomes lighter as the vehicle’s
speed decreases for better control of
the steering wheel.
Should you notice any change in the
effort required to steer during normal
vehicle operation, have the power
steering checked by an authorized
Kia dealer.
✽ ✽NOTICE
The following symptoms may occur
during normal vehicle operation:
• The steering effort is increased
immediately after turning the igni-
tion switch on. This happens as the
system performs the EPS system
diagnostics. When the diagnostics
are completed, the steering wheel
will return to its normal condition
• A click noise may be heard from the EPS relay after the ignition
switch is turned to the ON or
LOCK position.
• Motor noise may be heard when the vehicle is at a stop or at a low
driving speed.
• The steering effort increases if the steering wheel is rotated continu-
ously when the vehicle is not in
motion. However, after a few min-
utes, it will return to its normal
conditions.
• When you operate the steering wheel in low temperature, abnor-
mal noise could occur. If tempera-
ture rises, the noise will disappear.
This is a normal condition.
If the Electric Power Steering System
does not operate normally, the warn-
ing light will illuminate on the instru-
ment cluster. The steering wheel may
become difficult to control or operate
abnormally. Take your vehicle to an
authorized Kia dealer and have the
vehicle checked as soon as possible.
Page 106 of 415
Features of your vehicle
38
4
Tilt and telescoping steering
Tilt steering allows you to adjust the
steering wheel before you drive. You
can also raise it to give your legs
more room when you exit and enter
the vehicle.
The steering wheel should be posi-
tioned so that it is comfortable for
you to drive, while permitting you to
see the instrument panel warning
lights and gauges.
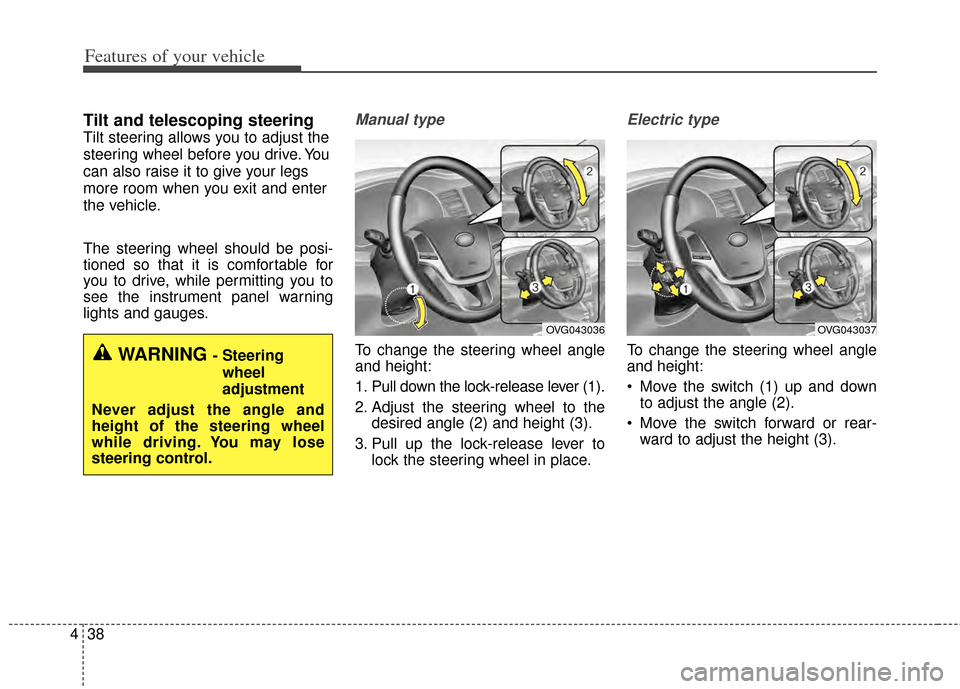
Manual type
To change the steering wheel angle
and height:
1. Pull down the lock-release lever (1).
2. Adjust the steering wheel to the
desired angle (2) and height (3).
3. Pull up the lock-release lever to lock the steering wheel in place.
Electric type
To change the steering wheel angle
and height:
Move the switch (1) up and downto adjust the angle (2).
Move the switch forward or rear- ward to adjust the height (3).WARNING - Steering
wheel
adjustment
Never adjust the angle and
height of the steering wheel
while driving. You may lose
steering control.
OVG043036OVG043037
Page 107 of 415

439
Features of your vehicle
Heated steering wheel
(if equipped)
With the ignition switch in the ON
position, pressing the heated steer-
ing wheel button warms the steering
wheel. The indicator on the button
will illuminate and notify you on the
LCD display.
To turn the heated steering wheel off,
press the button once again. The
indicator on the button will turn off
and notify you on the LCD display.
Horn
To sound the horn, press the horn
symbol on your steering wheel.
Check the horn regularly to be sure it
operates properly.
To sound the horn, press the area
indicated by the horn symbol on your
steering wheel (see illustration). The
horn will operate only when this area
is pressed.
CAUTION
Do not install any grip to oper-ate the steering wheel. Thiscauses damage to the heatedsteering wheel system.
OVG043200N
OXM043305
Page 108 of 415
Features of your vehicle
40
4
MIRRORS
Inside rearview mirror
Adjust the rearview mirror so that the
center view through the rear window
is seen. Make this adjustment before
you start driving.
Do not place objects in the rear seat
which would interfere with your vision
through the rear window.
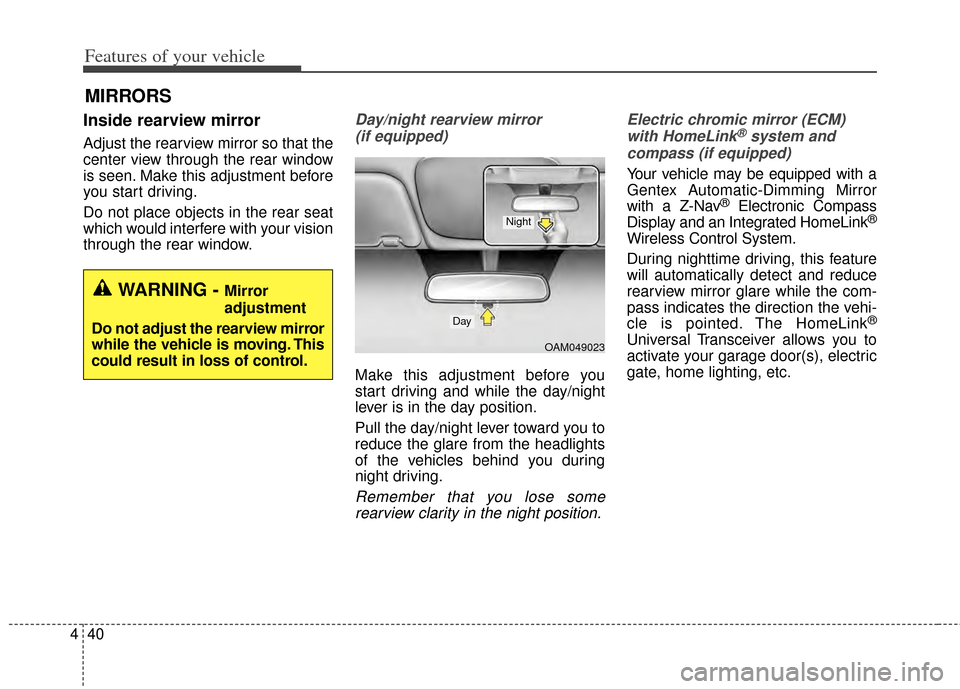
Day/night rearview mirror
(if equipped)
Make this adjustment before you
start driving and while the day/night
lever is in the day position.
Pull the day/night lever toward you to
reduce the glare from the headlights
of the vehicles behind you during
night driving.
Remember that you lose somerearview clarity in the night position. Electric chromic mirror (ECM)
with HomeLink
®system and
compass (if equipped)
Your vehicle may be equipped with a
Gentex Automatic-Dimming Mirror
with a Z-Nav
®Electronic Compass
Display and an Integrated HomeLink®
Wireless Control System.
During nighttime driving, this feature
will automatically detect and reduce
rearview mirror glare while the com-
pass indicates the direction the vehi-
cle is pointed. The HomeLink
®
Universal Transceiver allows you to
activate your garage door(s), electric
gate, home lighting, etc.
WARNING - Mirror
adjustment
Do not adjust the rearview mirror
while the vehicle is moving. This
could result in loss of control.
OAM049023
Day
Night
Page 109 of 415

441
Features of your vehicle
(1) Channel 1 button
(2) Channel 2 button
(3) Status indicator LED
(4) Channel 3 button
(5) Rear light sensor
(6) Dimming ON/OFF button
(7) Compass control button
(8) Compass display Automatic-Dimming Night Vision
Safety
®(NVS®) Mirror
The NVS
®Mirror in your vehicle is
the most advanced way to reduce
annoying glare in the rearview mirror
during any driving situation. For more
information regarding NVS
®mirrors
and other applications, please refer
to the Gentex website:
www.gentex.com Automatic-dimming function
Your mirror will automatically dim
upon detecting glare from the vehi-
cles traveling behind you. The auto-
dimming function can be controlled
by the Dimming ON/OFF Button:
1. Pressing the button turns the
auto-dimming function OFF which
is indicated by the green Status
Indicator LED turning off.
2. Pressing the button again turns the auto-dimming function ON
which is indicated by the green
Status Indicator LED turning on.
✽ ✽NOTICE
The mirror defaults to the ON posi-
tion each time the vehicle is started.
Z-Nav™ Compass Display
The NVS
®Mirror in your vehicle is
also equipped with a Z-Nav®
Compass that shows the vehicle
Compass heading in the Display
Window using the 8 basic cardinal
headings (N, NE, E, SE, etc.).
OYF049230CCAUTION
The NVS®Mirror automatically
reduces glare during driving conditions based upon light lev-els monitored in front of the vehi-cle and from the rear of the vehi-cle. These light sensors are visi-ble through openings in the frontand rear of the mirror case. Anyobject that obstructs either lightsensor will degrade the automat-ic dimming control feature.
Page 110 of 415

Features of your vehicle
42
4
Compass function
The Compass can be turned ON and
OFF and will remember the last state
when the ignition is cycled. To turn
the display feature ON/OFF:
1. Press and release the button to
turn the display feature OFF.
2. Press and release the button again to turn the display back ON.
Additional options can be set with
press and hold sequences of the
button and are detailed below.
There is a difference between mag-
netic north and true north. The com-
pass in the mirror can compensate
for this difference when it knows the
Magnetic Zone in which it is operat-
ing. This is set either by the dealer or
by the user. The operating Zone
Numbers for North America are
shown in the figure on the following
section.
B520C05NF