instrument cluster KIA CADENZA 2019 User Guide
[x] Cancel search | Manufacturer: KIA, Model Year: 2019, Model line: CADENZA, Model: KIA CADENZA 2019Pages: 518, PDF Size: 11.08 MB
Page 285 of 518
539
Driving your vehicle
The warning light illumi-
nates on the LCD display,
when you cancel the FCA
system. The driver can
monitor the FCA ON/OFF status on
the LCD display. Also, the warning
light illuminates when the
ESC(Electronic Stability Control) is
turned off (Traction & Stability control
disabled.). When the warning light
remains ON with the FCA activated,
have the system checked by an
authorized Kia dealer.
The driver can select the initial warn-
ing activation time in the User
Settings in the instrument cluster
LCD display. The options for the ini-
tial Forward Collision Warning
include the following:
selected, the initial
Forward Collision Warning
is activated earlier than
normal. This setting maxi-
mizes the amount of dis-
tance between the vehicle
or pedestrian ahead before
the initial warning occurs. If
the ‘EARLY’ condition feels
too sensitive, change it into
‘NORMAL’. When the vehi-
cle ahead suddenly stops,
the warning may seem to
activate later even if the
‘EARLY’ condition was
selected.
selected, the initial
Forward Collision
Warning is activated nor-
mally. This setting allows
for a smaller amount of
distance between the
vehicle or pedestrian
ahead before the initial
warning occurs than
EARLY mode.
selected, the initial Forward
Collision Warning is activat-
ed later than normal. This
setting reduces the amount
of distance between the
vehicle or pedestrian ahead
before the initial warning
occurs. Select this condition
only when traffic is light,
and you are driving slowly.
Page 300 of 518

Driving your vehicle
54
5
To set cruise control speed:
1. Press the CRUISE button on the
steering wheel to turn the system
on. The CRUISE indicator light in
the instrument cluster will illumi-
nate.
2. Accelerate to the desired speed, which must be more than 20 mph
(30 km/h). 3. Move the lever down (to SET-), and
release it at the desired speed. The
cruise indicator and set speed on
the LCD screen will illuminate.
Release the accelerator at the
same time. The desired speed will
automatically be maintained.
On a steep grade, the vehicle mayslow down when driving uphill orspeed up slightly while going downhill.
To increase cruise control set
speed:
Follow either of these procedures:
Move the lever up (to RES+) and hold it. Your vehicle will accelerate.
Release the lever at the speed you
want.
Move the lever up (to RES+) and release it immediately. The cruising
speed will increase by 1.0 mph (1
km/h ) each time the lever is operat-
ed in this manner.
OYG056033
OYG056034
OYG056035
Page 302 of 518
Driving your vehicle
56
5
Each of these actions will cancel
cruise control operation (The setspeed on the LCD will disappear andthe CRUISE indicator will illuminatecontinuously.), but it will not turn thesystem off. If you wish to resumecruise control operation, move thelever up (to RES+). You will return toyour previously preset speed.To resume cruising speed at
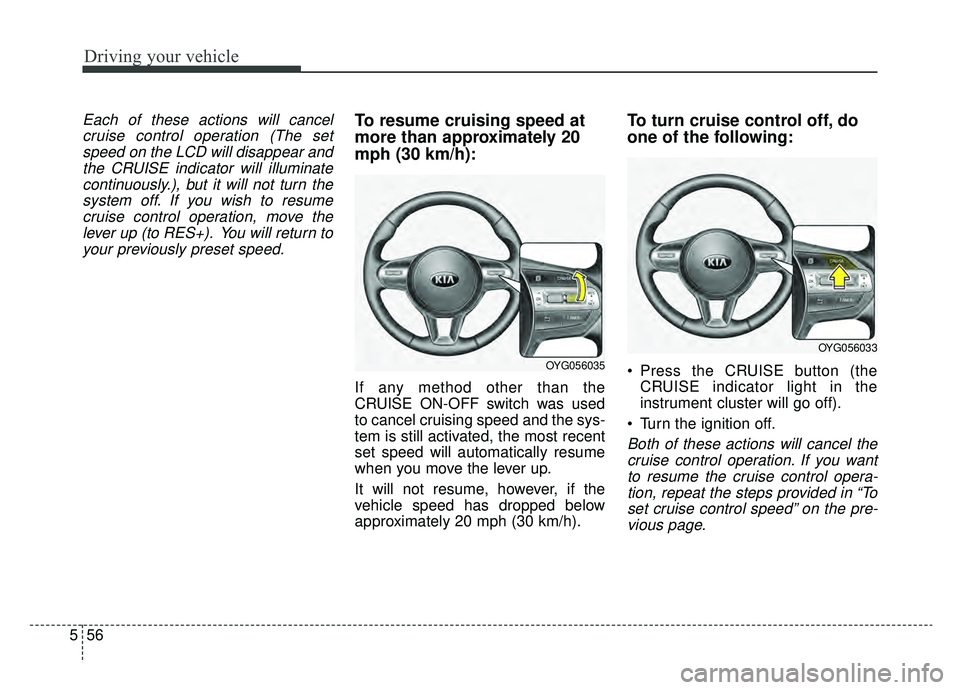
more than approximately 20
mph (30 km/h):
If any method other than the
CRUISE ON-OFF switch was used
to cancel cruising speed and the sys-
tem is still activated, the most recent
set speed will automatically resume
when you move the lever up.
It will not resume, however, if the
vehicle speed has dropped below
approximately 20 mph (30 km/h).
To turn cruise control off, do
one of the following:
Press the CRUISE button (the CRUISE indicator light in the
instrument cluster will go off).
Turn the ignition off.
Both of these actions will cancel the cruise control operation. If you wantto resume the cruise control opera-tion, repeat the steps provided in “Toset cruise control speed” on the pre-vious page.
OYG056035
OYG056033
Page 303 of 518
557
Driving your vehicle
SMART CRUISE CONTROL WITH STOP & GO SYSTEM (IF EQUIPPED)
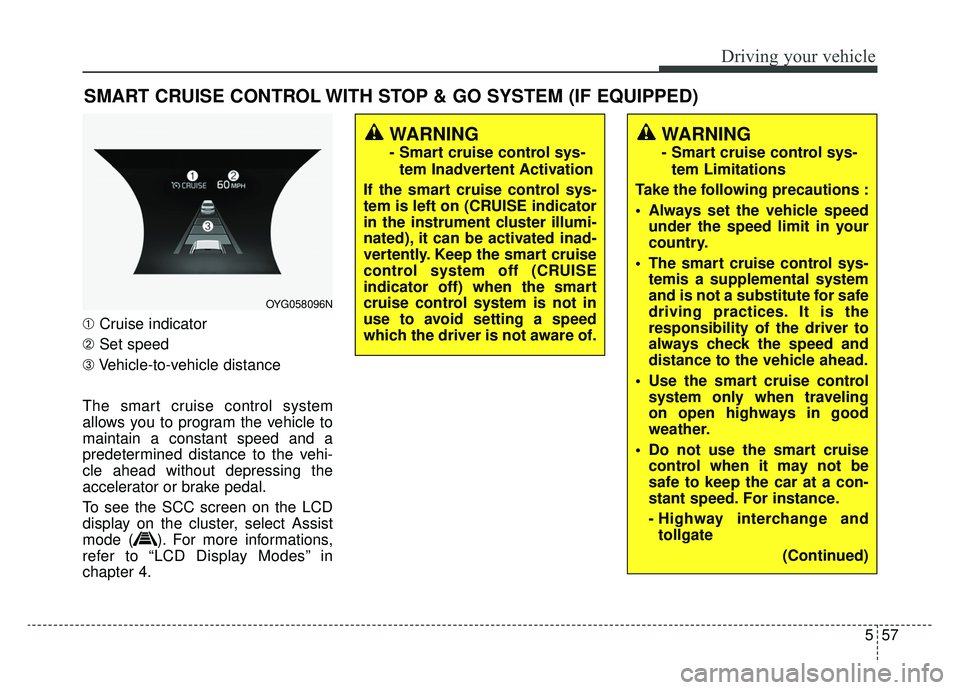
➀Cruise indicator
➁ Set speed
➂ Vehicle-to-vehicle distance
The smart cruise control system
allows you to program the vehicle to
maintain a constant speed and a
predetermined distance to the vehi-
cle ahead without depressing the
accelerator or brake pedal.
To see the SCC screen on the LCD
display on the cluster, select Assist
mode ( ). For more informations,
refer to “LCD Display Modes” in
chapter 4.
WARNING
- Smart cruise control sys- tem Inadvertent Activation
If the smart cruise control sys-
tem is left on (CRUISE indicator
in the instrument cluster illumi-
nated), it can be activated inad-
vertently. Keep the smart cruise
control system off (CRUISE
indicator off) when the smart
cruise control system is not in
use to avoid setting a speed
which the driver is not aware of.
WARNING
- Smart cruise control sys- tem Limitations
Take the following precautions :
Always set the vehicle speed under the speed limit in your
country.
The smart cruise control sys- temis a supplemental system
and is not a substitute for safe
driving practices. It is the
responsibility of the driver to
always check the speed and
distance to the vehicle ahead.
Use the smart cruise control system only when traveling
on open highways in good
weather.
control when it may not be
safe to keep the car at a con-
stant speed. For instance.
- Highway interchange andtollgate
(Continued)
OYG058096N
Page 305 of 518
559
Driving your vehicle
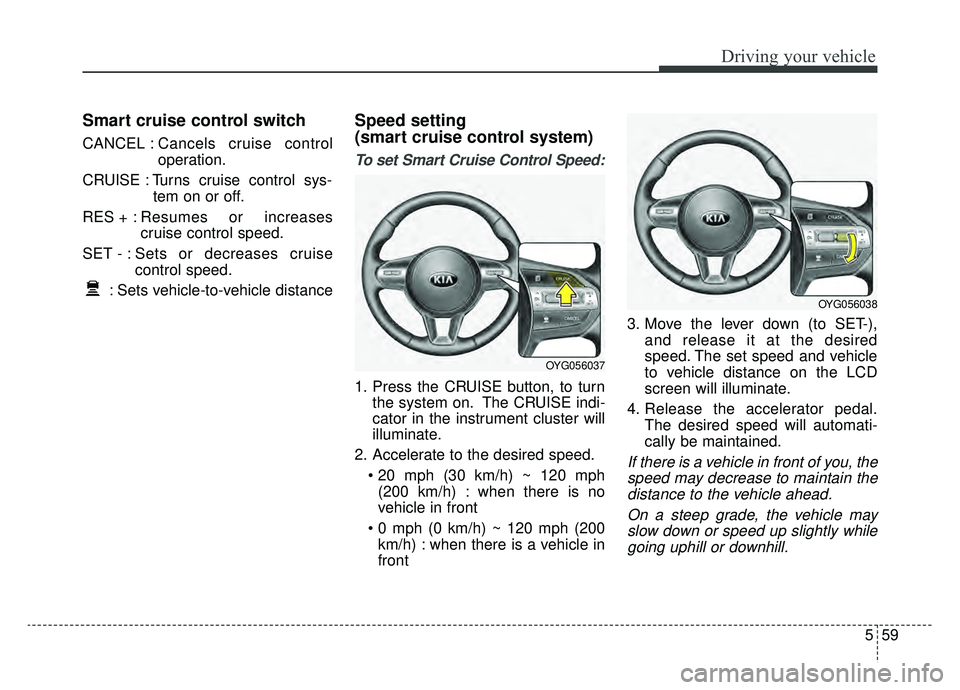
Smart cruise control switch
CANCEL :Cancels cruise control
operation.
CRUISE : Turns cruise control sys- tem on or off.
RES + : Resumes or increases
cruise control speed.
SET - : Sets or decreases cruise control speed.
: Sets vehicle-to-vehicle distance
Speed setting
(smart cruise control system)
To set Smart Cruise Control Speed:
1. Press the CRUISE button, to turn the system on. The CRUISE indi-
cator in the instrument cluster will
illuminate.
2. Accelerate to the desired speed. (200 km/h) : when there is no
vehicle in front
km/h) : when there is a vehicle in
front 3. Move the lever down (to SET-),
and release it at the desired
speed. The set speed and vehicle
to vehicle distance on the LCD
screen will illuminate.
4. Release the accelerator pedal. The desired speed will automati-
cally be maintained.
If there is a vehicle in front of you, thespeed may decrease to maintain thedistance to the vehicle ahead.
On a steep grade, the vehicle mayslow down or speed up slightly whilegoing uphill or downhill.
OYG056038
OYG056037
Page 309 of 518
563
Driving your vehicle
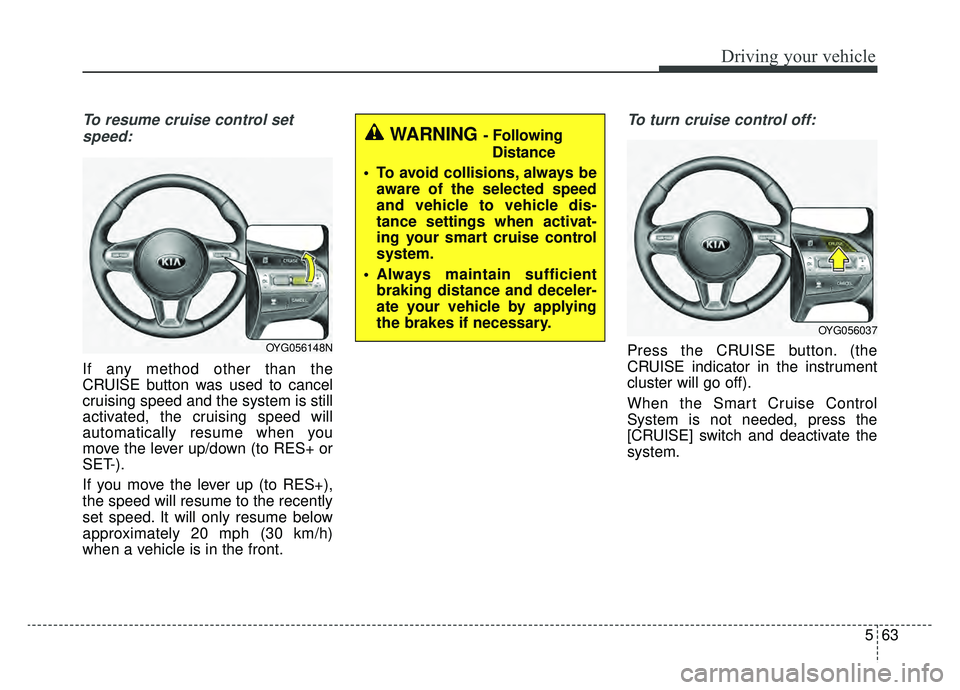
To resume cruise control setspeed:
If any method other than the
CRUISE button was used to cancel
cruising speed and the system is still
activated, the cruising speed will
automatically resume when you
move the lever up/down (to RES+ or
SET-).
If you move the lever up (to RES+),
the speed will resume to the recently
set speed. It will only resume below
approximately 20 mph (30 km/h)
when a vehicle is in the front.
To turn cruise control off:
Press the CRUISE button. (the
CRUISE indicator in the instrument
cluster will go off).
When the Smart Cruise Control
System is not needed, press the
[CRUISE] switch and deactivate the
system.
WARNING - Following Distance
To avoid collisions, always be aware of the selected speed
and vehicle to vehicle dis-
tance settings when activat-
ing your smart cruise control
system.
Always maintain sufficient braking distance and deceler-
ate your vehicle by applying
the brakes if necessary.
OYG056037
OYG056148N
Page 333 of 518
587
Driving your vehicle
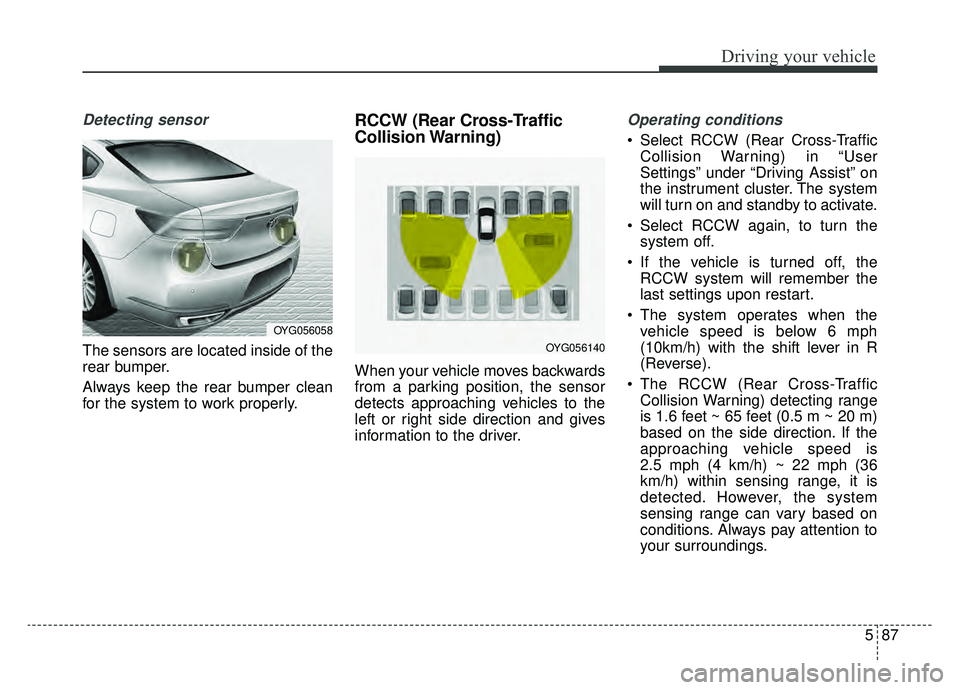
Detecting sensor
The sensors are located inside of the
rear bumper.
Always keep the rear bumper clean
for the system to work properly.
RCCW (Rear Cross-Traffic
Collision Warning)
When your vehicle moves backwards
from a parking position, the sensor
detects approaching vehicles to the
left or right side direction and gives
information to the driver.
Operating conditions
Select RCCW (Rear Cross-TrafficCollision Warning) in “User
Settings” under “Driving Assist” on
the instrument cluster. The system
will turn on and standby to activate.
Select RCCW again, to turn the system off.
If the vehicle is turned off, the RCCW system will remember the
last settings upon restart.
The system operates when the vehicle speed is below 6 mph
(10km/h) with the shift lever in R
(Reverse).
The RCCW (Rear Cross-Traffic Collision Warning) detecting range
is 1.6 feet ~ 65 feet (0.5 m ~ 20 m)
based on the side direction. If the
approaching vehicle speed is
2.5 mph (4 km/h) ~ 22 mph (36
km/h) within sensing range, it is
detected. However, the system
sensing range can vary based on
conditions. Always pay attention to
your surroundings.
OYG056058
OYG056140
Page 340 of 518

Driving your vehicle
94
5
It gently applies braking power on
the tire, which is located in the oppo-
site side of the possibly-colliding
point. The instrument cluster will
inform the driver of the system acti-
vation.
Blind-Spot Collision-Avoidance
Assist System (BCA) is automatical-
ly deactivated when :
- The vehicle drives a certain dis-
tance away
- The vehicle direction is changed against the possible-colliding point
- The steering wheel is abruptly moved
- The brake pedal is depressed
- After a certain period of time
The driver should drive the vehicle in
the middle of the vehicle lanes to
keep the system in the ready status.
When the vehicle drives too close to
one side of the vehicle lanes, the
system may not properly operate.
In addition, the system may not prop-
erly control your vehicle in accor-
dance with driving situations. Thus,
always pay close attention to road
situations. Check Blind-Spot Collision-Avoidance
Assist (BCA) system
If there is a problem with the BCA
system, a warning message will
appear. The system will turn off auto-
matically. BCW will still operate even
if the BCA system turns off due to
malfunction. We recommend that you
have your vehicle inspected by an
authorized Kia dealer to use BCA
system.Limitations of the system
The driver must be cautious in the
below situations, because the sys-
tem may not detect other vehicles or
objects in certain circumstances.
When a trailer or carrier is
installed.
The vehicle drives in inclement weather such as heavy rain or
snow.
The sensor is polluted with rain, snow, mud, etc.
The rear bumper where the sensor is located is covered with a foreign
object such as a bumper sticker, a
bumper guard, a bike rack, etc.
The rear bumper is damaged, or the sensor is out of the original
default position.
The vehicle height gets lower or higher due to heavy loading in a
trunk, abnormal tire pressure, etc.
When the temperature of the rear bumper is high.
When the sensors are blocked by other vehicles, walls or parking-lot
pillars.
OYG058243L
Page 345 of 518

599
Driving your vehicle
LKA SYSTEM operation
To activate/deactivate the LKA SYS-
TEM:
With the ignition switch in the ON
position, press the LKA SYSTEM
button located on the instrument
panel on the lower left hand side of
the driver.
The indicator in the cluster display
will initially illuminate white.
When the indicator (white) activated
in the previous ignition cycle, the
system turns on without any control.If you press the LKA SYSTEM button
again, the indicator on the cluster
display will go off.
The color of indicator will change
depend on the condition of LKA
SYSTEM.
- White : Sensor does not detect the
lane marker or vehicle
speed is less than 40 mph
(64 km/h).
- Green : S ensor detects the lane
marker and system is able
to control the steering.
LKA SYSTEM activation
To see the LKA SYSTEM screen on the LCD display in the cluster,
Tab to the Assist mode ( ).
For further details, refer to [menu settings] in chapter 4, [crash pad].
After LKA SYSTEM is activated, if both lane markers are detected,
vehicle speed is over 40 mph (64
km/h) and all the activation condi-
tions are satisfied, a green steering
wheel indicator will illuminate and
the steering wheel will be controlled.
OYG058193
WARNING
The Lane Keeping Assist
System is a system to help pre-
vent the driver from leaving the
lane. However, the driver should
not solely rely on the system
but always check the road con-
ditions when driving.
Page 454 of 518
Maintenance
54
7
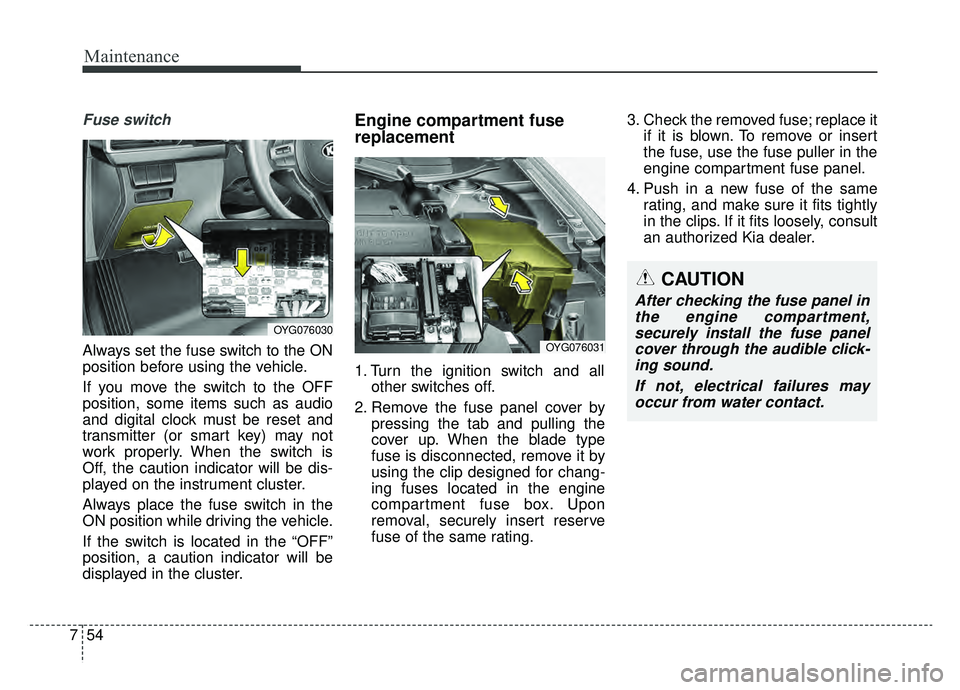
Fuse switch
Always set the fuse switch to the ON
position before using the vehicle.
If you move the switch to the OFF
position, some items such as audio
and digital clock must be reset and
transmitter (or smart key) may not
work properly. When the switch is
Off, the caution indicator will be dis-
played on the instrument cluster.
Always place the fuse switch in the
ON position while driving the vehicle.
If the switch is located in the “OFF”
position, a caution indicator will be
displayed in the cluster.
Engine compartment fuse
replacement
1. Turn the ignition switch and all
other switches off.
2. Remove the fuse panel cover by pressing the tab and pulling the
cover up. When the blade type
fuse is disconnected, remove it by
using the clip designed for chang-
ing fuses located in the engine
compartment fuse box. Upon
removal, securely insert reserve
fuse of the same rating. 3. Check the removed fuse; replace it
if it is blown. To remove or insert
the fuse, use the fuse puller in the
engine compartment fuse panel.
4. Push in a new fuse of the same rating, and make sure it fits tightly
in the clips. If it fits loosely, consult
an authorized Kia dealer.
CAUTION
After checking the fuse panel inthe engine compartment,securely install the fuse panelcover through the audible click-ing sound.
If not, electrical failures mayoccur from water contact.
OYG076030
OYG076031