air condition KIA CADENZA 2019 Service Manual
[x] Cancel search | Manufacturer: KIA, Model Year: 2019, Model line: CADENZA, Model: KIA CADENZA 2019Pages: 518, PDF Size: 11.08 MB
Page 417 of 518
717
Maintenance
Brake fluid
Check the brake fluid level in the
brake fluid reservoir. The level should
be between “MIN” and “MAX” marks
on the side of the reservoir. Use only
hydraulic brake fluid conforming to
DOT 3 or DOT 4 specification.
Parking brake
Inspect the parking brake system
including the parking brake pedal
and cables.
Brake discs, pads, calipers
and rotors
Check the pads for excessive wear,
discs for run out and wear, and
calipers for fluid leakage.
Exhaust pipe and muffler
Visually inspect the exhaust pipes,
muffler and hangers for cracks, dete-
rioration, or damage. Start the
engine and listen carefully for any
exhaust gas leakage. Tighten con-
nections or replace parts as neces-
sary.
Suspension mounting bolts
Check the suspension connections
for looseness or damage. Retighten
to the specified torque.
Steering gear box, linkage &
boots/lower arm ball joint
With the vehicle stopped and engine
off, check for excessive free-play in
the steering wheel.
Check the linkage for bends or dam-
age. Check the dust boots and ball
joints for deterioration, cracks, or
damage. Replace any damaged
parts.
Drive shafts and boots
Check the drive shafts, boots and
clamps for cracks, deterioration, or
damage. Replace any damaged
parts and, if necessary, repack the
grease.
Air conditioning refrigerant
Check the air conditioning lines and
connections for leakage and damage.
Page 423 of 518
723
Maintenance
BRAKE FLUID
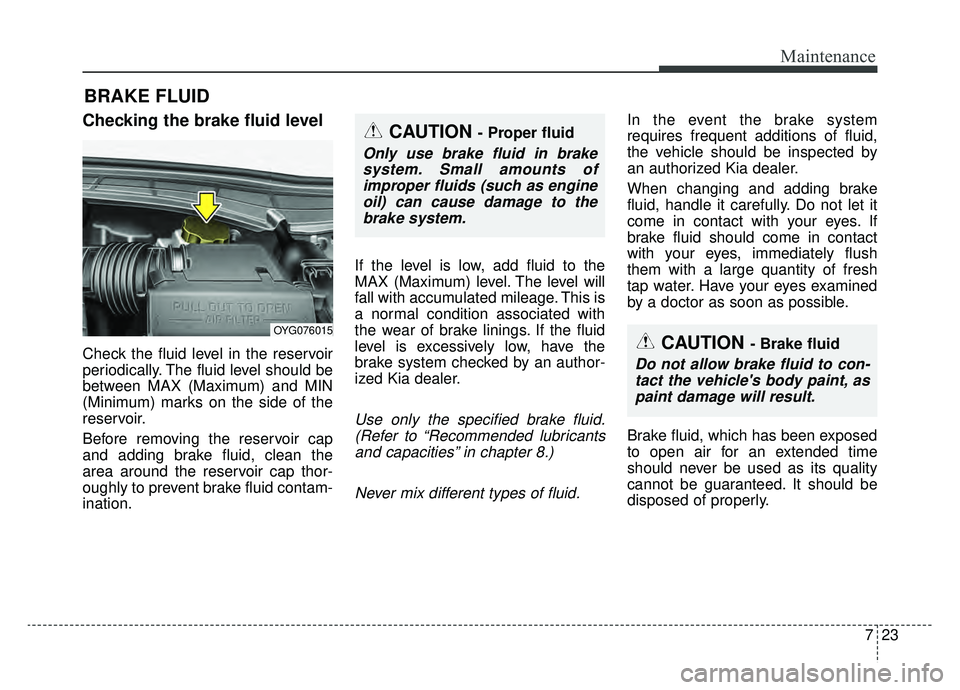
Checking the brake fluid level
Check the fluid level in the reservoir
periodically. The fluid level should be
between MAX (Maximum) and MIN
(Minimum) marks on the side of the
reservoir.
Before removing the reservoir cap
and adding brake fluid, clean the
area around the reservoir cap thor-
oughly to prevent brake fluid contam-
ination.If the level is low, add fluid to the
MAX (Maximum) level. The level will
fall with accumulated mileage. This is
a normal condition associated with
the wear of brake linings. If the fluid
level is excessively low, have the
brake system checked by an author-
ized Kia dealer.
Use only the specified brake fluid.
(Refer to “Recommended lubricantsand capacities” in chapter 8.)
Never mix different types of fluid.
In the event the brake system
requires frequent additions of fluid,
the vehicle should be inspected by
an authorized Kia dealer.
When changing and adding brake
fluid, handle it carefully. Do not let it
come in contact with your eyes. If
brake fluid should come in contact
with your eyes, immediately flush
them with a large quantity of fresh
tap water. Have your eyes examined
by a doctor as soon as possible.
Brake fluid, which has been exposed
to open air for an extended time
should never be used as its quality
cannot be guaranteed. It should be
disposed of properly.
OYG076015CAUTION - Brake fluid
Do not allow brake fluid to con-tact the vehicle's body paint, aspaint damage will result.
CAUTION - Proper fluid
Only use brake fluid in brakesystem. Small amounts ofimproper fluids (such as engineoil) can cause damage to thebrake system.
Page 427 of 518
727
Maintenance
Replace the filter according to the
Maintenance Schedule.
If the vehicle is operated in extreme-ly dusty or sandy areas, replace theelement more often than the usualrecommended intervals. (Refer to“Maintenance under severe usageconditions” in this chapter.)
CAUTION - Air filter
maintenance
Do not drive with the air clean- er removed; this will result inexcessive engine wear.
When removing the air cleaner filter, be careful that dust ordirt does not enter the airintake, or damage may result.
Use a Kia genuine part. Use of a non-genuine part coulddamage the air flow sensor.
Page 438 of 518
Maintenance
38
7
Remove the valve cap from the tire
valve stem. Press the tire gauge firm-
ly onto the valve to get a pressure
measurement. If the cold tire inflation
pressure matches the recommended
pressure on the tire and loading
information label, no further adjust-
ment is necessary. If the pressure is
low, add air until you reach the rec-
ommended amount.
If you overfill the tire, release air by
pushing on the metal stem in the
center of the tire valve. Recheck the
tire pressure with the tire gauge. Be
sure to put the valve caps back on
the valve stems. They help prevent
leaks by keeping out dirt and mois-
ture. Inspect your tires frequently for
proper inflation as well as wear and
damage. Always use a tire pres-
sure gauge.
Tires with too much or too little pressure wear unevenly causing
poor handling, loss of vehicle con-
trol, and sudden tire failure leading
to accidents, injuries, and even
death. The recommended cold tire
pressure for your vehicle can be
found in this manual and on the tire
label located on the driver's side
center pillar.
Remember to check the pressure of your spare tire. Kia recommends
that you check the spare every
time you check the pressure of the
other tires on your vehicle.Tire rotation
To equalize tread wear, it is recom-
mended that the tires be rotated
every 7,500 miles (12,000 km) or
sooner if irregular wear develops.
During rotation, check the tires for
correct balance.
When rotating tires, check for uneven
wear and damage. Abnormal wear is
usually caused by incorrect tire pres-
sure, improper wheel alignment, out-
of-balance wheels, severe braking or
severe cornering. Look for bumps or
bulges in the tread or side of tire.
Replace the tire if you find either of
these conditions. Replace the tire if
fabric or cord is visible. After rotation,
be sure to bring the front and rear tire
pressures to specification and check
lug nut tightness.
Refer to “Tire and wheels” in chapter
8.
Page 448 of 518
Maintenance
48
7
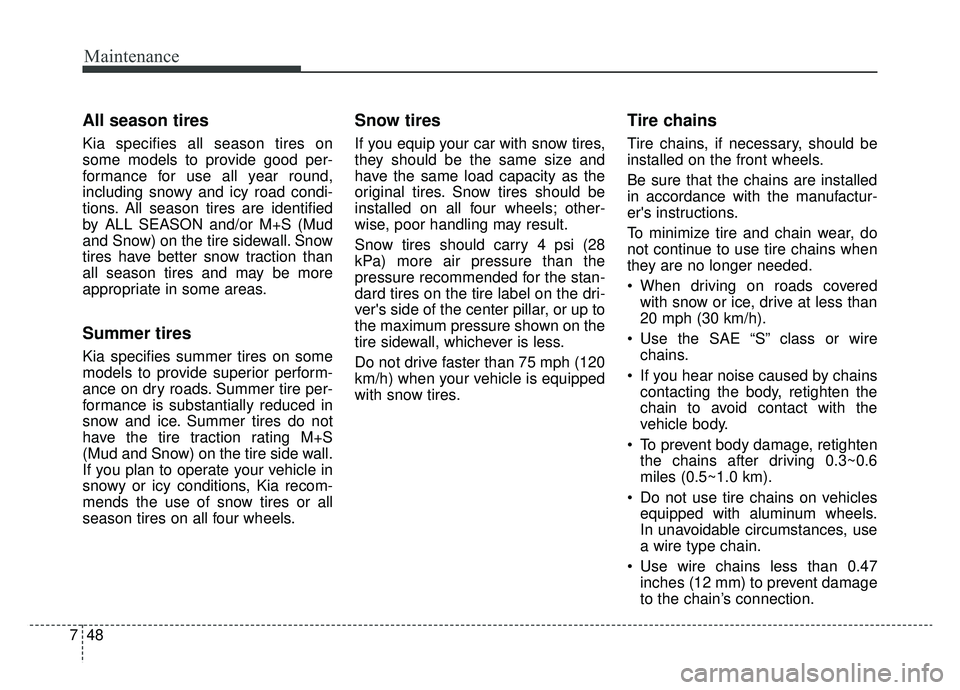
All season tires
Kia specifies all season tires on
some models to provide good per-
formance for use all year round,
including snowy and icy road condi-
tions. All season tires are identified
by ALL SEASON and/or M+S (Mud
and Snow) on the tire sidewall. Snow
tires have better snow traction than
all season tires and may be more
appropriate in some areas.
Summer tires
Kia specifies summer tires on some
models to provide superior perform-
ance on dry roads. Summer tire per-
formance is substantially reduced in
snow and ice. Summer tires do not
have the tire traction rating M+S
(Mud and Snow) on the tire side wall.
If you plan to operate your vehicle in
snowy or icy conditions, Kia recom-
mends the use of snow tires or all
season tires on all four wheels.
Snow tires
If you equip your car with snow tires,
they should be the same size and
have the same load capacity as the
original tires. Snow tires should be
installed on all four wheels; other-
wise, poor handling may result.
Snow tires should carry 4 psi (28
kPa) more air pressure than the
pressure recommended for the stan-
dard tires on the tire label on the dri-
ver's side of the center pillar, or up to
the maximum pressure shown on the
tire sidewall, whichever is less.
Do not drive faster than 75 mph (120
km/h) when your vehicle is equipped
with snow tires.
Tire chains
Tire chains, if necessary, should be
installed on the front wheels.
Be sure that the chains are installed
in accordance with the manufactur-
er's instructions.
To minimize tire and chain wear, do
not continue to use tire chains when
they are no longer needed.
When driving on roads covered
with snow or ice, drive at less than
20 mph (30 km/h).
Use the SAE “S” class or wire chains.
If you hear noise caused by chains contacting the body, retighten the
chain to avoid contact with the
vehicle body.
To prevent body damage, retighten the chains after driving 0.3~0.6
miles (0.5~1.0 km).
Do not use tire chains on vehicles equipped with aluminum wheels.
In unavoidable circumstances, use
a wire type chain.
Use wire chains less than 0.47 inches (12 mm) to prevent damage
to the chain’s connection.
Page 450 of 518
Maintenance
50
7
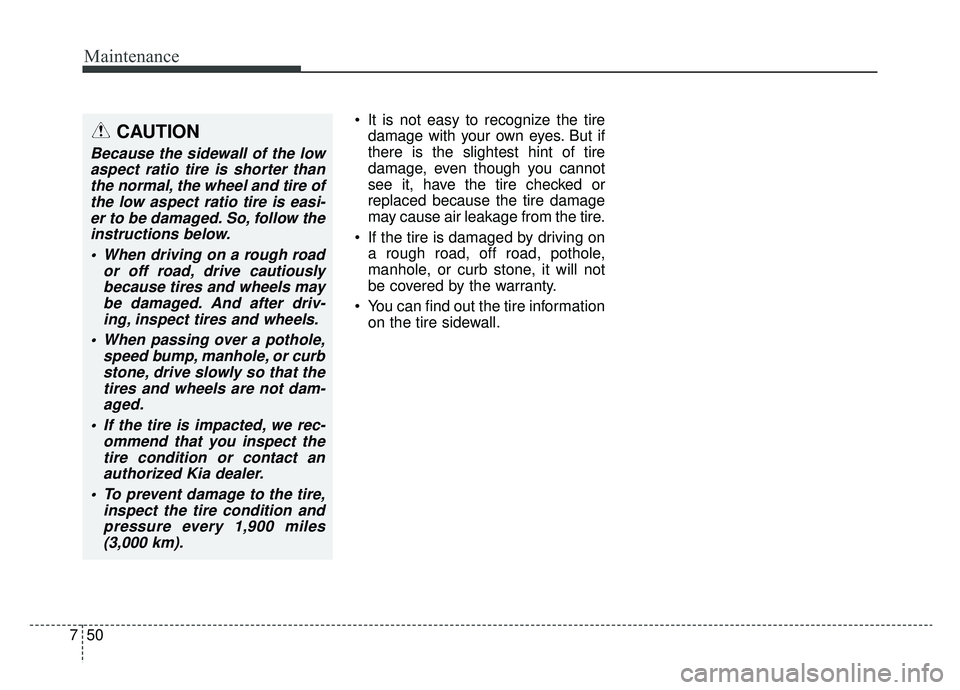
It is not easy to recognize the tire
damage with your own eyes. But if
there is the slightest hint of tire
damage, even though you cannot
see it, have the tire checked or
replaced because the tire damage
may cause air leakage from the tire.
If the tire is damaged by driving on a rough road, off road, pothole,
manhole, or curb stone, it will not
be covered by the warranty.
You can find out the tire information on the tire sidewall.CAUTION
Because the sidewall of the lowaspect ratio tire is shorter thanthe normal, the wheel and tire ofthe low aspect ratio tire is easi-er to be damaged. So, follow theinstructions below.
When driving on a rough road or off road, drive cautiouslybecause tires and wheels maybe damaged. And after driv-ing, inspect tires and wheels.
When passing over a pothole, speed bump, manhole, or curbstone, drive slowly so that thetires and wheels are not dam-aged.
If the tire is impacted, we rec- ommend that you inspect thetire condition or contact anauthorized Kia dealer.
To prevent damage to the tire, inspect the tire condition andpressure every 1,900 miles(3,000 km).
Page 458 of 518
Maintenance
58
7
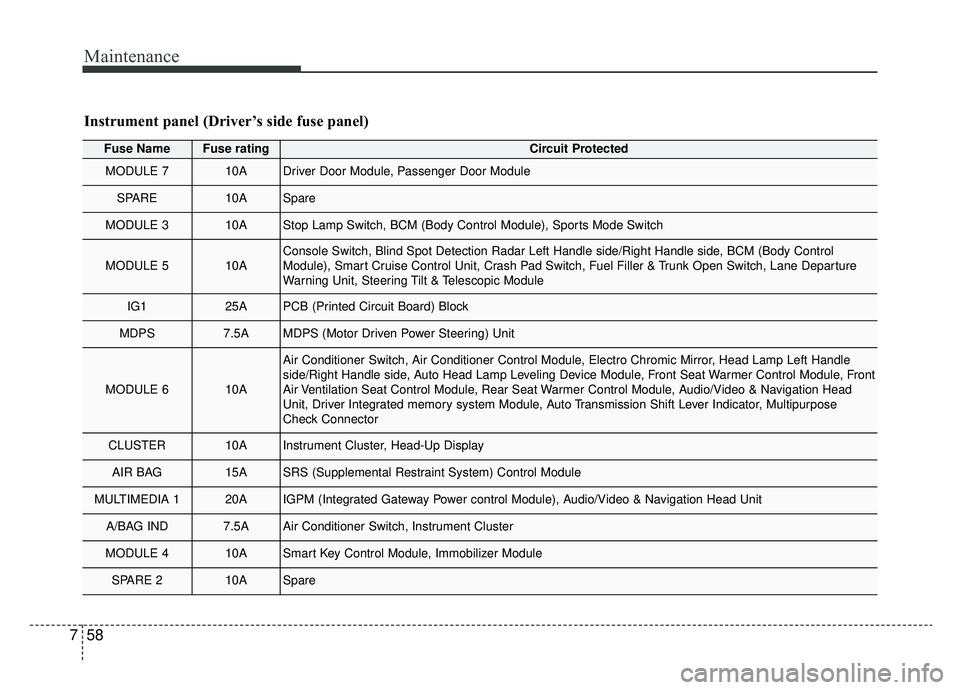
Fuse NameFuse ratingCircuit Protected
MODULE 710ADriver Door Module, Passenger Door Module
SPARE10ASpare
MODULE 310AStop Lamp Switch, BCM (Body Control Module), Sports Mode Switch
MODULE 510AConsole Switch, Blind Spot Detection Radar Left Handle side/Right Handle\
side, BCM (Body Control
Module), Smart Cruise Control Unit, Crash Pad Switch, Fuel Filler & Trunk Open Switch, Lane Departure
Warning Unit, Steering Tilt & Telescopic Module
IG125APCB (Printed Circuit Board) Block
MDPS7.5AMDPS (Motor Driven Power Steering) Unit
MODULE 610A
Air Conditioner Switch, Air Conditioner Control Module, Electro Chromic Mirror, Head Lamp Left Handle
side/Right Handle side, Auto Head Lamp Leveling Device Module, Front Seat Warmer Control Module, Front
Air Ventilation Seat Control Module, Rear Seat Warmer Control Module, Audio/Video & Navigation Head
Unit, Driver Integrated memory system Module, Auto Transmission Shift Lever Indicator, Multipurpose
Check Connector
CLUSTER10AInstrument Cluster, Head-Up Display
AIR BAG15ASRS (Supplemental Restraint System) Control Module
MULTIMEDIA 120AIGPM (Integrated Gateway Power control Module), Audio/Video & Navigation Head Unit
A/BAG IND7.5AAir Conditioner Switch, Instrument Cluster
MODULE 410ASmart Key Control Module, Immobilizer Module
SPARE 210ASpare
Instrument panel (Driver’s side fuse panel)
Page 459 of 518
759
Maintenance
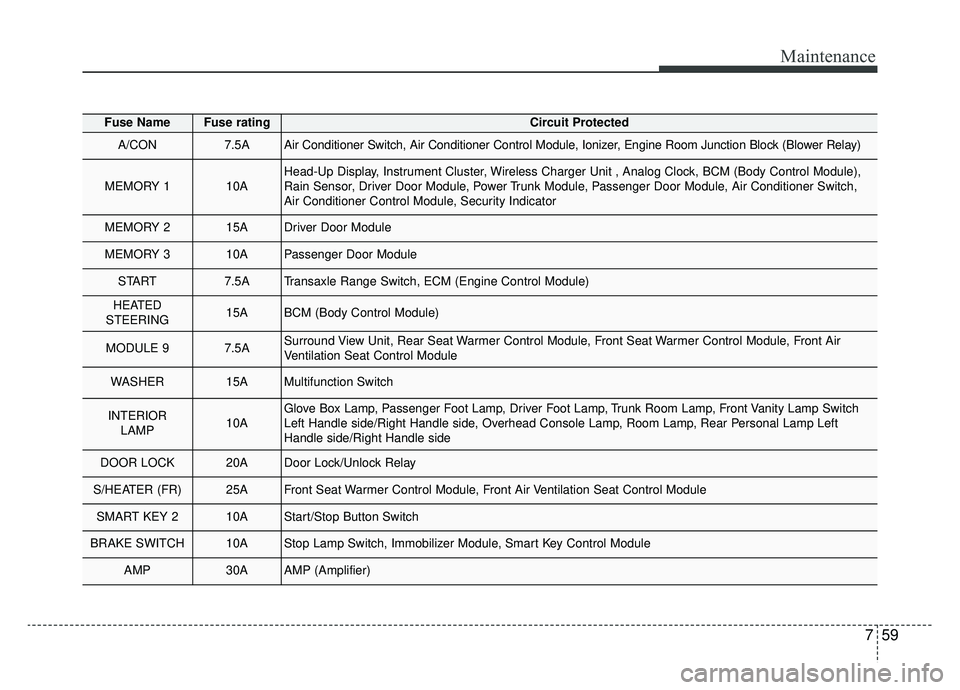
Fuse NameFuse ratingCircuit Protected
A/CON7.5AAir Conditioner Switch, Air Conditioner Control Module, Ionizer, Engine Room Junction Block (Blower Relay)
MEMORY 110AHead-Up Display, Instrument Cluster, Wireless Charger Unit , Analog Clock, BCM (Body Control Module),
Rain Sensor, Driver Door Module, Power Trunk Module, Passenger Door Module, Air Conditioner Switch,
Air Conditioner Control Module, Security Indicator
MEMORY 215ADriver Door Module
MEMORY 310APassenger Door Module
START7.5ATransaxle Range Switch, ECM (Engine Control Module)
HEATED
STEERING15ABCM (Body Control Module)
MODULE 97.5ASurround View Unit, Rear Seat Warmer Control Module, Front Seat Warmer Control Module, Front Air
Ventilation Seat Control Module
WASHER15AMultifunction Switch
INTERIOR LAMP10AGlove Box Lamp, Passenger Foot Lamp, Driver Foot Lamp, Trunk Room Lamp, Front Vanity Lamp Switch
Left Handle side/Right Handle side, Overhead Console Lamp, Room Lamp, Rear Personal Lamp Left
Handle side/Right Handle side
DOOR LOCK20ADoor Lock/Unlock Relay
S/HEATER (FR)25AFront Seat Warmer Control Module, Front Air Ventilation Seat Control Module
SMART KEY 210AStart/Stop Button Switch
BRAKE SWITCH10AStop Lamp Switch, Immobilizer Module, Smart Key Control Module
AMP30AAMP (Amplifier)
Page 461 of 518
761
Maintenance
Fuse NameFuse ratingCircuit Protected
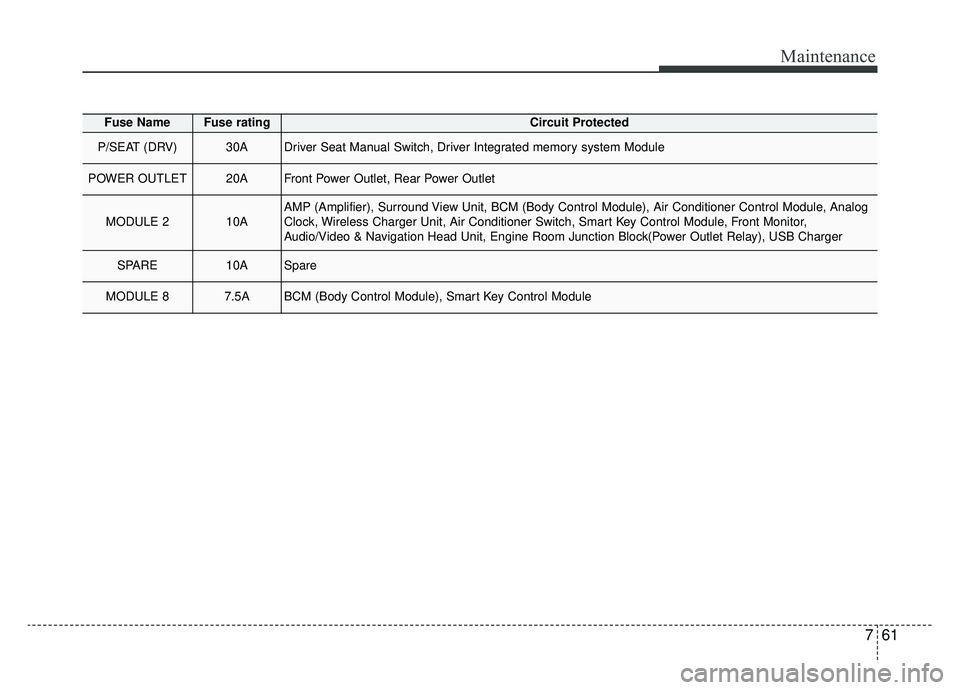
P/SEAT (DRV)30ADriver Seat Manual Switch, Driver Integrated memory system Module
POWER OUTLET20AFront Power Outlet, Rear Power Outlet
MODULE 210AAMP (Amplifier), Surround View Unit, BCM (Body Control Module), Air Conditioner Control Module, Analog
Clock, Wireless Charger Unit, Air Conditioner Switch, Smart Key Control Module, Front Monitor,
Audio/Video & Navigation Head Unit, Engine Room Junction Block(Power Outlet Relay), USB Charger
SPARE10ASpare
MODULE 87.5ABCM (Body Control Module), Smart Key Control Module
Page 464 of 518
Maintenance
64
7
Fuse NameFuse ratingCircuit Protected
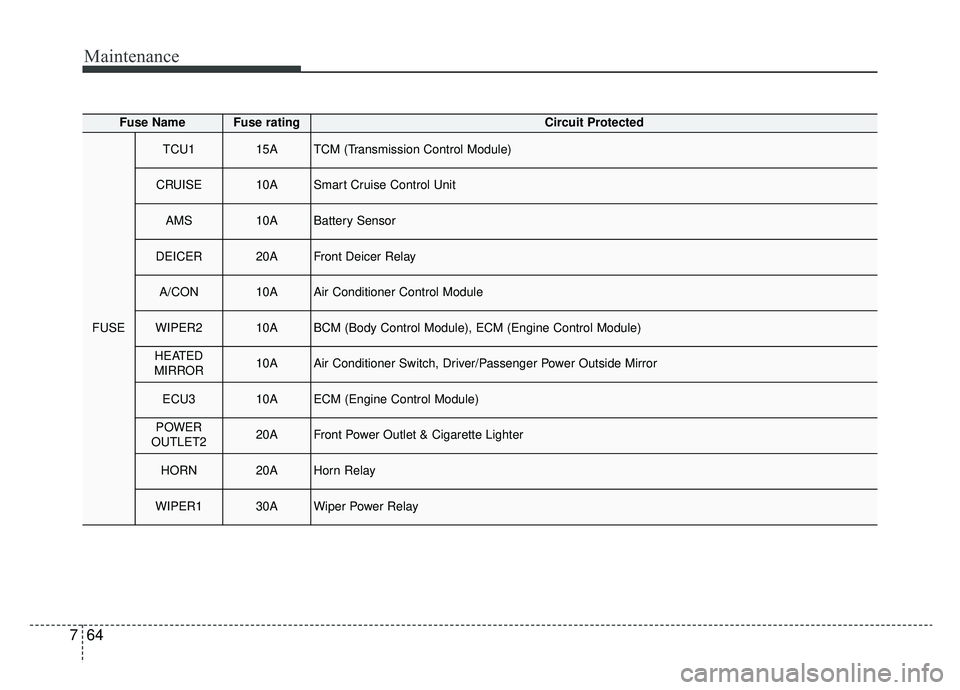
FUSE
TCU115ATCM (Transmission Control Module)
CRUISE10ASmart Cruise Control Unit
AMS10ABattery Sensor
DEICER20AFront Deicer Relay
A/CON10AAir Conditioner Control Module
WIPER210ABCM (Body Control Module), ECM (Engine Control Module)
HEATED
MIRROR10AAir Conditioner Switch, Driver/Passenger Power Outside Mirror
ECU310AECM (Engine Control Module)
POWER
OUTLET220AFront Power Outlet & Cigarette Lighter
HORN20AHorn Relay
WIPER130AWiper Power Relay