seat adjustment KIA CARENS RHD 2018 Owners Manual
[x] Cancel search | Manufacturer: KIA, Model Year: 2018, Model line: CARENS RHD, Model: KIA CARENS RHD 2018Pages: 723, PDF Size: 40.94 MB
Page 19 of 723
Safety features of your vehicle
3
Seat. . . . . . . . . . . . . . . . . . . . . . . . . . . . . . . . . . . . . . . 3-2 • Front seat adjustment - Manual . . . . . . . . . . . . . . . . . 3-6
. . . . . . . . . . . . . . . . . . . 3-7
. . . . . . . . . . . . . . . . . . . . . . . . . 3-10
. . . . . . . . . . . . . . . . . . . . . . . . . . . . . . 3-13
. . . . . . . . . . . . . . . . . . . . . . . . . 3-13
. . . . . . . . . . . . . . . . . . . . . . . . . . . . . . . . . . . . . 3-19
. . . . . . . . . . . . . . . . . . . . . . . . . . 3-20
Seat belt . . . . . . . . . . . . . . . . . . . . . . . . . . . . . . . . . . 3-22 . . . . . . . . . . . . . . . . . . . . . . . . . . . . . 3-24
. . . . . . . . . . . . . . . . . . . . . . . . 3-29
. . . . . . . . . . . . . . . . . . . . . . . . . . 3-35
. . . . . . . . . . . . . . . . . . . . . . . . . . . . . 3-37
Child restraint system . . . . . . . . . . . . . . . . . . . . . . 3-39 . . . . . . . . . . . . . . . . . . . . . . . . . 3-41
lap/shoulder belt . . . . . . . . . . . . . . . . . . . . . . . . . . . . 3-42
. . . . . . . . . . . . . . . . . . . . . 3-46
. . . . . . . 3-48
Air bag-supplemental restraint system . . . . . . . . 3-53 . . . . . . . . . . . . . . 3-56
. . . . . . . . . . . . . . . . . . . . . 3-57 . . . . . . . . . . . . . . . . . 3-59
. . . . . . . . . . . 3-62
. . . . . . . . . . . . . . . . . . . . . . . . . . . . . . . . . 3-67
. . . . . . . . . . . . . . . . . . . . . . . . . . . . . . 3-69
. . 3-71
. . . . . . . . . . . . . . . . . . . . . . . . . . . . . . . . . . . 3-76
. . . . . . . . . . . . . . . . . . . 3-77
. . . . . . . . . . . . . . . . . . . . . . . . . 3-78
Page 24 of 723
Safety features of your vehicle
6
3
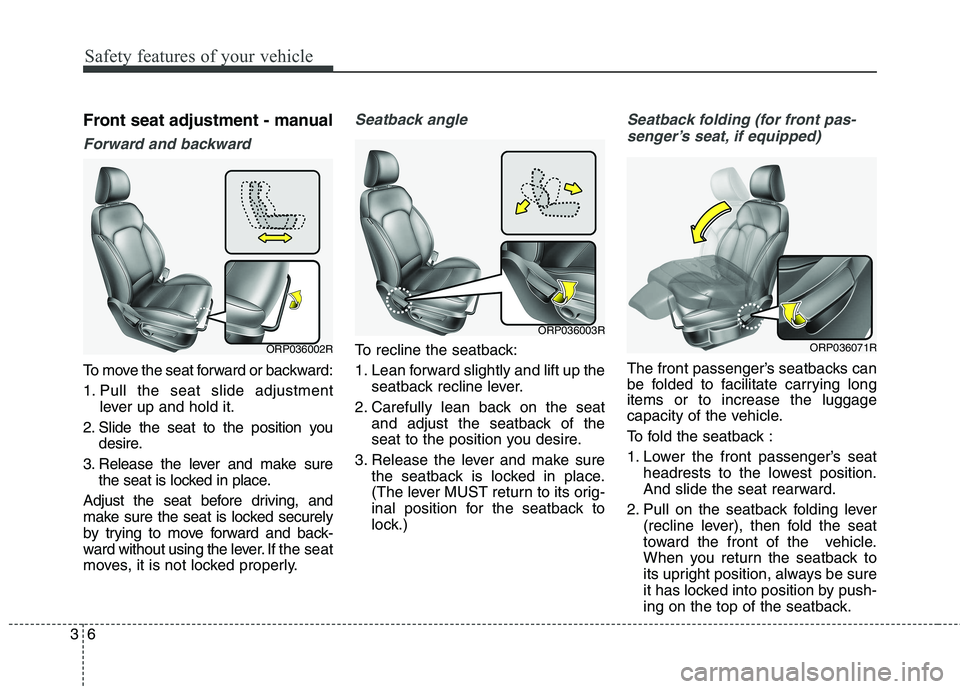
Front seat adjustment - manual
Forward and backward
To move the seat forward or backward:
1. Pull the seat slide adjustment
lever up and hold it.
2. Slide the seat to the position you desire.
3. Release the lever and make sure the seat is locked in place.
Adjust the seat before driving, and
make sure the seat is locked securely
by trying to move forward and back-
ward without using the lever. If the seat
moves, it is not locked properly.
Seatback angle
To recline the seatback:
1. Lean forward slightly and lift up the seatback recline lever.
2. Carefully lean back on the seat and adjust the seatback of the
seat to the position you desire.
3. Release the lever and make sure the seatback is locked in place.
(The lever MUST return to its orig-
inal position for the seatback to
lock.)
Seatback folding (for front pas-
senger’s seat, if equipped)
The front passenger’s seatbacks can
be folded to facilitate carrying longitems or to increase the luggage
capacity of the vehicle.
To fold the seatback :
1. Lower the front passenger’s seat headrests to the lowest position.
And slide the seat rearward.
2. Pull on the seatback folding lever (recline lever), then fold the seat
toward the front of the vehicle.
When you return the seatback to
its upright position, always be sure
it has locked into position by push-
ing on the top of the seatback.
ORP036002R
ORP036003R
ORP036071R
Page 25 of 723
37
Safety features of your vehicle
3. To use the front passenger’s seat,lift and pull the seatback backward
by pulling on the folding lever.
Pull the seatback firmly until it
clicks into place. Make sure the
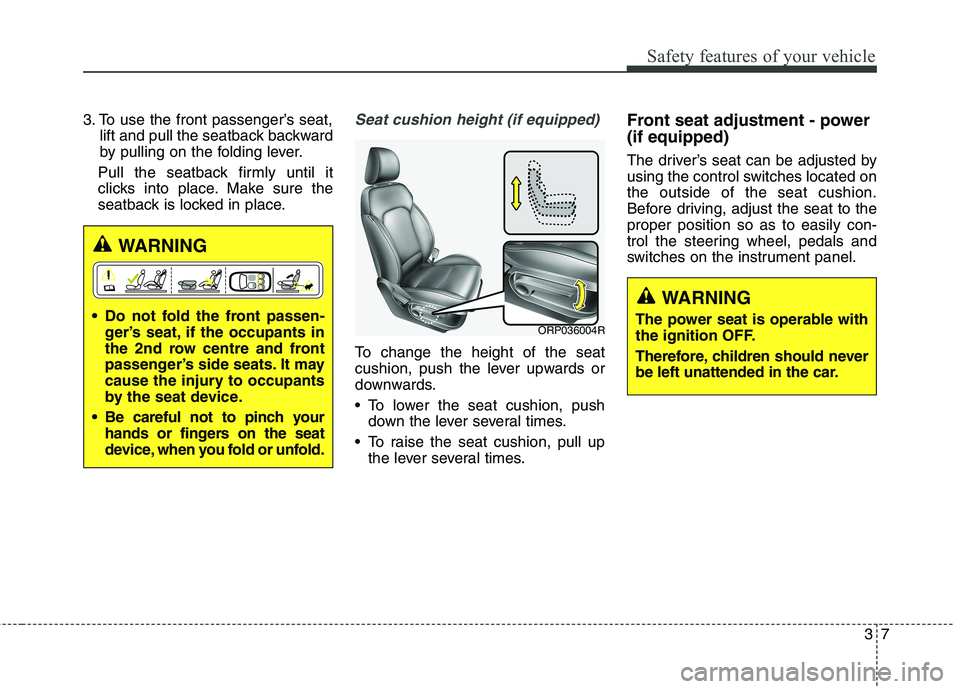
seatback is locked in place.Seat cushion height (if equipped)
To change the height of the seat
cushion, push the lever upwards or
downwards.
To lower the seat cushion, push down the lever several times.
To raise the seat cushion, pull up the lever several times. Front seat adjustment - power (if equipped)
The driver’s seat can be adjusted by
using the control switches located onthe outside of the seat cushion.
Before driving, adjust the seat to theproper position so as to easily con-
trol the steering wheel, pedals and
switches on the instrument panel.
WARNING
Do not fold the front passen- ger’s seat, if the occupants in
the 2nd row centre and front
passenger’s side seats. It may
cause the injury to occupants
by the seat device.
Be careful not to pinch your hands or fingers on the seat
device, when you fold or unfold.
ORP036004R
WARNING
The power seat is operable with
the ignition OFF.
Therefore, children should never
be left unattended in the car.
Page 26 of 723
Safety features of your vehicle
8
3
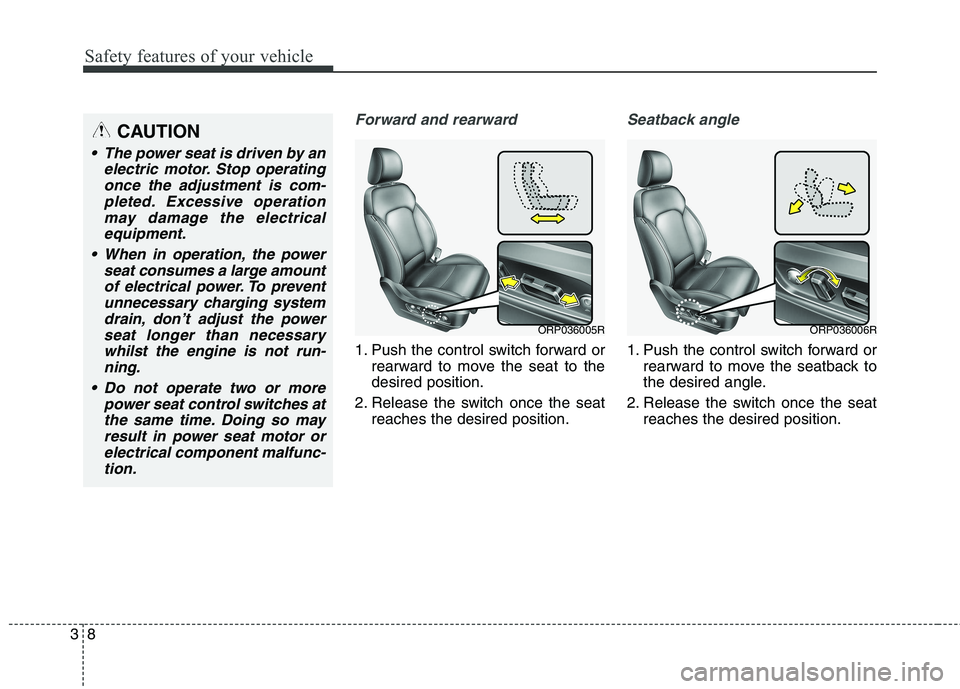
Forward and rearward
1. Push the control switch forward or
rearward to move the seat to the desired position.
2. Release the switch once the seat reaches the desired position.
Seatback angle
1. Push the control switch forward orrearward to move the seatback to
the desired angle.
2. Release the switch once the seat reaches the desired position.
CAUTION
The power seat is driven by an
electric motor. Stop operatingonce the adjustment is com-pleted. Excessive operationmay damage the electrical equipment.
When in operation, the power seat consumes a large amountof electrical power. To preventunnecessary charging system drain, don’t adjust the powerseat longer than necessarywhilst the engine is not run- ning.
Do not operate two or more power seat control switches atthe same time. Doing so mayresult in power seat motor or electrical component malfunc-tion.
ORP036005RORP036006R
Page 27 of 723
39
Safety features of your vehicle
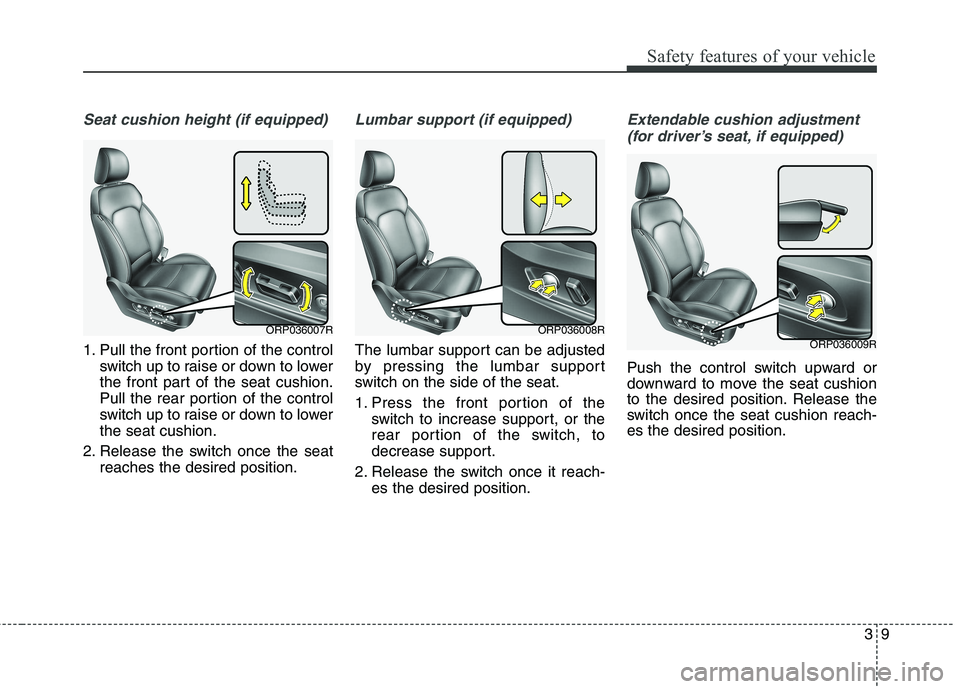
Seat cushion height (if equipped)
1. Pull the front portion of the controlswitch up to raise or down to lower
the front part of the seat cushion.
Pull the rear portion of the control
switch up to raise or down to lowerthe seat cushion.
2. Release the switch once the seat reaches the desired position.
Lumbar support (if equipped)
The lumbar support can be adjusted
by pressing the lumbar support
switch on the side of the seat.
1. Press the front portion of theswitch to increase support, or the
rear portion of the switch, to
decrease support.
2. Release the switch once it reach- es the desired position.
Extendable cushion adjustment
(for driver’s seat, if equipped)
Push the control switch upward or
downward to move the seat cushion
to the desired position. Release the
switch once the seat cushion reach-es the desired position.
ORP036007RORP036008RORP036009R
Page 28 of 723
Safety features of your vehicle
10
3
Headrest (for front seat)
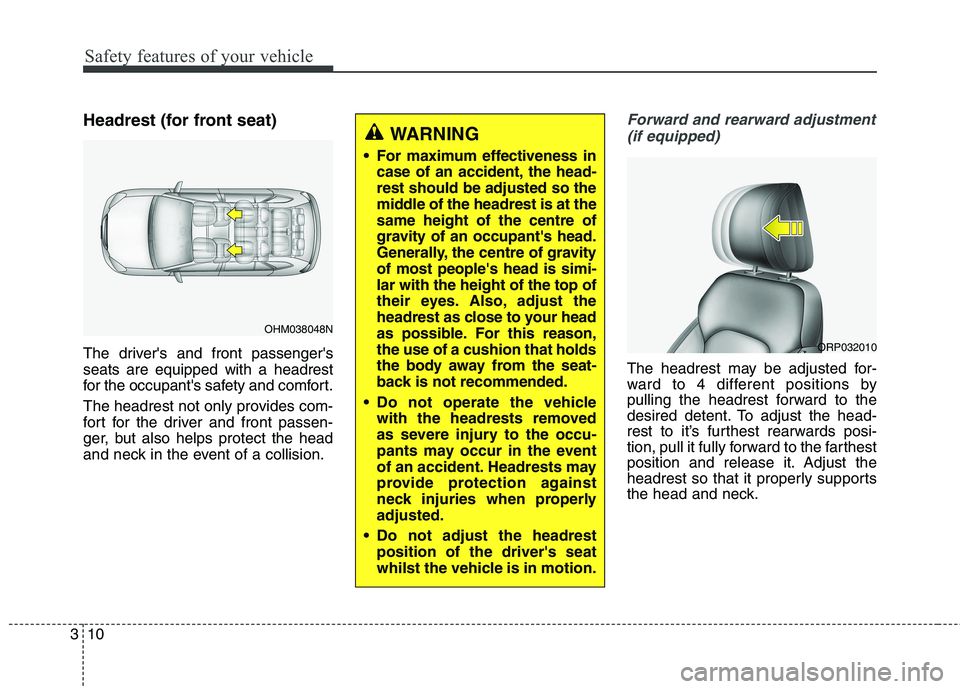
The driver's and front passenger's seats are equipped with a headrest
for the occupant's safety and comfort.
The headrest not only provides com-
fort for the driver and front passen-
ger, but also helps protect the head
and neck in the event of a collision.Forward and rearward adjustment
(if equipped)
The headrest may be adjusted for-
ward to 4 different positions by
pulling the headrest forward to the
desired detent. To adjust the head-
rest to it’s furthest rearwards posi-
tion, pull it fully forward to the farthest
position and release it. Adjust the
headrest so that it properly supports
the head and neck.
OHM038048N
WARNING
For maximum effectiveness in case of an accident, the head- rest should be adjusted so the
middle of the headrest is at thesame height of the centre of
gravity of an occupant's head.
Generally, the centre of gravityof most people's head is simi-lar with the height of the top of
their eyes. Also, adjust the
headrest as close to your head
as possible. For this reason,the use of a cushion that holds
the body away from the seat-
back is not recommended.
Do not operate the vehicle with the headrests removed
as severe injury to the occu-
pants may occur in the event
of an accident. Headrests may
provide protection against
neck injuries when properlyadjusted.
Do not adjust the headrest position of the driver's seat
whilst the vehicle is in motion.
ORP032010
Page 31 of 723
313
Safety features of your vehicle
Seatback pocket
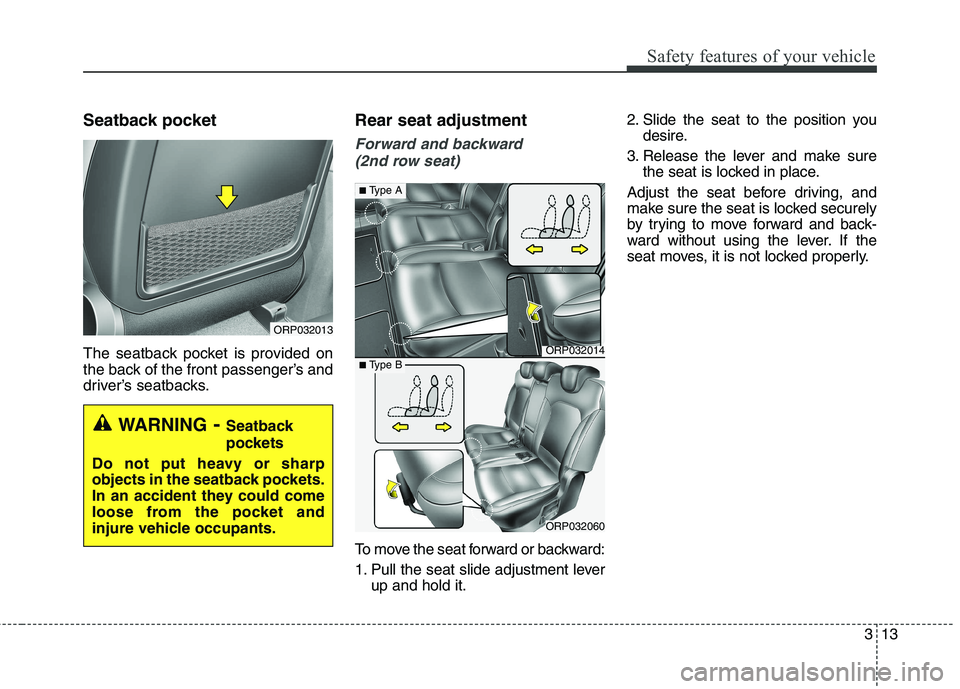
The seatback pocket is provided on
the back of the front passenger’s and
driver’s seatbacks.Rear seat adjustment
Forward and backward
(2nd row seat)
To move the seat forward or backward:
1. Pull the seat slide adjustment lever up and hold it. 2. Slide the seat to the position you
desire.
3. Release the lever and make sure the seat is locked in place.
Adjust the seat before driving, and
make sure the seat is locked securely
by trying to move forward and back-
ward without using the lever. If the
seat moves, it is not locked properly.
ORP032014
ORP032060
■ Type A
■Type B
ORP032013
WARNING - Seatback
pockets
Do not put heavy or sharp
objects in the seatback pockets.
In an accident they could come
loose from the pocket and
injure vehicle occupants.
Page 44 of 723
Safety features of your vehicle
26
3
And then, the rear corresponding
seat belt warning light will illuminate
for approximately 35 seconds, if any
of following occurs;
- You start the engine when the rear
belt is not fastened.
- You drive over 9km/h when the rear belt is not fastened.
- The rear belt is disconnected when driving under 20km/h.
If the rear seat belt is fastened, the
warning light will turn off immediately. If the rear seat belt is disconnected
when you drive over the 20km/h, the
corresponding seat belt warning light
will blink and warning chime will
sound for 35 seconds. But, if the rear passenger's lap/shoul- der belt is/are connected and discon-nected twice within 9 seconds after
the belt is fastened, the correspon-
ding seat belt warning light will not
operate.Lap/shoulder belt
Height adjustment
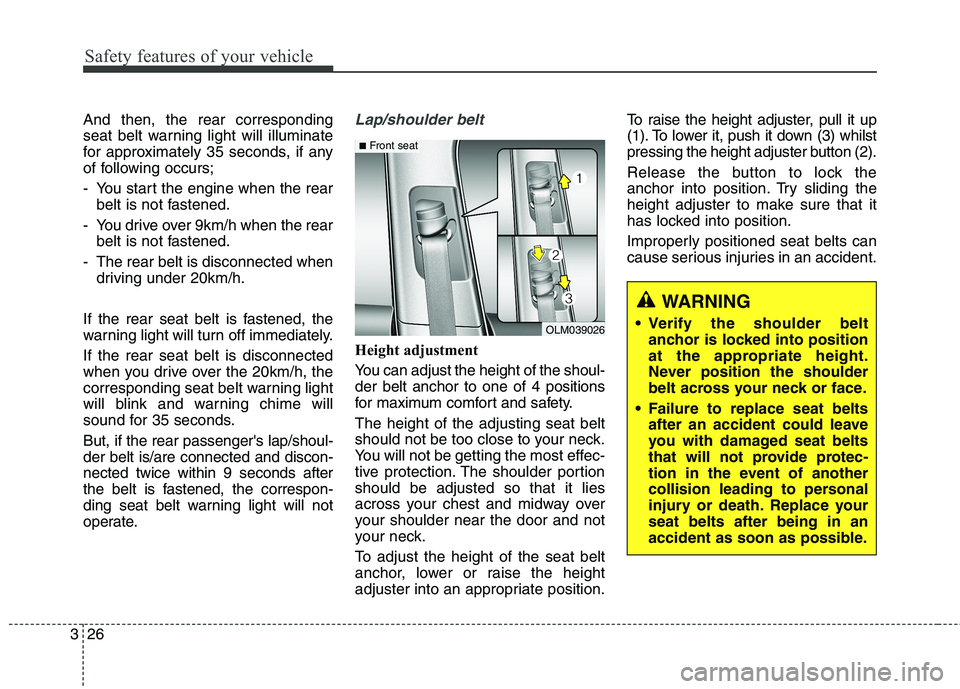
You can adjust the height of the shoul- der belt anchor to one of 4 positions
for maximum comfort and safety. The height of the adjusting seat belt
should not be too close to your neck.
You will not be getting the most effec-
tive protection. The shoulder portionshould be adjusted so that it lies
across your chest and midway over
your shoulder near the door and not
your neck.
To adjust the height of the seat belt
anchor, lower or raise the height
adjuster into an appropriate position. To raise the height adjuster, pull it up
(1). To lower it, push it down (3) whilst
pressing the height adjuster button (2).
Release the button to lock the
anchor into position. Try sliding the
height adjuster to make sure that it
has locked into position.
Improperly positioned seat belts can
cause serious injuries in an accident.
OLM039026
■
Front seat
WARNING
Verify the shoulder belt anchor is locked into position
at the appropriate height.
Never position the shoulder
belt across your neck or face.
Failure to replace seat belts after an accident could leave
you with damaged seat belts
that will not provide protec-
tion in the event of another
collision leading to personal
injury or death. Replace yourseat belts after being in an
accident as soon as possible.
Page 60 of 723
Safety features of your vehicle
42
3
Installing a child restraint system
with a lap/shoulder belt
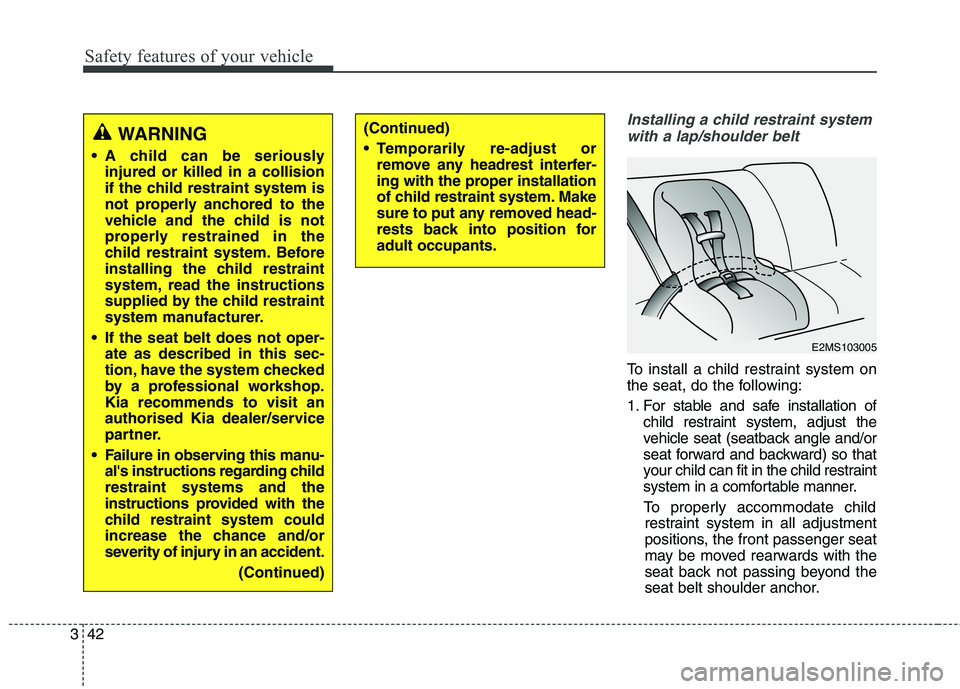
To install a child restraint system on
the seat, do the following:
1. For stable and safe installation of child restraint system, adjust the
vehicle seat (seatback angle and/or
seat forward and backward) so that
your child can fit in the child restraint
system in a comfortable manner.
To properly accommodate child restraint system in all adjustment
positions, the front passenger seat
may be moved rearwards with the
seat back not passing beyond the
seat belt shoulder anchor.
WARNING
A child can be seriously injured or killed in a collision
if the child restraint system is
not properly anchored to the
vehicle and the child is not
properly restrained in the
child restraint system. Before
installing the child restraint
system, read the instructions
supplied by the child restraint
system manufacturer.
If the seat belt does not oper- ate as described in this sec-
tion, have the system checked
by a professional workshop.Kia recommends to visit an
authorised Kia dealer/service
partner.
Failure in observing this manu- al's instructions regarding childrestraint systems and the
instructions provided with the
child restraint system could
increase the chance and/or
severity of injury in an accident.
(Continued)(Continued)
Temporarily re-adjust orremove any headrest interfer-
ing with the proper installation
of child restraint system. Make
sure to put any removed head-
rests back into position foradult occupants.
E2MS103005
Page 148 of 723
Features of your vehicle
52
4
Inside rearview mirror
Adjust the rearview mirror so that the
centre view through the rear window
is seen. Make this adjustment before
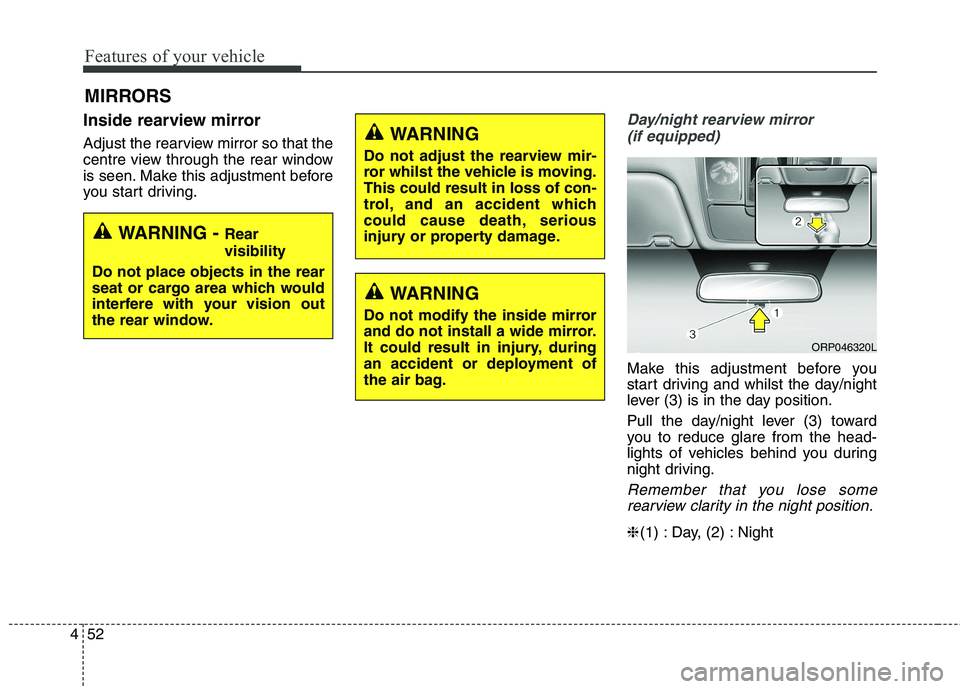
you start driving.Day/night rearview mirror
(if equipped)
Make this adjustment before you
start driving and whilst the day/night
lever (3) is in the day position.
Pull the day/night lever (3) toward
you to reduce glare from the head-
lights of vehicles behind you during
night driving.
Remember that you lose somerearview clarity in the night position.
❈ (1) : Day, (2) : Night
MIRRORS
WARNING -
Rear visibility
Do not place objects in the rear
seat or cargo area which would
interfere with your vision out
the rear window.
WARNING
Do not adjust the rearview mir-
ror whilst the vehicle is moving.This could result in loss of con-
trol, and an accident which
could cause death, serious
injury or property damage.
WARNING
Do not modify the inside mirror
and do not install a wide mirror.
It could result in injury, during
an accident or deployment of
the air bag.
ORP046320L