AV Tail KIA CARNIVAL 2007 User Guide
[x] Cancel search | Manufacturer: KIA, Model Year: 2007, Model line: CARNIVAL, Model: KIA CARNIVAL 2007Pages: 1575, PDF Size: 44.86 MB
Page 496 of 1575

Dismount the tire and mount the wheel on a wheel balancer. Measure the
runout on both wheel flanges. Go to detailed test C
● Is the runout within specifications ?
→ YES
Locate and Mark the low spot on the wheel. Install the tire, matching the
high spot on the tire with the low spot on the wheel. Balance the assembly.
Test the system for normal operation. If the condition persists, Go to D8.
→ NO
Install a new wheel. Check the runout on the new wheel. If the new wheel
is within limits, locate and Mark the low spot. Install the tire, matching the
high spot on the tire with the low spot on the wheel. Balance the assembly.
Test the system for normal operation. If the condition persists, Go to D8.
CHECK FOR VIBRATION FROM THE FRONT OF THE VEHICLE Spin the front wheel and tire assemblies with a wheel balancer while the
vehicle is raised on a hoist. Feel for vibration in the front fender or while
seated in the vehicle.
● Is the vibration present ?
→ YES
Substitute known good wheel and tire assemblies as necessary.
Test the system for normal operation.
→ NO
Check the driveline components. Test the system for normal operation.
DETAILED TEST E : DRIFT LEFT OR RIGHT CONDITIONS DETAILS/RESULTS/ACTIONS
CHECK THE TIRES Inspect the tires for excessive wear or damage.
● Are the tires excessively worn or damaged ?
→ YES
Install new tires.
→ NO
Go to E2.
CHECK THE STEERING LINKAGE
a.Raise and support the vehicle.
b. Check the steering components for indications of excessive wear or
damage.
See ST group - specification.
● Is there an indication of excessive wear or damage ?
→ YES
Repair or Install new components as necessary.
→ NO
Go to
CHECK THE VEHICLE ALIGNMENT a.Place the vehicle on an alignment rack.
Page 497 of 1575

Check the vehicle alignmnt.
● Is the alignment within specification ?
→ YES
Go to
→ NO
Adjust the alignment as necessary.
See page SS - 69 (wheel alignment).
BRAKE DRAG DIAGNOSIS Apply the brakes while driving.
● Does drift or pull occur when the brakes are applied ?
→ YES
See BR group - specification.
→ NO
If the steering wheel is in the center, the vehicle is OK.
If the steering wheel is off- center, Go to Detailed Test F.
DETAILED TEST F : STEERING WHEEL OFF- CENTER CONDITIONS DETAILS/RESULTS/ACTIONS
CHECK THE CLEAR VISION Place the vehicle on an alignment rack.
● Is the clear vision within specification ?
→ YES
Go to F2.
→ NO
Adjust the clear vision to specification.
INSPECT THE STEERING COMPONENTS
a.Raise and support the vehicle.
b. Inspect the steering components for excessive wear or damage.
See ST group - specification.
● Are the steering components excessively worn or damaged ?
→ YES
Repair or Install new components as necessary.
→ NO
If it tracks correctly, vehicle is OK.
If it tracks incorrectly, Go to Detailed Test
DETAILED TEST G : TRACKS INCORRECTLY CONDITIONS DETAILS/RESULTS/ACTIONS
CHECK THE CASTER Place the vehicle on an alignment rack.
● Is the caster within specification ?
→ YES
Go to G2.
Page 498 of 1575
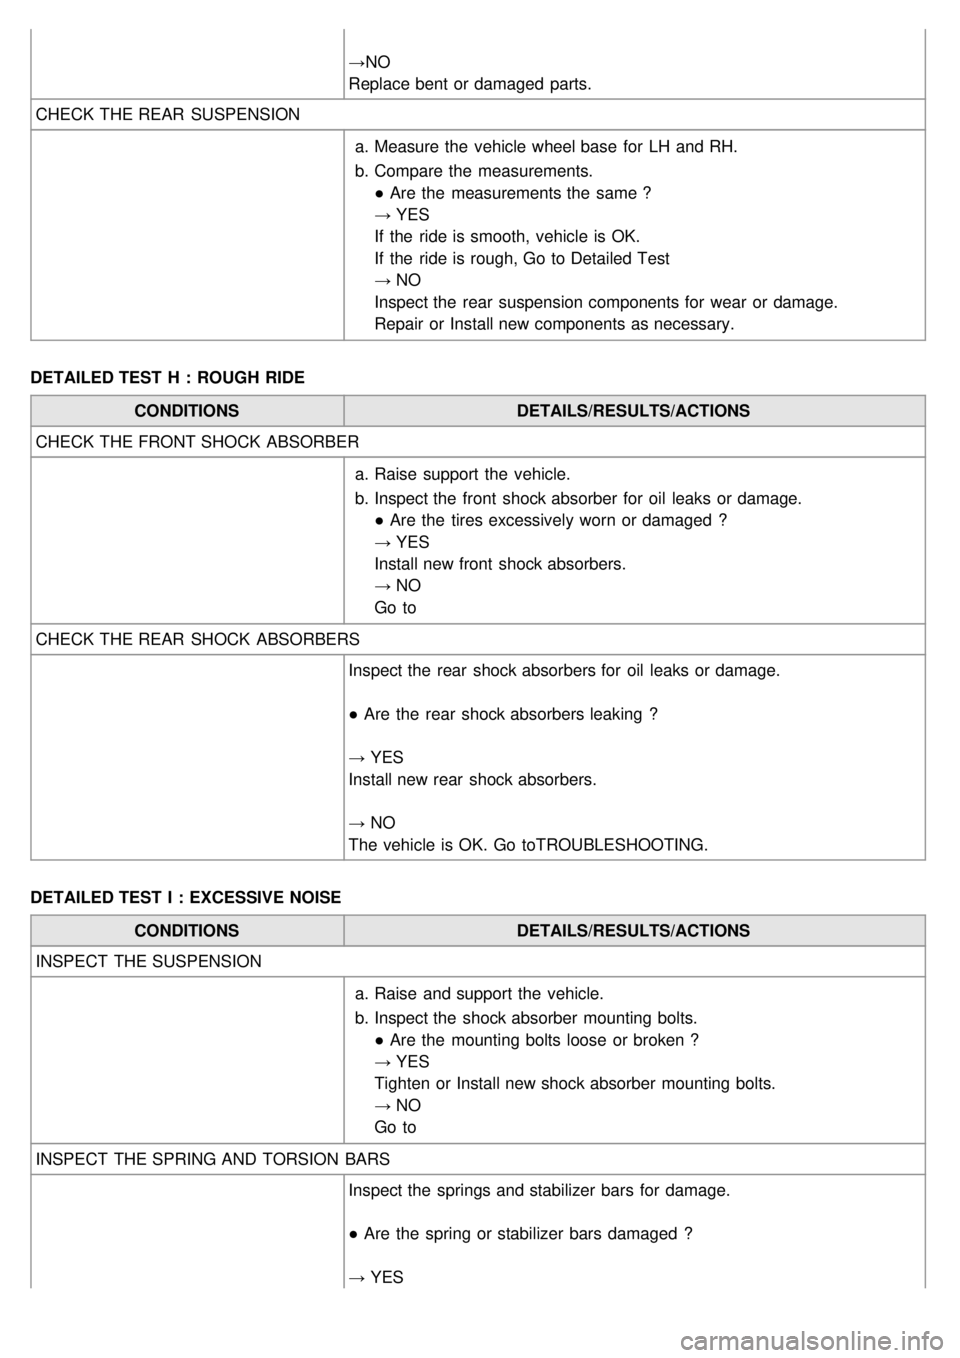
→NO
Replace bent or damaged parts.
CHECK THE REAR SUSPENSION
a.Measure the vehicle wheel base for LH and RH.
b. Compare the measurements.
● Are the measurements the same ?
→ YES
If the ride is smooth, vehicle is OK.
If the ride is rough, Go to Detailed Test
→ NO
Inspect the rear suspension components for wear or damage.
Repair or Install new components as necessary.
DETAILED TEST H : ROUGH RIDE CONDITIONS DETAILS/RESULTS/ACTIONS
CHECK THE FRONT SHOCK ABSORBER
a.Raise support the vehicle.
b. Inspect the front shock absorber for oil leaks or damage.
● Are the tires excessively worn or damaged ?
→ YES
Install new front shock absorbers.
→ NO
Go to
CHECK THE REAR SHOCK ABSORBERS Inspect the rear shock absorbers for oil leaks or damage.
● Are the rear shock absorbers leaking ?
→ YES
Install new rear shock absorbers.
→ NO
The vehicle is OK. Go to TROUBLESHOOTING.
DETAILED TEST I : EXCESSIVE NOISE CONDITIONS DETAILS/RESULTS/ACTIONS
INSPECT THE SUSPENSION
a.Raise and support the vehicle.
b. Inspect the shock absorber mounting bolts.
● Are the mounting bolts loose or broken ?
→ YES
Tighten or Install new shock absorber mounting bolts.
→ NO
Go to
INSPECT THE SPRING AND TORSION BARS Inspect the springs and stabilizer bars for damage.
● Are the spring or stabilizer bars damaged ?
→ YES
Install new spring and/or stabilizer bars.
Page 499 of 1575
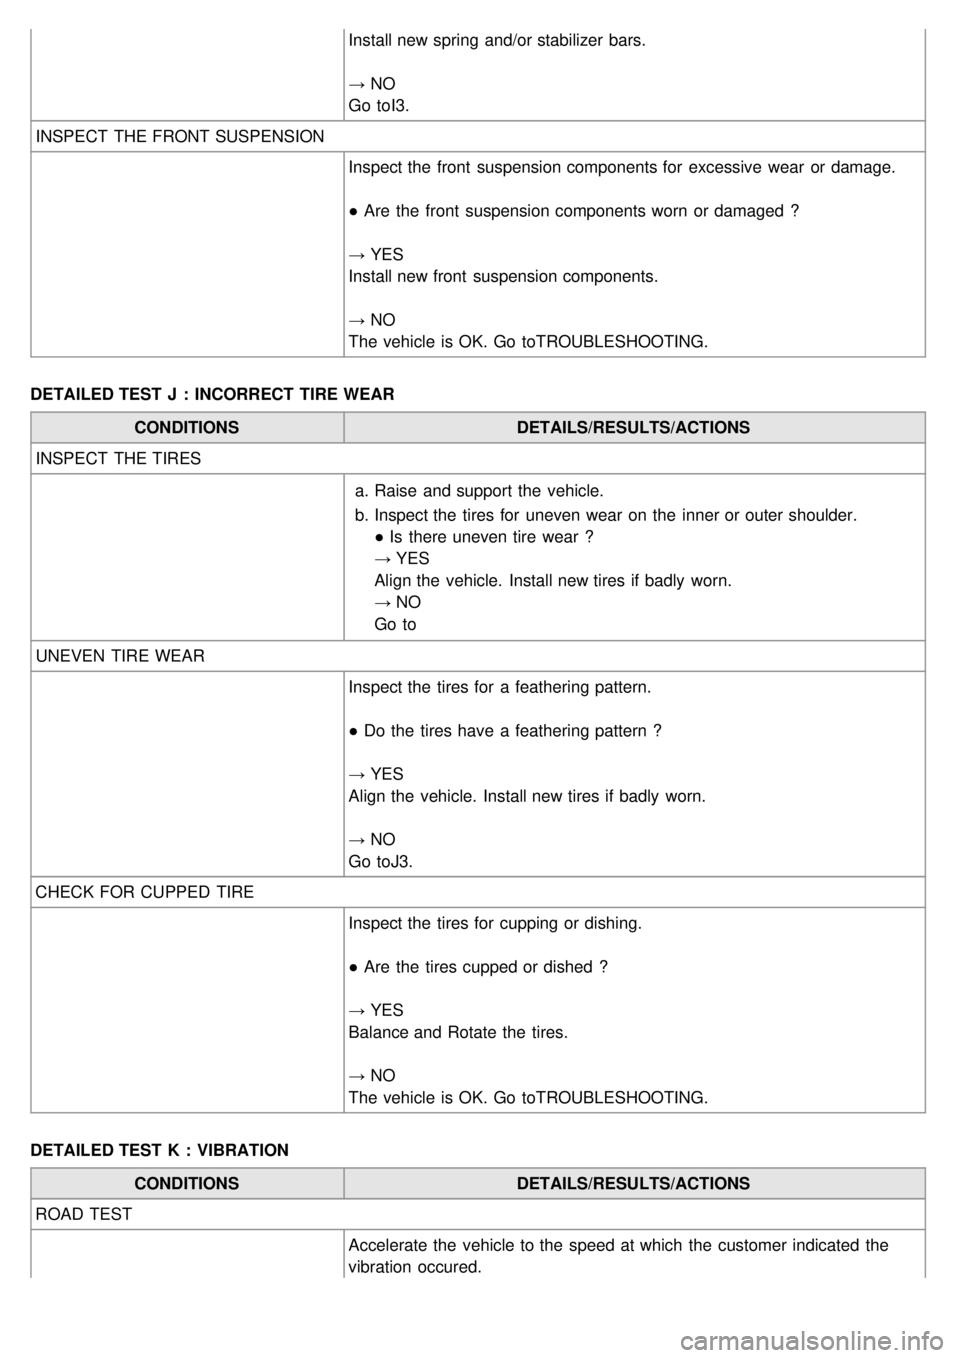
Install new spring and/or stabilizer bars.
→ NO
Go toI3.
INSPECT THE FRONT SUSPENSION Inspect the front suspension components for excessive wear or damage.
● Are the front suspension components worn or damaged ?
→ YES
Install new front suspension components.
→ NO
The vehicle is OK. Go to TROUBLESHOOTING.
DETAILED TEST J : INCORRECT TIRE WEAR CONDITIONS DETAILS/RESULTS/ACTIONS
INSPECT THE TIRES
a.Raise and support the vehicle.
b. Inspect the tires for uneven wear on the inner or outer shoulder.
● Is there uneven tire wear ?
→ YES
Align the vehicle. Install new tires if badly worn.
→ NO
Go to
UNEVEN TIRE WEAR Inspect the tires for a feathering pattern.
● Do the tires have a feathering pattern ?
→ YES
Align the vehicle. Install new tires if badly worn.
→ NO
Go to J3.
CHECK FOR CUPPED TIRE Inspect the tires for cupping or dishing.
● Are the tires cupped or dished ?
→ YES
Balance and Rotate the tires.
→ NO
The vehicle is OK. Go to TROUBLESHOOTING.
DETAILED TEST K : VIBRATION CONDITIONS DETAILS/RESULTS/ACTIONS
ROAD TEST Accelerate the vehicle to the speed at which the customer indicated the
vibration occured.
Page 755 of 1575
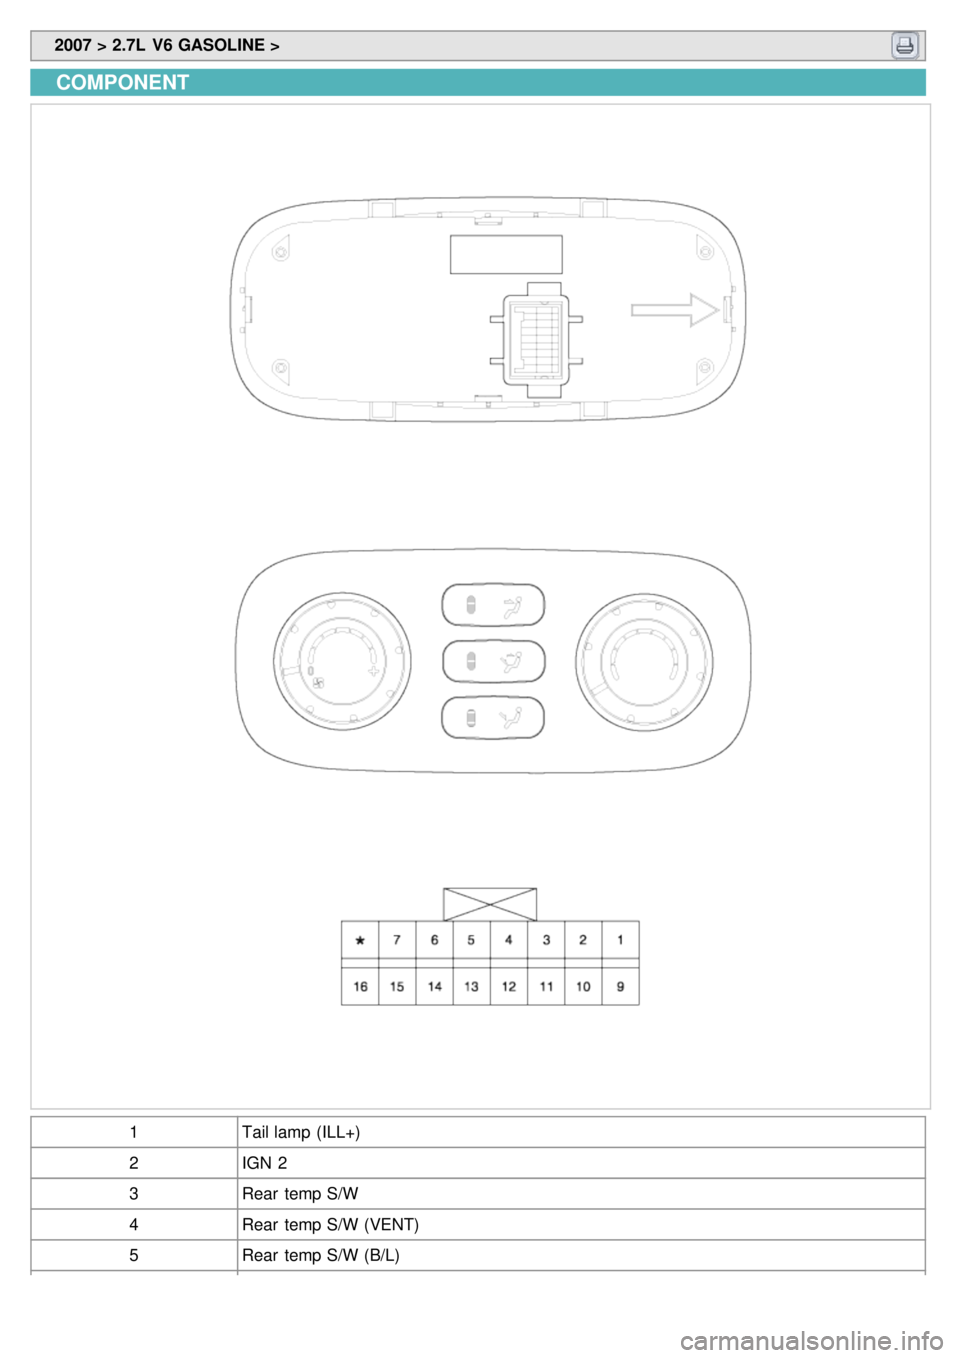
2007 > 2.7L V6 GASOLINE >
COMPONENT
1 Tail lamp (ILL+)
2 IGN 2
3 Rear temp S/W
4 Rear temp S/W (VENT)
5 Rear temp S/W (B/L)
Page 782 of 1575

2007 > 2.7L V6 GASOLINE >
COMPONENT
CONNECTOR PIN FUNCTION
PIN NO. Function PIN NO. Function
1 BATTERY 7-
2 IGN 2 8POWER MOSFET (GATE) - REAR
3 TAIL LAMP (ILL+) 9POWER MOSFET (DRAIN) -
REAR
4 REAR TEMP ACTUATOR
(COOL) 10
-
5 REAR TEMP ACTUATOR
(WARM) 11
SENSOR GND
Page 786 of 1575

2007 > 2.7L V6 GASOLINE >
COMPONENT
CONNECTOR PIN FUNCTION
PIN NO. Function PIN NO. Function
1 BATTERY 7-
2 IGN 2 8POWER MOSFET (GATE) - REAR
3 TAIL LAMP (ILL+) 9POWER MOSFET (DRAIN) -
REAR
4 REAR TEMP ACTUATOR
(COOL) 10
-
5 REAR TEMP ACTUATOR
(WARM) 11
SENSOR GND
Page 994 of 1575
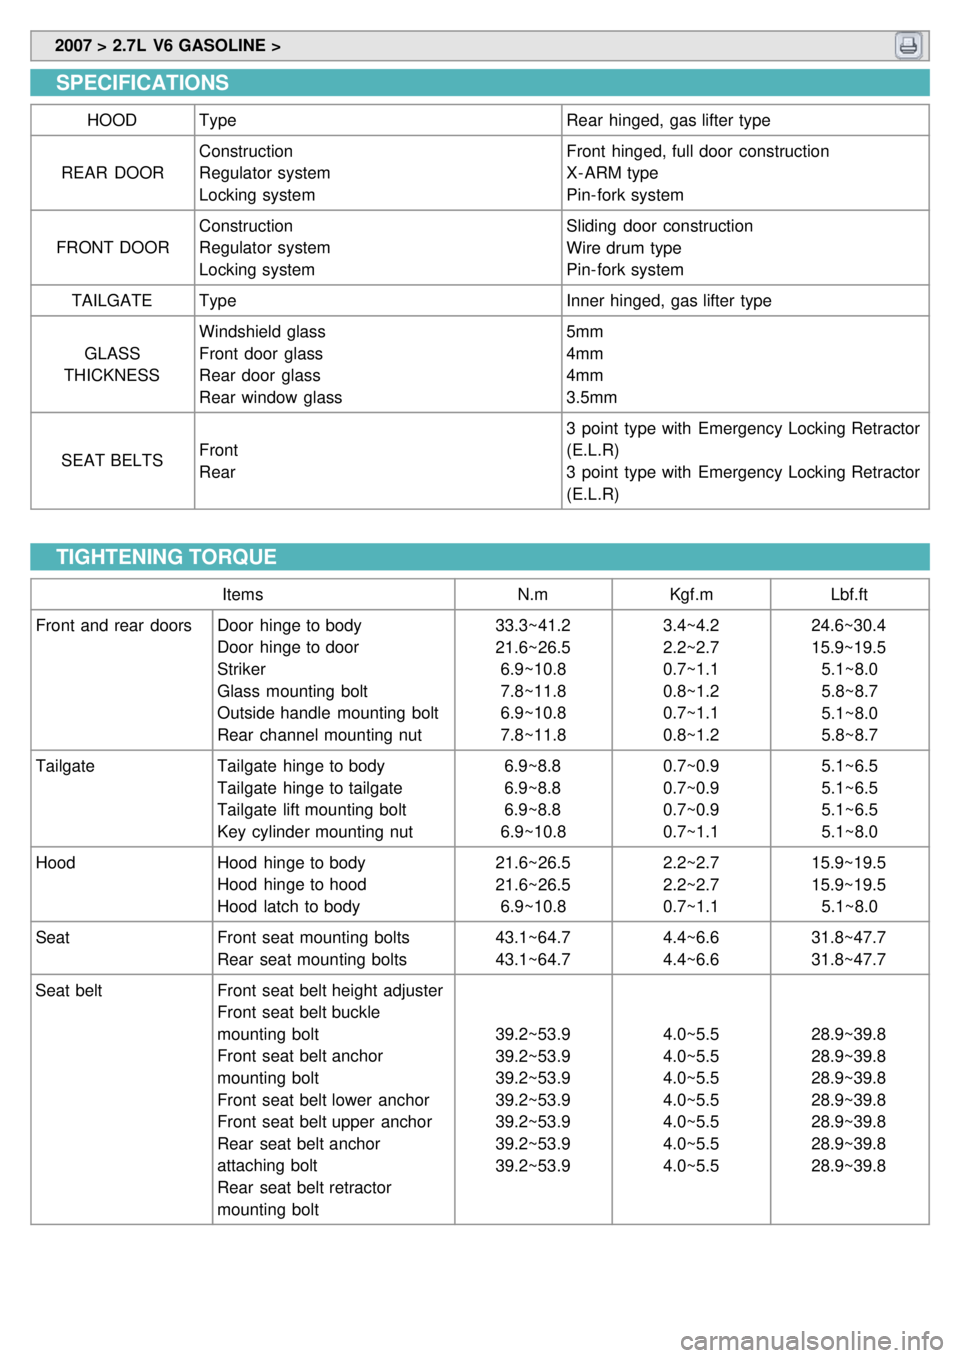
2007 > 2.7L V6 GASOLINE >
SPECIFICATIONS
HOOD Type Rear hinged, gas lifter type
REAR DOOR Construction
Regulator system
Locking system Front hinged, full door construction
X- ARM type
Pin- fork system
FRONT DOOR Construction
Regulator system
Locking system Sliding door construction
Wire drum type
Pin- fork system
TAILGATE Type Inner hinged, gas lifter type
GLASS
THICKNESS Windshield glass
Front door glass
Rear door glass
Rear window glass 5mm
4mm
4mm
3.5mm
SEAT BELTS Front
Rear 3 point type with Emergency Locking Retractor
(E.L.R)
3 point type with Emergency Locking Retractor
(E.L.R)
TIGHTENING TORQUE
Items
N.mKgf.m Lbf.ft
Front and rear doors Door hinge to body
Door hinge to door
Striker
Glass mounting bolt
Outside handle mounting bolt
Rear channel mounting nut 33.3~41.2
21.6~26.5
6.9~10.8
7.8~11.8
6.9~10.8
7.8~11.8 3.4~4.2
2.2~2.7
0.7~1.1
0.8~1.2
0.7~1.1
0.8~1.224.6~30.4
15.9~19.5
5.1~8.0
5.8~8.7
5.1~8.0
5.8~8.7
Tailgate Tailgate hinge to body
Tailgate hinge to tailgate
Tailgate lift mounting bolt
Key cylinder mounting nut 6.9~8.8
6.9~8.8
6.9~8.8
6.9~10.8 0.7~0.9
0.7~0.9
0.7~0.9
0.7~1.15.1~6.5
5.1~6.5
5.1~6.5
5.1~8.0
Hood Hood hinge to body
Hood hinge to hood
Hood latch to body 21.6~26.5
21.6~26.5
6.9~10.8 2.2~2.7
2.2~2.7
0.7~1.115.9~19.5
15.9~19.5
5.1~8.0
Seat Front seat mounting bolts
Rear seat mounting bolts 43.1~64.7
43.1~64.74.4~6.6
4.4~6.631.8~47.7
31.8~47.7
Seat belt Front seat belt height adjuster
Front seat belt buckle
mounting bolt
Front seat belt anchor
mounting bolt
Front seat belt lower anchor
Front seat belt upper anchor
Rear seat belt anchor
attaching bolt
Rear seat belt retractor
mounting bolt 39.2~53.9
39.2~53.9
39.2~53.9
39.2~53.9
39.2~53.9
39.2~53.9
39.2~53.9
4.0~5.5
4.0~5.5
4.0~5.5
4.0~5.5
4.0~5.5
4.0~5.5
4.0~5.528.9~39.8
28.9~39.8
28.9~39.8
28.9~39.8
28.9~39.8
28.9~39.8
28.9~39.8
Page 1008 of 1575

2007 > 2.7L V6 GASOLINE >
REPLACEMENT
INSIDE HANDLE REPLACEMENT
1. After loosening the mounting screws, remove the inside handle (A).
2.Installation is the reverse of removal.
ROOM LAMP REPLACEMENT
1.Remove the room ramp.
a. Remove the lens (A).
b. Remove the screw.
c. Pull out the room lamp (B).
d. Disconnect the connector (C).
2.Installation is the reverse of removal.
TAILGATE TRIM REPLACEMENT
a.When prying with a flat- tipper screwdriver, wrap it with protective tape, and apply protective tape around the
related parts, to prevent damage.
b. Put on gloves to protect your hands.
1. Remove the following items.
a. Room lamp
Page 1009 of 1575

b.Inside handle
2. Disconnect the clip (A), remove the tailgate lifter (B).
3.Using a screwdriver, remove the tailgate switch (A).
4. Disconnect the connector (B).
5.Using a screwdriver, remove the tailgate upper trim (A).
6.Loosen the screw, then remove tailgate side trim (A).