headlight KIA CEED 2010 User Guide
[x] Cancel search | Manufacturer: KIA, Model Year: 2010, Model line: CEED, Model: KIA CEED 2010Pages: 442, PDF Size: 28.25 MB
Page 389 of 442
Maintenance
54
7
Battery recharging
Your vehicle has a maintenance-free,
calcium-based battery.
If the battery becomes discharged in a
short time (because, for example, the
headlights or interior lights were left on
while the vehicle was not in use),
recharge it by slow charging (trickle)
for 10 hours.
If the battery gradually discharges because of high electric load while the
vehicle is being used, recharge it at 20-
30A for two hours.(Continued)
When lifting a plastic-cased bat-tery, excessive pressure on the
case may cause battery acid to
leak, resulting in personal injury.
Lift with a battery carrier or with
your hands on opposite corners.
Never attempt to recharge the battery when the battery cablesare connected.
The electrical ignition system works with high voltage. Never
touch these components with theengine running or the ignition
switched on.
Failure to follow the above warn-
ings can result in serious bodily
injury or death.WARNING - Recharging
battery
When recharging the battery,
observe the following precautions:
The battery must be removed from the vehicle and placed in an area with good ventilation.
Do not allow cigarettes, sparks, or flame near the battery.
Watch the battery during charg- ing, and stop or reduce the charg-
ing rate if the battery cells begin
gassing (boiling) violently or if
the temperature of the electrolyte
of any cell exceeds 49°C (120°F).
Wear eye protection when check- ing the battery during charging.
Disconnect the battery charger in the following order.
1. Turn off the battery charger main switch.
2. Unhook the negative clamp from the negative battery terminal.
3. Unhook the positive clamp from the positive battery terminal.
Page 396 of 442

761
Maintenance
Compact spare tire replacement (if equipped)
A compact spare tire has a shorter
tread life than a regular size tire.
Replace it when you can see the
tread wear indicator bars on the tire.The replacement compact spare tire
should be the same size and design
tire as the one provided with your
new vehicle and should be mountedon the same compact spare tire
wheel. The compact spare tire is notdesigned to be mounted on a regular
size wheel, and the compact spare
tire wheel is not designed for mount-
ing a regular size tire. Wheel replacement
When replacing the metal wheels for
any reason, make sure the new
wheels are equivalent to the original
factory units in diameter, rim widthand offset.
Tire traction
Tire traction can be reduced if you
drive on worn tires, tires that are
improperly inflated or on slippery
road surfaces. Tires should be
replaced when tread wear indicators
appear. Slow down whenever there
is rain, snow or ice on the road, toreduce the possibility of losing con-
trol of the vehicle. Tire maintenance In addition to proper inflation, correct wheel alignment helps decrease tire
wear. If you find a tire worn unevenly,
have your dealer check the wheelalignment.
When you have new tires installed,
make sure they are balanced. This
will increase vehicle ride comfort and
tire life. Additionally, a tire should
always be rebalanced if it is removedfrom the wheel.
WARNING
A wheel that is not the correct
size may adversely affect wheel
and bearing life, braking and
stopping abilities, handling
characteristics, ground clear-
ance, body-to-tire clearance,
snow chain clearance,speedometer and odometer cal-
ibration, headlight aim and
bumper height.
Page 402 of 442
767
Maintenance
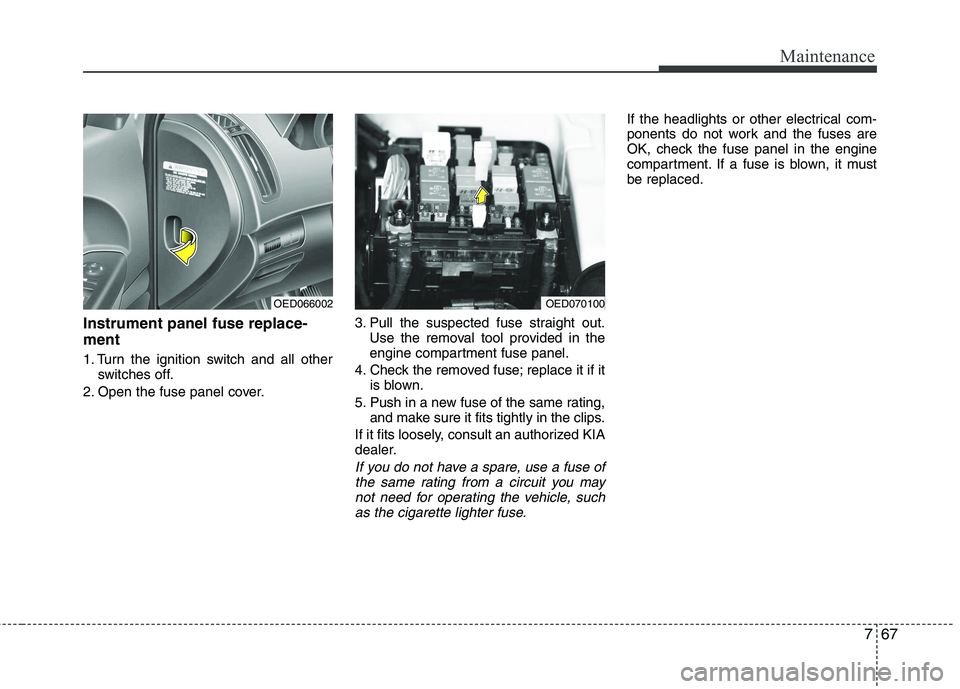
Instrument panel fuse replace- ment
1. Turn the ignition switch and all otherswitches off.
2. Open the fuse panel cover. 3. Pull the suspected fuse straight out.
Use the removal tool provided in the
engine compartment fuse panel.
4. Check the removed fuse; replace it if it is blown.
5. Push in a new fuse of the same rating, and make sure it fits tightly in the clips.
If it fits loosely, consult an authorized KIA
dealer.
If you do not have a spare, use a fuse of the same rating from a circuit you may
not need for operating the vehicle, such as the cigarette lighter fuse.
If the headlights or other electrical com-
ponents do not work and the fuses are
OK, check the fuse panel in the engine
compartment. If a fuse is blown, it mustbe replaced.
OED070100OED066002
Page 403 of 442

Maintenance
68
7
Memory fuse
Your vehicle is equipped with a memory
fuse to prevent battery discharge if your
vehicle is parked without being operated
for prolonged periods. Use the following
procedures before parking the vehicle for
prolonged periods.
1. Turn off the engine.
2. Turn off the headlights and tail lights.
3. Open the driver’s side panel cover and
pull up the memory fuse.
✽✽ NOTICE
If the memory fuse is pulled up from the fuse panel, the warning chime,
audio, clock and interior lamps, etc.,
will not operate. Some items must be
reset after replacement. Refer to
“Battery” in this section.
Even though the memory fuse is
pulled up, the battery can still be dis-
charged by operation of the head-
lights or other electrical devices.
Engine compartment panel fuse replacement
1. Turn the ignition switch and all other switches off.
2. Remove the fuse box cover by press- ing the tab and pulling up the cover.
OED066010
OFD079039E/OED066005
Diesel only
Page 406 of 442
771
Maintenance
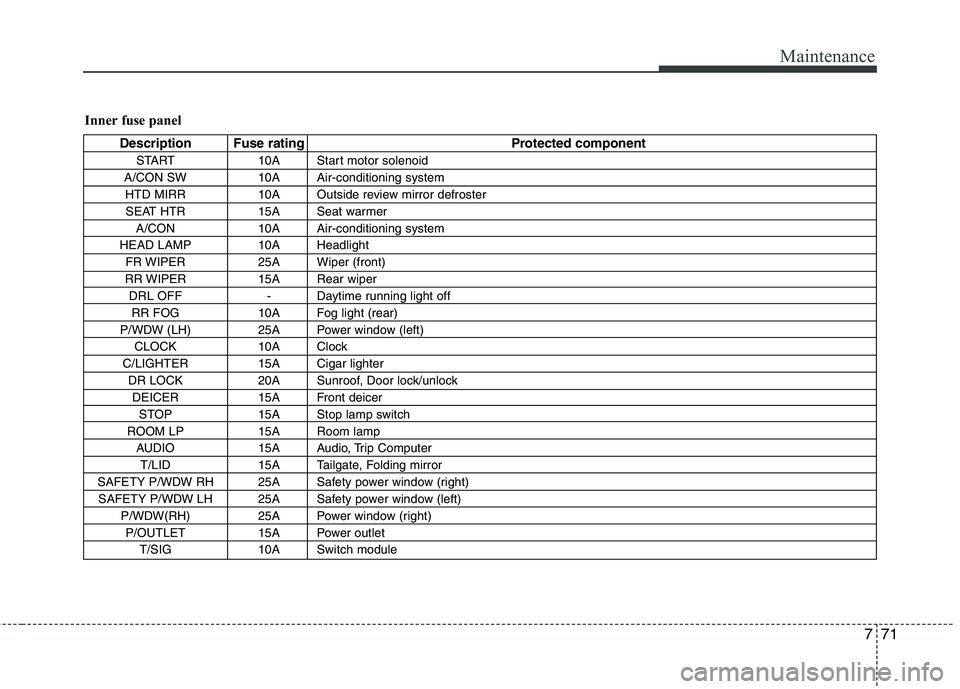
Inner fuse panel
Description Fuse rating Protected componentSTART 10A Start motor solenoid
A/CON SW 10A Air-conditioning system HTD MIRR 10A Outside review mirror defrosterSEAT HTR 15A Seat warmer A/CON 10A Air-conditioning system
HEAD LAMP 10A Headlight FR WIPER 25A Wiper (front)
RR WIPER 15A Rear wiper DRL OFF - Daytime running light offRR FOG 10A Fog light (rear)
P/WDW (LH) 25A Power window (left) CLOCK 10A Clock
C/LIGHTER 15A Cigar lighter DR LOCK 20A Sunroof, Door lock/unlockDEICER 15A Front deicer STOP 15A Stop lamp switch
ROOM LP 15A Room lamp AUDIO 15A Audio, Trip ComputerT/LID 15A Tailgate, Folding mirror
SAFETY P/WDW RH 25A Safety power window (right) SAFETY P/WDW LH 25A Safety power window (left) P/WDW(RH) 25A Power window (right)P/OUTLET 15A Power outlet T/SIG 10A Switch module
Page 410 of 442
775
Maintenance
LIGHT BULBS
Use only the bulbs of the specifiedwattage.
✽✽ NOTICE
After heavy, driving rain or washing,
headlight and taillight lenses could
appear frosty. This condition is caused by
the temperature difference between the
lamp inside and outside. This is similar
to the condensation on your windows
inside your vehicle during the rain and
doesn’t indicate a problem with your
vehicle. If the water leaks into the lamp
bulb circuitry, have the vehicle checked
by an authorized KIA dealer.
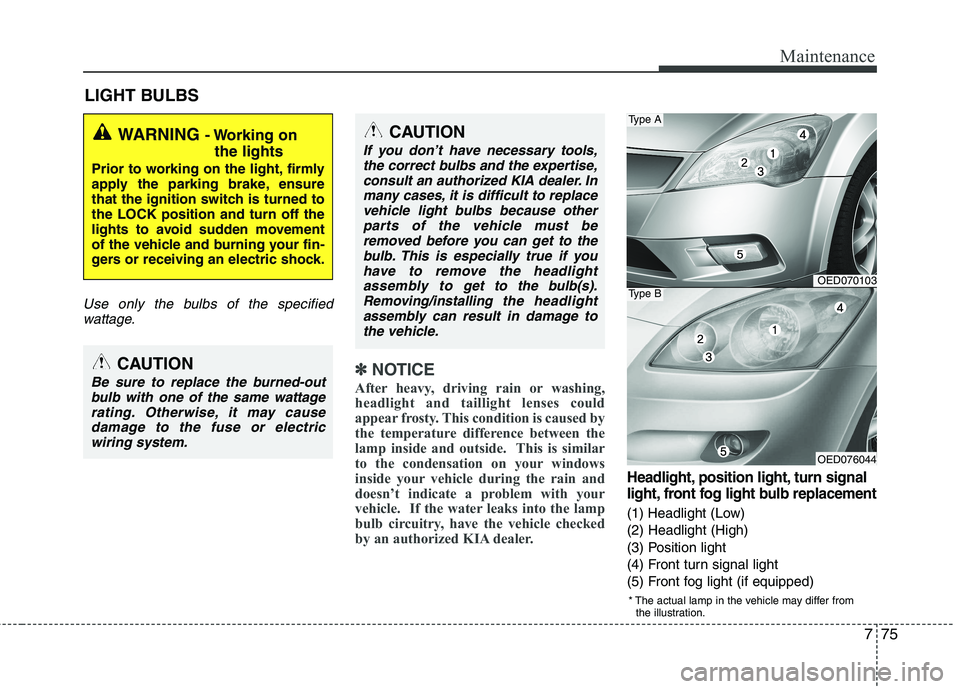
Headlight, position light, turn signal
light, front fog light bulb replacement
(1) Headlight (Low) (2) Headlight (High)
(3) Position light
(4) Front turn signal light
(5) Front fog light (if equipped)
WARNING - Working on
the lights
Prior to working on the light, firmly
apply the parking brake, ensure
that the ignition switch is turned tothe LOCK position and turn off the
lights to avoid sudden movement
of the vehicle and burning your fin-
gers or receiving an electric shock.
CAUTION
Be sure to replace the burned-out bulb with one of the same wattagerating. Otherwise, it may cause
damage to the fuse or electric wiring system.
CAUTION
If you don’t have necessary tools,the correct bulbs and the expertise,
consult an authorized KIA dealer. Inmany cases, it is difficult to replacevehicle light bulbs because other parts of the vehicle must be
removed before you can get to thebulb. This is especially true if youhave to remove the headlight
assembly to
get to the bulb(s).
Removing/installingthe headlight
assembly can result in damage to the vehicle.
OED070103
* The actual lamp in the vehicle may differ from the illustration.
Type A
OED076044
Type B
Page 411 of 442

Maintenance
76
7
Headlight bulb
1. Open the hood.
2. Remove the radiator upper cover
(Type B).
3. Loosen the retaining bolts and remove the headlight assembly from the body
of the vehicle.
4. Disconnect the power connector from the back of the headlight assembly.
(Continued)
If a bulb becomes damaged orcracked, replace it immediately
and carefully dispose of it.
Wear eye protection when chang- ing a bulb. Allow the bulb to cool
down before handling it.
G270A03O
WARNING - Halogen bulbs
Halogen bulbs contain pressur-
ized gas that will produce flying
pieces of glass if broken.
Always handle them carefully, and avoid scratches and abra-
sions. If the bulbs are lit, avoid
contact with liquids. Never touchthe glass with bare hands.
Residual oil may cause the bulb
to overheat and burst when lit. A
bulb should be operated onlywhen installed in a headlight.
(Continued)
OED079069
Type A
Type BOED070104
Page 412 of 442
777
Maintenance
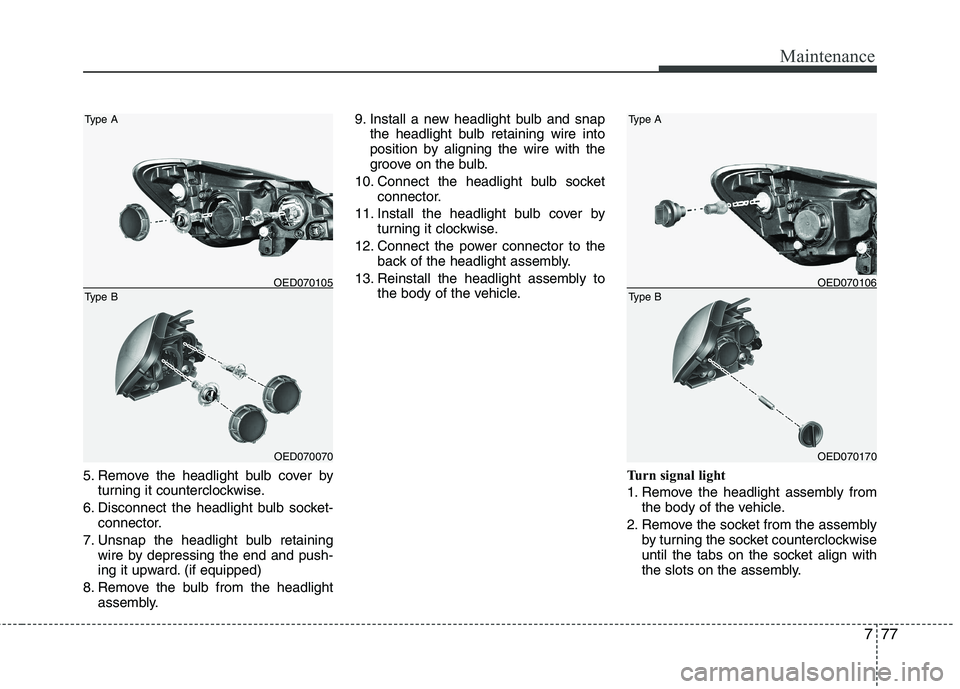
5. Remove the headlight bulb cover byturning it counterclockwise.
6. Disconnect the headlight bulb socket- connector.
7. Unsnap the headlight bulb retaining wire by depressing the end and push-
ing it upward. (if equipped)
8. Remove the bulb from the headlight assembly. 9. Install a new headlight bulb and snap
the headlight bulb retaining wire into
position by aligning the wire with the
groove on the bulb.
10. Connect the headlight bulb socket connector.
11. Install the headlight bulb cover by turning it clockwise.
12. Connect the power connector to the back of the headlight assembly.
13. Reinstall the headlight assembly to the body of the vehicle.
Turn signal light
1. Remove the headlight assembly fromthe body of the vehicle.
2. Remove the socket from the assembly by turning the socket counterclockwise
until the tabs on the socket align with
the slots on the assembly.
OED070070
Type A
Type B
OED070105
OED070170
Type A
Type B
OED070106
Page 413 of 442
Maintenance
78
7
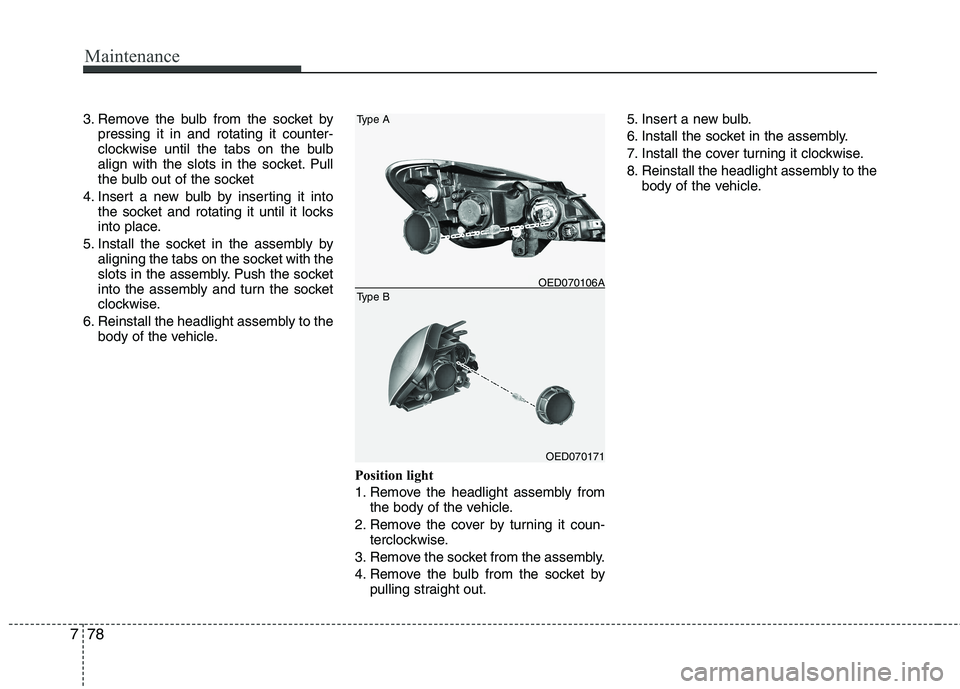
3. Remove the bulb from the socket by
pressing it in and rotating it counter-
clockwise until the tabs on the bulb
align with the slots in the socket. Pull
the bulb out of the socket
4. Insert a new bulb by inserting it into the socket and rotating it until it locks
into place.
5. Install the socket in the assembly by aligning the tabs on the socket with the
slots in the assembly. Push the socket
into the assembly and turn the socket
clockwise.
6. Reinstall the headlight assembly to the body of the vehicle.
Position light
1. Remove the headlight assembly fromthe body of the vehicle.
2. Remove the cover by turning it coun- terclockwise.
3. Remove the socket from the assembly.
4. Remove the bulb from the socket by pulling straight out. 5. Insert a new bulb.
6. Install the socket in the assembly.
7. Install the cover turning it clockwise.
8. Reinstall the headlight assembly to the
body of the vehicle.
OED070171
Type A
Type B
OED070106A
Page 433 of 442
83
Specifications & Consumer information
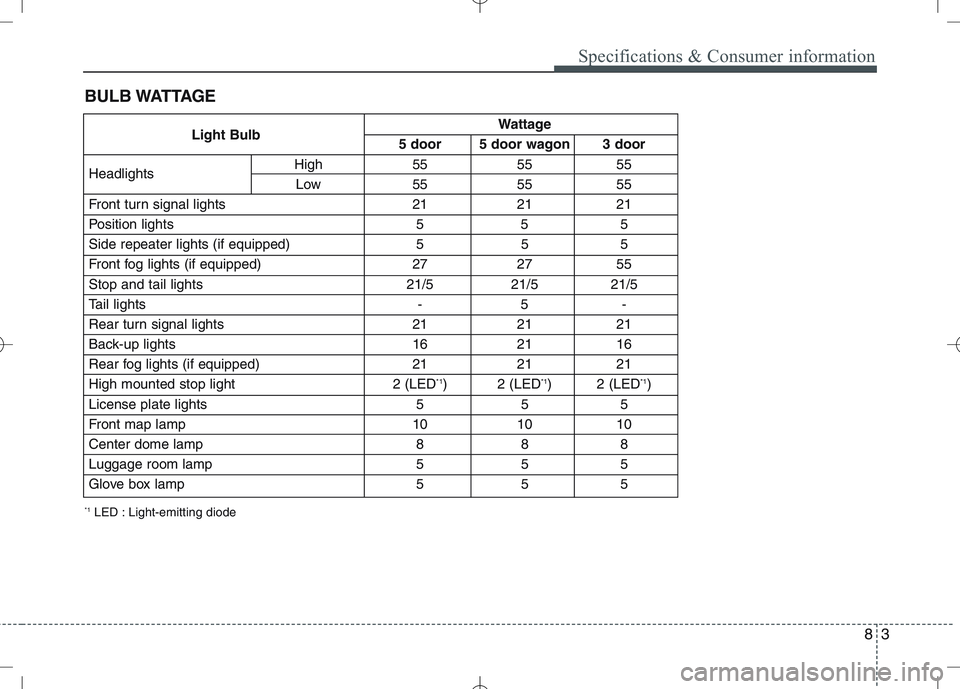
BULB WATTAGE
Light BulbWattage
5 door 5 door wagon 3 door
Headlights High 55 55 55
Low 55 55 55
Front turn signal lights 21 21 21
Position lights 5 5 5
Side repeater lights (if equipped) 5 5 5
Front fog lights (if equipped) 27 27 55
Stop and tail lights 21/5 21/5 21/5
Tail lights - 5 -
Rear turn signal lights 21 21 21
Back-up lights 16 21 16
Rear fog lights (if equipped) 21 21 21
High mounted stop light 2 (LED *1
) 2 (LED *1
) 2 (LED *1
)
License plate lights 5 5 5
Front map lamp 10 10 10
Center dome lamp 8 8 8
Luggage room lamp 5 5 5
Glove box lamp 5 5 5
*1
LED : Light-emitting diode