rear view mirror KIA CEED 2010 Owners Manual
[x] Cancel search | Manufacturer: KIA, Model Year: 2010, Model line: CEED, Model: KIA CEED 2010Pages: 442, PDF Size: 28.25 MB
Page 11 of 442

Your vehicle at a glance
2
2
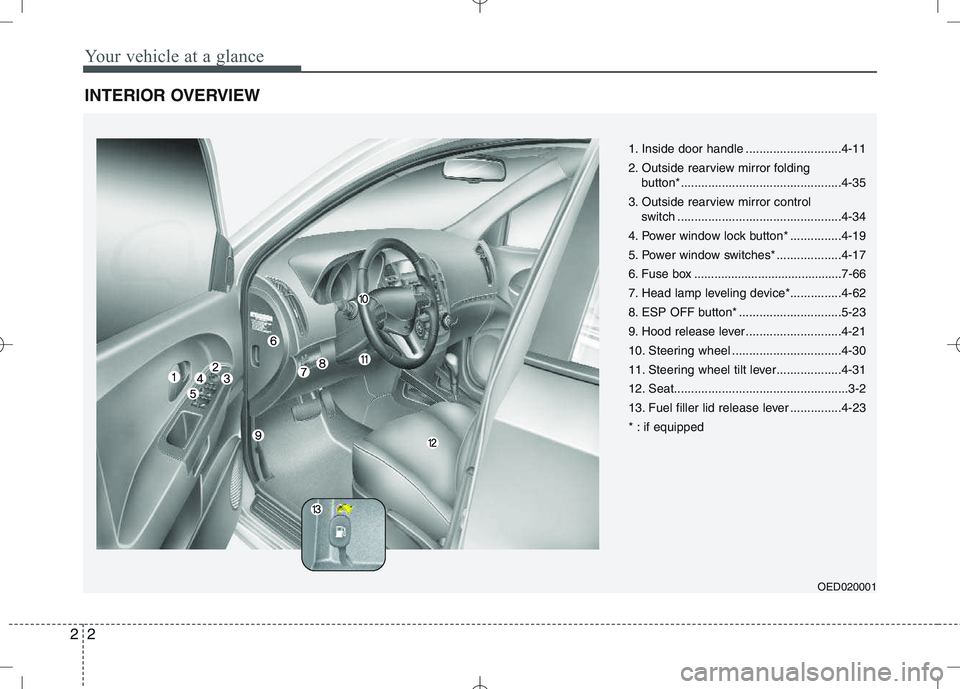
INTERIOR OVERVIEW
1. Inside door handle ............................4-11
2. Outside rearview mirror folding
button*...............................................4-35
3. Outside rearview mirror control switch ................................................4-34
4. Power window lock button* ...............4-19
5. Power window switches* ...................4-17
6. Fuse box ............................................7-66
7. Head lamp leveling device*...............4-62
8. ESP OFF button* ..............................5-23
9. Hood release lever ............................4-21
10. Steering wheel ................................4-30
11. Steering wheel tilt lever...................4-31
12. Seat...................................................3-2
13. Fuel filler lid release lever ...............4-23
* : if equipped
OED020001
Page 103 of 442

Features of your vehicle
32
4
Inside rearview mirror
Adjust the rearview mirror so that the
center view through the rear window is
seen. Make this adjustment before you
start driving.
Day/night rearview mirror
(if equipped)
Make this adjustment before you start
driving and while the day/night lever is in
the day position.
Pull the day/night lever toward you to reduce glare from the headlights of the
vehicles behind you during night driving.
Remember that you lose some rearviewclarity in the night position.
Electrochromic mirror (ECM)
(if equipped)
The electric rearview mirror automatical- ly controls the glare from the headlights
of the car behind you in nighttime or low
light driving conditions. The sensormounted in the mirror senses the light
level around the vehicle, and automati-cally controls the headlight glare from
vehicles behind you.
When the engine is running, the glare is
automatically controlled by the sensor
mounted in the rearview mirror.
Whenever the shift lever is shifted into
reverse (R), the mirror will automatically
go to the brightest setting in order to
improve the drivers view behind the vehi-
cle.
MIRRORS
OAM049023
CAUTION
When cleaning the mirror, use a
paper towel or similar material dampened with glass cleaner. Donot spray glass cleaner directly on
the mirror as that may cause the liq-uid cleaner to enter the mirror hous-ing.
Day
Night
WARNING - Rear visibility
Do not place objects in the rear
seat or cargo area which would
interfere with your vision out the
rear window.
WARNING
Do not adjust the rearview mirror
while the vehicle is moving. This
could result in loss of control, and
an accident which could cause
death, serious injury or property
damage.
Page 104 of 442

433
Features of your vehicle
To operate the electric rearview mirror:
The mirror defaults to the ON positionwhenever the ignition switch is turned on.
Press the ON/OFF button (1) to turn the automatic dimming function off.
The mirror indicator light will turn off.
Press the ON/OFF button (1) once
again to turn the automatic dimming
function on. The mirror indicator light
will illuminate. Outside rearview mirror Be sure to adjust the mirror angles
before driving.
Your vehicle is equipped with both left-
hand and right-hand outside rearview
mirrors. The mirrors can be adjusted
remotely with the remote switch (if
equipped). The mirror heads can be fold-
ed back to prevent damage during an
automatic car wash or when passing
through a narrow street.WARNING -
Rearview mir-
rors
The right outside rearview mirror is convex. In some countries, the
left outside rearview mirror is
also convex. Objects seen in the
mirror are closer than they
appear.
Use your interior rearview mirror or direct observation to deter-
mine the actual distance of fol-
lowing vehicles when changinglanes.
CAUTION
Do not scrape ice off the mirror
face; this may damage the surface
of the glass. If ice should restrict movement of the mirror, do notforce the mirror for adjustment. Toremove ice, use a deicer spray, or a
sponge or soft cloth with very warmwater.
1KMA3084Indicator
CAUTION
If the mirror is jammed with ice, donot adjust the mirror by force. Use
an approved spray de-icer (not radi- ator antifreeze) to release thefrozen mechanism or move the vehicle to a warm place and allow
the ice to melt.
WARNING
Do not adjust or fold the outside
rearview mirrors while the vehicle
is moving. This could result in loss
of control, and an accident which
could cause death, serious injury
or property damage.
Page 105 of 442

Features of your vehicle
34
4
Remote control
Manual type (if equipped)
To adjust an outside mirror, move the
control lever. Electric type (if equipped)
The electric remote control mirror switch
allows you to adjust the position of the
left and right outside rearview mirrors. To
adjust the position of either mirror, move
the lever (1) to R or L to select the right
side mirror or the left side mirror, thenpress a corresponding point on the mirroradjustment control to position the select-
ed mirror up, down, left or right.
After adjustment, put the lever into neu-
tral (center) position to prevent the inad-
vertent adjustment.
CAUTION
The mirrors stop moving when
they reach the maximum adjust-
ing angles, but the motor contin- ues to operate while the switch isdepressed. Do not depress theswitch longer than necessary, the
motor may be damaged.
Do not attempt to adjust the out- side rearview mirror by hand.Doing so may damage the parts.
B510A01EOED036047
Page 106 of 442

435
Features of your vehicle
Folding the outside rearview mirror
Manual type
To fold the outside rearview mirror, grasp
the housing of the mirror and then fold it
toward the rear of the vehicle.Electric Type (if equipped)
To fold the outside rearview mirror,
depress the button.
To unfold it, depress the button again.
Outside rearview mirror heater
(if equipped)
The outside rearview mirror heater is actuated in connection with the rear win-
dow defroster. To heat the outside
rearview mirror glass, push the button
( ) for the rear window defroster.
The outside rearview mirror glass will be
heated for defrosting or defogging and
will give you improved rear vision in
inclement weather conditions. Push the
button again to turn the heater off. The
outside rearview mirror heater automati-
cally turns off after 20 minutes.
CAUTION
In case of the electric type of out- side rearview mirror, don’t fold it by
hand. It could cause the failure of the motor.
CAUTION
The electric type outside rearviewmirror operates even though the
ignition switch is in the LOCK posi-tion. However, to prevent unneces-sary battery discharge, do notadjust the mirrors longer than nec-
essary while the engine is not run-ning.
1LDA2083AOED036083
Page 158 of 442

487
Features of your vehicle
For maximum defrosting, set the tem-perature control to the extreme
right/hot position and the fan speedcontrol to the highest speed.
If warm air to the floor is desired while defrosting or defogging, set the modeto the floor-defrost position.
Before driving, clear all snow and ice from the windshield, rear window, out-
side rear view mirrors, and all side win-
dows.
Clear all snow and ice from the hood and air inlet in the cowl grill to improveheater and defroster efficiency and to
reduce the probability of fogging upinside of the windshield. Manual climate control system
To defog inside windshield
1. Select any fan speed except “0” posi-
tion.
2. Select desired temperature.
3. Select the or position.
4. The outside (fresh) air and air condi- tioning will be selected automatically.
If the air conditioning and outside (fresh) air position are not selected automatical-
ly, press the corresponding button manu-
ally.
WINDSHIELD DEFROSTING AND DEFOGGING
WARNING - Windshield
heating
Do not use the or position during cooling operation in
extremely humid weather. The dif-
ference between the temperature ofthe outside air and that of the wind-shield could cause the outer sur-
face of the windshield to fog up,
causing loss of visibility. In this
case, set the mode selection knob
or button to the position and
fan speed control knob or button to
the lower speed.
OED040064
Page 210 of 442

53
Driving your vehicle
Before entering vehicle
• Be sure that all windows, outside mir-ror(s), and outside lights are clean.
Check the condition of the tires.
Check under the vehicle for any sign of leaks.
Be sure there are no obstacles behind you if you intend to back up.
Necessary inspections
Fluid levels, such as engine oil, engine
coolant, brake fluid, and washer fluid
should be checked on a regular basis,
with the exact interval depending on the
fluid. Further details are provided in sec-
tion 7, “Maintenance”.
Before starting
Close and lock all doors.
Position the seat so that all controls are easily reached.
Adjust the inside and outside rearview mirrors. Be sure that all lights work.
Check all gauges.
Check the operation of warning lights
when the ignition switch is turned to the ON position.
Release the parking brake and make sure the brake warning light goes out.
For safe operation, be sure you are famil-
iar with your vehicle and its equipment.
BEFORE DRIVING
WARNING
All passengers must be properly
belted whenever the vehicle is mov-
ing. Refer to “Seat belts” in section
3 for more information on their
proper use.
WARNING
Always check the surrounding
areas near your vehicle for people,
especially children, before putting a
car into D (Drive) or R (Reverse).
WARNING - Driving under
the influence of alcohol or drugs
Drinking and driving is dangerous.
Drunk driving is the number one
contributor to the highway death
toll each year. Even a small amount
of alcohol will affect your reflexes,
perceptions and judgment. Drivingwhile under the influence of drugs
is as dangerous or more dangerousthan driving drunk.
You are much more likely to have a
serious accident if you drink or
take drugs and drive.
If you are drinking or taking drugs,
don’t drive. Do not ride with a driv-er who has been drinking or taking
drugs. Choose a designated driveror call a cab.
WARNING
When you intend to park or stop the
vehicle with the engine on, be care-ful not to depress the accelerator
pedal for a long period of time. It
may overheat the engine or exhaust
system and cause fire.
Page 262 of 442

53
Driving your vehicle
Before entering vehicle
• Be sure that all windows, outside mir-ror(s), and outside lights are clean.
Check the condition of the tires.
Check under the vehicle for any sign of leaks.
Be sure there are no obstacles behind you if you intend to back up.
Necessary inspections
Fluid levels, such as engine oil, engine
coolant, brake fluid, and washer fluid
should be checked on a regular basis,
with the exact interval depending on the
fluid. Further details are provided in sec-
tion 7, “Maintenance”.
Before starting
Close and lock all doors.
Position the seat so that all controls are easily reached.
Adjust the inside and outside rearview mirrors. Be sure that all lights work.
Check all gauges.
Check the operation of warning lights
when the ignition switch is turned to the ON position.
Release the parking brake and make sure the brake warning light goes out.
For safe operation, be sure you are famil-
iar with your vehicle and its equipment.
BEFORE DRIVING
WARNING
All passengers must be properly
belted whenever the vehicle is mov-
ing. Refer to “Seat belts” in section
3 for more information on their
proper use.
WARNING
Always check the surrounding
areas near your vehicle for people,
especially children, before putting a
car into D (Drive) or R (Reverse).
WARNING - Driving under
the influence of alcohol or drugs
Drinking and driving is dangerous.
Drunk driving is the number one
contributor to the highway death
toll each year. Even a small amount
of alcohol will affect your reflexes,
perceptions and judgment. Drivingwhile under the influence of drugs
is as dangerous or more dangerousthan driving drunk.
You are much more likely to have a
serious accident if you drink or
take drugs and drive.
If you are drinking or taking drugs,
don’t drive. Do not ride with a driv-er who has been drinking or taking
drugs. Choose a designated driveror call a cab.
WARNING
When you intend to park or stop the
vehicle with the engine on, be care-ful not to depress the accelerator
pedal for a long period of time. It
may overheat the engine or exhaust
system and cause fire.
Page 406 of 442

771
Maintenance
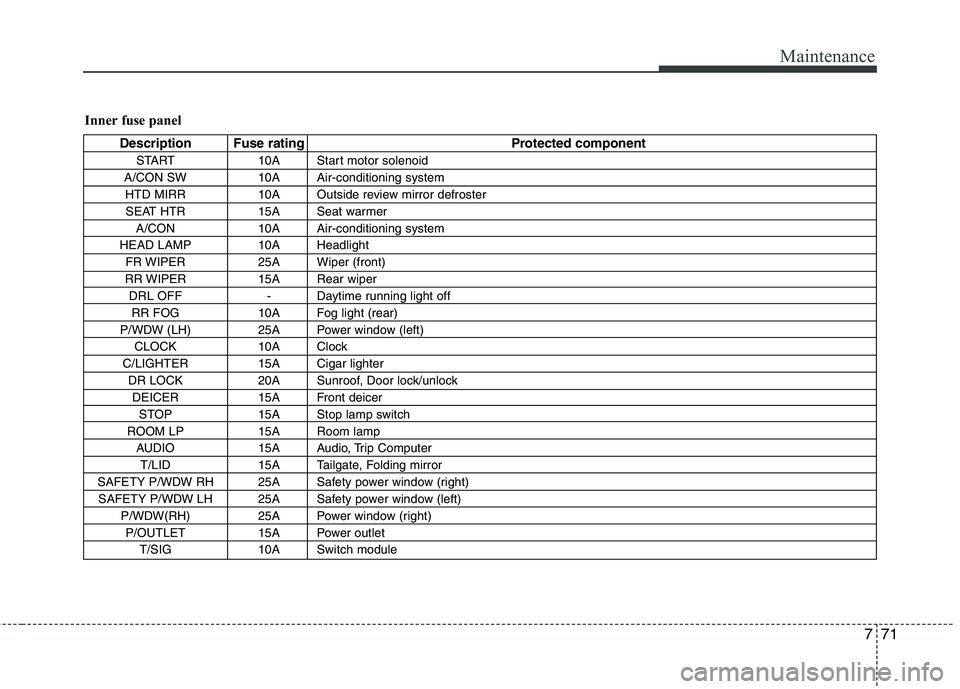
Inner fuse panel
Description Fuse rating Protected componentSTART 10A Start motor solenoid
A/CON SW 10A Air-conditioning system HTD MIRR 10A Outside review mirror defrosterSEAT HTR 15A Seat warmer A/CON 10A Air-conditioning system
HEAD LAMP 10A Headlight FR WIPER 25A Wiper (front)
RR WIPER 15A Rear wiper DRL OFF - Daytime running light offRR FOG 10A Fog light (rear)
P/WDW (LH) 25A Power window (left) CLOCK 10A Clock
C/LIGHTER 15A Cigar lighter DR LOCK 20A Sunroof, Door lock/unlockDEICER 15A Front deicer STOP 15A Stop lamp switch
ROOM LP 15A Room lamp AUDIO 15A Audio, Trip ComputerT/LID 15A Tailgate, Folding mirror
SAFETY P/WDW RH 25A Safety power window (right) SAFETY P/WDW LH 25A Safety power window (left) P/WDW(RH) 25A Power window (right)P/OUTLET 15A Power outlet T/SIG 10A Switch module
Page 441 of 442

I3
Index
If the engine overheats . . . . . . . . . . . . . . . . . . . . . . . . . 6-6
If the engine will not start . . . . . . . . . . . . . . . . . . . . . . 6-3
If you have a flat tire (with spare tire) . . . . . . . . . . . . 6-7
In case of an emergency while driving . . . . . . . . . . . . 6-2
Indicator symbols on the instrument cluster . . . . . . . 1-6
Instrument cluster . . . . . . . . . . . . . . . . . . . . . . . . . . . 4-36
Instrument panel overview . . . . . . . . . . . . . . . . . . . . . 2-3
Interior features . . . . . . . . . . . . . . . . . . . . . . . . . . . . . 4-93
Interior light . . . . . . . . . . . . . . . . . . . . . . . . . . . . . . . . 4-68
Interior overview. . . . . . . . . . . . . . . . . . . . . . . . . . . . . . 2-2
ISG(idle stop and go) system . . . . . . . . . . . . . . . . . . . . 5-7
Key . . . . . . . . . . . . . . . . . . . . . . . . . . . . . . . . . . . . . . . . . 4-2
Key positions . . . . . . . . . . . . . . . . . . . . . . . . . . . . . . . . . 5-4
Light bulbs. . . . . . . . . . . . . . . . . . . . . . . . . . . . . . . . . . 7-75
Lighting . . . . . . . . . . . . . . . . . . . . . . . . . . . . . . . . . . . . 4-58
Maintenance services . . . . . . . . . . . . . . . . . . . . . . . . . . 7-4
Manual climate control system . . . . . . . . . . . . . . . . . 4-70
Manual transaxle . . . . . . . . . . . . . . . . . . . . . . . . . . . . . 5-9 Mirrors . . . . . . . . . . . . . . . . . . . . . . . . . . . . . . . . . . . . . 4-32
Mounting bracket for roof carrier . . . . . . . . . . . . . 4-102
Owner maintenance . . . . . . . . . . . . . . . . . . . . . . . . . . . 7-6
Parking brake . . . . . . . . . . . . . . . . . . . . . . . . . . . . . . . 7-44
Rear parking assist system. . . . . . . . . . . . . . . . . . . . . 4-55
Recommended lubricants and capacities . . . . . . . . . . 8-5
Remote keyless entry . . . . . . . . . . . . . . . . . . . . . . . . . . 4-5
Road warning . . . . . . . . . . . . . . . . . . . . . . . . . . . . . . . . 6-2
Scheduled maintenance service . . . . . . . . . . . . . . . . . . 7-8
Seat belts . . . . . . . . . . . . . . . . . . . . . . . . . . . . . . . . . . . 3-15
Seats . . . . . . . . . . . . . . . . . . . . . . . . . . . . . . . . . . . . . . . . 3-2
Special driving conditions . . . . . . . . . . . . . . . . . . . . . 5-36
Speed limit control system . . . . . . . . . . . . . . . . . . . . . 5-32
Starting the engine . . . . . . . . . . . . . . . . . . . . . . . . . . . . 5-5
Steering wheel . . . . . . . . . . . . . . . . . . . . . . . . . . . . . . . 4-30
Storage compartment . . . . . . . . . . . . . . . . . . . . . . . . . 4-90
Sunroof . . . . . . . . . . . . . . . . . . . . . . . . . . . . . . . . . . . . . 4-26
I
K
L
M
O
P
R
S