tire KIA CEED 2010 Owners Manual
[x] Cancel search | Manufacturer: KIA, Model Year: 2010, Model line: CEED, Model: KIA CEED 2010Pages: 442, PDF Size: 28.25 MB
Page 5 of 442

Introduction
2
1
We want to help you get the greatest
possible driving pleasure from your vehi-
cle. Your Owner’s Manual can assist you
in many ways. We strongly recommend
that you read the entire manual. In order
to minimize the chance of death or injury,
you must read the WARNING and CAU-
TION sections in the manual.
Illustrations complement the words in this
manual to best explain how to enjoy your
vehicle. By reading your manual, you
learn about features, important safety
information, and driving tips under vari-
ous road conditions. The general layout of the manual is pro-
vided in the Table of Contents. A good
place to start is the index; it has an alpha-
betical listing of all information in your
manual.
Sections: This manual has eight sections
plus an index. Each section begins with a
brief list of contents so you can tell at a
glance if that section has the information
you want.
You will find various WARNINGs,
CAUTIONs, and NOTICEs in this manu-
al. These WARNINGs were prepared to
enhance your personal safety. You should
carefully read and follow ALL procedures
and recommendations provided in these
WARNINGs, CAUTIONs and NOTICEs.
✽✽
NOTICE
A NOTICE indicates interesting or help-
ful information is being provided.
HOW TO USE THIS MANUAL
WARNING
A WARNING indicates a situation in
which harm, serious bodily injury ordeath could result if the warning isignored.
CAUTION
A CAUTION indicates a situation in which damage to your vehicle couldresult if the caution is ignored.
Page 9 of 442
Introduction
6
1
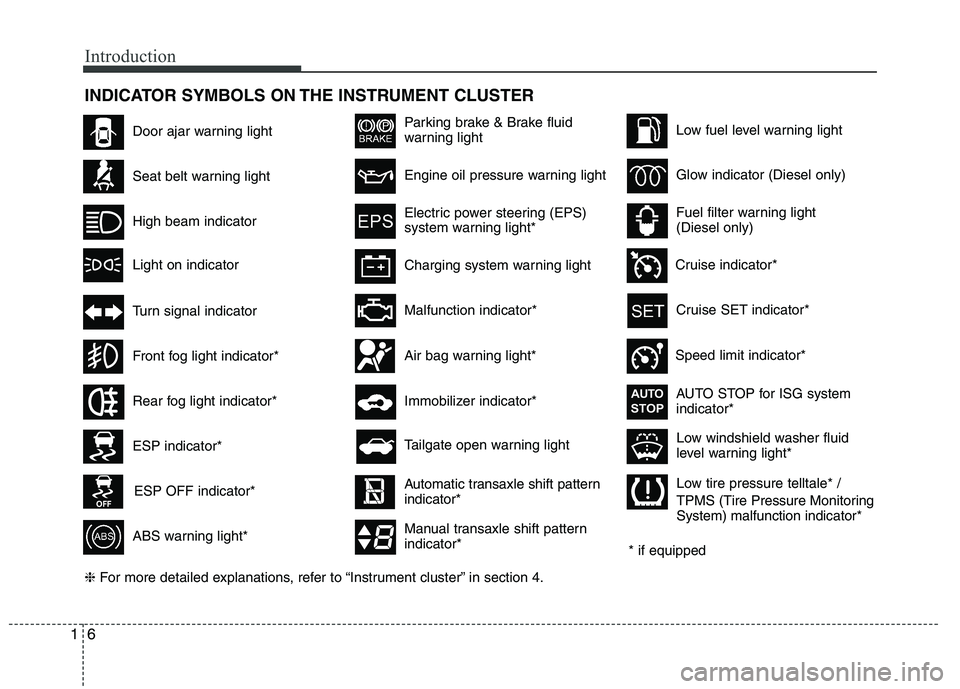
INDICATOR SYMBOLS ON THE INSTRUMENT CLUSTER
Seat belt warning light
High beam indicator
Turn signal indicator
ABS warning light*
Parking brake & Brake fluid
warning light
Malfunction indicator*
Immobilizer indicator*
Low fuel level warning light
Glow indicator (Diesel only)
Fuel filter warning light (Diesel only)
* if equipped
Tailgate open warning light
❈ For more detailed explanations, refer to “Instrument cluster” in section 4.
Charging system warning light
Door ajar warning light
ESP indicator*
ESP OFF indicator*
Front fog light indicator*
Engine oil pressure warning light
Electric power steering (EPS)
system warning light*
Air bag warning light*
Low tire pressure telltale* /
TPMS (Tire Pressure Monitoring System) malfunction indicator*
Rear fog light indicator*
Cruise SET indicator*
Speed limit indicator* AUTO STOP for ISG system indicator*
Cruise indicator*
AUTOSTOP
Low windshield washer fluid
level warning light*
Light on indicator
Automatic transaxle shift pattern indicator*
Manual transaxle shift pattern indicator*
Page 27 of 442

Safety features of your vehicle
14
3
Armrest (if equipped)
The armrest is located in the center of
the rear seat. Pull the armrest down from
the seatback.
Entering the rear seat
(3 Door, if equipped)
Before entering the rear seat
1. Lift up the lever and fold the seatback down.
2. Push the entire seat forward.
After entering the rear seat
3. Push the front seat back to the upright position until you hear a click noise.
4. Adjust the front seat to the desired position.
OED038015-1OED030089OED038015-2
Page 28 of 442

315
Safety features of your vehicle
Seat belt restraint systemSEAT BELTS
WARNING
For maximum restraint system protection, the seat belts must
always be used whenever the car
is moving.
Seat belts are most effective when seatbacks are in theupright position.
Children age 12 and under must always be properly restrained in
the rear seat. Never allow chil-
dren to ride in the front passen-
ger seat. If a child over 12 must
be seated in the front seat, he/she
must be properly belted and the
seat should be moved as far back
as possible.
Never wear the shoulder belt under your arm or behind your
back. An improperly positionedshoulder belt can cause serious
injuries in a crash. The shoulder
belt should be positioned midway
over your shoulder across your
collarbone.
(Continued)
WARNING
Seat belts are designed to bear
upon the bony structure of the
body, and should be worn low
across the front of the pelvis or the
pelvis, chest and shoulders, as
applicable; wearing the lap section
of the belt across the abdominal
area must be avoided. Seat belts should be adjusted as
firmly as possible, consistent with
comfort, to provide the protection
for which they have been designed.
A slack belt will greatly reduce the
protection afforded to the wearer.
(Continued)
(Continued)
Avoid wearing twisted seat belts.A twisted belt can't do its job as
well. In a collision, it could even
cut into you. Be sure the beltwebbing is straight and not twist-ed.
Be careful not to damage the belt webbing or hardware. If the belt
webbing or hardware is dam-
aged, replace it.
WARNING
No modifications or additions
should be made by the user which
will either prevent the seat belt
adjusting devices from operating to
remove slack, or prevent the seat
belt assembly from being adjusted
to remove slack.
(Continued)
Care should be taken to avoid con- tamination of the webbing with pol-
ishes, oils and chemicals, and par-
ticularly battery acid. Cleaning may
safely be carried out using mild
soap and water. The belt should bereplaced if webbing becomes
frayed, contaminated or damaged. It is essential to replace the entire
assembly after it has been worn in
a severe impact even if damage to
the assembly is not obvious. Belts
should not be worn with straps
twisted. Each belt assembly must
only be used by one occupant; it is
dangerous to put a belt around a
child being carried on the occu-pant's lap.
Page 38 of 442

325
Safety features of your vehicle
Do not lie down
To reduce the chance of injuries in the
event of an accident and to achieve max-
imum effectiveness of the restraint sys-tem, all passengers should be sitting upand the front and rear seats should be in
an upright position when the car is mov-
ing. A seat belt cannot provide proper
protection if the person is lying down inthe rear seat or if the front and rear seatsare in a reclined position.Care of seat belts
Seat belt systems should never be disas-
sembled or modified. In addition, care
should be taken to assure that seat belts
and belt hardware are not damaged by
seat hinges, doors or other abuse.
Periodic inspection
All seat belts should be inspected peri-
odically for wear or damage of any kind.
Any damaged parts should be replaced
as soon as possible.
Keep belts clean and dry
Seat belts should be kept clean and dry.
If belts become dirty, they can be
cleaned by using a mild soap solution
and warm water. Bleach, dye, strong
detergents or abrasives should not be
used because they may damage and
weaken the fabric.
When to replace seat belts
The entire in-use seat belt assembly or
assemblies should be replaced if the
vehicle has been involved in an accident.
This should be done even if no damage
is visible. Additional questions concern-
ing seat belt operation should be directed
by an authorized KIA dealer.
WARNING
When you return the rear seatback to its upright position after the rear
seatback has been folded down, be
careful not to damage the seat belt
webbing or buckle. Be sure that the
webbing or buckle does not get
caught or pinched in the rear seat.
A seat belt with damaged webbing
or buckle could possibly fail during
a collision or sudden stop, result-
ing in serious injury. If the webbing
or buckles are damaged, get them
replaced immediately.
WARNING
Riding with a reclined seatback
increases your chance of serious or
fatal injuries in the event of a colli-
sion or sudden stop. The protection
of your restraint system (seat belts
and air bags) is greatly reduced by
reclining your seat. Seat belts must
be snug against your hips and
chest to work properly. The more
the seatback is reclined, the greater
the chance that an occupant's hipswill slide under the lap belt causingserious internal injuries or the
occupant's neck could strike the
shoulder belt. Drivers and passen-
gers should always sit well back in
their seats, properly belted, andwith the seat backs upright.
Page 85 of 442

Features of your vehicle
14
4
Opening the tailgate
The tailgate is locked or unlocked when
all doors are locked or unlocked with the
key, transmitter or central door lock
switch.
Only the tailgate is unlocked if the only tailgate unlock button on the transmitter
is pressed (if equipped). Once the tail-gate is opened and then closed, the tail-
gate is locked automatically. If unlocked, the tailgate can be opened
by pressing the handle and pulling it up.
* The actual feature may differ from the illus- tration.
✽✽ NOTICE
In cold and wet climates door lock and door mechanisms may not work prop-
erly due to freezing conditions.
When jacking up the vehicle to
change a tire or repair the vehicle, do
not operate the tailgate. This could
cause the tailgate to close improperly.
Closing the tailgate
To close the tailgate, lower and push
down the tailgate firmly. Make sure thatthe tailgate is securely latched.
TAILGATE
WARNING
ering shelf. If the vehicle sudden-
ly stops or makes a curve, the
object may injure passengers.
ering shelf, when you are using
the luggage room. You may injure
yourself.
CAUTION
Do not put any heavy object on the
covering shelf. It may damage thecovering shelf.
WARNING - Exhaust fumes
If you drive with the tailgate open,
you will draw dangerous exhaust
fumes into your vehicle which can
cause serious injury or death to
vehicle occupants.
If you must drive with the tailgate
open, keep the air vents and all win-
dows open so that additional out-
side air comes into the vehicle.
WARNING - Rear cargo area
Occupants should never ride in the
rear cargo area where no restraints
are available. To avoid injury in the
event of an accident or sudden
stops, occupants should always be
properly restrained.
OED036010
OED030010
Type A
Type B
Page 122 of 442
451
Features of your vehicle
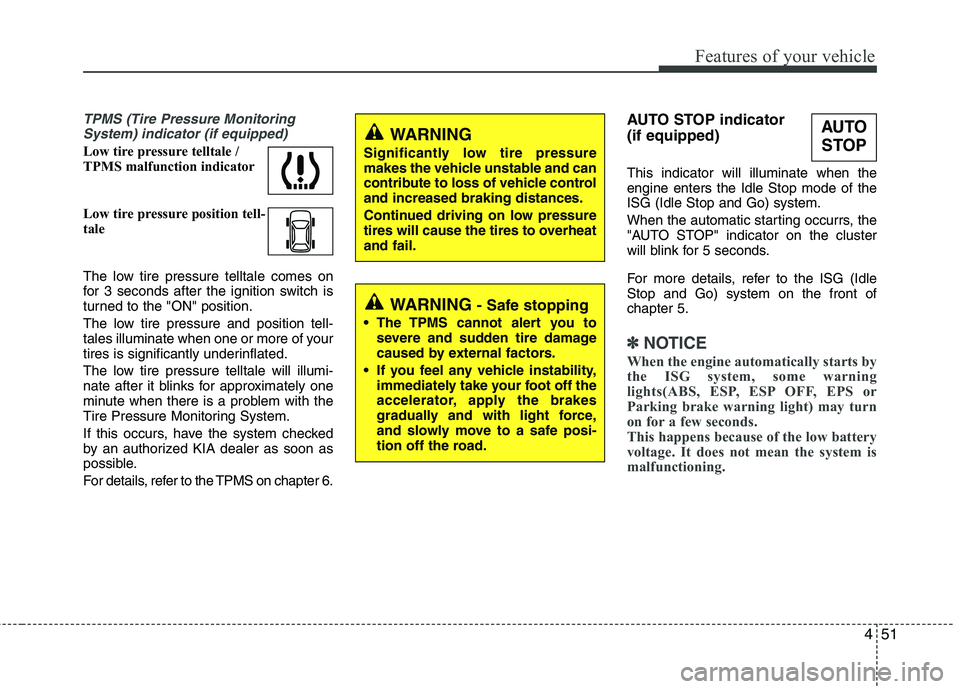
TPMS (Tire Pressure MonitoringSystem) indicator (if equipped)
Low tire pressure telltale /
TPMS malfunction indicator
Low tire pressure position tell-
tale
The low tire pressure telltale comes on
for 3 seconds after the ignition switch is
turned to the "ON" position.
The low tire pressure and position tell-
tales illuminate when one or more of your
tires is significantly underinflated.
The low tire pressure telltale will illumi-
nate after it blinks for approximately one
minute when there is a problem with the
Tire Pressure Monitoring System.
If this occurs, have the system checked
by an authorized KIA dealer as soon as
possible.
For details, refer to the TPMS on chapter 6. AUTO STOP indicator (if equipped) This indicator will illuminate when the engine enters the Idle Stop mode of theISG (Idle Stop and Go) system.
When the automatic starting occurrs, the
"AUTO STOP" indicator on the cluster
will blink for 5 seconds.
For more details, refer to the ISG (Idle Stop and Go) system on the front ofchapter 5.
✽✽
NOTICE
When the engine automatically starts by
the ISG system, some warning
lights(ABS, ESP, ESP OFF, EPS or
Parking brake warning light) may turn
on for a few seconds.
This happens because of the low battery
voltage. It does not mean the system is
malfunctioning.
WARNING
Significantly low tire pressure
makes the vehicle unstable and can
contribute to loss of vehicle controland increased braking distances.
Continued driving on low pressure
tires will cause the tires to overheatand fail.
WARNING - Safe stopping
The TPMS cannot alert you to severe and sudden tire damage
caused by external factors.
If you feel any vehicle instability, immediately take your foot off the
accelerator, apply the brakes
gradually and with light force,
and slowly move to a safe posi-
tion off the road.
AUTO
STOP
Page 125 of 442

Features of your vehicle
54
4
TPMS (if equipped)
The monitor will display the correspon-
ding tire that is low with pressure.
For details, see Tire Pressure Monitoring System on chapter 6.
Stop lamp fail display (if equipped)
The monitor will display the correspon- ding stop lamp that has malfunctioned.
(1) Right stop lamp failure
(2) Left stop lamp failure
(3) Left and Right stop lamp failure
OED040077OED040076 ① ② ③
Page 210 of 442
53
Driving your vehicle
Before entering vehicle
• Be sure that all windows, outside mir-ror(s), and outside lights are clean.
Check the condition of the tires.
Check under the vehicle for any sign of leaks.
Be sure there are no obstacles behind you if you intend to back up.
Necessary inspections
Fluid levels, such as engine oil, engine
coolant, brake fluid, and washer fluid
should be checked on a regular basis,
with the exact interval depending on the
fluid. Further details are provided in sec-
tion 7, “Maintenance”.
Before starting
Close and lock all doors.
Position the seat so that all controls are easily reached.
Adjust the inside and outside rearview mirrors. Be sure that all lights work.
Check all gauges.
Check the operation of warning lights
when the ignition switch is turned to the ON position.
Release the parking brake and make sure the brake warning light goes out.
For safe operation, be sure you are famil-
iar with your vehicle and its equipment.
BEFORE DRIVING
WARNING
All passengers must be properly
belted whenever the vehicle is mov-
ing. Refer to “Seat belts” in section
3 for more information on their
proper use.
WARNING
Always check the surrounding
areas near your vehicle for people,
especially children, before putting a
car into D (Drive) or R (Reverse).
WARNING - Driving under
the influence of alcohol or drugs
Drinking and driving is dangerous.
Drunk driving is the number one
contributor to the highway death
toll each year. Even a small amount
of alcohol will affect your reflexes,
perceptions and judgment. Drivingwhile under the influence of drugs
is as dangerous or more dangerousthan driving drunk.
You are much more likely to have a
serious accident if you drink or
take drugs and drive.
If you are drinking or taking drugs,
don’t drive. Do not ride with a driv-er who has been drinking or taking
drugs. Choose a designated driveror call a cab.
WARNING
When you intend to park or stop the
vehicle with the engine on, be care-ful not to depress the accelerator
pedal for a long period of time. It
may overheat the engine or exhaust
system and cause fire.
Page 228 of 442
521
Driving your vehicle
Anti-lock brake system (ABS) (if equipped)The ABS continuously senses the speed
of the wheels. If the wheels are going to
lock, the ABS system repeatedly modu-
lates the hydraulic brake pressure to the
wheels.
When you apply your brakes under con-
ditions which may lock the wheels, you
may hear a “tik-tik’’ sound from the
brakes, or feel a corresponding sensation
in the brake pedal. This is normal and it
means your ABS is active.
In order to obtain the maximum benefit
from your ABS in an emergency situa-
tion, do not attempt to modulate your
brake pressure and do not try to pump
your brakes. Press your brake pedal as
hard as possible or as hard as the situa-
tion allows the ABS to control the force
being delivered to the brakes.
WARNING
ABS (or ESP) will not prevent acci-
dents due to improper or danger-
ous driving maneuvers. Even
though vehicle control is improved
during emergency braking, always
maintain a safe distance between
you and objects ahead. Vehicle
speeds should always be reduced
during extreme road conditions.
The braking distance for vehicles
equipped with an anti-lock braking
system (or Electronic Stability
Program System) may be longer
than for those without it in the fol-
lowing road conditions.
During these conditions the vehicle should be driven at reducedspeeds:
Rough, gravel or snow-covered roads.
With tire chains installed. (Continued)
(Continued)
On roads where the road surfaceis pitted or has different surface height.
The safety features of an ABS (or
ESP) equipped vehicle should not
be tested by high speed driving or
cornering. This could endanger the
safety of yourself or others.