check engine KIA CEED 2011 Service Manual
[x] Cancel search | Manufacturer: KIA, Model Year: 2011, Model line: CEED, Model: KIA CEED 2011Pages: 390, PDF Size: 20.01 MB
Page 311 of 390

727
Maintenance
EXPLANATION OF SCHEDULED MAINTENANCE ITEMS
Engine oil and filter The engine oil and filter should be
changed at the intervals specified in the
maintenance schedule. If the car is being
driven in severe conditions, more fre-quent oil and filter changes are required. Drive belts
Inspect all drive belts for evidence of
cuts, cracks, excessive wear or oil satu-
ration and replace if necessary. Drive
belts should be checked periodically forproper tension and adjusted as neces-
sary.
Fuel filter (cartridge) A clogged filter can limit the speed at
which the vehicle may be driven, damage
the emission system and cause multiple
issues such as hard starting. If an exces-
sive amount of foreign matter accumu-
lates in the fuel tank, the filter may
require replacement more frequently.
After installing a new filter, run the engine
for several minutes, and check for leaks
at the connections. Fuel filters should be
installed by an authorized KIA dealer. Fuel lines, fuel hoses and con- nections
Check the fuel lines, fuel hoses and con-
nections for leakage and damage. Have
an authorized KIA dealer replace any
damaged or leaking parts immediately.
Timing belt (if equipped)
Inspect all parts related to the timing belt
for damage and deformation. Replace
any damaged parts immediately.
Vapor hose and fuel filler cap
The vapor hose and fuel filler cap should
be inspected at those intervals specified
in the maintenance schedule. Make sure
that a new vapor hose or fuel filler cap iscorrectly replaced.
WARNING -
Diesel only
Never work on injection system with engine running or within 30
seconds after shutting off engine.
High pressure pump, rail, injectorsand high pressure pipes are sub-
ject to high pressure even after the
engine stopped. The fuel jet pro-
duced by fuel leaks may cause seri-
ous injury, if it touch the body.
People using pacemakers should
not move than 30cm closer to theECU or wiring harness within the
engine room while engine is run-
ning, since the high currents in the
Common Rail system produce con-
siderable magnetic fields.
ED(FL) ENG 7.QXP 10/28/2010 6:26 PM Page 27
Page 312 of 390

Maintenance
28
7
Vacuum crankcase ventilation hoses (if equipped)
Inspect the surface of hoses for evidence
of heat and/or mechanical damage. Hard
and brittle rubber, cracking, tears, cuts,
abrasions, and excessive swelling indi-
cate deterioration. Particular attention
should be paid to examine those hose
surfaces nearest to high heat sources,
such as the exhaust manifold. Inspect the hose routing to assure that the hoses do not come in contact with
any heat source, sharp edges or movingcomponent which might cause heat dam-
age or mechanical wear. Inspect all hose
connections, such as clamps and cou-
plings, to make sure they are secure, and
that no leaks are present. Hoses should
be replaced immediately if there is any
evidence of deterioration or damage. Air cleaner filter
A Genuine KIA air cleaner filter is recom- mended when the filter is replaced.
Spark plugs (for gasoline engine)
Make sure to install new spark plugs of
the correct heat range.
Valve clearance (if equipped)
Inspect for excessive valve noise and/or
engine vibration and adjust if necessary.
An authorized KIA dealer should perform
the operation.
Cooling system
Check cooling system components, such
as radiator, coolant reservoir, hoses and
connections for leakage and damage.
Replace any damaged parts. Coolant The coolant should be changed at the
intervals specified in the maintenance
schedule.
Manual transaxle fluid (if equipped)
Inspect the manual transaxle fluid
according to the maintenance schedule.
ED(FL) ENG 7.QXP 10/28/2010 6:26 PM Page 28
Page 313 of 390

729
Maintenance
Automatic transaxle fluid (if equipped)
The fluid level should be in the "HOT"
range of the dipstick, after the engine
and transaxle are at normal operating
temperature. Check the automatic
transaxle fluid level with the engine run-
ning and the transaxle in neutral, with the
parking brake properly applied. Brake hoses and lines
Visually check for proper installation,
chafing, cracks, deterioration and any
leakage. Replace any deteriorated or
damaged parts immediately. Brake fluid
Check brake fluid level in the brake fluid
reservoir. The level should be between
“MIN” and “MAX” marks on the side of
the reservoir. Use only hydraulic brake
fluid conforming to DOT 3 or DOT 4specification.Parking brake
Inspect the parking brake system includ-
ing the parking brake pedal and cables.
Brake discs, pads, calipers and
rotors
Check the pads for excessive wear, discs
for run out and wear, and calipers for fluid
leakage. Suspension mounting bolts
Check the suspension connections for
looseness or damage. Retighten to the
specified torque.
Steering gear box, linkage &
boots/lower arm ball joint
With the vehicle stopped and engine off,
check for excessive free-play in the
steering wheel.
Check the linkage for bends or damage.
Check the dust boots and ball joints for
deterioration, cracks, or damage.
Replace any damaged parts. Drive shafts and boots
Check the drive shafts, boots and clamps
for cracks, deterioration, or damage.
Replace any damaged parts and, if nec-
essary, repack the grease.
Air conditioning refrigerant (if equipped)
Check the air conditioning lines and con-
nections for leakage and damage.
ED(FL) ENG 7.QXP 10/28/2010 6:26 PM Page 29
Page 314 of 390

Maintenance
30
7
ENGINE OIL
Checking the engine oil level
1. Be sure the vehicle is on level ground.
2. Start the engine and allow it to reach normal operating temperature. 3. Turn the engine off and wait for a few
minutes (about 5 minutes) for the oil to
return to the oil pan.
4. Pull the dipstick out, wipe it clean, and reinsert it fully.
5. Pull the dipstick out again and check the level. The level should be betweenF and L. If it is near or at L, add enough oil to bring
the level to F.
Do not overfill.
Use a funnel to help prevent oil frombeing spilled on engine components.
Use only the specified engine oil. (Refer to “Recommended lubricants and capaci- ties” in section 8.)
WARNING - Radiator hose
Be very careful not to touch the
radiator hose when checking or
adding the engine oil as it may be
hot enough to burn you.
CAUTION
Do not overfill the engine oil. It may damage the engine.
CAUTION - Diesel engine
Overfilling the engine oil may cause
severe dieseling due to churning effect. It may lead to engine damageaccompanied with abrupt engine
speed increment, combustion noiseand white smoke emission.
OED076005OED076007
ED(FL) ENG 7.QXP 10/28/2010 6:26 PM Page 30
Page 315 of 390

731
Maintenance
Changing the engine oil and filter
Have the engine oil and filter changed by
an authorized KIA dealer according tothe Maintenance Schedule at the begin-ning of this section.The high-pressure cooling system has a
reservoir filled with year-round antifreeze
coolant. The reservoir is filled at the fac-
tory.
Check the antifreeze protection and
coolant level at least once a year, at thebeginning of the winter season, and
before traveling to a colder climate.Checking the coolant level
WARNING
Used engine oil may cause skin irri- tation or cancer if left in contact
with the skin for prolonged periods
of time. Used engine oil contains
chemicals that have caused cancer
in laboratory animals. Always pro-
tect your skin by washing your
hands thoroughly with soap and
warm water as soon as possibleafter handling used oil.
ENGINE COOLANT
WARNING - Removing
radiator cap
Never attempt to remove the radi- ator cap while the engine is oper-
ating or hot. Doing so might leadto cooling system and engine
damage. Also hot coolant orsteam could cause serious per-
sonal injury.
Turn the engine off and wait until it cools down. Use extreme care
when removing the radiator cap.
Wrap a thick towel around it, and
turn it counterclockwise slowly to
the first stop. Step back while the
pressure is released from the
cooling system. When you aresure all the pressure has been
released, press down on the cap,
using a thick towel, and continue
turning counterclockwise to
remove it.
Even if the engine is not operat- ing, do not remove the radiatorcap or the drain plug while the
engine and radiator are hot. Hot
coolant and steam may still blow
out under pressure, causing seri-
ous injury.
ED(FL) ENG 7.QXP 10/28/2010 6:26 PM Page 31
Page 316 of 390

Maintenance
32
7
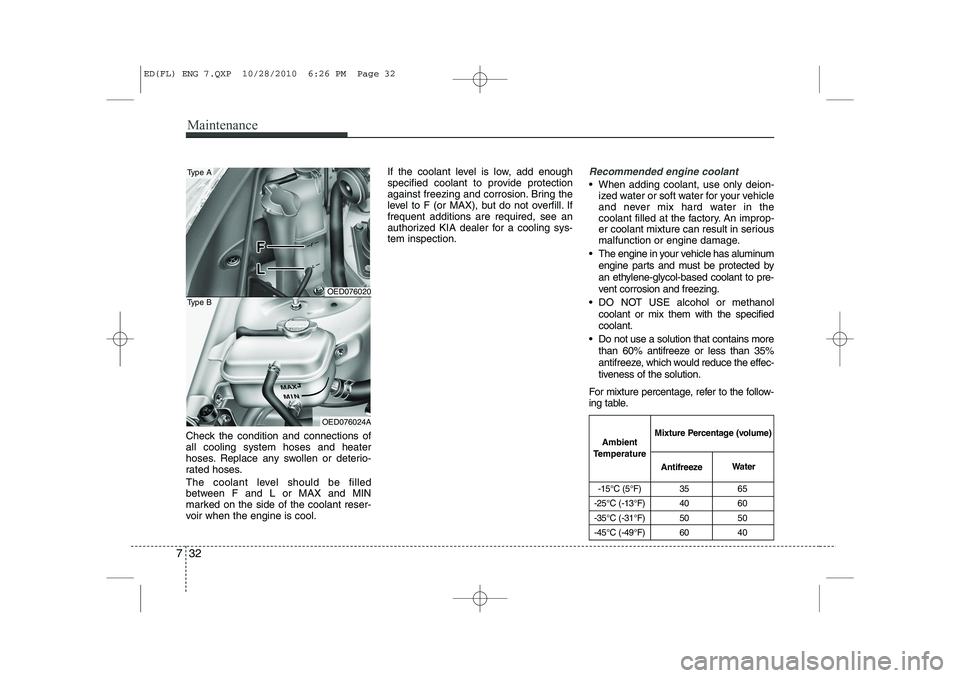
Check the condition and connections of all cooling system hoses and heater
hoses. Replace any swollen or deterio-
rated hoses.
The coolant level should be filled
between F and L or MAX and MIN
marked on the side of the coolant reser-
voir when the engine is cool. If the coolant level is low, add enough
specified coolant to provide protection
against freezing and corrosion. Bring the
level to F (or MAX), but do not overfill. Iffrequent additions are required, see an
authorized KIA dealer for a cooling sys-tem inspection.
Recommended engine coolant
When adding coolant, use only deion-
ized water or soft water for your vehicle
and never mix hard water in the
coolant filled at the factory. An improp-
er coolant mixture can result in serious
malfunction or engine damage.
The engine in your vehicle has aluminum engine parts and must be protected by
an ethylene-glycol-based coolant to pre-
vent corrosion and freezing.
DO NOT USE alcohol or methanol coolant or mix them with the specifiedcoolant.
Do not use a solution that contains more than 60% antifreeze or less than 35%
antifreeze, which would reduce the effec-
tiveness of the solution.
For mixture percentage, refer to the follow-
ing table.
-15°C (5°F) 35 65
-25°C (-13°F) 40 60
-35°C (-31°F) 50 50
-45°C (-49°F) 60 40
Ambient
Temperature Mixture Percentage (volume)
Antifreeze Water
OED076020
OED076024A
Type A
Type B
ED(FL) ENG 7.QXP 10/28/2010 6:26 PM Page 32
Page 318 of 390

Maintenance
34
7
BRAKE/CLUTCH FLUID (IF EQUIPPED)
Checking the brake/clutch fluid
level
Check the fluid level in the reservoir peri-
odically. The fluid level should be
between MAX and MIN marks on the
side of the reservoir.
Before removing the reservoir cap and
adding brake/clutch fluid, clean the area
around the reservoir cap thoroughly to
prevent brake/clutch fluid contamination. If the level is low, add fluid to the MAX
level. The level will fall with accumulated
mileage. This is a normal condition asso-
ciated with the wear of the brake linings
and/or clutch disc (if equipped). If the
fluid level is excessively low, have the
brake system checked by an authorized
KIA dealer.
Use only the specified brake/clutch fluid.
(Refer to “Recommended lubricants or
capacities” in section 8.)
Never mix different types of fluid.
WARNING - Loss of brake fluid
In the event the brake system
requires frequent additions of fluid,
the vehicle should be inspected by
an authorized KIA dealer.
WARNING - Brake/clutch fluid
When changing and adding
brake/clutch fluid, handle it careful-
ly. Do not let it come in contact with
your eyes. If brake/clutch fluid
come in contact with your eyes,
immediately flush them with a large
quantity of fresh tap water. Have
your eyes examined by a doctor as
soon as possible.
CAUTION
Do not allow brake/clutch fluid to contact the vehicle's body paint, as
paint damage will result.
Brake/clutch fluid, which has beenexposed to open air for an extendedtime should never be used as itsquality cannot be guaranteed. It
should be properly disposed. Don'tput in the wrong kind of fluid. A few drops of mineral-based oil, such asengine oil, in your brake/clutch sys-
tem can damage brake/clutch sys- tem parts.
OED076023
* The actual feature may differ from the illus- tration.
ED(FL) ENG 7.QXP 10/28/2010 6:26 PM Page 34
Page 319 of 390

735
Maintenance
AUTOMATIC TRANSAXLE FLUID (IF EQUIPPED)
Checking the automatic transaxle
fluid level
The automatic transaxle fluid level
should be checked regularly.
Keep the vehicle on the level ground with
the parking brake applied and check the
fluid level according to the following pro-
cedure.
1. Place the shift lever in N (Neutral) posi- tion and confirm the engine is running
at normal idle speed.
2. After the transaxle is warmed up suffi- ciently [fluid temperature 70~80°C
(158~176°F)], for example by 10 min-
utes usual driving, move the shift leverthrough all positions then place the
shift lever in N(Neutral) or P(Park)position. 3. Confirm if the fluid level is in the "HOT"
range on the level gauge. If the fluid
level is lower, add the specified fluid
from the fill hole. If the fluid level is
higher, drain the fluid from the drain
hole.
4. If the fluid level is checked in cold con- dition [fluid temperature 20~30 °C
(68~86 °F)], add the fluid to the “C”
(COLD) line and then recheck the fluid
level according to the above step 2.
WARNING - Transaxle fluid
The transaxle fluid level should be
checked when the engine is at nor-
mal operating temperature. This
means that the engine, radiator,
radiator hose and exhaust system
etc., are very hot. Exercise great
care not to burn yourself during
this procedure.
WARNING - Parking brake
To avoid sudden movement of the
vehicle, apply parking brake and
depress the brake pedal before
moving the shift lever.
CAUTION
Low fluid level causes transaxle slippage. Overfilling can causefoaming, loss of fluid and transaxle malfunction.
The use of a non-specified fluid could result in transaxle malfunc-tion and failure.
OED076025OED070045
COLD
HOT
↔
↔
ED(FL) ENG 7.QXP 10/28/2010 6:26 PM Page 35
Page 322 of 390

Maintenance
38
7
FUEL FILTER (FOR DIESEL)
Draining water from the fuel filter
The fuel filter for diesel engine plays an
important role of separating water from
fuel and accumulating the water in itsbottom.
If water accumulates in the fuel filter, the
warning light comes on when the ignition
switch is in the ON position. If this warning light illuminates,
take your car to an authorized
KIA dealer and have drain the
water and checked the sys-tem. Extracting air from the fuel filter
If you drove until you have no fuel left
or if you replaced the fuel filter, be
sure to extract air in the fuel system
as it makes you difficult to start the
engine.
1. Remove the air extract nozzle cap
on the fuel filter.
2. Pump up and down until the fuel flows out of the plug opening.
✽✽NOTICE
Page 332 of 390

Maintenance
48
7
Reset items
Items should be reset after the battery
has been discharged or the battery hasbeen disconnected.
Auto up/down window (See section 4)
Sunroof (See section 4)
Trip computer (See section 4)
Climate control system
(See section 4)
Clock (See section 4)
Audio (See section 4)
WARNING
Before performing maintenance or recharging the battery, turn off all accessories and stop the
engine.
The negative battery cable must be removed first and installed
last when the battery is discon-nected.WARNING - Recharging
battery
When recharging the battery,
observe the following precautions:
The battery must be removed from the vehicle and placed in an area with good ventilation.
Do not allow cigarettes, sparks, or flame near the battery.
Watch the battery during charg- ing, and stop or reduce the charg-
ing rate if the battery cells begin
gassing (boiling) violently or if
the temperature of the electrolyte
of any cell exceeds 49°C (120°F).
Wear eye protection when check- ing the battery during charging.
Disconnect the battery charger in the following order.
1. Turn off the battery charger main switch.
2. Unhook the negative clamp from the negative battery terminal.
3. Unhook the positive clamp from the positive battery terminal.
ED(FL) ENG 7.QXP 10/28/2010 6:27 PM Page 48