headlights KIA CEED 2014 User Guide
[x] Cancel search | Manufacturer: KIA, Model Year: 2014, Model line: CEED, Model: KIA CEED 2014Pages: 1206, PDF Size: 50.15 MB
Page 583 of 1206
Specifications & Consumer information
6
8
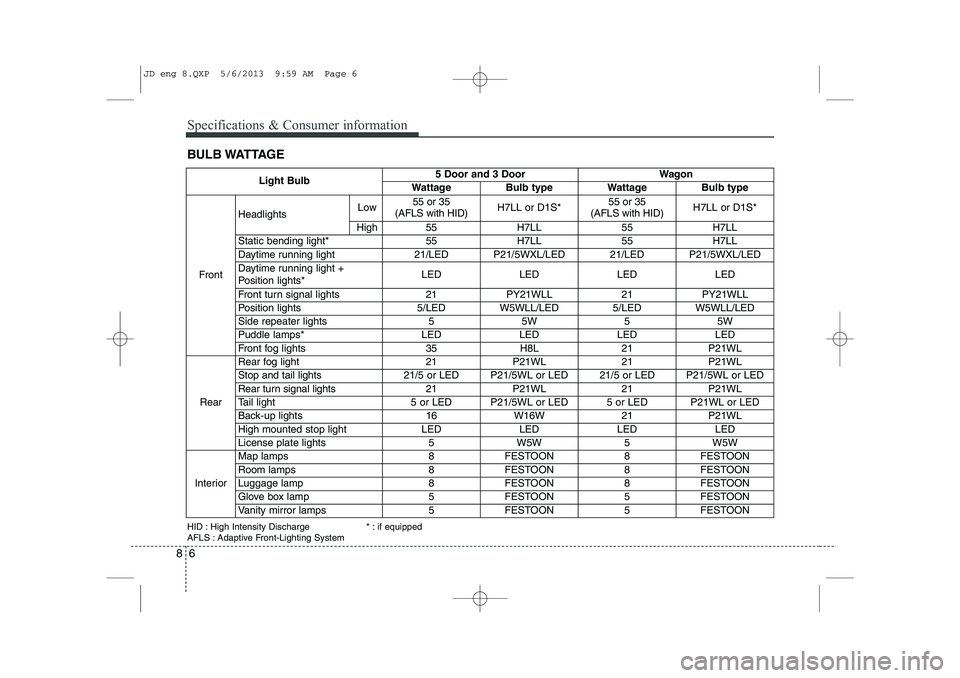
BULB WATTAGE
Light Bulb5 Door and 3 DoorWagon
WattageBulb typeWattageBulb type
Front
HeadlightsLow55 or 35
(AFLS with HID)H7LL or D1S*55 or 35
(AFLS with HID)H7LL or D1S*
High55H7LL55H7LL
Static bending light*55H7LL55H7LL
Daytime running light21/LEDP21/5WXL/LED21/LEDP21/5WXL/LED
Daytime running light +
Position lights*LEDLEDLEDLED
Front turn signal lights21PY21WLL21PY21WLL
Position lights5/LEDW5WLL/LED5/LEDW5WLL/LED
Side repeater lights55W55W
Puddle lamps*LEDLEDLEDLED
Front fog lights35H8L21P21WL
Rear
Rear fog light21P21WL21P21WL
Stop and tail lights 21/5 or LEDP21/5WL or LED21/5 or LEDP21/5WL or LED
Rear turn signal lights 21P21WL21P21WL
Tail light 5 or LEDP21/5WL or LED5 or LEDP21WL or LED
Back-up lights 16W16W21P21WL
High mounted stop lightLEDLEDLEDLED
License plate lights5W5W5W5W
Interior
Map lamps8FESTOON8FESTOON
Room lamps8FESTOON8FESTOON
Luggage lamp8FESTOON8FESTOON
Glove box lamp5FESTOON5FESTOON
Vanity mirror lamps5FESTOON5FESTOON
HID : High Intensity Discharge
AFLS : Adaptive Front-Lighting System * : if equipped
JD eng 8.QXP 5/6/2013 9:59 AM Page 6
Page 726 of 1206

Features of your vehicle
42
4
Inside rearview mirror
Adjust the rearview mirror so that the
centre view through the rear window is
seen. Make this adjustment before you
start driving.
Day/night rearview mirror
(if equipped)
Make this adjustment before you start
driving and whilst the day/night lever is in
the day position.
Pull the day/night lever toward you to
reduce glare from the headlights of vehi-
cles behind you during night driving.
Remember that you lose some rearviewclarity in the night position.
Electric chromic mirror (ECM)
(if equipped)
The electric rearview mirror automatical- ly controls the glare from the headlights
of the car behind you in nighttime or low
light driving conditions. The sensormounted in the mirror senses the light
level around the vehicle, and automati-cally controls the headlight glare from
vehicles behind you.
When the engine is running, the glare is
automatically controlled by the sensor
mounted in the rearview mirror.
Whenever the shift lever is shifted into R
(Reverse), the mirror will automatically
go to the brightest setting in order to
improve the drivers view behind the vehi-
cle.
MIRRORS
WARNING -
Rear visibility
Do not place objects in the rear
seat or cargo area which would
interfere with your vision out the
rear window.
CAUTION
When cleaning the mirror, use a paper towel or similar materialdampened with glass cleaner. Do not spray glass cleaner directly on
the mirror as that may cause the liq- uid cleaner to enter the mirror hous-ing.
WARNING
Do not adjust the rearview mirror
whilst the vehicle is moving. This
could result in loss of control, and
an accident which could cause
death, serious injury or property
damage.
WARNING
Do not modify the inside mirror and
do not install a wide mirror. It could
result in injury, during an accident
or deployment of the air bag.
OMD040031
D
DDDaaaayyyy
NNNNiiiigggghhhhtttt
JD RHD 4a(~171).QXP 4/29/2013 11:56 AM Page 42
Page 765 of 1206
481
Features of your vehicle
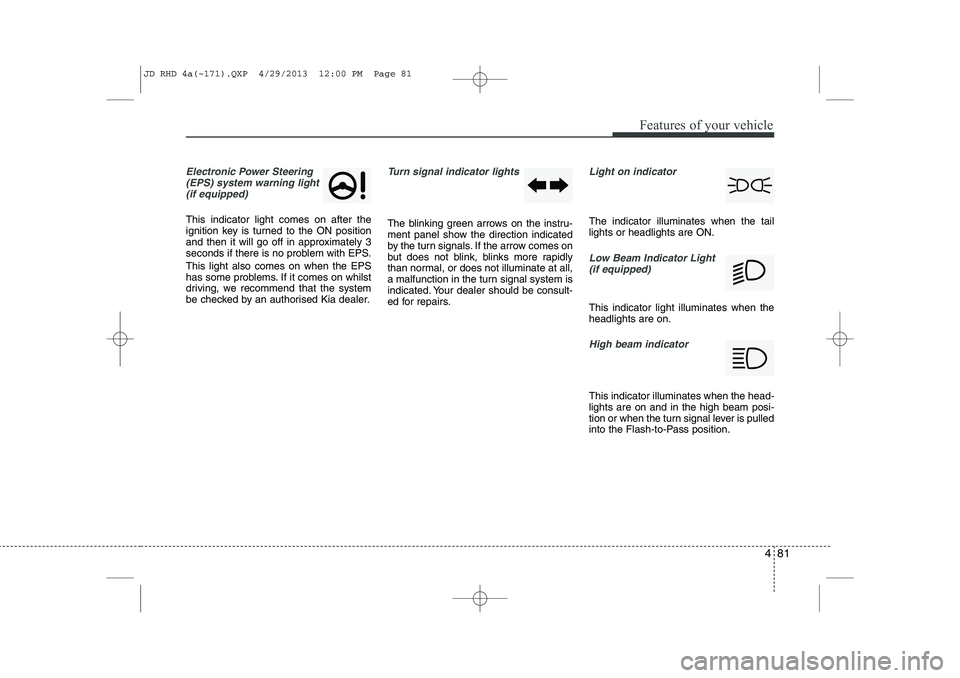
Electronic Power Steering(EPS) system warning light(if equipped)
This indicator light comes on after the
ignition key is turned to the ON position
and then it will go off in approximately 3
seconds if there is no problem with EPS. This light also comes on when the EPS
has some problems. If it comes on whilst
driving, we recommend that the system
be checked by an authorised Kia dealer.
Turn signal indicator lights
The blinking green arrows on the instru-
ment panel show the direction indicated
by the turn signals. If the arrow comes on
but does not blink, blinks more rapidly
than normal, or does not illuminate at all,
a malfunction in the turn signal system is
indicated. Your dealer should be consult-
ed for repairs.
Light on indicator
The indicator illuminates when the tail lights or headlights are ON.
Low Beam Indicator Light
(if equipped)
This indicator light illuminates when the headlights are on.
High beam indicator
This indicator illuminates when the head- lights are on and in the high beam posi-
tion or when the turn signal lever is pulled
into the Flash-to-Pass position.
JD RHD 4a(~171).QXP 4/29/2013 12:00 PM Page 81
Page 795 of 1206

4 111
Features of your vehicle
Battery saver function
The purpose of this feature is to pre-vent the battery from being dis-
charged. The system automatically
turns off the parking lights when the
driver removes the ignition key (Smart
key : turns off the engine) and opens
the driver- side door.
With this feature, the parking lights will be turned off automatically if the driver
parks on the side of road at night.
If necessary, to keep the lights on
when the ignition key is removed, per-
form the following :
1) Open the driver-side door.
2) Turn the parking lights OFF and ON again using the light switch on the
steering column. Headlamp delay function (if equipped) The headlamps (and/or taillights) remain
on for same minutes (Type A: 20 minutes,
Type B: 5 minutes) after the ignition key
is removed or turned to the ACC or
LOCK position. However, if the driver’sdoor is opened and closed, the head-
lights are turned off after 15 seconds.
The headlights can be turned off by
pressing the lock button on the transmit-
ter or smart key twice or turning off the
light switch from the headlight or Autolight position.
You can activate or deactivate the head-
lamp delay fuction. Refer to “User setting”in this section.
Headlight (Headlamp) welcome function (if equipped)
When the headlight switch is in the ON or
AUTO position and all doors (and tail-
gate) are closed and locked, if you press
the door unlock button on the transmitter
or smart key, the headlights will come on
for about 15 seconds.
If the headlight switch is in the AUTO
position, the function can only operate atnight.
At this time, if you press the door unlock
button again or door lock button on the
transmitter or smart key, the headlights
will turn off immediately.
You can activate or deactivate the head-
lamp welcome fuction. Refer to “User set-
ting” in this section.
✽✽
NOTICE
There can be turned on front fog light and the fail light when you turn on the
headlight switch ON. In this case we rec-ommend that you the system checked by
an authorised Kia dealer.
LIGHTING
CAUTION
If the driver gets out of the vehicle through other doors (except driver’s door), the battery saver functiondoes not operate and the headlamp
delay function does not turn offautomatically. Therefore, it causes the battery to be discharged. In this case, make sure to turn off the lampbefore getting out of the vehicle.
JD RHD 4a(~171).QXP 4/29/2013 12:01 PM Page 111
Page 797 of 1206
4 113
Features of your vehicle
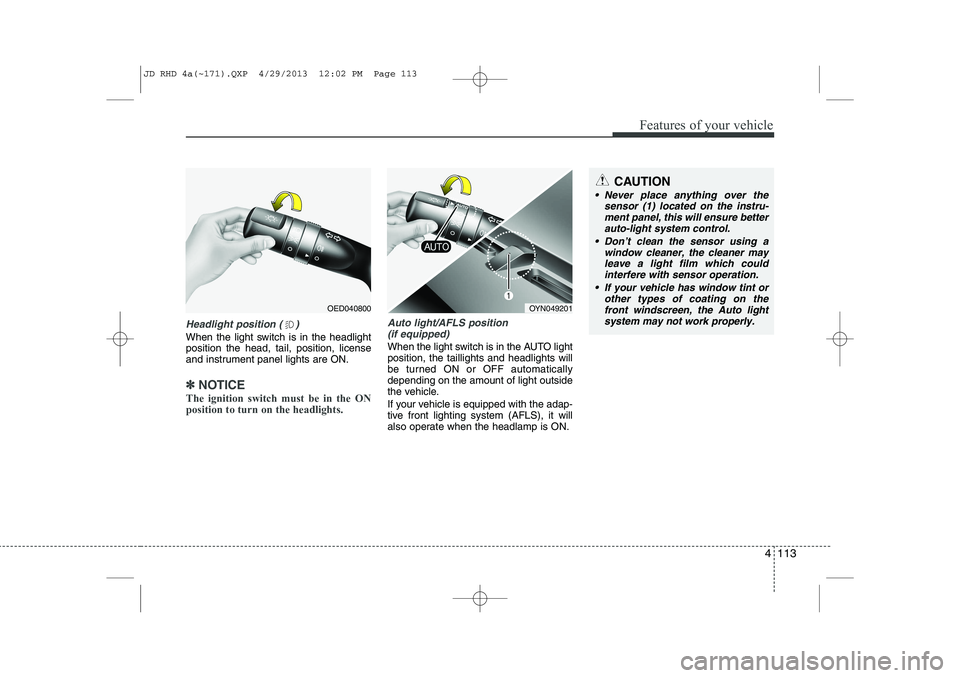
Headlight position ( )
When the light switch is in the headlight position the head, tail, position, license
and instrument panel lights are ON.
✽✽NOTICE
The ignition switch must be in the ON position to turn on the headlights.
Auto light/AFLS position (if equipped)
When the light switch is in the AUTO light position, the taillights and headlights will
be turned ON or OFF automaticallydepending on the amount of light outside
the vehicle.
If your vehicle is equipped with the adap-
tive front lighting system (AFLS), it will
also operate when the headlamp is ON.
OYN049201
CAUTION
Never place anything over the sensor (1) located on the instru-
ment panel, this will ensure betterauto-light system control.
Don’t clean the sensor using a window cleaner, the cleaner may
leave a light film which couldinterfere with sensor operation.
If your vehicle has window tint or other types of coating on thefront windscreen, the Auto light
system may not work properly.
OED040800
JD RHD 4a(~171).QXP 4/29/2013 12:02 PM Page 113
Page 798 of 1206
Features of your vehicle
114
4
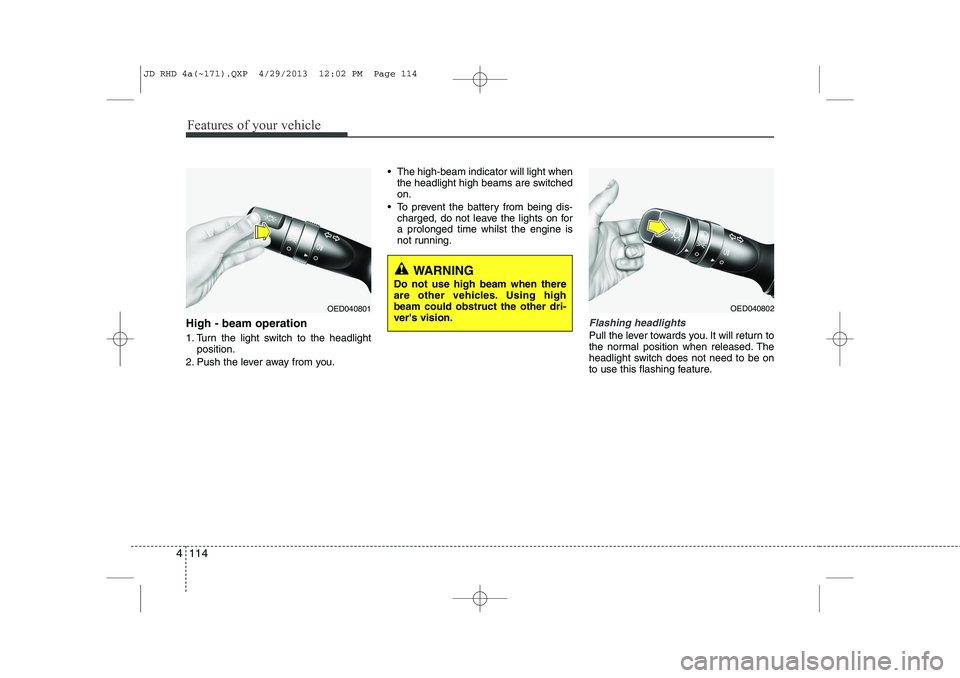
High - beam operation
1. Turn the light switch to the headlight
position.
2. Push the lever away from you. The high-beam indicator will light when
the headlight high beams are switched on.
To prevent the battery from being dis- charged, do not leave the lights on fora prolonged time whilst the engine is
not running.Flashing headlights
Pull the lever towards you. It will return to
the normal position when released. The
headlight switch does not need to be on
to use this flashing feature.
WARNING
Do not use high beam when there
are other vehicles. Using highbeam could obstruct the other dri-ver's vision.
OED040801OED040802
JD RHD 4a(~171).QXP 4/29/2013 12:02 PM Page 114
Page 806 of 1206
Features of your vehicle
122
4
Headlight washer (if equipped)
If your vehicle is equipped with the head-
light washer it will operate at the same
time when you operate the windscreen
washer. It will operate when the headlight
switch is in the first or second position
and the ignition switch or engine
start/stop button is in the ON position.
The washer fluid will be sprayed on to the
headlights.
✽✽
NOTICE
Check the headlight washers periodical-
ly to confirm that the washer fluid is
being sprayed properly onto the head-light lenses.
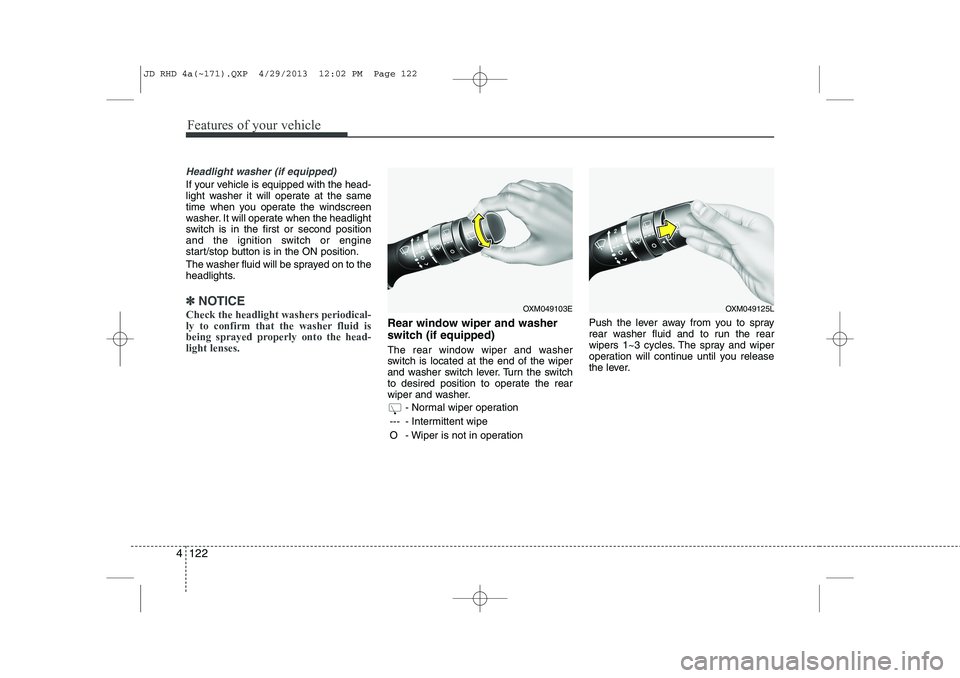
Rear window wiper and washer
switch (if equipped)
The rear window wiper and washer
switch is located at the end of the wiper
and washer switch lever. Turn the switch
to desired position to operate the rear
wiper and washer.
- Normal wiper operation
--- - Intermittent wipe
O - Wiper is not in operation Push the lever away from you to spray
rear washer fluid and to run the rear
wipers 1~3 cycles. The spray and wiper
operation will continue until you release
the lever.
OXM049103EOXM049125L
JD RHD 4a(~171).QXP 4/29/2013 12:02 PM Page 122
Page 1014 of 1206
565
Driving your vehicle
✽✽NOTICE
The ESC system should be turned OFF
prior to rocking the vehicle.
Smooth cornering
Avoid braking or gear changing in cor-
ners, especially when roads are wet.
Ideally, corners should always be taken
under gentle acceleration. If you follow
these suggestions, tyre wear will be held
to a minimum. Driving at night
Because night driving presents more
hazards than driving in the daylight, here
are some important tips to remember:
Slow down and keep more distance between you and other vehicles, as it
may be more difficult to see at night,
especially in areas where there may
not be any street lights.
Adjust your mirrors to reduce the glare from other driver's headlights.
Keep your headlights clean and prop- erly aimed on vehicles not equippedwith the automatic headlight aiming
feature. Dirty or improperly aimed
headlights will make it much more diffi-cult to see at night.
Avoid staring directly at the headlights of oncoming vehicles. You could be
temporarily blinded, and it will take
several seconds for your eyes to read-
just to the darkness. Driving in the rain
Rain and wet roads can make driving
dangerous, especially if you’re not pre-
pared for the slick pavement. Here are a
few things to consider when driving in the
rain:
A heavy rainfall will make it harder to
see and will increase the distance
needed to stop your vehicle, so slow
down.
Keep your windscreen wiping equip- ment in good shape. Replace your
windscreen wiper blades when they
show signs of streaking or missingareas on the windscreen.
If your tyres are not in good condition, making a quick stop on wet pavement
can cause a skid and possibly lead to
an accident. Be sure your tyres are in
good shape.
Turn on your headlights to make it eas- ier for others to see you.
Driving too fast through large puddles can affect your brakes. If you must go
through puddles, try to drive through
them slowly.
If you believe you may have gotten your brakes wet, apply them lightly
whilst driving until normal braking
operation returns.
WARNING - Spinning tyres
Do not spin the wheels, especially at speeds more than 56 km/h (35
mph). Spinning the wheels at high
speeds when the vehicle is station-
ary could cause a tyre to overheat
which could result in tyre damage
that may injure bystanders.
WARNING
If your vehicle becomes stuck in
snow, mud, sand, etc., then you
may attempt to rock the vehicle free
by moving it forward and backward.
Do not attempt this procedure if
people or objects are anywhere
near the vehicle. During the rocking
operation the vehicle may suddenly
move forward or backward as it
becomes unstuck, causing injury
or damage to nearby people orobjects.
JD RHD 5.QXP 4/29/2013 11:28 AM Page 65
Page 1114 of 1206
753
Maintenance
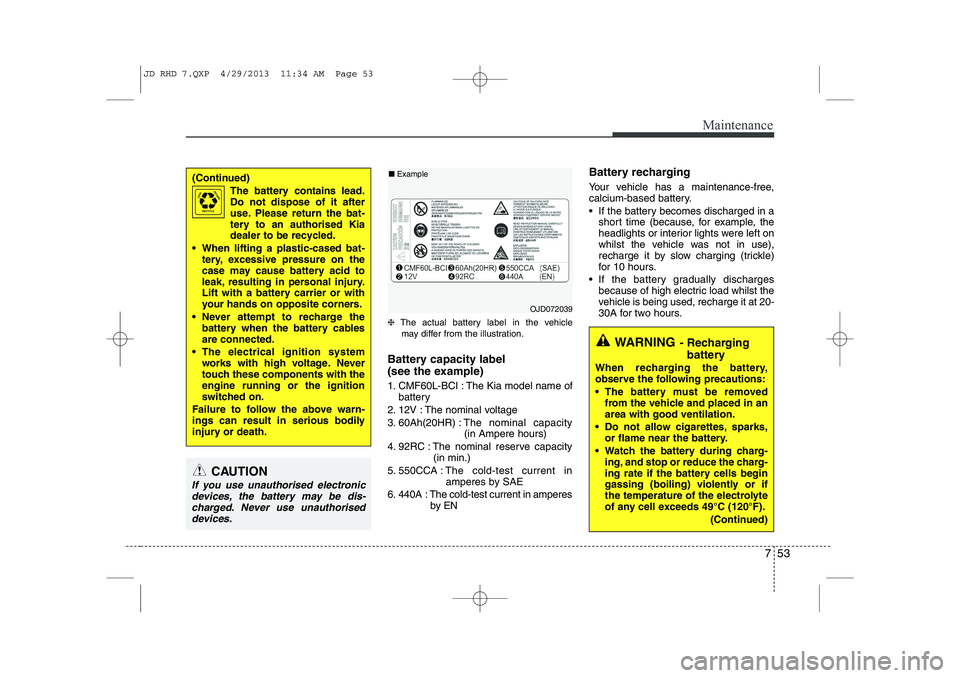
❈The actual battery label in the vehicle
may differ from the illustration.
Battery capacity label
(see the example)
1. CMF60L-BCI : The Kia model name of battery
2. 12V : The nominal voltage
3. 60Ah(20HR) : The nominal capacity
(in Ampere hours)
4. 92RC : The nominal reserve capacity (in min.)
5. 550CCA : The cold-test current in
amperes by SAE
6. 440A : The cold-test current in amperes by EN Battery recharging
Your vehicle has a maintenance-free,
calcium-based battery.
If the battery becomes discharged in a
short time (because, for example, the
headlights or interior lights were left on
whilst the vehicle was not in use),
recharge it by slow charging (trickle)
for 10 hours.
If the battery gradually discharges because of high electric load whilst the
vehicle is being used, recharge it at 20-
30A for two hours.
(Continued)
The battery contains lead.
Do not dispose of it after
use. Please return the bat-
tery to an authorised Kia
dealer to be recycled.
When lifting a plastic-cased bat- tery, excessive pressure on the
case may cause battery acid to
leak, resulting in personal injury.
Lift with a battery carrier or with
your hands on opposite corners.
Never attempt to recharge the battery when the battery cablesare connected.
The electrical ignition system works with high voltage. Never
touch these components with theengine running or the ignition
switched on.
Failure to follow the above warn-
ings can result in serious bodily
injury or death.
CAUTION
If you use unauthorised electronic devices, the battery may be dis- charged. Never use unauthoriseddevices.
OJD072039
WARNING - Recharging
battery
When recharging the battery,
observe the following precautions:
The battery must be removed from the vehicle and placed in an area with good ventilation.
Do not allow cigarettes, sparks, or flame near the battery.
Watch the battery during charg- ing, and stop or reduce the charg-
ing rate if the battery cells begin
gassing (boiling) violently or if
the temperature of the electrolyte
of any cell exceeds 49°C (120°F).
(Continued)
■Example
JD RHD 7.QXP 4/29/2013 11:34 AM Page 53
Page 1128 of 1206

767
Maintenance
Inner panel fuse replacement
1. Turn the ignition switch and all otherswitches off.
2. Open the fuse panel cover. 3. Pull the suspected fuse straight out.
Use the removal tool provided in the
engine compartment fuse panel.
4. Check the removed fuse; replace it if it is blown.
5. Push in a new fuse of the same rating, and make sure it fits tightly in the clips.
If it fits loosely, we recommend that you
consult an authorised Kia dealer.
If you do not have a spare, use a fuse of the same rating from a circuit you may
not need for operating the vehicle, suchas the cigar lighter fuse.
If the headlights, fog lights, turn signallights, position lights or interior lights do not work and there is nothing wrong with
the bulbs, we recommend that you con- sult with an authorised Kia dealer.
OJD072016ROGDE071017R
CAUTION
When replacing a blown fuse or relay with a new one, make sure
the new fuse or relay fits tightlyinto the clips. The incomplete fas-tening fuse or relay may cause the vehicle wiring and electric
systems damage and a possiblefire.
Do not remove fuses, relays and terminals fastened with bolts or
nuts. The fuses, relays and termi-nals may be fastened incomplete-ly, and it may cause a possiblefire. If fuses, relays and terminals
fastened with bolts or nuts areblown, we recommend that youconsult with an authorised Kia
dealer.
Do not input any other objects except fuses or relays intofuse/relay terminals such as adriver or wiring. It may cause con-
tact failure and system malfunc-tion.
JD RHD 7.QXP 4/29/2013 11:34 AM Page 67