oil level KIA CERATO 2006 Owners Manual
[x] Cancel search | Manufacturer: KIA, Model Year: 2006, Model line: CERATO, Model: KIA CERATO 2006Pages: 315, PDF Size: 11.29 MB
Page 151 of 315
439
1 23456789
Driving your vehicle
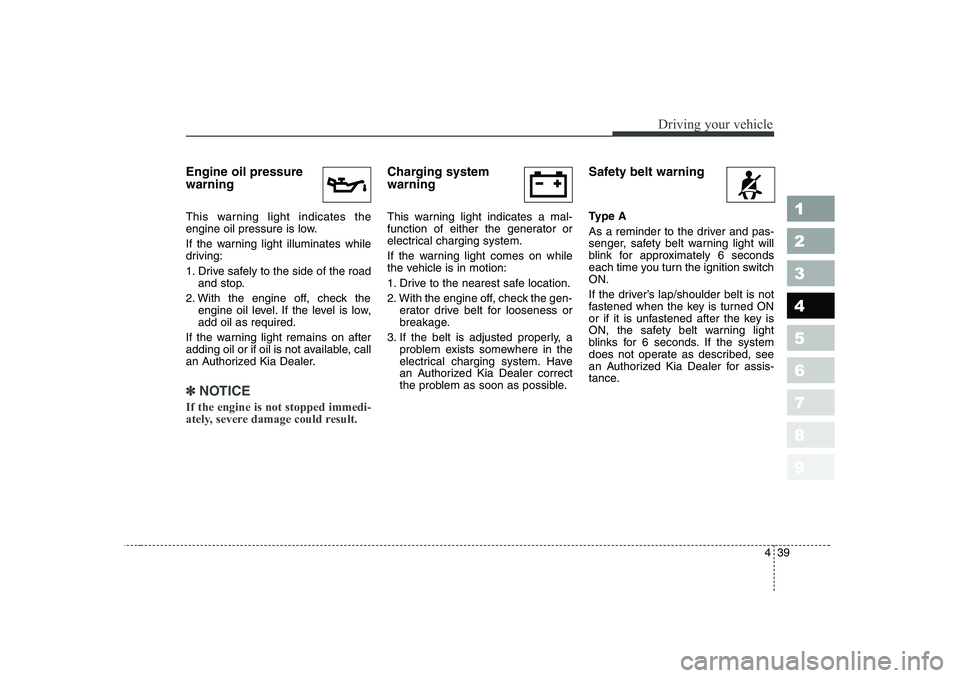
Engine oil pressure warning
This warning light indicates the
engine oil pressure is low.
If the warning light illuminates while
driving:
1. Drive safely to the side of the roadand stop.
2. With the engine off, check the engine oil level. If the level is low, add oil as required.
If the warning light remains on after
adding oil or if oil is not available, call
an Authorized Kia Dealer.
✽✽
NOTICE
If the engine is not stopped immedi-
ately, severe damage could result.
Charging system warning
This warning light indicates a mal-
function of either the generator or
electrical charging system.
If the warning light comes on while
the vehicle is in motion:
1. Drive to the nearest safe location.
2. With the engine off, check the gen- erator drive belt for looseness or
breakage.
3. If the belt is adjusted properly, a problem exists somewhere in the
electrical charging system. Have
an Authorized Kia Dealer correct
the problem as soon as possible. Safety belt warning
Type A
As a reminder to the driver and pas-
senger, safety belt warning light will
blink for approximately 6 seconds
each time you turn the ignition switchON.
If the driver
’s lap/shoulder belt is not
fastened when the key is turned ON
or if it is unfastened after the key is
ON, the safety belt warning light
blinks for 6 seconds. If the system
does not operate as described, see
an Authorized Kia Dealer for assis-
tance.
Page 202 of 315
55
Driving tips
BEFORE DRIVING
Before entering vehicle:
Be sure that all windows, outside mirror(s), and outside lights are clean.
Check the condition of the tires.
Check under the vehicle for any sign of leaks.
Be sure there are no obstacles behind you if you intend to back up.
Necessary inspections
Fluid levels, such as engine oil,
engine coolant, brake fluid, and
washer fluid should be checked on a
regular basis, with the exact interval
depending on the fluid. Further
details are provided in Section 7,
Maintenance. Before starting
Close and lock all doors.
Position the seat so that all con-
trols are easily reached.
Adjust the inside and outside rearview mirrors.
Be sure that all lights work.
Check all gauges.
Check the operation of warning lights when the ignition switch is
turned to the ON position.
Release the parking brake and make sure the brake warning lightgoes out.
For safe operation, be sure you are
familiar with your vehicle and itsequipment.
1 23456789
WARNING - Driving under
the influence of alcohol or drugs
Drinking and driving is danger-
ous. Drunk driving is the num-
ber one contributor to the high-
way death toll each year. Even asmall amount of alcohol will
affect your reflexes, perceptions
and judgement.
You are much more likely to
have a serious accident if you
drink and drive.
If you are drinking or taking
drugs, don’t drive. Do not ridewith a driver who has beendrinking or taking drugs.Choose a designated driver orcall a cab. Driving while under the influ-
ence of drugs is as dangerous
or more dangerous than drivingdrunk.
Page 223 of 315
63
In case of an emergency
OVERHEATING
If your temperature gauge indicates
overheating, if you experience a loss
of power, or if you hear a loud knock-
ing or pinging noise, the engine has
probably overheated. Should any of
these symptoms occur, use the fol-
lowing procedure:
1. Turn on the hazard warning flash- er, then drive to the nearest safe
location and stop your vehicle; set
the automatic transaxle in P
(Park), or shift the manual
transaxle to N (Neutral) and apply
the parking brake.
2. Make sure the air conditioner is off.
3. If coolant or steam is boiling out of the radiator, stop the engine and
call an Authorized Kia Dealer for
assistance. If coolant is not boiling out, allowthe engine to idle and open the
hood to permit the engine to cool
gradually.
If the temperature does not go
down with the engine idling, stop
the engine and allow sufficient
time for it to cool.
4. The coolant level should then be checked. If the level in the reser-
voir is low, look for leaks at the
radiator hoses and connections,
heater hoses and connections,
radiator, and water pump. If youfind a major leak or another prob-
lem that may have caused the
engine to overheat, do not operatethe engine until it has been cor-
rected. Call an Authorized Kia
Dealer for assistance. If you do not
find a leak or other problem, care-
fully add coolant to the reservoir.
If the engine frequently overheats,
have the cooling system checkedand repaired by an Authorized Kia Dealer.
1 23456789
WARNING - Removing
radiator cap
Do not remove the radiator cap when the engine and radiator
are hot. Scalding hot coolant
and steam may blow out under
pressure. This could cause seri-
ous injury.
Page 250 of 315
1 23456789
75
Maintenance
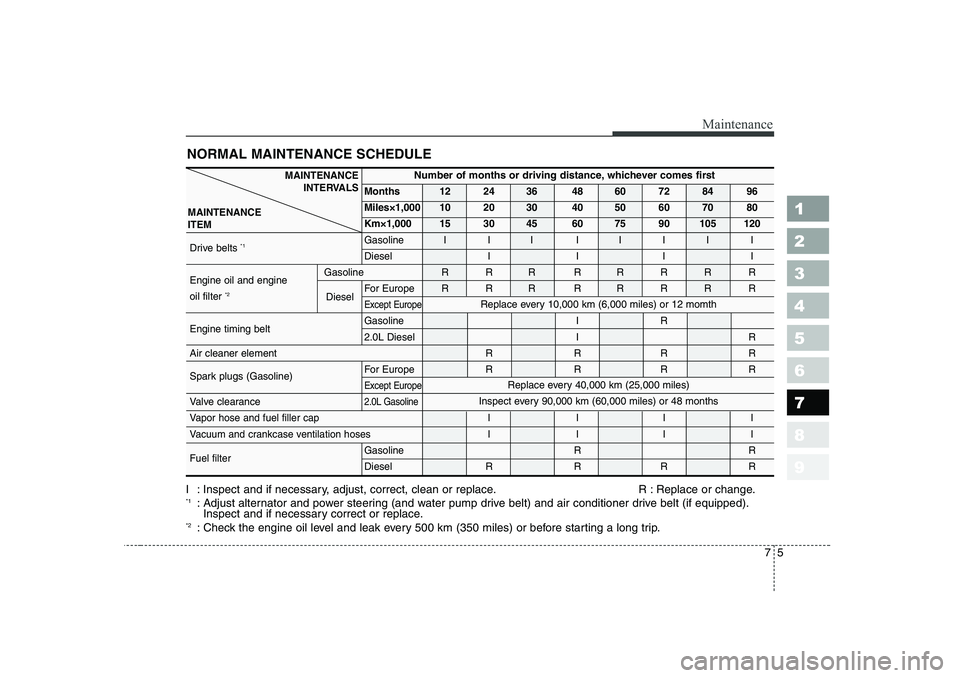
NORMAL MAINTENANCE SCHEDULE
I : Inspect and if necessary, adjust, correct, clean or replace. R : Replace or change. *1: Adjust alternator and power steering (and water pump drive belt) and air conditioner drive belt (if equipped).
Inspect and if necessary correct or replace.
*2 : Check the engine oil level and leak every 500 km (350 miles) or before starting a long trip.
MAINTENANCE
INTERVALS
MAINTENANCE ITEMNumber of months or driving distance, whichever comes first
Months 12 24 36 48 60 72 84 96
Miles×1,000 10 20 30 40 50 60 70 80
Km×1,000 15 30 45 60 75 90 105 120
Drive belts *1 Gasoline I I I I I I I I
Diesel I I I I
Engine oil and engine Gasoline R R R R R R R R
oil filter *2 For Europe R R R R R R R R
Except Europe
Engine timing belt Gasoline
I R
2.0L Diesel I R
Air cleaner element I R I R I R I R
Spark plugs (Gasoline) For Europe R R R R
Except Europe
Valve clearance 2.0L Gasoline
Vapor hose and fuel filler cap
I I I I
Vacuum and crankcase ventilation hoses I I I I Fuel filter
Gasoline RR
Diesel R R R R Replace every 40,000 km (25,000 miles)
Inspect every 90,000 km (60,000 miles) or 48 months
DieselReplace every 10,000 km (6,000 miles) or 12 momth
Page 255 of 315
Maintenance
10
7
1 23456789
OWNER MAINTENANCE
Owner maintenance schedule
The following lists are vehicle checks and inspections that should be per-
formed by the owner or an
Authorized Kia Dealer at the fre-quencies indicated to help ensure
safe, dependable operation of your
vehicle.
Any adverse conditions should be
brought to the attention of your deal-
er as soon as possible.
These Owner Maintenance Checks
are generally not covered by war-
ranties and you may be charged for
labor, parts and lubricants used.
When you stop for fuel:
Check the engine oil level.
Check coolant level in coolant reservoir.
Check the windshield washer fluid level.
Look for low or under-inflated tires.
While operating your vehicle:
Note any changes in the sound of the exhaust or any smell of
exhaust fumes in the vehicle.
Check for vibrations in the steering wheel. Notice any increased steer-
ing effort or looseness in the steer-
ing wheel, or change in its straight-ahead position.
Notice if your vehicle constantly turns slightly or “pulls” to one side
when traveling on smooth, levelroad.
When stopping, listen and check for strange sounds, pulling to one
side, increased brake pedal travel
or “hard-to-push” brake pedal.
If any slipping or changes in the operation of your transaxle occurs,
check the transaxle fluid level.
Check automatic transaxle P (Park) function.
Check parking brake.
Check for fluid leaks under your vehicle (water dripping from the air conditioning system after use is
normal).
WARNING
Be careful when checking your
engine coolant level when the
engine is hot. Scalding hot
coolant and steam may blow out
under pressure. This could
cause serious injury.
Page 261 of 315
Maintenance
16
7
1 23456789
ENGINE OIL AND OIL FILTER
Checking the engine oil level
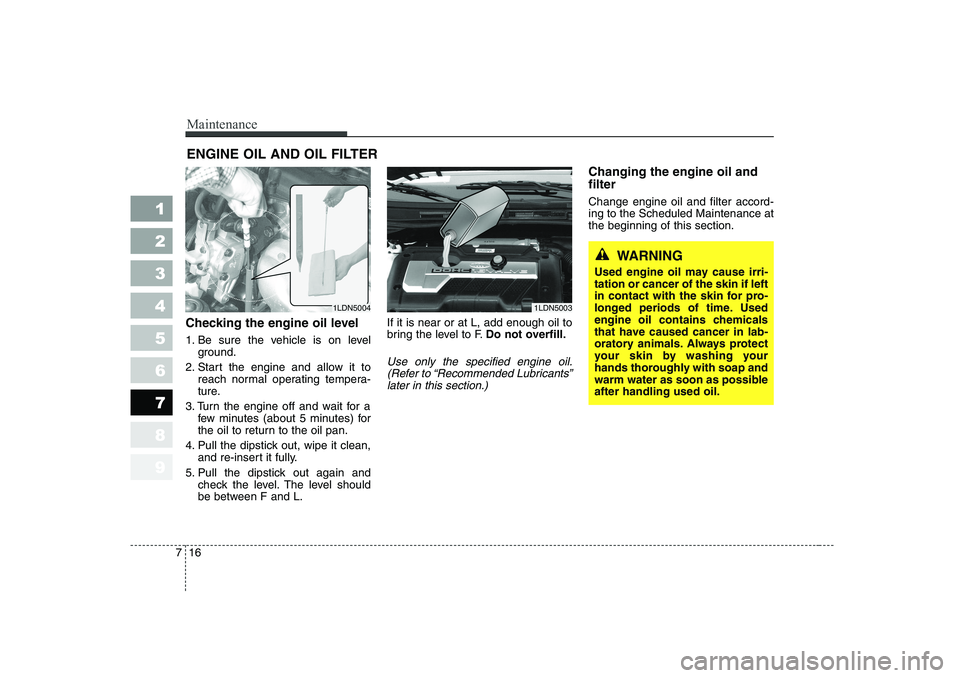
1. Be sure the vehicle is on level ground.
2. Start the engine and allow it to reach normal operating tempera-
ture.
3. Turn the engine off and wait for a few minutes (about 5 minutes) for
the oil to return to the oil pan.
4. Pull the dipstick out, wipe it clean, and re-insert it fully.
5. Pull the dipstick out again and check the level. The level should
be between F and L. If it is near or at L, add enough oil to
bring the level to F.
Do not overfill.
Use only the specified engine oil.
(Refer to “Recommended Lubricants”later in this section.)
Changing the engine oil and filter Change engine oil and filter accord- ing to the Scheduled Maintenance atthe beginning of this section.
1LDN50031LDN5004
WARNING
Used engine oil may cause irri- tation or cancer of the skin if left
in contact with the skin for pro-
longed periods of time. Used
engine oil contains chemicals
that have caused cancer in lab-
oratory animals. Always protect
your skin by washing your
hands thoroughly with soap and
warm water as soon as possibleafter handling used oil.
Page 262 of 315
717
Maintenance
1 23456789
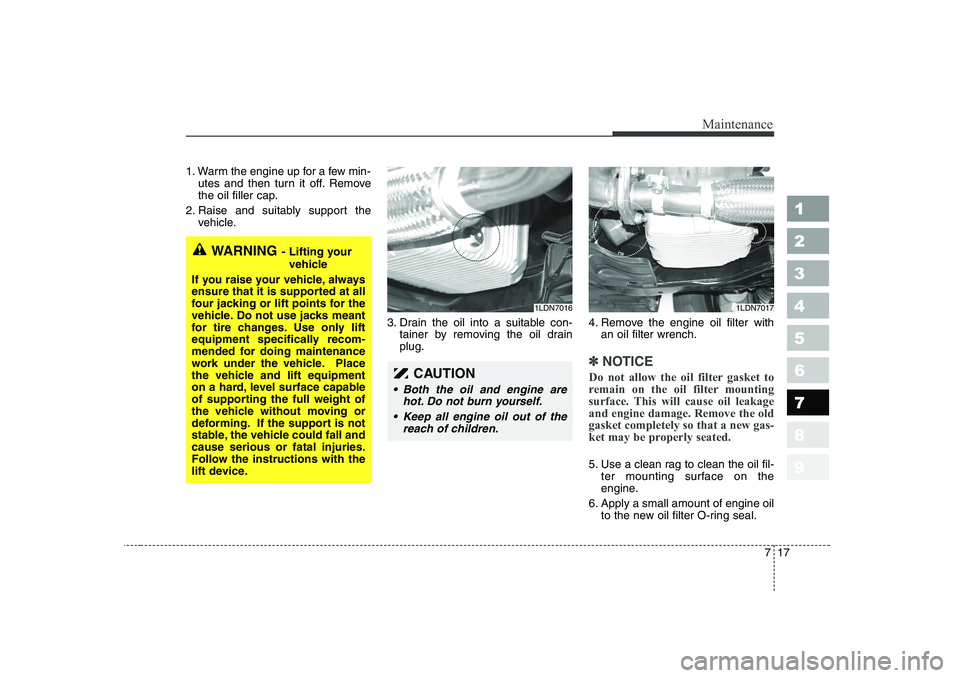
1. Warm the engine up for a few min-utes and then turn it off. Remove
the oil filler cap.
2. Raise and suitably support the vehicle.
3. Drain the oil into a suitable con-tainer by removing the oil drainplug. 4. Remove the engine oil filter with
an oil filter wrench.
✽✽ NOTICE
Do not allow the oil filter gasket to
remain on the oil filter mounting
surface. This will cause oil leakageand engine damage. Remove the oldgasket completely so that a new gas-
ket may be properly seated.
5. Use a clean rag to clean the oil fil- ter mounting surface on the
engine.
6. Apply a small amount of engine oil to the new oil filter O-ring seal.
CAUTION
Both the oil and engine are
hot. Do not burn yourself.
Keep all engine oil out of the reach of children.
1LDN70161LDN7017
WARNING - Lifting your
vehicle
If you raise your vehicle, always
ensure that it is supported at all
four jacking or lift points for the
vehicle. Do not use jacks meant
for tire changes. Use only lift
equipment specifically recom-
mended for doing maintenance
work under the vehicle. Place
the vehicle and lift equipment
on a hard, level surface capable
of supporting the full weight of
the vehicle without moving or
deforming. If the support is not
stable, the vehicle could fall andcause serious or fatal injuries.
Follow the instructions with the
lift device.
Page 263 of 315
Maintenance
18
7
1 23456789
7. Install the oil filter and tighten it.
(Refer to the oil filter caution label
for tightening instructions.)
8. Install a new washer on the drain plug. Don’t use an old washer
repeatedly.
9. Replace the drain plug after the oil has thoroughly drained. Torque theplug to 4.0~4.5 kgm (28.9~32.5lbft, 39.2~44.1 Nm).
10. Refill the engine with new oil to the F mark on the dipstick. Do not
overfill.
11. Reinstall the oil filler cap secure- ly.
12. Start the engine and inspect around the oil filter seal for leaks.
Stop the engine.
13. Check the oil level and fill to the F mark as necessary.Oil capacity
■1.6 L Gasoline Engine
With filter change : 3.3 liters (3.5 US qt.)Without filter change :3.0 liters (3.2 US qt.)
■ 2.0 L Gasoline Engine
With filter change :4.0 liters (4.2 US qt.)Without filter change :3.7 liters (3.9 US qt.)
■ 1.5 L/1.6L Diesel Engine
With filter change :5.3 liters (5.6 US qt.)Without filter change :4.8 liters (5.07 US qt.)
■ 2.0 L Diesel Engine
With filter change :5.9 liters (6.2 US qt.)Without filter change :5.4 liters (5.7 US qt.)
Use only the specified Service
Grade engine oil. (Refer to“Recommended Lubricants” later inthis section.)
✽✽ NOTICE
Page 271 of 315
Maintenance
26
7
1 23456789
STEERING WHEEL
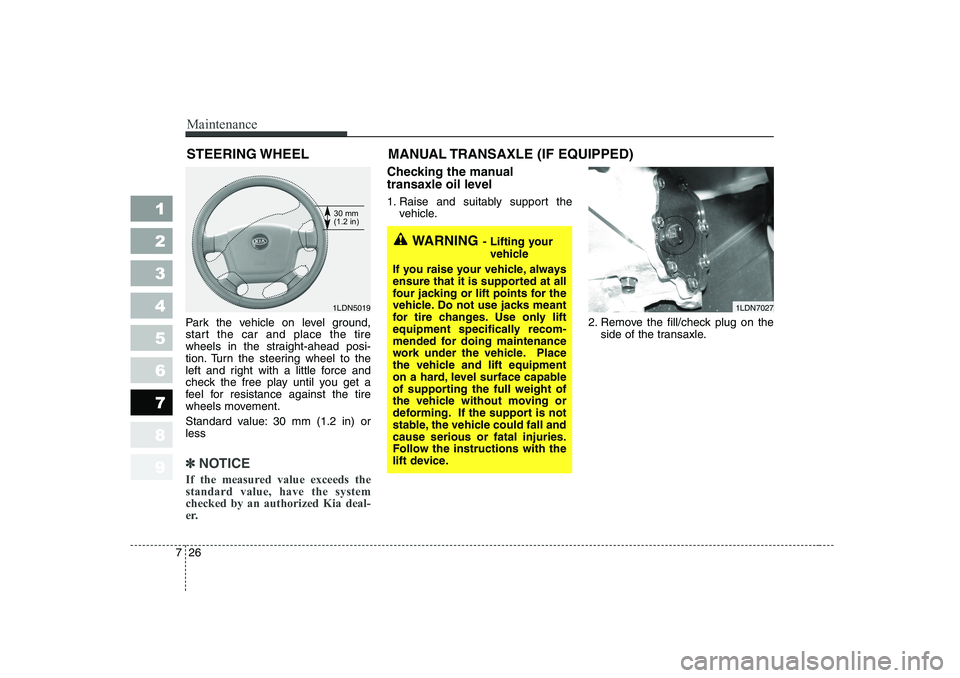
Park the vehicle on level ground,
start the car and place the tire
wheels in the straight-ahead posi-
tion. Turn the steering wheel to the
left and right with a little force and
check the free play until you get a
feel for resistance against the tire
wheels movement.
Standard value: 30 mm (1.2 in) or less
✽✽ NOTICE
If the measured value exceeds the standard value, have the systemchecked by an authorized Kia deal-
er.
Checking the manual
transaxle oil level
1. Raise and suitably support the vehicle.
2. Remove the fill/check plug on theside of the transaxle.
1LDN5019 MANUAL TRANSAXLE (IF EQUIPPED)1LDN7027
30 mm (1.2 in)
WARNING
- Lifting your
vehicle
If you raise your vehicle, always
ensure that it is supported at all
four jacking or lift points for the
vehicle. Do not use jacks meant
for tire changes. Use only lift
equipment specifically recom-
mended for doing maintenance
work under the vehicle. Place
the vehicle and lift equipment
on a hard, level surface capable
of supporting the full weight of
the vehicle without moving or
deforming. If the support is not
stable, the vehicle could fall andcause serious or fatal injuries.
Follow the instructions with the
lift device.
Page 272 of 315
727
Maintenance
1 23456789
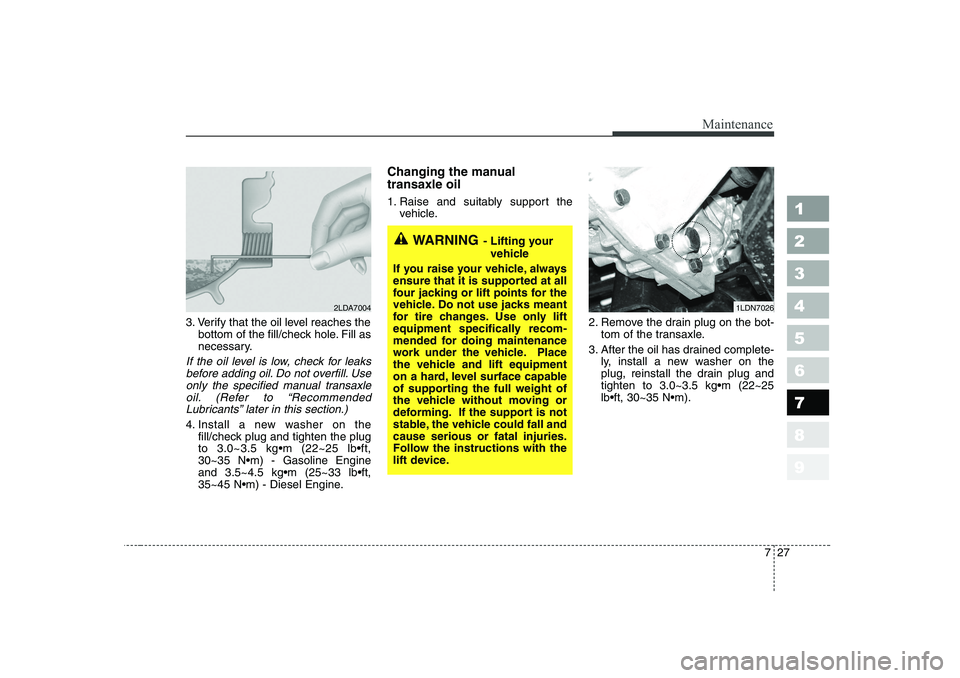
3. Verify that the oil level reaches thebottom of the fill/check hole. Fill as
necessary.
If the oil level is low, check for leaks
before adding oil. Do not overfill. Use only the specified manual transaxleoil. (Refer to “RecommendedLubricants” later in this section.)
4. Install a new washer on the fill/check plug and tighten the plugto 3.0~3.5 kgm (22~25 lbft,30~35 Nm) - Gasoline Engineand 3.5~4.5 kgm (25~33 lbft,
35~45 Nm) - Diesel Engine. Changing the manual transaxle oil
1. Raise and suitably support the
vehicle.
2. Remove the drain plug on the bot-tom of the transaxle.
3. After the oil has drained complete- ly, install a new washer on the
plug, reinstall the drain plug andtighten to 3.0~3.5 kgm (22~25lbft, 30~35 Nm).
2LDA70041LDN7026
WARNING - Lifting your
vehicle
If you raise your vehicle, always
ensure that it is supported at all
four jacking or lift points for the
vehicle. Do not use jacks meant
for tire changes. Use only lift
equipment specifically recom-
mended for doing maintenance
work under the vehicle. Place
the vehicle and lift equipment
on a hard, level surface capable
of supporting the full weight of
the vehicle without moving or
deforming. If the support is not
stable, the vehicle could fall andcause serious or fatal injuries.
Follow the instructions with the
lift device.