headlights KIA CERATO 2007 Owners Manual
[x] Cancel search | Manufacturer: KIA, Model Year: 2007, Model line: CERATO, Model: KIA CERATO 2007Pages: 329, PDF Size: 34.09 MB
Page 8 of 329

Your vehicle at a glance
2
2
1 23456789
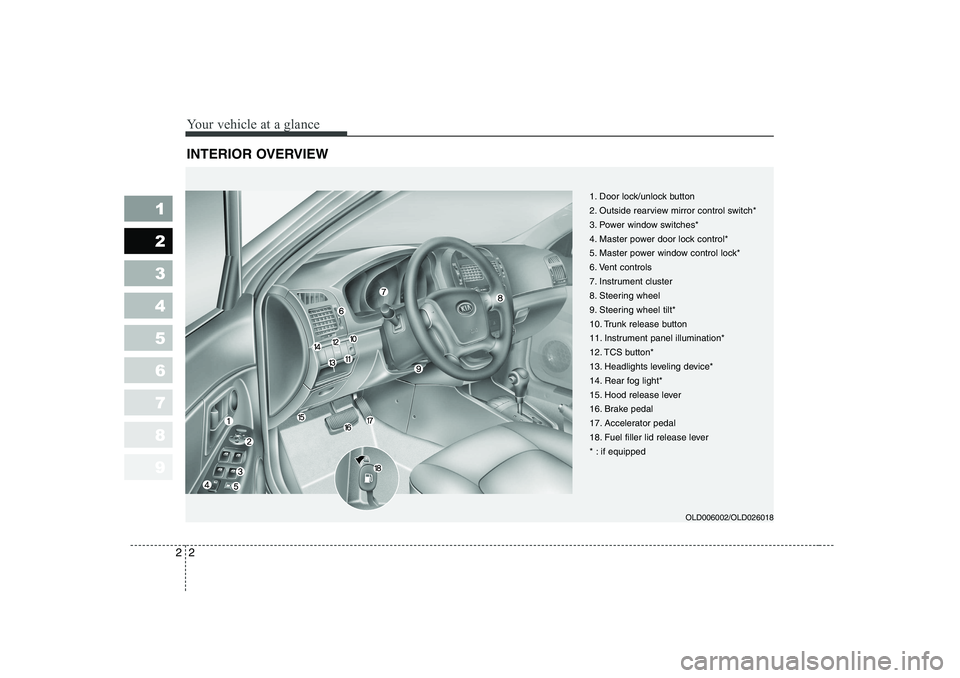
INTERIOR OVERVIEW
1. Door lock/unlock button
2. Outside rearview mirror control switch*
3. Power window switches*
4. Master power door lock control*
5. Master power window control lock*
6. Vent controls
7. Instrument cluster
8. Steering wheel
9. Steering wheel tilt*
10. Trunk release button
11. Instrument panel illumination*
12. TCS button*
13. Headlights leveling device*
14. Rear fog light*
15. Hood release lever
16. Brake pedal
17. Accelerator pedal
18. Fuel filler lid release lever
* : if equipped
OLD006002/OLD026018
Page 95 of 329

385
1 23456789
Knowing your vehicle
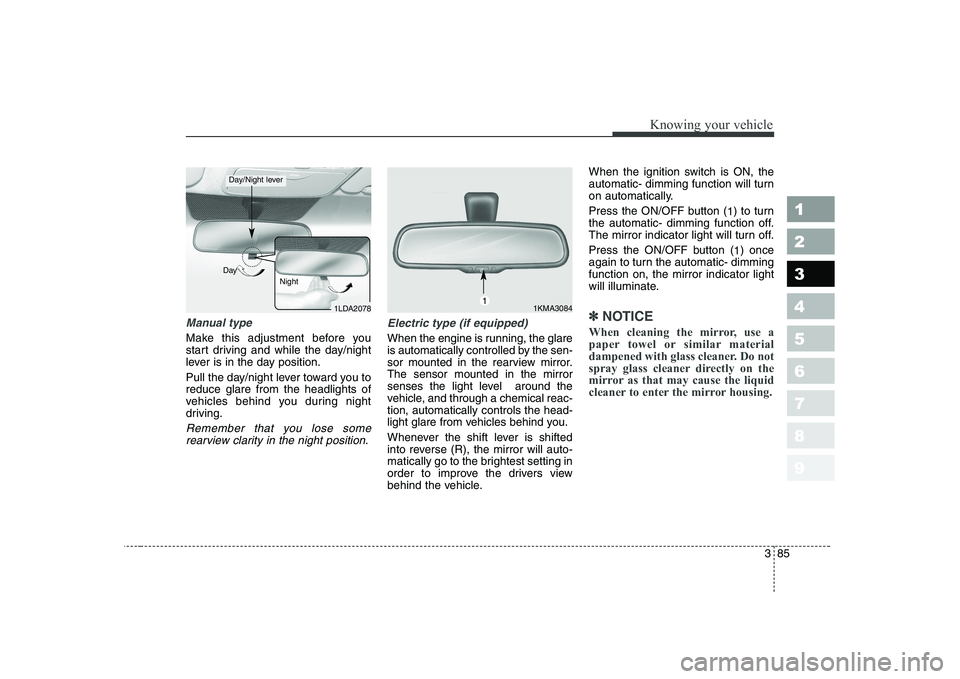
Manual type
Make this adjustment before you
start driving and while the day/night
lever is in the day position.
Pull the day/night lever toward you to reduce glare from the headlights of
vehicles behind you during night
driving.
Remember that you lose somerearview clarity in the night position.
Electric type (if equipped)
When the engine is running, the glare
is automatically controlled by the sen-
sor mounted in the rearview mirror.The sensor mounted in the mirror
senses the light level around the
vehicle, and through a chemical reac-tion, automatically controls the head-
light glare from vehicles behind you.
Whenever the shift lever is shifted
into reverse (R), the mirror will auto-
matically go to the brightest setting in
order to improve the drivers view
behind the vehicle. When the ignition switch is ON, the
automatic- dimming function will turn
on automatically.
Press the ON/OFF button (
1) to turn
the automatic- dimming function off.
The mirror indicator light will turn off.
Press the ON/OFF button ( 1) once
again to turn the automatic- dimming function on, the mirror indicator light
will illuminate.
✽✽ NOTICE
When cleaning the mirror, use a
paper towel or similar material
dampened with glass cleaner. Do not
spray glass cleaner directly on the
mirror as that may cause the liquid
cleaner to enter the mirror housing.1LDA2078
Day
Night
Day/Night lever
1KMA30841
Page 171 of 329

Driving your vehicle
36
4
1 23456789
Average speed
This mode indicates the average
speed from the starting of the vehicle
to the ignition key “OFF”. When the
ignition key is “OFF”, it will initialize to0 km/h (0 mph).
Driving time
This mode indicates the total time
from the starting of the vehicle to the
ignition key “OFF” after resetting.
When the “TRIP” switch is pushed, it
will initialize to 0:00. Reset
Push “TRIP” for more than 1 second
to initialize the displayed information
such as average speed and driving
time. Instrument panel illumination (if equipped)
When the vehicle’s parking lights or headlights are on, rotate the illumina-
tion control knob to adjust the instru-
ment panel illumination intensity.
OLD026204LOLD026097OLD026095
Page 176 of 329

441
1 23456789
Driving your vehicle
Trunk lid open warning (if equipped)
This warning light activates when the
trunk is not closed securely.
Low fuel level warning
This warning light indicates the fuel
tank is nearly empty. The warning
light will come on when the fuel level
has dropped to about 8.5 liters.
Refuel as soon as possible. Door ajar warning
This warning light illuminates when a door is not closed securely with the
ignition in any position.Headlight high beam indicator This indicator illuminates when the headlights are on and in the high
beam position or when the turn sig-
nal lever is pulled into the Flash-to-
Pass position.
Front fog light indica- tor (if equipped) This light comes on when the front
fog lights are ON.
Low washer fluid level warning indicator
This warning light indicates the
washer fluid reservoir is near empty.
Refill the washer fluid as soon as
possible.Malfunction indicator (if equipped)
This indicator light is part of the Engine Control System which moni-
tors various emission control system
components. If this light illuminates
while driving, it indicates that a
potential problem has been detected
somewhere in the emission controlsystem. This light will also illuminate when
the ignition switch is turned to the
ON position, and will go out in a few
seconds after the engine is started. If
it illuminates while driving, or doesnot illuminate when the ignition
switch is turned to the ON position,
take your vehicle to your nearest
authorized KIA dealer and have the
system checked.
Generally, your vehicle will continue
to be drivable and will not need tow-
ing, but have the system checked by
an authorized Kia Dealer as soon as
possible.
Page 182 of 329

447
1 23456789
Driving your vehicle
High - beam operation
To turn on the high beam headlights,
push the lever away from you. Pull it
back for low beams. The high-beam indicator will light when the headlight high beams are
switched on.
To prevent the battery from being
discharged, do not leave the lights
on for a prolonged time while the
engine is not running.Flashing headlights
To flash the headlights, pull the lever
towards you. It will return to the nor-
mal (low-beam) position when
released. The headlight switch doesnot need to be on to use this flashing
feature.
Turn signals (A)
The ignition switch must be on for the
turn signals to function. To turn on
the turn signals, move the lever up or
down. Green arrow indicators on the
instrument panel indicate which turn
signal is operating. They will self-
cancel after a turn is completed. If
the indicator continues to flash after
a turn, manually return the lever tothe OFF position.
OLD0261061LDN2107OLD026105
Page 184 of 329

449
1 23456789
Driving your vehicle
Daytime running light (if equipped)
Daytime Running Lights (DRL) can
make it easier for others to see the
front of your vehicle during the day.
DRL can be helpful in many different
driving conditions, and it is especial-
ly helpful after dawn and before sun-set.
The DRL system will make your low-
beam headlights turn OFF when:
1. The headlight switch is ON.
2. The parklight switch is ON.
3. Engine stops.Headlight leveling device (if equipped)
This manual system is provided to
avoid obstructing oncoming drivers
vision with your headlights. The
headlight level can be adjusted by
rotating the thumb-wheel switch in
accordance with the following set-
tings.Switch setting: 4 Door 5 Door
Position
Loading on
Front seats Rear seats Rear Trunk
0 1 driver - -
2 persons - -
1 2 persons 3 persons -
2 2 persons 3 persons 140 kg
3 1 driver - 410 kg
Loading on
Position Front seats Rear seats Rear luggage
room
0 1 driver - -
2 persons - -
1 2 persons 3 persons -
2 2 persons 3 persons 120 kg
3 1 driver - 380 kg
OLD026203L
Page 225 of 329

Driving tips
8
5
Driving at night
Because night driving presents more
hazards than driving in the daylight,
here are some important tips to
remember:
Slow down and keep more dis-
tance between you and other vehi-
cles, as it may be more difficult tosee at night, especially in areas
where there may not be any street
lights.
Adjust your mirrors to reduce the glare from other driver's head-
lights.
Keep your headlights clean and properly aimed on vehicles notequipped with the automatic head-
light aiming feature. Dirty or
improperly aimed headlights will
make it much more difficult to seeat night.
Avoid staring directly at the head- lights of oncoming vehicles. You
could be temporarily blinded, and it
will take several seconds for your
eyes to readjust to the darkness. Driving in the rain
Rain and wet roads can make driving
dangerous, especially if you’re not
prepared for the slick pavement.
Here are a few things to consider
when driving in the rain:
A heavy rainfall will make it harder
to see and will increase the dis-
tance needed to stop your vehicle,
so slow down.
Keep your windshield wiping equipment in good shape. Replace
your windshield wiper blades when
they show signs of streaking ormissing areas on the windshield.
If your tires are not in good condi- tion, making a quick stop on wet
pavement can cause a skid and
possibly lead to an accident. Be
sure your tires are in good shape.
Turn on your headlights to make it easier for others to see you.
1 23456789
WARNING - Spinning tires
Do not spin the wheels, espe-
cially at speeds more than 56
km/h (35 mph). Spinning thewheels at high speeds when the
vehicle is stationary could
cause a tire to overheat, explode
and injure bystanders.
Page 248 of 329

In case of an emergency
8
6
Fuse replacement
Driver-side knee bolster
1. Turn the ignition switch and allother switches off.
2. Pull the suspected fuse straight out. Use the removal tool provided
on the cover.
3. Check the removed fuse; replace it if it is blown.
Spare fuses are provided in the
fuse panel in engine compart-ment.
4. Push in a new fuse of the same rating, and make sure it fits tightly
in the clips.
If it fits loosely, consult an Authorized
Kia Dealer.
If you do not have a spare, use a fuse of the same rating from a circuityou may not need for operating thevehicle, such as the audio fuse.
If the headlights or other electrical
components do not work and the
fuses are OK, check the fuse block in
the engine compartment. If a fuse is
blown, it must be replaced.
1 23456789
1LDA40031LDN4022
WARNING - Fuse replace-
ment
Never replace a fuse with any- thing but another fuse of the same rating.
A higher capacity fuse could cause damage through over-
heating and possibly a fire.
Never install a wire instead of the proper fuse - even as a
temporary repair. It may cause
extensive wiring damage and
possibly a fire.
Do not use a screwdriver or any other metal object to
remove fuses because it may
cause a short circuit and dam-
age the system.
Page 253 of 329

613
In case of an emergency
1 23456789
Memory fuse
Your vehicle is equipped with a mem-
ory fuse to prevent battery discharge
if your vehicle is parked without
being operated for prolonged peri-
ods. Use the following procedures
before parking the vehicle for pro-
longed period.1. Turn off the engine.
2. Turn off the headlights and tail
lights.
3. Open the driver-side knee bolster cover and pull up the “ROOM 15A”.
✽✽ NOTICE
Page 300 of 329

735
Maintenance
1 23456789
For best battery service :
Keep the battery securely mount-ed.
Keep the battery top clean and dry.
Keep the terminals and connec- tions clean, tight, and coated with
petroleum jelly or terminal grease.
Rinse any spilled electrolyte from the battery immediately with a
solution of water and baking soda.
If the vehicle is not going to be used for an extended time, discon-
nect the battery cables. Battery recharging
Your vehicle has a maintenance-free,
calcium-based battery.
If the battery becomes discharged
in a short time (because, for exam-
ple, the headlights or interior lights
were left on while the vehicle was
not in use), recharge it by slow
charging (trickle) for 10 hours.
If the battery gradually discharges because of high electric load while
the vehicle is being used, recharge
it at 20-30A for two hours.
Items to be reset after the battery
has been discharged or the bat-tery has been disconnected.
Clock (See section 3)
Climate control system (See section 4)
Audio (See section 3)
Sunroof (See section 3)
1LDE5028