seats KIA CERATO 2008 User Guide
[x] Cancel search | Manufacturer: KIA, Model Year: 2008, Model line: CERATO, Model: KIA CERATO 2008Pages: 327, PDF Size: 42.19 MB
Page 59 of 327
349
1 23456789
Knowing your vehicle
4. Buckle the seat belt and allow theseat belt to take up any slack. After
installation of the child restraint
system, try to move it in all direc-
tions to be sure the child restraintsystem is securely installed.
If you need to tighten the belt, pull
more webbing toward the retractor.
When you unbuckle the seat belt and
allow it to retract, the retractor will
automatically revert back to its nor-mal seated passenger emergency
locking usage condition.
MMSA3030
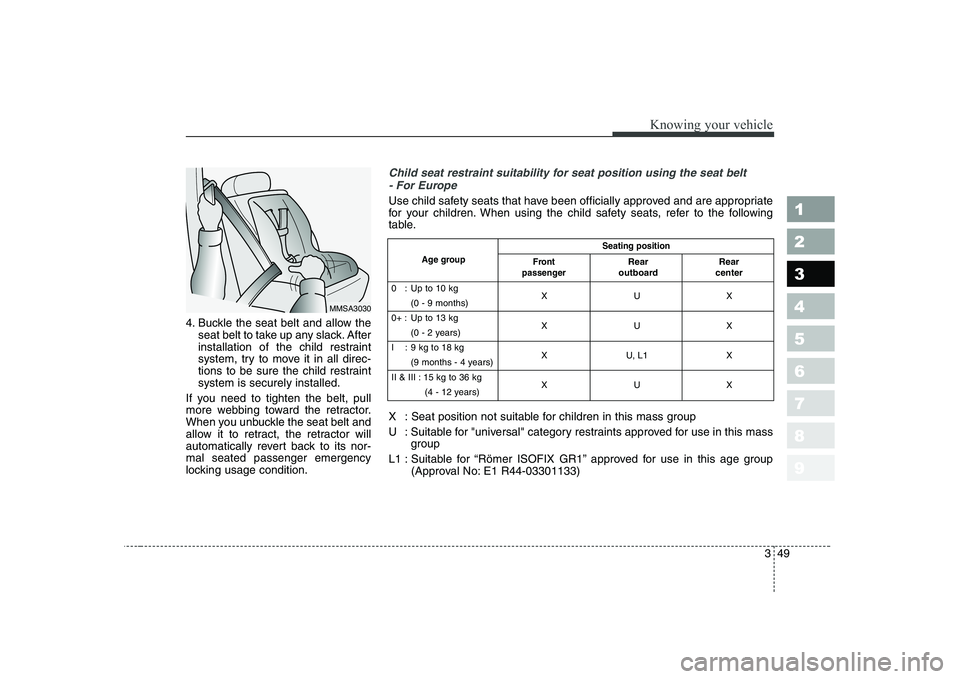
Child seat restraint suitability for seat position using the seat belt - For Europe
Use child safety seats that have been officially approved and are appropriate
for your children. When using the child safety seats, refer to the following
table.
X : Seat position not suitable for children in this mass group
U : Suitable for "universal" category restraints approved for use in this mass group
L1 : Suitable for “Römer ISOFIX GR1” approved for use in this age group (Approval No: E1 R44-03301133)
Seating position
Age group
0 : Up to 10 kg XUX
(0 - 9 months)
0+ : Up to 13 kg XUX
(0 - 2 years)
I : 9 kg to 18 kg X U, L1 X
(9 months - 4 years)
II & III : 15 kg to 36 kg XUX
(4 - 12 years)
Front
passengerRear
outboard Rear
center
Page 60 of 327
Knowing your vehicle
50
3
1 23456789
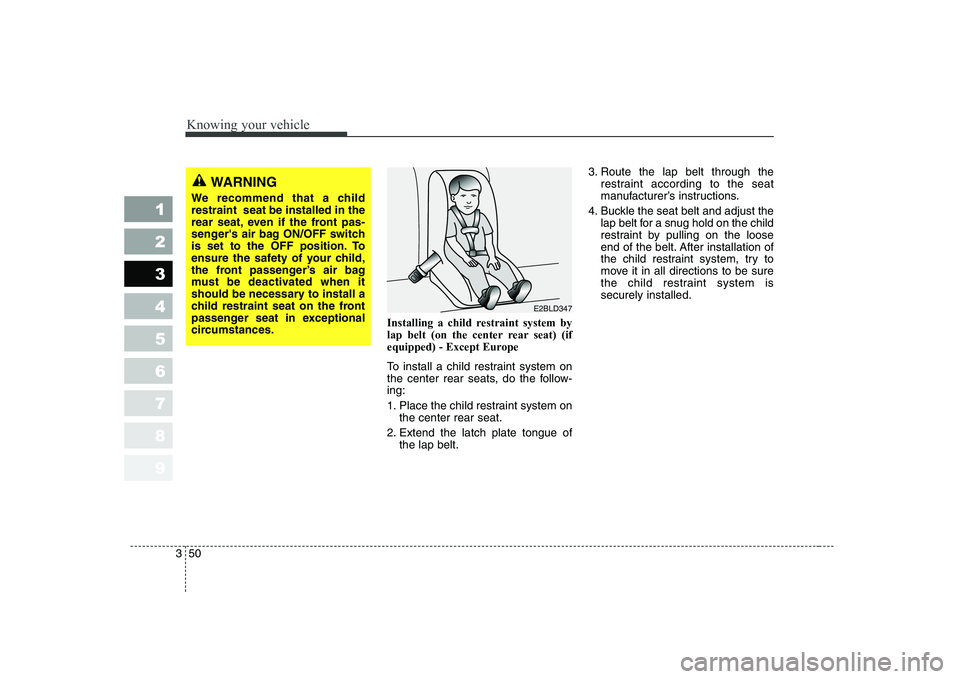
Installing a child restraint system by
lap belt (on the center rear seat) (if
equipped) - Except Europe
To install a child restraint system on
the center rear seats, do the follow-ing:
1. Place the child restraint system on
the center rear seat.
2. Extend the latch plate tongue of the lap belt. 3. Route the lap belt through the
restraint according to the seat
manufacturer’s instructions.
4. Buckle the seat belt and adjust the lap belt for a snug hold on the child
restraint by pulling on the loose
end of the belt. After installation of
the child restraint system, try to
move it in all directions to be sure
the child restraint system issecurely installed.
E2BLD347
WARNING
We recommend that a child restraint seat be installed in the
rear seat, even if the front pas-
senger's air bag ON/OFF switch
is set to the OFF position. To
ensure the safety of your child,
the front passenger’s air bag
must be deactivated when it
should be necessary to install a
child restraint seat on the front
passenger seat in exceptional
circumstances.
Page 61 of 327
351
1 23456789
Knowing your vehicle
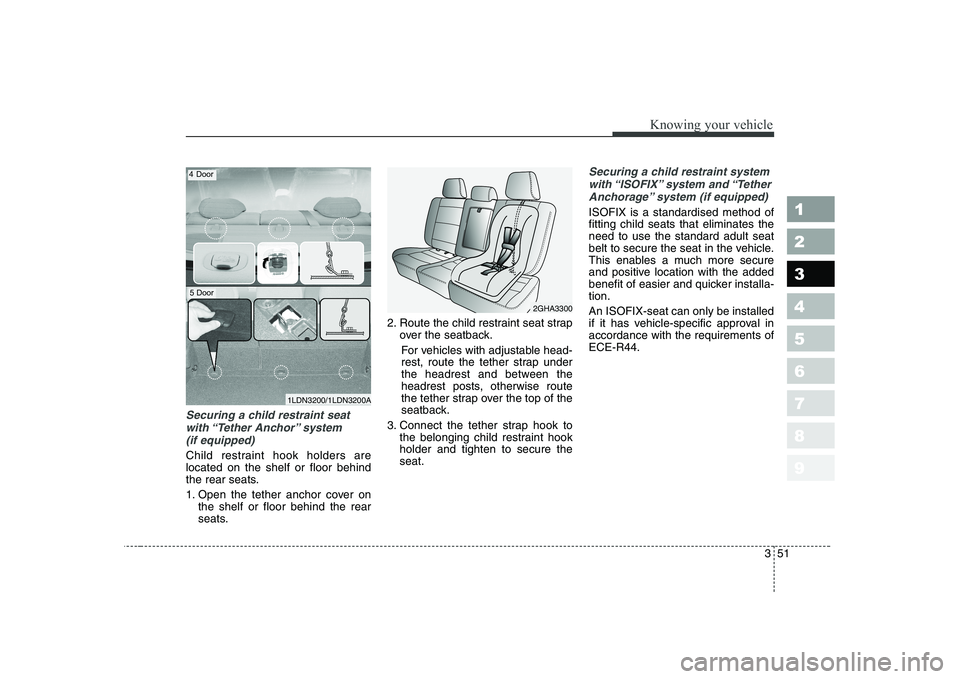
Securing a child restraint seatwith “Tether Anchor” system (if equipped)
Child restraint hook holders are located on the shelf or floor behind
the rear seats.
1. Open the tether anchor cover on the shelf or floor behind the rear
seats. 2. Route the child restraint seat strap
over the seatback.
For vehicles with adjustable head-
rest, route the tether strap under
the headrest and between the
headrest posts, otherwise route
the tether strap over the top of the
seatback.
3. Connect the tether strap hook to the belonging child restraint hookholder and tighten to secure theseat.
Securing a child restraint system
with “ISOFIX” system and “Tether Anchorage” system (if equipped)
ISOFIX is a standardised method of fitting child seats that eliminates theneed to use the standard adult seat
belt to secure the seat in the vehicle.
This enables a much more secure
and positive location with the added
benefit of easier and quicker installa-tion. An ISOFIX-seat can only be installed
if it has vehicle-specific approval inaccordance with the requirements ofECE-R44.
1LDN3200/1LDN3200A
2GHA3300
4 Door
5 Door
Page 62 of 327
Knowing your vehicle
52
3
1 23456789
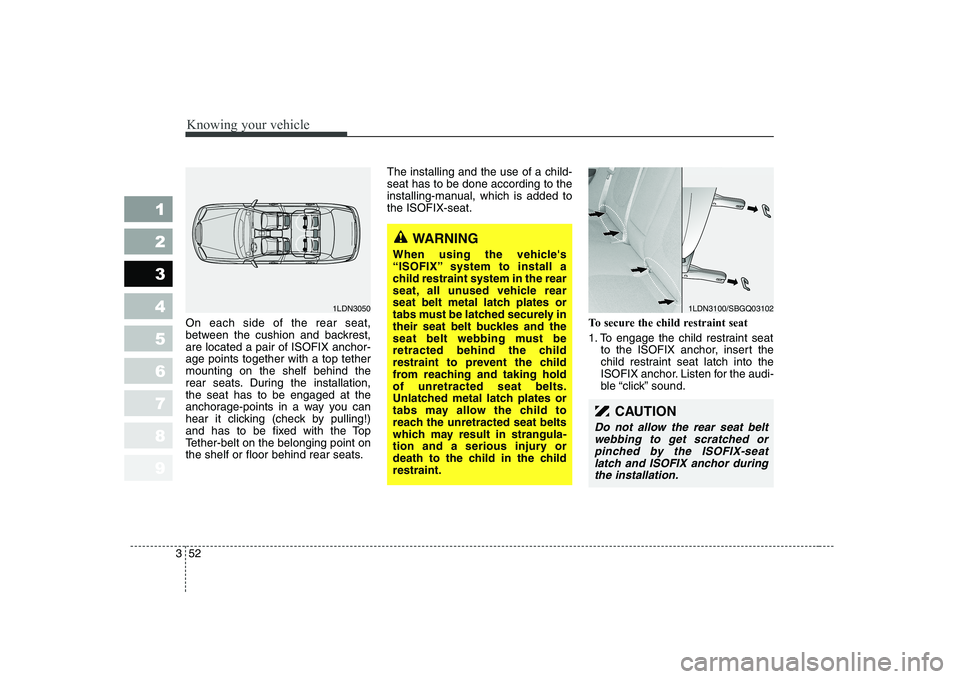
On each side of the rear seat,
between the cushion and backrest,are located a pair of ISOFIX anchor-age points together with a top tethermounting on the shelf behind the
rear seats. During the installation,the seat has to be engaged at the
anchorage-points in a way you can
hear it clicking (check by pulling!)
and has to be fixed with the Top
Tether-belt on the belonging point on
the shelf or floor behind rear seats. The installing and the use of a child-seat has to be done according to the
installing-manual, which is added tothe ISOFIX-seat.
To secure the child restraint seat
1. To engage the child restraint seatto the ISOFIX anchor, insert the
child restraint seat latch into the
ISOFIX anchor. Listen for the audi-
ble “click” sound.
1LDN3100/SBGQ03102
WARNING
When using the vehicle's
“ISOFIX” system to install a
child restraint system in the rear
seat, all unused vehicle rear
seat belt metal latch plates or
tabs must be latched securely in
their seat belt buckles and the
seat belt webbing must be
retracted behind the child
restraint to prevent the child
from reaching and taking holdof unretracted seat belts.
Unlatched metal latch plates or
tabs may allow the child to
reach the unretracted seat belts
which may result in strangula-
tion and a serious injury or
death to the child in the childrestraint.
1LDN3050
CAUTION
Do not allow the rear seat belt webbing to get scratched orpinched by the ISOFIX-seatlatch and ISOFIX anchor during the installation.
Page 72 of 327
Knowing your vehicle
62
3
1 23456789
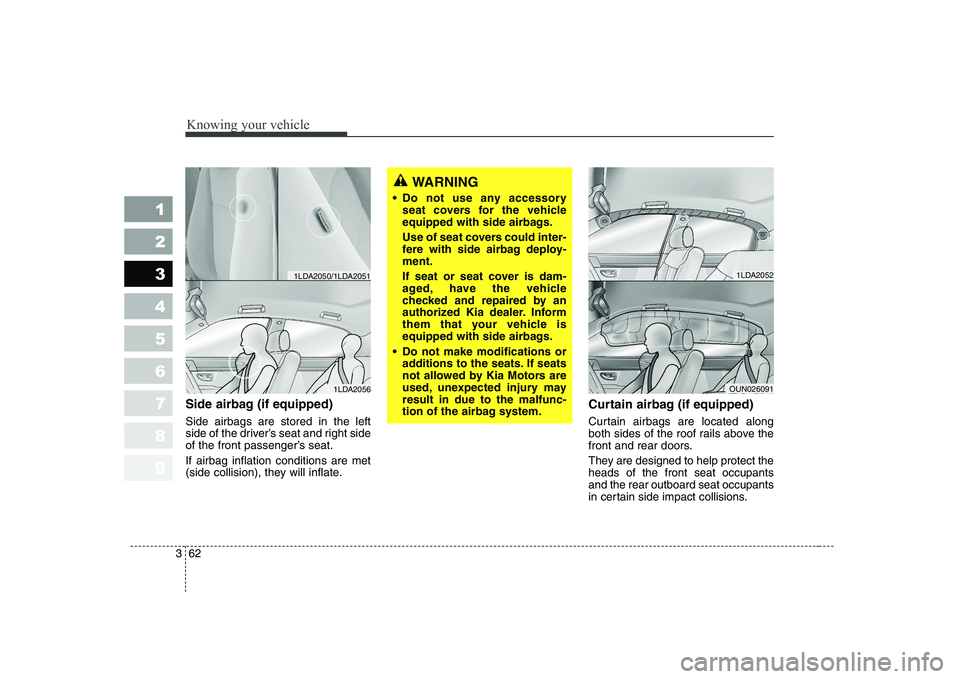
Side airbag (if equipped) Side airbags are stored in the left
side of the driver’s seat and right side
of the front passenger’s seat. If airbag inflation conditions are met
(side collision), they will inflate. Curtain airbag (if equipped)
Curtain airbags are located along
both sides of the roof rails above the
front and rear doors.
They are designed to help protect the heads of the front seat occupantsand the rear outboard seat occupants
in certain side impact collisions.
WARNING
Do not use any accessory seat covers for the vehicle
equipped with side airbags.
Use of seat covers could inter-
fere with side airbag deploy-ment.
If seat or seat cover is dam-
aged, have the vehicle
checked and repaired by an
authorized Kia dealer. Inform
them that your vehicle is
equipped with side airbags.
Do not make modifications or additions to the seats. If seats
not allowed by Kia Motors are
used, unexpected injury mayresult in due to the malfunc-
tion of the airbag system.
1LDA2052
OUN0260911LDA2056
1LDA2050/1LDA2051
Page 73 of 327
363
1 23456789
Knowing your vehicle
The curtain airbag deploymentoccurs only on the side of the vehi-
cle affected by the impact.
The side airbags (side and/or cur- tain airbags) are not designed to
deploy during collisions from the
front or rear of the vehicle or in
most rollover situations.
The curtain airbags are designed to deploy only during certain side-
impact collisions, depending on the
crash severity, angle, speed and
impact. The curtain airbags are not
designed to deploy in all side
impact situations.WARNING
In order for side airbags (side and curtain airbags) to pro-
vide its best protection, both
front seat occupants and both
outboard rear occupantsshould sit in an upright posi-
tion with the seat belts proper-
ly fastened. Especially, chil-
dren should sit in a proper
child restraint system.
When children are seated in the rear outboard seats, they
must be seated in the proper
child restraint system. Make
sure to put the child restraint
system as far away from the
door side as possible, and
secure the child restraint sys-
tem to be locked in position.
(Continued)(Continued)
Do not allow the passengersto lean their heads or bodies
onto doors, put their arms on
the doors, stretch their arms
out of the window, or place
objects between the doors
and passengers when they areseated on the seats where
side airbags are equipped.
Never try to open or repair any components of the side cur-
tain airbag system. This
should be done only by an
authorized Kia dealer.
Failure to follow the above men-tioned instructions can result in
injury or death to the vehicleoccupants in an accident.
Page 81 of 327
371
1 23456789
Knowing your vehicle
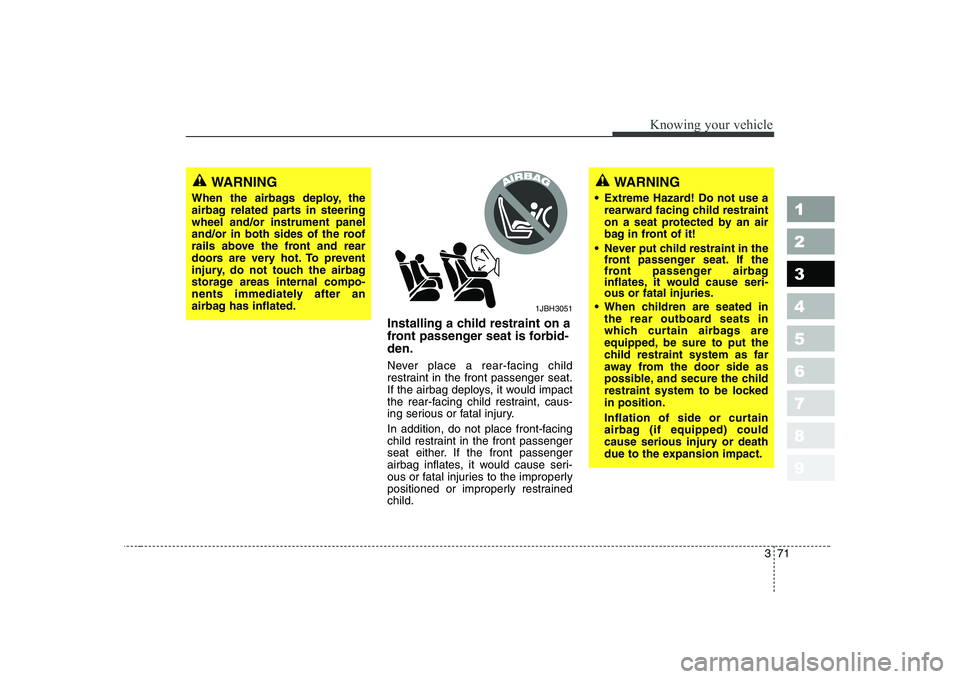
Installing a child restraint on a
front passenger seat is forbid-den.
Never place a rear-facing child
restraint in the front passenger seat.
If the airbag deploys, it would impact
the rear-facing child restraint, caus-
ing serious or fatal injury.
In addition, do not place front-facing
child restraint in the front passenger
seat either. If the front passenger
airbag inflates, it would cause seri-
ous or fatal injuries to the improperly
positioned or improperly restrainedchild.
WARNING
Extreme Hazard! Do not use a rearward facing child restraint
on a seat protected by an air
bag in front of it!
Never put child restraint in the front passenger seat. If the
front passenger airbag
inflates, it would cause seri-ous or fatal injuries.
When children are seated in the rear outboard seats in
which curtain airbags are
equipped, be sure to put the
child restraint system as far
away from the door side as
possible, and secure the child
restraint system to be lockedin position.
Inflation of side or curtain
airbag (if equipped) could
cause serious injury or death
due to the expansion impact.WARNING
When the airbags deploy, the
airbag related parts in steeringwheel and/or instrument panel
and/or in both sides of the roof
rails above the front and rear
doors are very hot. To prevent
injury, do not touch the airbag
storage areas internal compo-
nents immediately after an
airbag has inflated.
1JBH3051
Page 114 of 327
Knowing your vehicle
104
3
1 23456789
Care of cassette tapes (if equipped)
Because the thickness of a cas-
sette tape with the total playback
time of over 60 minutes (C-60) are
too thin, we suggest that you do
not use any of them to avoid hav-ing tapes being tangled.
To achieve better sound quality, periodically clean the tape head
using a cotton stick with colorlessalcohol (once per month).
If a tape is too loose, fasten it to reel by winding with objects like a pencil.
Because dust or foreign objects on a cassette tape may damage the
playback head, always store tapes
in their cases when not in use.
Make sure cassette tapes are kept away from magnetic devices (TV,stereo system, etc) in order to
achieve better sound quality.
Be certain that no objects or sub-stances other than cassette tapes are
inserted into the cassette tape player.
Because tape media can be dis- torted when exposed to direct sun-
light, Do not leave cassette tapes
on the seats, dashboard or near
the back windshield. Care of disc (if equipped)
If the temperature inside the car is too
high, open the car windows for venti-
lation before using your car audio.
It is illegal to copy and use MP3/WMA/AAC/WAVE files without
permission(If equipped with M465,use only MP3/WMA, If equipped
with M445, use only CD-DA). Use
CDs that are created only by lawful
means.
Do not apply volatile agents such as benzene and thinner, normal
cleaners and magnetic sprays
made for analogue disc onto CDs.
To prevent the disc surface from getting damaged. Hold and carry
CDs by the edges or the edges of
the center hole only.
Clean the disc surface with a piece of soft cloth before playback (wipe it
from the center to the outside edge.).
Do not damage the disc surface or attach pieces of sticky tape orpaper onto it.
Make sure on undesirable matter other than CDs are inserted into
the CD player (Do not insert morethan one CD at a time). Keep CDs in their cases after use
to protect them from scratches or
dirt.
Depending on the type of CD- R/CD-RW CDs, certain CDs may
not operate normally according to
manufacturing companies or mak-
ing and recording methods. In such
circumstances, if you still continue
to use those CDs, they may cause
the malfunction of your car audiosystem.
✽✽ NOTICE - Playing an
Incompatible Copy-Protected
Audio CD
Some copy-protected CDs, which do not comply with the internationalaudio CD standards(Red Book),
may not play on your car audio.Please note that if you try to play
copyprotected CDs and the CD
player of your car audio is not per-
forming to your expectation, thismay be caused by those CDs and nota defect in the device itself. Please
replace those CDs.
Page 184 of 327
449
1 23456789
Driving your vehicle
Daytime running light (if equipped)
Daytime Running Lights (DRL) can
make it easier for others to see the
front of your vehicle during the day.
DRL can be helpful in many different
driving conditions, and it is especial-
ly helpful after dawn and before sun-set.
The DRL system will make your low-
beam headlights turn OFF when:
1. The headlight switch is ON.
2. The parklight switch is ON.
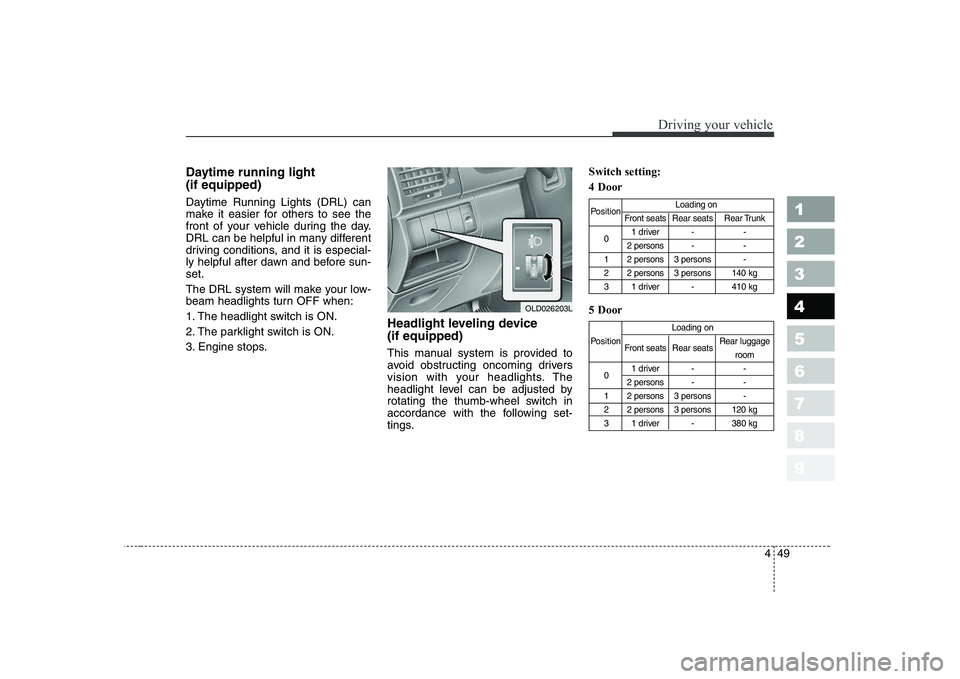
3. Engine stops.Headlight leveling device (if equipped)
This manual system is provided to
avoid obstructing oncoming drivers
vision with your headlights. The
headlight level can be adjusted by
rotating the thumb-wheel switch in
accordance with the following set-
tings.Switch setting: 4 Door 5 Door
Position
Loading on
Front seats Rear seats Rear Trunk
0 1 driver - -
2 persons - -
1 2 persons 3 persons -
2 2 persons 3 persons 140 kg
3 1 driver - 410 kg
Loading on
Position Front seats Rear seats Rear luggage
room
0 1 driver - -
2 persons - -
1 2 persons 3 persons -
2 2 persons 3 persons 120 kg
3 1 driver - 380 kg
OLD026203L