KIA CERATO 2008 Owners Manual
Manufacturer: KIA, Model Year: 2008, Model line: CERATO, Model: KIA CERATO 2008Pages: 327, PDF Size: 42.19 MB
Page 261 of 327
In case of an emergency
24
6
1 23456789
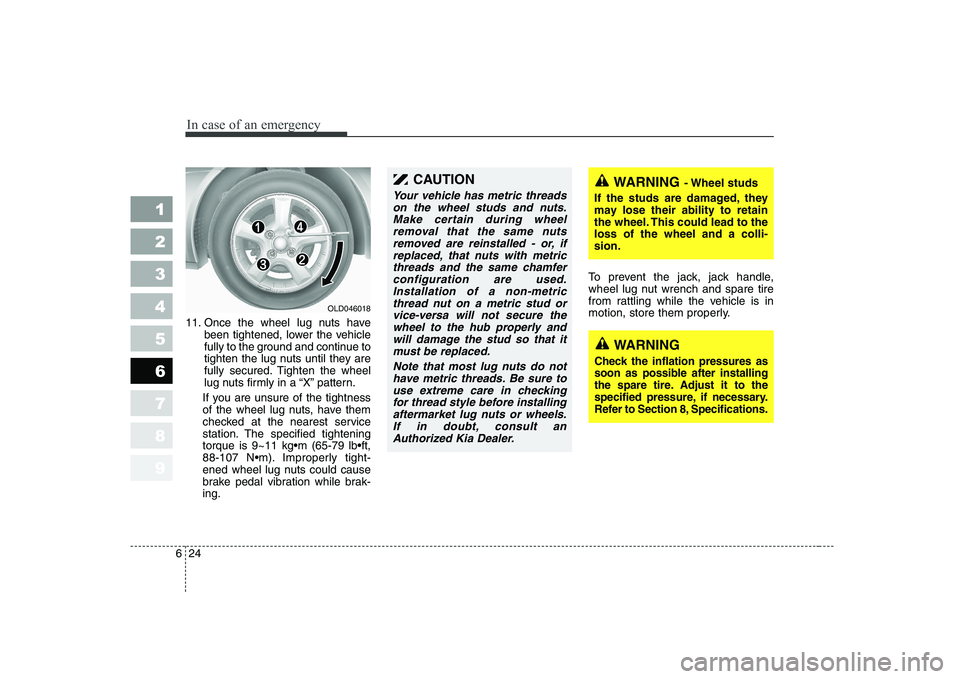
11. Once the wheel lug nuts have
been tightened, lower the vehicle
fully to the ground and continue to
tighten the lug nuts until they are
fully secured. Tighten the wheel
lug nuts firmly in a “X” pattern.
If you are unsure of the tightness
of the wheel lug nuts, have them
checked at the nearest service
station. The specified tightening
Improperly tight-
ened wheel lug nuts could cause
brake pedal vibration while brak-ing. To prevent the jack, jack handle,
wheel lug nut wrench and spare tire
from rattling while the vehicle is in
motion, store them properly.
OLD046018
CAUTION
Your vehicle has metric threads
on the wheel studs and nuts.Make certain during wheelremoval that the same nuts removed are reinstalled - or, ifreplaced, that nuts with metricthreads and the same chamfer configuration are used.Installation of a non-metricthread nut on a metric stud or vice-versa will not secure thewheel to the hub properly andwill damage the stud so that it must be replaced.
Note that most lug nuts do nothave metric threads. Be sure touse extreme care in checkingfor thread style before installing aftermarket lug nuts or wheels.If in doubt, consult anAuthorized Kia Dealer.
WARNING - Wheel studs
If the studs are damaged, they
may lose their ability to retain
the wheel. This could lead to theloss of the wheel and a colli-sion.
WARNING
Check the inflation pressures as
soon as possible after installing
the spare tire. Adjust it to the
specified pressure, if necessary.
Refer to Section 8, Specifications.
Page 262 of 327
625
In case of an emergency
1 23456789
EMERGENCY COMMODITY (IF EQUIPPED)
There are some emergency com-
modities in the vehicle to help yourespond to the emergency situation. Fire extinguisher
The fire extinguisher is located in the
trunk.
If there is small fire and you know
how to use the fire extinguisher, take
the following steps carefully.
1. Pull the pin at the top of the extin-
guisher that keeps the handle from being accidentally pressed.
2. Aim the nozzle toward the base of the fire.
3. Stand approximately 2.5 m (8 ft) away from the fire and squeeze
the handle to discharge the extin-
guisher. If you release the handle,
the discharge will stop.
4. Sweep the nozzle back and forth at the base of the fire. After the fire
appears to be out, watch it careful-
ly since it may re-ignite. First aid kit There are some items such as scis-
sors, bandage and adhesive tape
and etc. in the kit to give first aid toan injured person.
Triangle reflector
Place the triangle reflector on the
road to warn oncoming vehicles dur-
ing emergencies, such as when the
vehicle is parked by the roadside due
to any problems.
Page 263 of 327
In case of an emergency
26
6
1 23456789
Tire pressure gauge (If equipped)
Tires normally lose some air in day-
to-day use, and you may have to add
a few pounds of air periodically and it
is not usually a sign of a leaking tire,
but of normal wear. Always check tirepressure when the tires are coldbecause tire pressure increases with
temperature. To check the tire pressure, take the
following steps;
1. Unscrew the inflation valve cap
that is located on the rim of the
tire.
2. Press and hold the gauge against the tire valve. Some air will escape
as you begin and more will escape
if you don't press the gauge in
firmly.
3. A firm non-leaking push will acti- vate the gauge.
4. Read the tire pressure on the gauge to know whether the tire
pressure is low or high.
5. Adjust the tire pressures to the specified pressure. Refer to“Recommended Inflation Pressure”on the page 8-2.
6. Reinstall the inflation valve cap.
Page 264 of 327
1 234567891 23456789
10
Maintenance services / 7-3 Normal maintenance schedule / 7-5
Maintenance under severe usage conditions / 7-9
Owner maintenance / 7-11Engine compartment / 7-14
Engine oil and oil filter / 7-17Engine cooling system / 7-18Brakes and clutch / 7-21Parking brake / 7-22
Power steering / 7-23Manual transaxle / 7-23Automatic transaxle / 7-24Lubricants and fluids / 7-26
Fuel filter / 7-27
Air cleaner / 7-28
Climate control air filter / 7-30
Wiper blades / 7-32Battery / 7-34
Tires and wheels / 7-36
Maintenance
Page 265 of 327
1 23456789Bulb replacement / 7-44Exterior care / 7-51Interior care / 7-55
Maintenance
1 23456789
Page 266 of 327
73
Maintenance
MAINTENANCE SERVICES
You should exercise the utmost care
to prevent damage to your vehicle
and injury to yourself whenever per-
forming any maintenance or inspec-
tion procedures.
Should you have any doubts con-
cerning the inspection or servicing of
your vehicle, we strongly recom-
mend that you have an Authorized
Kia Dealer perform this work.
An Authorized Kia Dealer has facto-
ry-trained technicians and genuine
Kia parts to service your vehicle
properly. For expert advice and qual-
ity service, see an Authorized Kia
Dealer.
Inadequate, incomplete or insuffi-
cient servicing may result in opera-
tional problems with your vehicle that
could lead to vehicle damage, an
accident, or personal injury. Owner’s responsibility
✽✽
NOTICE
Maintenance Service and Record
Retention are the owner's responsi-
bility.
You should retain documents that
show proper maintenance has been
performed on your vehicle in accor-dance with the scheduled mainte-
nance service charts shown on the
following pages. You need this infor-
mation to establish your compliance
with the servicing and maintenance
requirements of your Kia warranties.
Detailed warranty information is pro-
vided in your Warranty & Maintenancebook. Repairs and adjustments required asa result of improper maintenance or
a lack of required maintenance are
not covered.
We recommend you have your vehi-
cle maintained and repaired by an
authorized Kia dealer.
An authorized Kia dealer meets Kia’s
high service quality standards and
receives technical support from Kia
in order to provide you with a high
level of service satisfaction.
1 23456789
Page 267 of 327
Maintenance
4
7
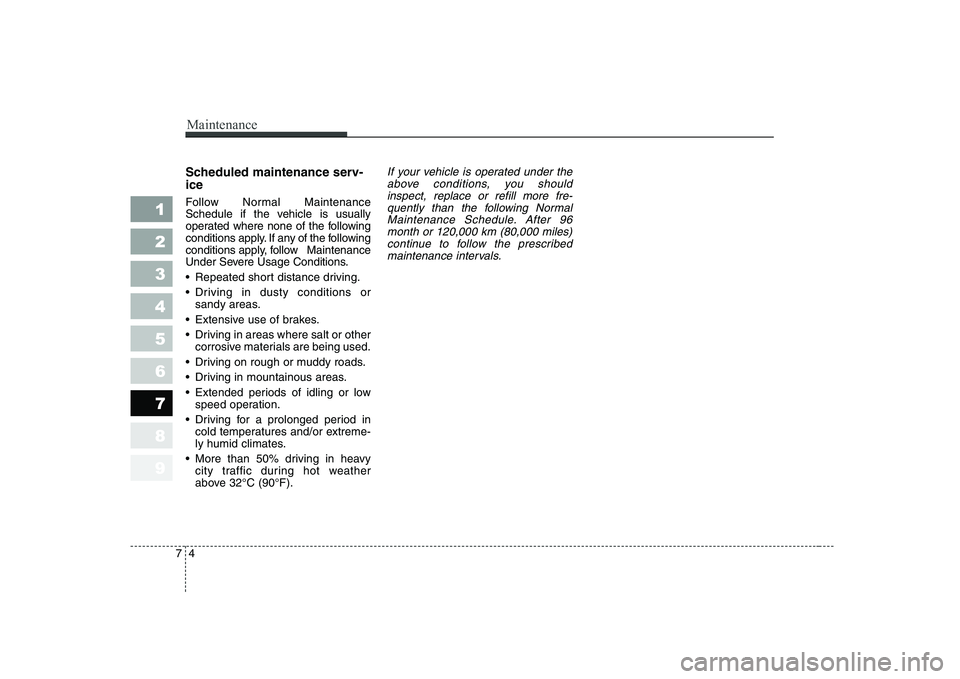
Scheduled maintenance serv- ice
Follow Normal Maintenance
Schedule if the vehicle is usually
operated where none of the following
conditions apply. If any of the following
conditions apply, follow Maintenance
Under Severe Usage Conditions.
Repeated short distance driving.
Driving in dusty conditions or
sandy areas.
Extensive use of brakes.
Driving in areas where salt or other corrosive materials are being used.
Driving on rough or muddy roads.
Driving in mountainous areas.
Extended periods of idling or low speed operation.
Driving for a prolonged period in cold temperatures and/or extreme-
ly humid climates.
More than 50% driving in heavy city traffic during hot weather
above 32°C (90°F).If your vehicle is operated under the
above conditions, you shouldinspect, replace or refill more fre-quently than the following Normal
Maintenance Schedule. After 96month or 120,000 km (80,000 miles)continue to follow the prescribed maintenance intervals.
1 23456789
Page 268 of 327
1 23456789
75
Maintenance
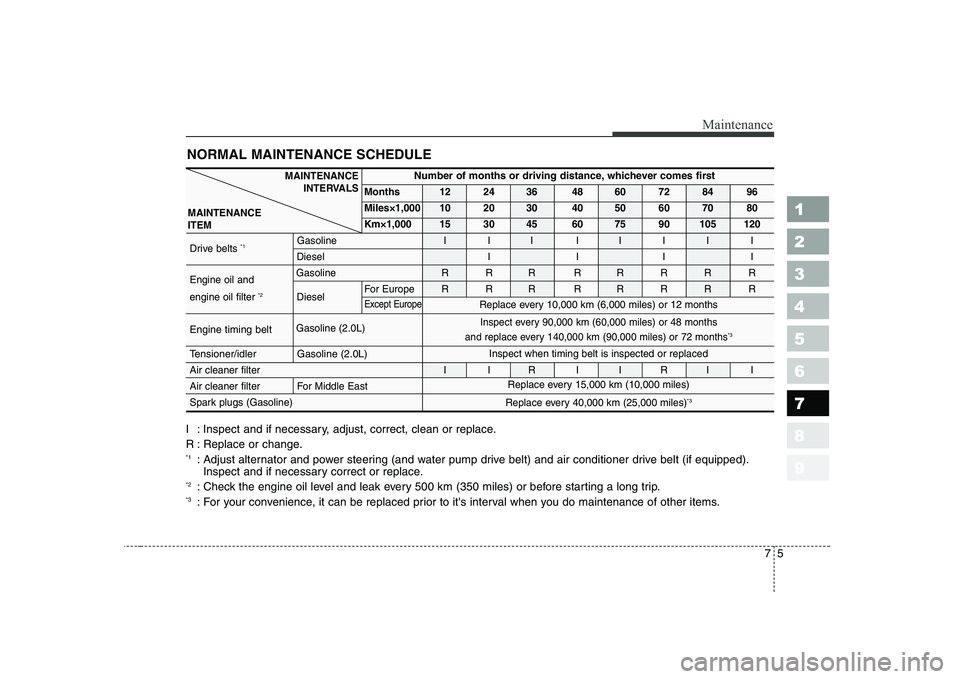
NORMAL MAINTENANCE SCHEDULE
I : Inspect and if necessary, adjust, correct, clean or replace.
R : Replace or change. *1: Adjust alternator and power steering (and water pump drive belt) and air conditioner drive belt (if equipped).
Inspect and if necessary correct or replace.
*2 : Check the engine oil level and leak every 500 km (350 miles) or before starting a long trip.
*3 : For your convenience, it can be replaced prior to it's interval when you do maintenance of other items.
MAINTENANCE
INTERVALS
MAINTENANCE ITEMNumber of months or driving distance, whichever comes first
Months 12 24 36 48 60 72 84 96
Miles×1,000 10 20 30 40 50 60 70 80
Km×1,000 15 30 45 60 75 90 105 120
Drive belts *1 Gasoline I I I I I I I I
Diesel I I I I
Engine oil and Gasoline R R R R R R R R
engine oil filter *2
Diesel For Europe R R R R R R R R
Except Europe
Gasoline (2.0L)Engine timing belt
Tensioner/idler Gasoline (2.0L)
Air cleaner filter
I I R I I R I I
Air cleaner filter For Middle East
Spark plugs (Gasoline)
Replace every 10,000 km (6,000 miles) or 12 months
Inspect every 90,000 km (60,000 miles) or 48 months
and replace every 140,000 km (90,000 miles) or 72 months*3
Replace every 40,000 km (25,000 miles) *3
Replace every 15,000 km (10,000 miles)
Inspect when timing belt is inspected or replaced
Page 269 of 327
1 23456789
Maintenance
6
7
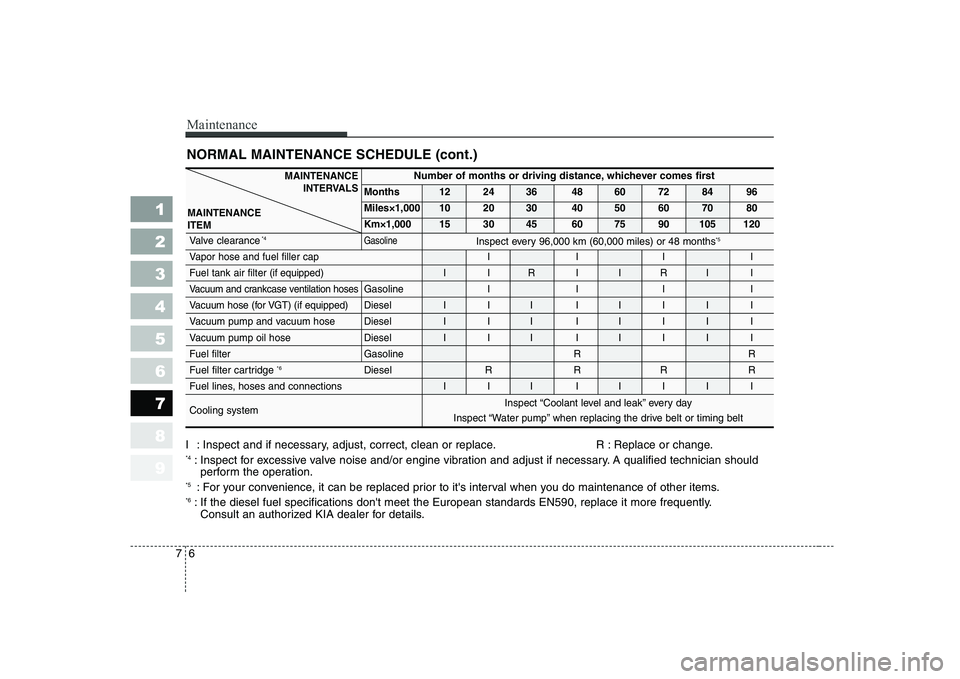
NORMAL MAINTENANCE SCHEDULE (cont.)
MAINTENANCE
INTERVALS
MAINTENANCE ITEMNumber of months or driving distance, whichever comes first
Months 12 24 36 48 60 72 84 96
Miles×1,000 10 20 30 40 50 60 70 80
Km×1,000 15 30 45 60 75 90 105 120
Valve clearance *4
Gasoline
Vapor hose and fuel filler cap
I I I I
Fuel tank air filter (if equipped) I I R I I R I I
Vacuum and crankcase ventilation hosesGasolineIIII
Vacuum hose (for VGT) (if equipped) Diesel
III IIIII
Vacuum pump and vacuum hose DieselIII IIIII
Vacuum pump oil hose DieselIII IIIII
Fuel filterGasoline RR
Fuel filter cartridge *6
Diesel R R R R
Fuel lines, hoses and connections I I I I I I I I Cooling system
Inspect every 96,000 km (60,000 miles) or 48 months *5
Inspect “Coolant level and leak” every day
Inspect “Water pump” when replacing the drive belt or timing belt
I : Inspect and if necessary, adjust, correct, clean or replace. R : Replace or change. *4 : Inspect for excessive valve noise and/or engine vibration and adjust if necessary. A qualified technician should
perform the operation.
*5 : For your convenience, it can be replaced prior to it's interval when you do maintenance of other items.
*6 : If the diesel fuel specifications don't meet the European standards EN590, replace it more frequently.
Consult an authorized KIA dealer for details.
Page 270 of 327
1 23456789
77
Maintenance
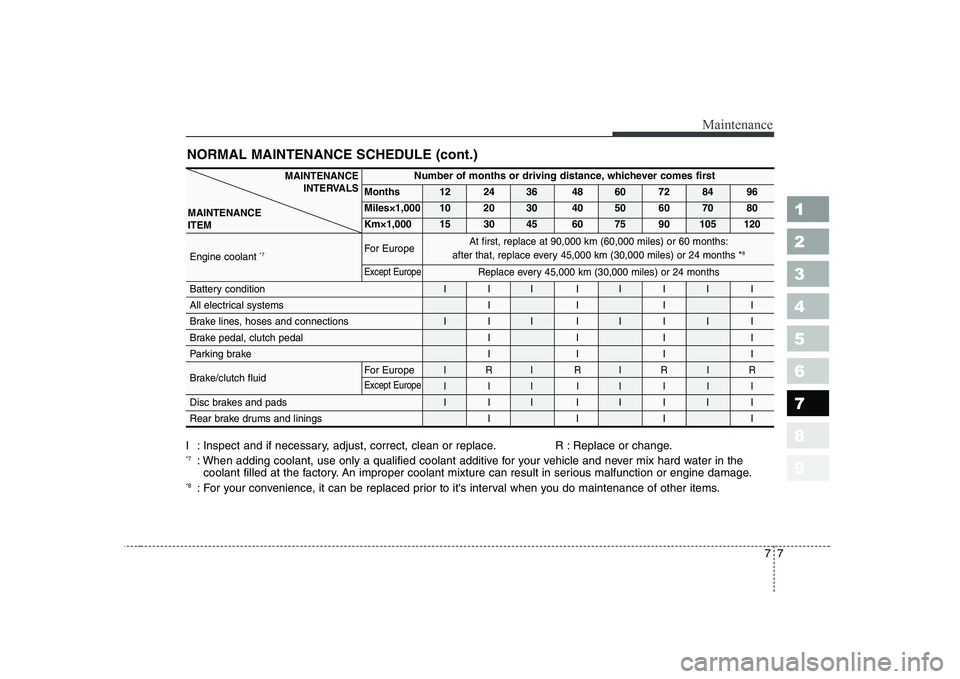
NORMAL MAINTENANCE SCHEDULE (cont.)
I : Inspect and if necessary, adjust, correct, clean or replace. R : Replace or change. *7: When adding coolant, use only a qualified coolant additive for your vehicle and never mix hard water in the
coolant filled at the factory. An improper coolant mixture can result in serious malfunction or engine damage.
*8 : For your convenience, it can be replaced prior to it's interval when you do maintenance of other items.
MAINTENANCE
INTERVALS
MAINTENANCE ITEMNumber of months or driving distance, whichever comes first
Months 12 24 36 48 60 72 84 96
Miles×1,000 10 20 30 40 50 60 70 80
Km×1,000 15 30 45 60 75 90 105 120
For Europe
Engine coolant *7
Except Europe
Battery condition
I I I I I I I I
All electrical systems I I I I
Brake lines, hoses and connections I I I I I I I I
Brake pedal, clutch pedal I I I I
Parking brake I I I I
Brake/clutch fluid For Europe
IRI RIRIR
Except EuropeIII IIIII
Disc brakes and pads I I I I I I I I
Rear brake drums and linings
I I I I
At first, replace at 90,000 km (60,000 miles) or 60 months:
after that, replace every 45,000 km (30,000 miles) or 24 months *8
Replace every 45,000 km (30,000 miles) or 24 months