automatic KIA Cerato 2010 1.G User Guide
[x] Cancel search | Manufacturer: KIA, Model Year: 2010, Model line: Cerato, Model: KIA Cerato 2010 1.GPages: 321, PDF Size: 6.3 MB
Page 73 of 321
Features of your vehicle84REMOTE KEYLESS ENTRY (IF EQUIPPED)Remote keyless entry system
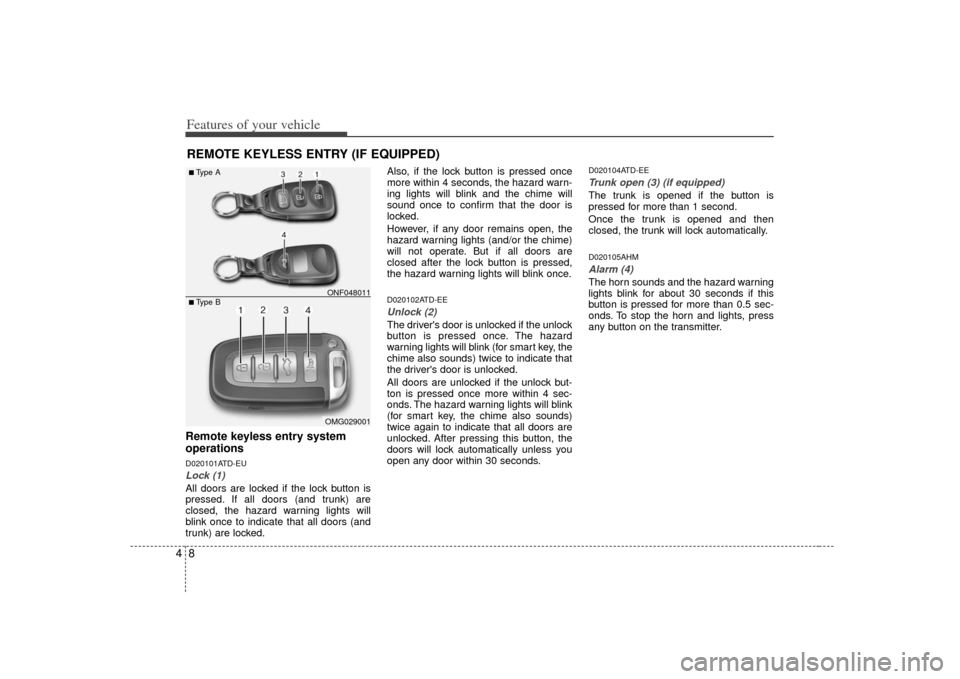
operationsD020101ATD-EULock (1)All doors are locked if the lock button is
pressed. If all doors (and trunk) are
closed, the hazard warning lights will
blink once to indicate that all doors (and
trunk) are locked.Also, if the lock button is pressed once
more within 4 seconds, the hazard warn-
ing lights will blink and the chime will
sound once to confirm that the door is
locked.
However, if any door remains open, the
hazard warning lights (and/or the chime)
will not operate. But if all doors are
closed after the lock button is pressed,
the hazard warning lights will blink once.
D020102ATD-EEUnlock (2) The driver's door is unlocked if the unlock
button is pressed once. The hazard
warning lights will blink (for smart key, the
chime also sounds) twice to indicate that
the driver's door is unlocked.
All doors are unlocked if the unlock but-
ton is pressed once more within 4 sec-
onds. The hazard warning lights will blink
(for smart key, the chime also sounds)
twice again to indicate that all doors are
unlocked. After pressing this button, the
doors will lock automatically unless you
open any door within 30 seconds.
D020104ATD-EETrunk open (3) (if equipped)The trunk is opened if the button is
pressed for more than 1 second.
Once the trunk is opened and then
closed, the trunk will lock automatically.D020105AHMAlarm (4)The horn sounds and the hazard warning
lights blink for about 30 seconds if this
button is pressed for more than 0.5 sec-
onds. To stop the horn and lights, press
any button on the transmitter.
OMG029001
■Type B■Type A
ONF048011
Page 77 of 321
Features of your vehicle12
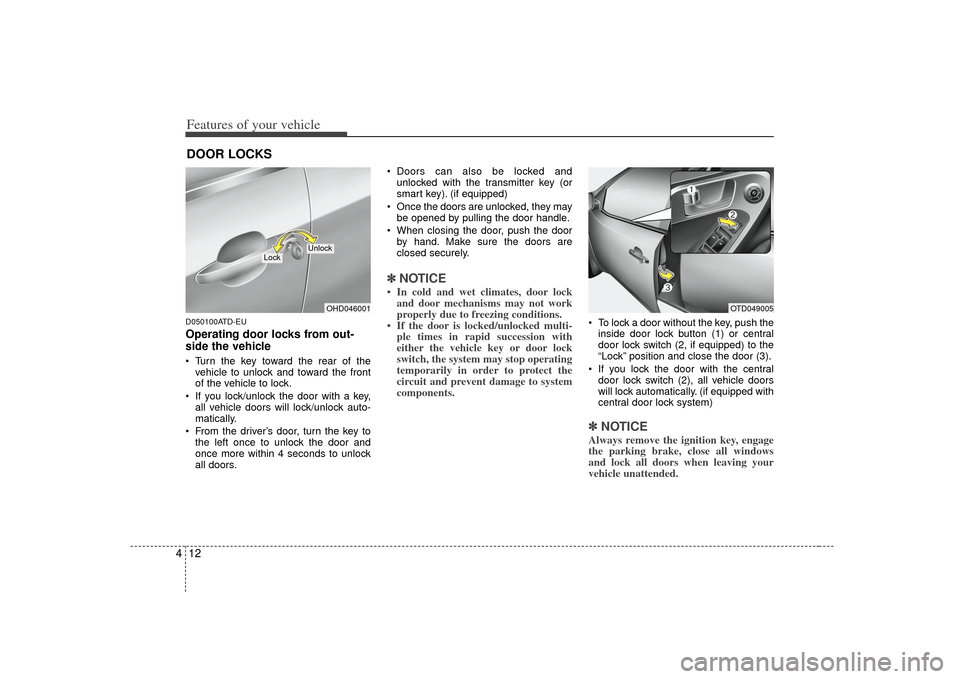
4D050100ATD-EUOperating door locks from out-
side the vehicle Turn the key toward the rear of the
vehicle to unlock and toward the front
of the vehicle to lock.
If you lock/unlock the door with a key, all vehicle doors will lock/unlock auto-
matically.
From the driver’s door, turn the key to the left once to unlock the door and
once more within 4 seconds to unlock
all doors. Doors can also be locked and
unlocked with the transmitter key (or
smart key). (if equipped)
Once the doors are unlocked, they may be opened by pulling the door handle.
When closing the door, push the door by hand. Make sure the doors are
closed securely.
✽ ✽ NOTICE• In cold and wet climates, door lock
and door mechanisms may not work
properly due to freezing conditions.
• If the door is locked/unlocked multi- ple times in rapid succession with
either the vehicle key or door lock
switch, the system may stop operating
temporarily in order to protect the
circuit and prevent damage to system
components.
To lock a door without the key, push the
inside door lock button (1) or central
door lock switch (2, if equipped )to the
“Lock” position and close the door (3).
If you lock the door with the central door lock switch (2), all vehicle doors
will lock automatically. (if equipped with
central door lock system)✽ ✽ NOTICEAlways remove the ignition key, engage
the parking brake, close all windows
and lock all doors when leaving your
vehicle unattended.
DOOR LOCKS
OHD046001
Lock
Unlock
OTD049005
Page 79 of 321
Features of your vehicle14
4 Press the switch to the "Lock" position
(1), all vehicle doors will lock.
Press the switch to the "Unlock" posi- tion (2), all vehicle doors will unlock.
If the key is in the ignition switch (or if the smart key is in the vehicle) and any
front door is opened, the doors will not
lock when the “Lock” position (1) of the
central door lock switch is pressed. (if
equipped)
D050300AHMImpact sensing door unlock sys-
tem (if equipped)All doors will automatically unlock when
an impact causes the air bags to deploy.D050400ATD-EUAuto door lock/unlock feature
(if equipped) All doors will automatically lock whenthe transaxle shift lever is shifted out of
P (Park).
All doors will automatically unlock when the transaxle shift lever is shifted
into P (Park).
WARNING
- Unlocked
vehicles
Leaving your vehicle unlocked can
invite theft or possible harm to you
or others from someone hiding in
your vehicle while you are gone.
Always remove the ignition key,
engage the parking brake, close all
windows and lock all doors when
leaving your vehicle unattended.
WARNING
- Unattendedchildren
An enclosed vehicle can become
extremely hot, causing death or
severe injury to unattended chil-
dren or animals who cannot escape
the vehicle. Furthermore, children
might operate features of the vehi-
cle that could injure them, or they
could encounter other harm, possi-
bly from someone gaining entry to
the vehicle. Never leave children or
animals unattended in your vehicle.
WARNING -
Doors
The doors should always be fully
closed and locked while the vehi-
cle is in motion to prevent acci-
dental opening of the door.
Locked doors will also discour-
age potential intruders when the
vehicle stops or slows.
Be careful when opening doors and watch for vehicles, motorcy-
cles, bicycles or pedestrians
approaching the vehicle in the
path of the door. Opening a door
when something is approaching
can cause damage or injury.
Page 81 of 321
Features of your vehicle16
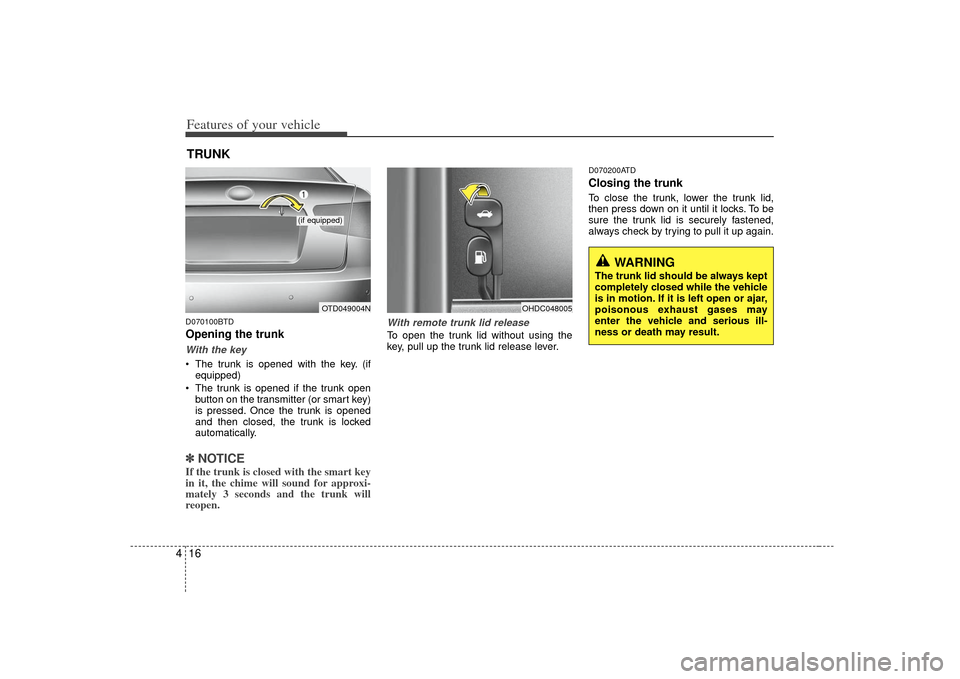
4D070100BTDOpening the trunkWith the key The trunk is opened with the key. (if
equipped)
The trunk is opened if the trunk open button on the transmitter (or smart key)
is pressed. Once the trunk is opened
and then closed, the trunk is locked
automatically.✽ ✽ NOTICEIf the trunk is closed with the smart key
in it, the chime will sound for approxi-
mately 3 seconds and the trunk will
reopen.
With remote trunk lid releaseTo open the trunk lid without using the
key, pull up the trunk lid release lever.
D070200ATDClosing the trunkTo close the trunk, lower the trunk lid,
then press down on it until it locks. To be
sure the trunk lid is securely fastened,
always check by trying to pull it up again.
TRUNK
OTD049004N
(if equipped)
OHDC048005
WARNING
The trunk lid should be always kept
completely closed while the vehicle
is in motion. If it is left open or ajar,
poisonous exhaust gases may
enter the vehicle and serious ill-
ness or death may result.
Page 83 of 321
Features of your vehicle18
4
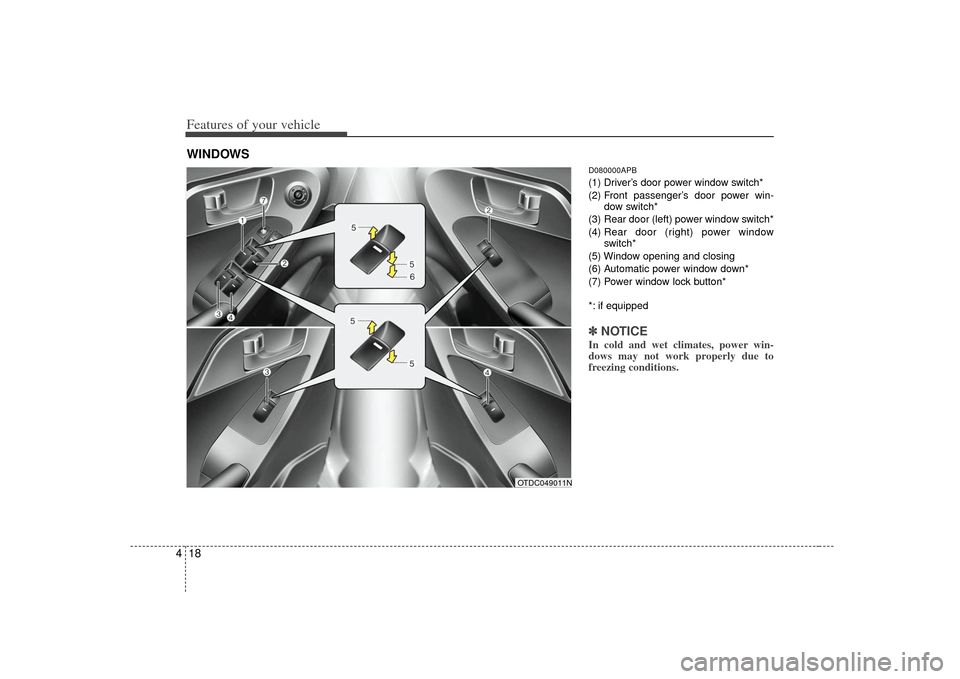
D080000APB(1) Driver’s door power window switch*
(2) Front passenger’s door power win-
dow switch*
(3) Rear door (left) power window switch*
(4) Rear door (right) power window
switch*
(5) Window opening and closing
(6) Automatic power window down*
(7) Power window lock button*
*: if equipped✽ ✽ NOTICEIn cold and wet climates, power win-
dows may not work properly due to
freezing conditions.
WINDOWS
OTDC049011N
Page 88 of 321
423
Features of your vehicle
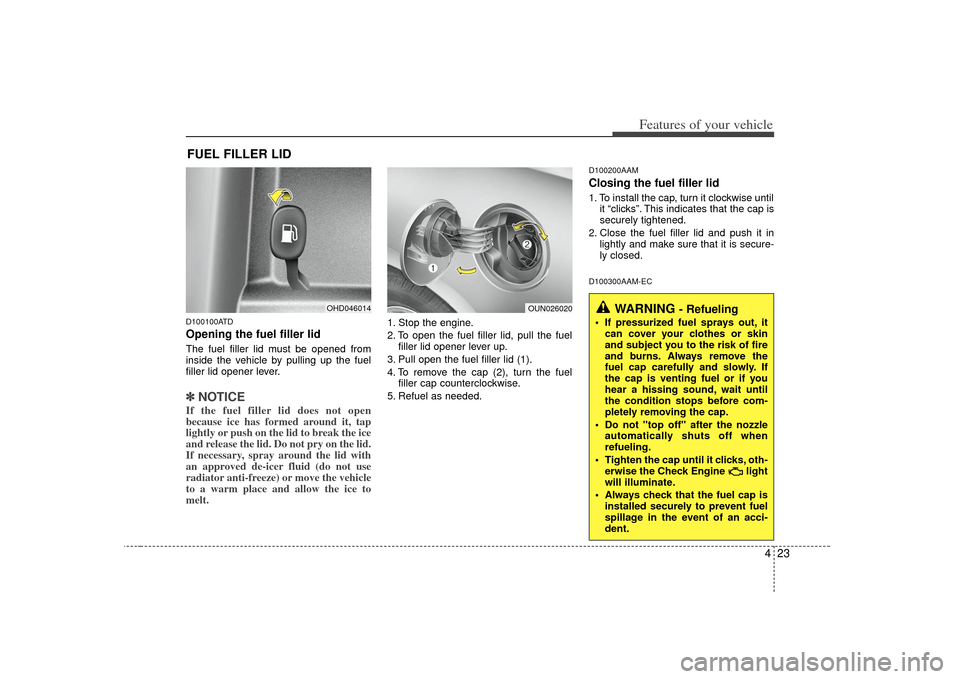
D100100ATDOpening the fuel filler lidThe fuel filler lid must be opened from
inside the vehicle by pulling up the fuel
filler lid opener lever.✽ ✽NOTICEIf the fuel filler lid does not open
because ice has formed around it, tap
lightly or push on the lid to break the ice
and release the lid. Do not pry on the lid.
If necessary, spray around the lid with
an approved de-icer fluid (do not use
radiator anti-freeze) or move the vehicle
to a warm place and allow the ice to
melt.
1. Stop the engine.
2. To open the fuel filler lid, pull the fuel
filler lid opener lever up.
3. Pull open the fuel filler lid (1).
4. To remove the cap (2), turn the fuel filler cap counterclockwise.
5. Refuel as needed.
D100200AAMClosing the fuel filler lid1. To install the cap, turn it clockwise until it “clicks”. This indicates that the cap is
securely tightened.
2. Close the fuel filler lid and push it in lightly and make sure that it is secure-
ly closed.D100300AAM-EC
FUEL FILLER LID
OHD046014
OUN026020
WARNING
- Refueling
If pressurized fuel sprays out, itcan cover your clothes or skin
and subject you to the risk of fire
and burns. Always remove the
fuel cap carefully and slowly. If
the cap is venting fuel or if you
hear a hissing sound, wait until
the condition stops before com-
pletely removing the cap.
Do not "top off" after the nozzle automatically shuts off when
refueling.
Tighten the cap until it clicks, oth- erwise the Check Engine light
will illuminate.
Always check that the fuel cap is installed securely to prevent fuel
spillage in the event of an acci-
dent.
Page 92 of 321
427
Features of your vehicle
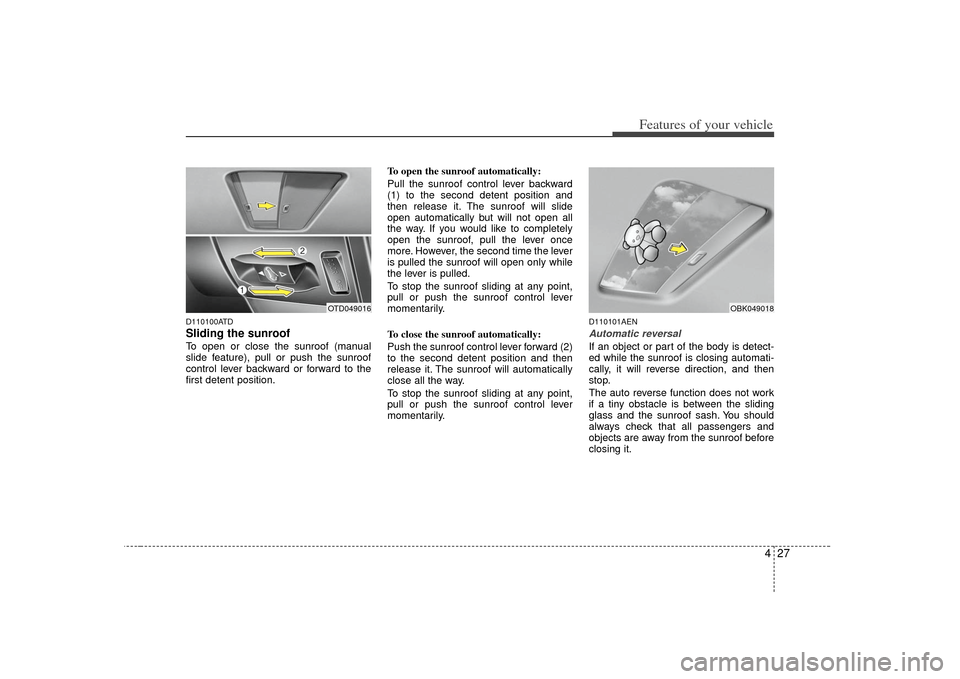
D110100ATDSliding the sunroof To open or close the sunroof (manual
slide feature), pull or push the sunroof
control lever backward or forward to the
first detent position.To open the sunroof automatically:
Pull the sunroof control lever backward
(1) to the second detent position and
then release it. The sunroof will slide
open automatically but will not open all
the way. If you would like to completely
open the sunroof, pull the lever once
more. However, the second time the lever
is pulled the sunroof will open only while
the lever is pulled.
To stop the sunroof sliding at any point,
pull or push the sunroof control lever
momentarily.
To close the sunroof automatically:
Push the sunroof control lever forward (2)
to the second detent position and then
release it. The sunroof will automatically
close all the way.
To stop the sunroof sliding at any point,
pull or push the sunroof control lever
momentarily.
D110101AENAutomatic reversalIf an object or part of the body is detect-
ed while the sunroof is closing automati-
cally, it will reverse direction, and then
stop.
The auto reverse function does not work
if a tiny obstacle is between the sliding
glass and the sunroof sash. You should
always check that all passengers and
objects are away from the sunroof before
closing it.
OBK049018
OTD049016
Page 93 of 321
Features of your vehicle28
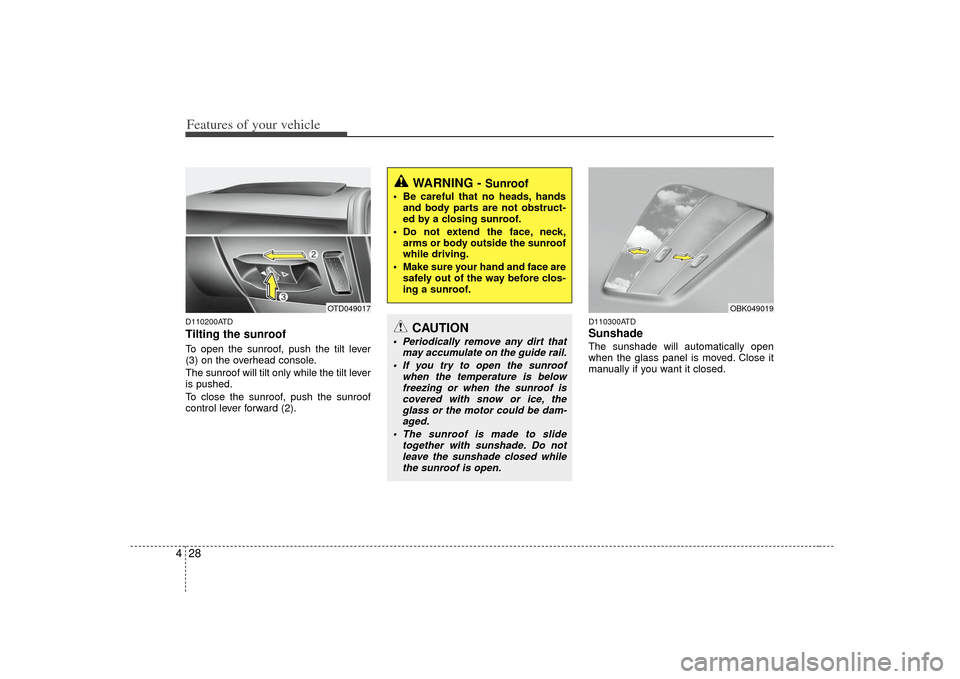
4D110200ATDTilting the sunroof To open the sunroof, push the tilt lever
(3) on the overhead console.
The sunroof will tilt only while the tilt lever
is pushed.
To close the sunroof, push the sunroof
control lever forward (2).
D110300ATDSunshade The sunshade will automatically open
when the glass panel is moved. Close it
manually if you want it closed.
OBK049019
WARNING -
Sunroof
Be careful that no heads, hands
and body parts are not obstruct-
ed by a closing sunroof.
Do not extend the face, neck, arms or body outside the sunroof
while driving.
Make sure your hand and face are safely out of the way before clos-
ing a sunroof.
CAUTION
Periodically remove any dirt that may accumulate on the guide rail.
If you try to open the sunroof when the temperature is belowfreezing or when the sunroof iscovered with snow or ice, theglass or the motor could be dam-aged.
The sunroof is made to slide together with sunshade. Do notleave the sunshade closed whilethe sunroof is open.
OTD049017
Page 98 of 321
433
Features of your vehicle
D140100ATDInside rearview mirrorAdjust the rearview mirror so that the
center view through the rear window is
seen. Make this adjustment before you
start driving.
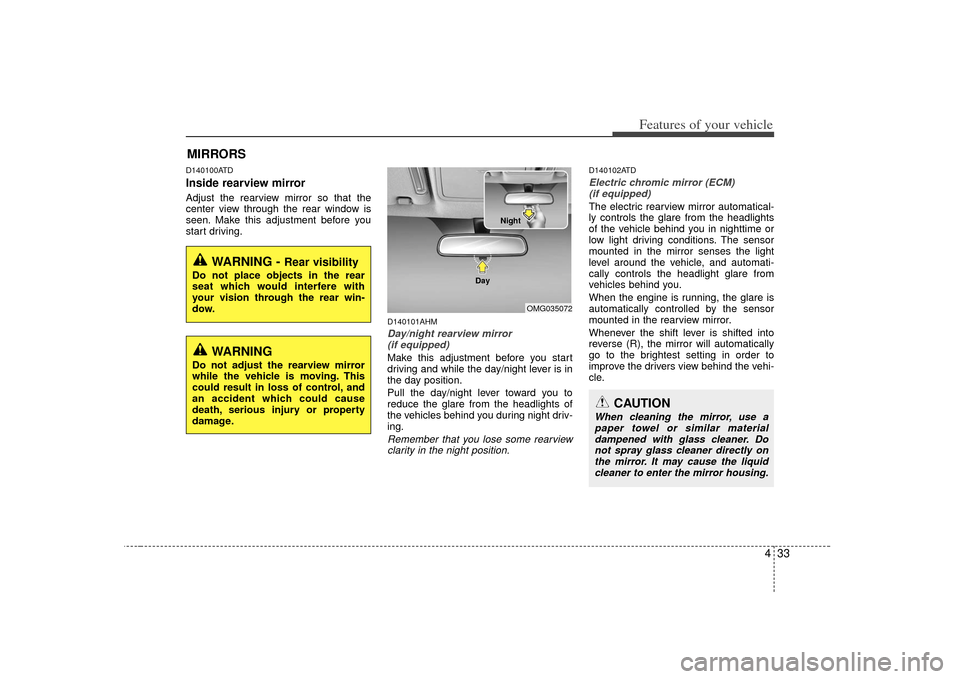
D140101AHMDay/night rearview mirror (if equipped)Make this adjustment before you start
driving and while the day/night lever is in
the day position.
Pull the day/night lever toward you to
reduce the glare from the headlights of
the vehicles behind you during night driv-
ing.Remember that you lose some rearviewclarity in the night position.
D140102ATDElectric chromic mirror (ECM) (if equipped)The electric rearview mirror automatical-
ly controls the glare from the headlights
of the vehicle behind you in nighttime or
low light driving conditions. The sensor
mounted in the mirror senses the light
level around the vehicle, and automati-
cally controls the headlight glare from
vehicles behind you.
When the engine is running, the glare is
automatically controlled by the sensor
mounted in the rearview mirror.
Whenever the shift lever is shifted into
reverse (R), the mirror will automatically
go to the brightest setting in order to
improve the drivers view behind the vehi-
cle.
MIRRORS
WARNING -
Rear visibility
Do not place objects in the rear
seat which would interfere with
your vision through the rear win-
dow.
OMG035072
CAUTION
When cleaning the mirror, use apaper towel or similar material dampened with glass cleaner. Donot spray glass cleaner directly on the mirror. It may cause the liquidcleaner to enter the mirror housing.
WARNING
Do not adjust the rearview mirror
while the vehicle is moving. This
could result in loss of control, and
an accident which could cause
death, serious injury or property
damage.
Night
Day
Page 99 of 321
Features of your vehicle34
4To operate the electric rearview mirror
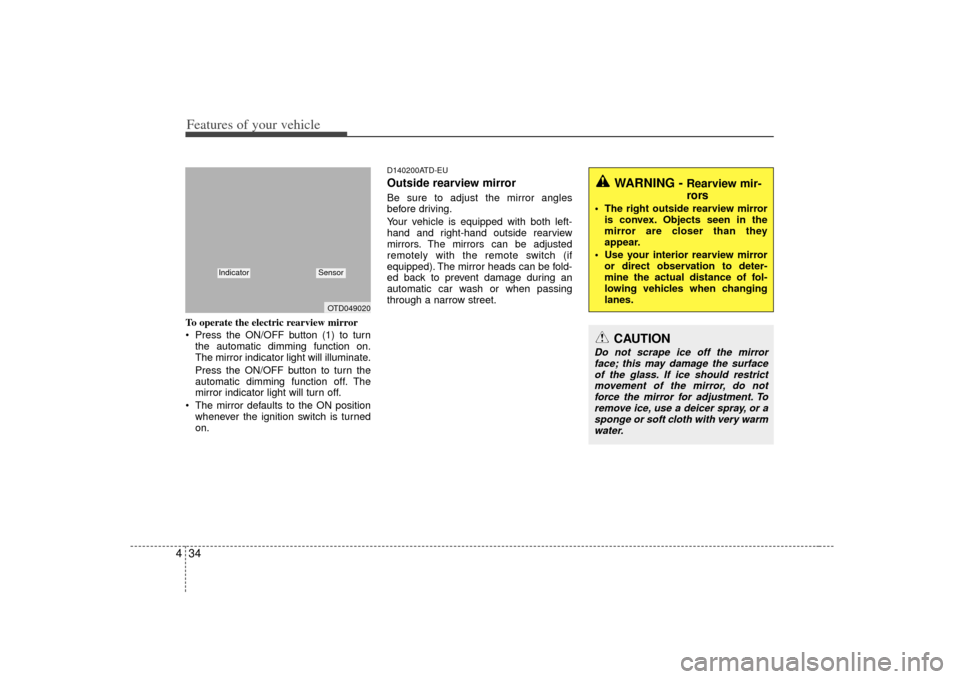
Press the ON/OFF button (1) to turn
the automatic dimming function on.
The mirror indicator light will illuminate.
Press the ON/OFF button to turn the
automatic dimming function off. The
mirror indicator light will turn off.
The mirror defaults to the ON position whenever the ignition switch is turned
on.
D140200ATD-EUOutside rearview mirror Be sure to adjust the mirror angles
before driving.
Your vehicle is equipped with both left-
hand and right-hand outside rearview
mirrors. The mirrors can be adjusted
remotely with the remote switch (if
equipped). The mirror heads can be fold-
ed back to prevent damage during an
automatic car wash or when passing
through a narrow street.
WARNING -
Rearview mir-
rors
The right outside rearview mirroris convex. Objects seen in the
mirror are closer than they
appear.
Use your interior rearview mirror or direct observation to deter-
mine the actual distance of fol-
lowing vehicles when changing
lanes.
CAUTION
Do not scrape ice off the mirrorface; this may damage the surface of the glass. If ice should restrictmovement of the mirror, do notforce the mirror for adjustment. To remove ice, use a deicer spray, or asponge or soft cloth with very warm water.
OTD049020
Indicator
Sensor