KIA Cerato 2011 1.G Owner's Manual
Manufacturer: KIA, Model Year: 2011, Model line: Cerato, Model: KIA Cerato 2011 1.GPages: 342, PDF Size: 7.23 MB
Page 221 of 342
515
Driving your vehicle
E060000ATDE060100ATD-EU
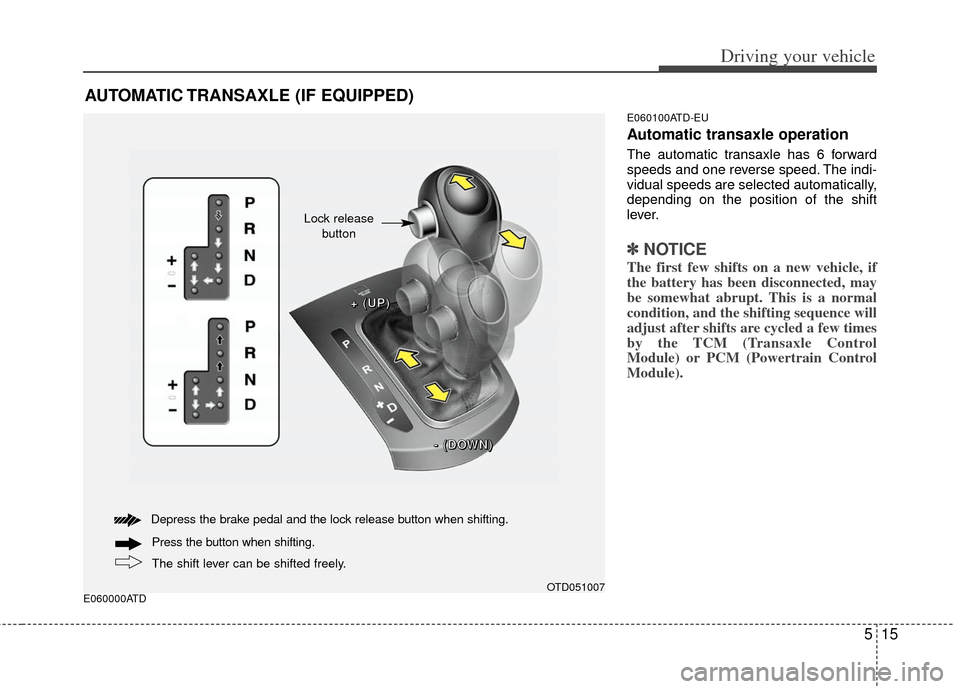
Automatic transaxle operation
The automatic transaxle has 6 forward
speeds and one reverse speed. The indi-
vidual speeds are selected automatically,
depending on the position of the shift
lever.
✽ ✽
NOTICE
The first few shifts on a new vehicle, if
the battery has been disconnected, may
be somewhat abrupt. This is a normal
condition, and the shifting sequence will
adjust after shifts are cycled a few times
by the TCM (Transaxle Control
Module) or PCM (Powertrain Control
Module).
AUTOMATIC TRANSAXLE (IF EQUIPPED)
OTD051007
Depress the brake pedal and the lock release button when shifting.
The shift lever can be shifted freely. Press the button when shifting.
+
+
+
+
(
(
(
(
U
U
U
U
P
P
P
P
)
)
)
)
-
-
-
-
(
(
(
(
D
D
D
D
O
O
O
O
W
W
W
W
N
N
N
N
)
)
)
)
Lock release
button
Page 222 of 342
Driving your vehicle
16
5
For smooth operation, depress the brake
pedal when shifting from N (Neutral) to aforward or reverse gear.E060101ATD-EU
Transaxle ranges
The indicator light in the instrument clus-
ter displays the shift lever position when
the ignition switch is in the ON position.
P (Park)
Always come to a complete stop before
shifting into P (Park). This position locks
the transaxle and prevents the front
wheels from rotating.
WARNING- Automatic transaxle
Always check the surrounding
areas near your vehicle for peo-
ple, especially children, before
shifting a shift lever into D (Drive)
or R (Reverse).
Before leaving the driver’s seat, always make sure the shift lever
is in the P (Park) position; then
set the parking brake fully and
shut the engine off. Unexpected
and sudden vehicle movement
can occur if these precautions
are not followed in the order iden-
tified.
CAUTION
To avoid damage to your transaxle, do not accelerate theengine in R (Reverse) or any for-ward gear position with thebrakes on.
When stopped on an upgrade, do not hold the vehicle with enginepower. Use the service brake orthe parking brake.
Do not shift from N (Neutral) or P (Park) into D (Drive), or R(Reverse) when the engine isabove idle speed.
Page 223 of 342
517
Driving your vehicle
R (Reverse)
Use this position to drive the vehicle
backward.
N (Neutral)
The wheels and transaxle are not
engaged. The vehicle will roll freely even
on the slightest incline unless the parking
brake or service brakes are applied.D (Drive)
This is the normal forward driving posi-
tion. The transaxle will automatically shift
through a 6-gear sequence, providing the
best fuel economy and power.
For extra power when passing another
vehicle or climbing grades, depress the
accelerator fully, at which time the
transaxle will automatically downshift to
the next lower gear.
✽ ✽
NOTICE
Always come to a complete stop before
shifting into D (Drive).
WARNING
Shifting into P (Park) while the
vehicle is in motion will cause the
drive wheels to lock which will
cause you to lose control of the
vehicle.
Do not use the P (Park) position in place of the parking brake.
Always make sure the shift lever
is latched in the P (Park) position
and set the parking brake fully.
Never leave a child unattended in a vehicle.
CAUTION
The transaxle may be damaged ifyou shift into P (Park) while the vehicle is in motion.
CAUTION
Always come to a complete stopbefore shifting into or out of R (Reverse); you may damage thetransaxle if you shift into R(Reverse) while the vehicle is inmotion, except when “Rocking theVehicle” explained in this section.
Page 224 of 342
Driving your vehicle
18
5
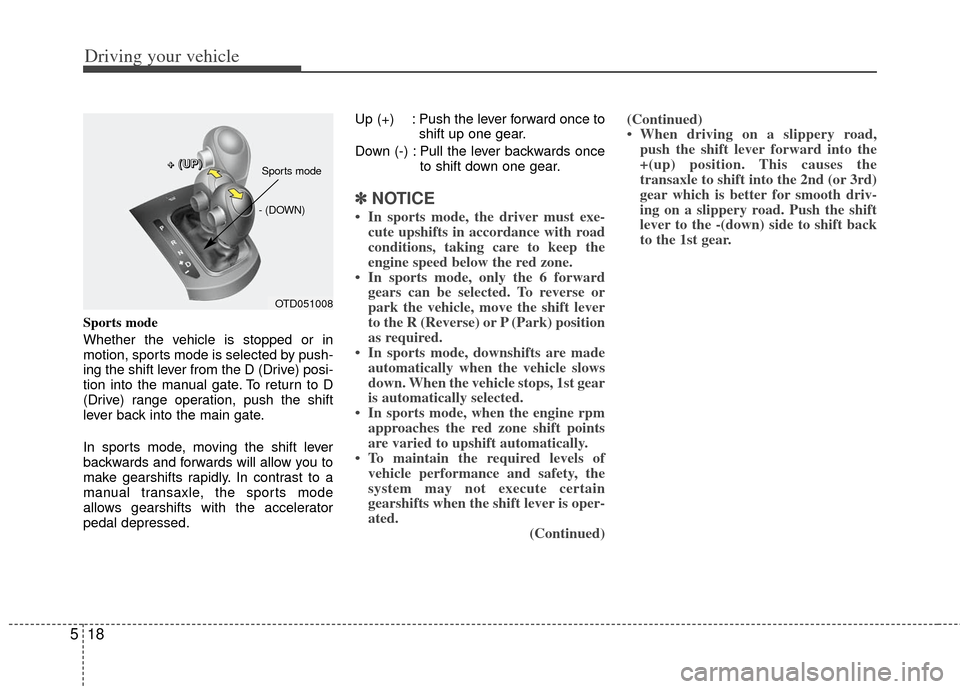
Sports mode
Whether the vehicle is stopped or in
motion, sports mode is selected by push-
ing the shift lever from the D (Drive) posi-
tion into the manual gate. To return to D
(Drive) range operation, push the shift
lever back into the main gate.
In sports mode, moving the shift lever
backwards and forwards will allow you to
make gearshifts rapidly. In contrast to a
manual transaxle, the sports mode
allows gearshifts with the accelerator
pedal depressed. Up (+) : Push the lever forward once to
shift up one gear.
Down (-) : Pull the lever backwards once to shift down one gear.
✽ ✽NOTICE
• In sports mode, the driver must exe-
cute upshifts in accordance with road
conditions, taking care to keep the
engine speed below the red zone.
• In sports mode, only the 6 forward gears can be selected. To reverse or
park the vehicle, move the shift lever
to the R (Reverse) or P (Park) position
as required.
• In sports mode, downshifts are made automatically when the vehicle slows
down. When the vehicle stops, 1st gear
is automatically selected.
• In sports mode, when the engine rpm approaches the red zone shift points
are varied to upshift automatically.
• To maintain the required levels of vehicle performance and safety, the
system may not execute certain
gearshifts when the shift lever is oper-
ated. (Continued)(Continued)
• When driving on a slippery road,
push the shift lever forward into the
+(up) position. This causes the
transaxle to shift into the 2nd (or 3rd)
gear which is better for smooth driv-
ing on a slippery road. Push the shift
lever to the -(down) side to shift back
to the 1st gear.
OTD051008
+
+
+
+
(
(
(
(
U
U
U
U
P
P
P
P
)
)
)
)
- (DOWN)
Sports mode
Page 225 of 342
519
Driving your vehicle
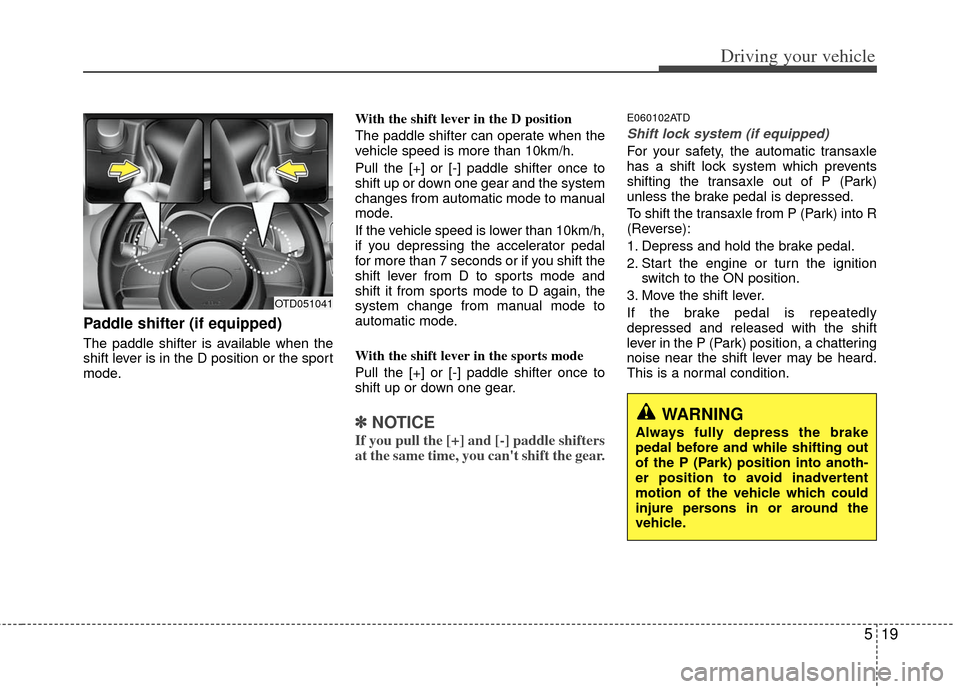
Paddle shifter (if equipped)
The paddle shifter is available when the
shift lever is in the D position or the sport
mode.With the shift lever in the D position
The paddle shifter can operate when the
vehicle speed is more than 10km/h.
Pull the [+] or [-] paddle shifter once to
shift up or down one gear and the system
changes from automatic mode to manual
mode.
If the vehicle speed is lower than 10km/h,
if you depressing the accelerator pedal
for more than 7 seconds or if you shift the
shift lever from D to sports mode and
shift it from sports mode to D again, the
system change from manual mode to
automatic mode.
With the shift lever in the sports mode
Pull the [+] or [-] paddle shifter once to
shift up or down one gear.
✽ ✽
NOTICE
If you pull the [+] and [-] paddle shifters
at the same time, you can't shift the gear.
E060102ATD
Shift lock system (if equipped)
For your safety, the automatic transaxle
has a shift lock system which prevents
shifting the transaxle out of P (Park)
unless the brake pedal is depressed.
To shift the transaxle from P (Park) into R
(Reverse):
1. Depress and hold the brake pedal.
2. Start the engine or turn the ignition
switch to the ON position.
3. Move the shift lever.
If the brake pedal is repeatedly
depressed and released with the shift
lever in the P (Park) position, a chattering
noise near the shift lever may be heard.
This is a normal condition.
OTD051041
WARNING
Always fully depress the brake
pedal before and while shifting out
of the P (Park) position into anoth-
er position to avoid inadvertent
motion of the vehicle which could
injure persons in or around the
vehicle.
Page 226 of 342
Driving your vehicle
20
5
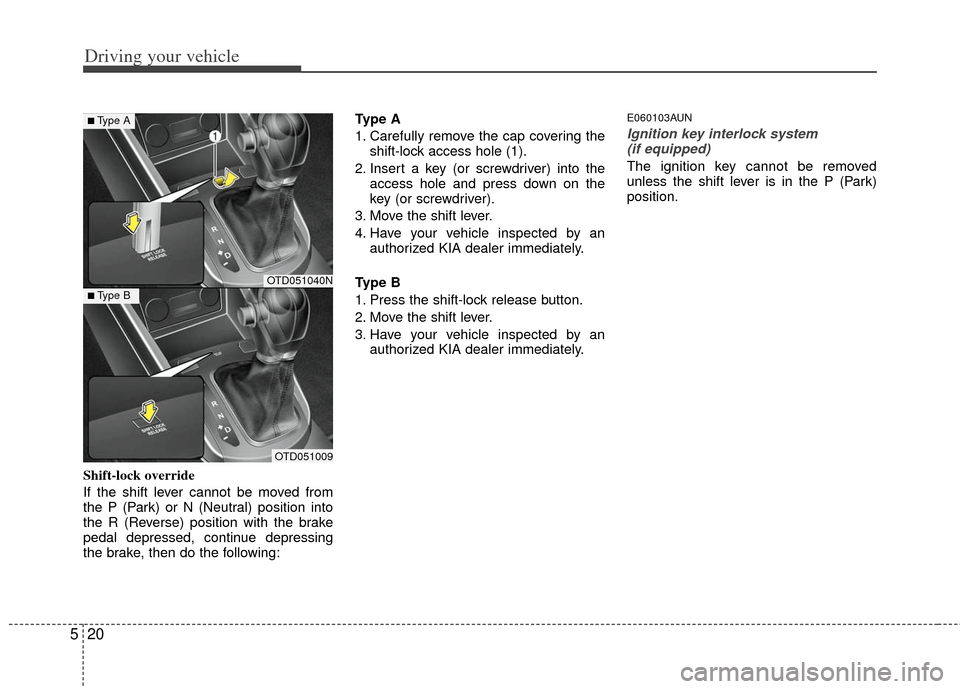
Shift-lock override
If the shift lever cannot be moved from
the P (Park) or N (Neutral) position into
the R (Reverse) position with the brake
pedal depressed, continue depressing
the brake, then do the following: Type A
1. Carefully remove the cap covering the
shift-lock access hole (1).
2. Insert a key (or screwdriver) into the access hole and press down on the
key (or screwdriver).
3. Move the shift lever.
4. Have your vehicle inspected by an authorized KIA dealer immediately.
Type B
1. Press the shift-lock release button.
2. Move the shift lever.
3. Have your vehicle inspected by an authorized KIA dealer immediately.
E060103AUN
Ignition key interlock system (if equipped)
The ignition key cannot be removed
unless the shift lever is in the P (Park)
position.
OTD051040N
OTD051009
■Type A
■Type B
Page 227 of 342
521
Driving your vehicle
E060200APB
Good driving practices
Never move the shift lever from P(Park) or N (Neutral) to any other posi-
tion with the accelerator pedal
depressed.
Never move the shift lever into P (Park) when the vehicle is in motion.
Be sure the vehicle is completely stopped before you attempt to shift into
R (Reverse) or D (Drive).
Never take the vehicle out of gear and coast down a hill. This may be
extremely hazardous. Always leave the
car in gear when moving.
Do not "ride" the brakes. This can cause them to overheat and malfunc-
tion. Instead, when you are driving
down a long hill, slow down and shift to
a lower gear. When you do this, engine
braking will help slow down the vehicle.
Slow down before shifting to a lower gear. Otherwise, the lower gear may
not be engaged.
Always use the parking brake. Do not depend on placing the transaxle in P
(Park) to keep the vehicle from moving. Exercise extreme caution when driving
on a slippery surface. Be especially
careful when braking, accelerating or
shifting gears. On a slippery surface,
an abrupt change in vehicle speed can
cause the drive wheels to lose traction
and the vehicle to go out of control.
Optimum vehicle performance and economy is obtained by smoothly
depressing and releasing the accelera-
tor pedal.
WARNING
Always buckle-up! In a collision,an unbelted occupant is signifi-
cantly more likely to be seriously
injured or killed than a properly
belted occupant.
Avoid high speeds when corner- ing or turning.
Do not make quick steering wheel movements, such as sharp
lane changes or fast, sharp turns.
The risk of rollover is greatly increased if you lose control of
your vehicle at highway speeds.
Losing control often occurs if two or more wheels drop off the road-
way and the driver oversteers to
reenter the roadway.
In the event your vehicle leaves the roadway, do not steer sharply.
Instead, slow down before pulling
back into the travel lanes.
Never exceed posted speed lim- its.
Page 228 of 342
Driving your vehicle
22
5
E060203AFD
Moving up a steep grade from a stand-
ing start
To move up a steep grade from a stand-
ing start, depress the brake pedal, shift
the shift lever to D (Drive). Select the
appropriate gear depending on load
weight and steepness of the grade, and
release the parking brake. Depress the
accelerator gradually while releasing the
service brakes.
WARNING
If your vehicle becomes stuck in
snow, mud, sand, etc., then you
may attempt to rock the vehicle free
by moving it forward and backward.
Do not attempt this procedure if
people or objects are anywhere
near the vehicle. During the rocking
operation the vehicle may suddenly
move forward of backward as it
becomes unstuck, causing injury
or damage to nearby people or
objects.
Page 229 of 342
523
Driving your vehicle
E070100AUN
Power brakes
Your vehicle has power-assisted brakes
that adjust automatically through normal
usage.
In the event that the power-assisted
brakes lose power because of a stalled
engine or some other reason, you can
still stop your vehicle by applying greater
force to the brake pedal than you nor-
mally would. The stopping distance, how-
ever, will be longer.
When the engine is not running, the
reserve brake power is partially depleted
each time the brake pedal is applied. Do
not pump the brake pedal when the
power assist has been interrupted.
Pump the brake pedal only when neces-
sary to maintain steering control on slip-
pery surfaces.
E070101AUN
In the event of brake failure
If service brakes fail to operate while the
vehicle is in motion, you can make an
emergency stop with the parking brake.
The stopping distance, however, will be
much greater than normal.
BRAKE SYSTEM
(Continued)
When descending a long or steephill, shift to a lower gear and
avoid continuous application of
the brakes. Continuous brake
application will cause the brakes
to overheat and could result in a
temporary loss of braking per-
formance.
Wet brakes may impair the vehi- cle’s ability to sefely slow down;
the vehicle may also pull to one
side when the brakes are applied.
Applying the brakes lightly will
indicate whether they have been
affected in this way. Always test
your brakes in this fashion after
driving through deep water. To
dry the brakes, apply them lightly
while maintaining a safe forward
speed until brake performance
returns to normal.
WARNING- Parking brake
Applying the parking brake while
the vehicle is moving at normal
speeds can cause a sudden loss of
control of the vehicle. If you must
use the parking brake to stop the
vehicle, use great caution in apply-
ing the brake.
WARNING- Brakes
Do not drive with your foot rest-ing on the brake pedal. This will
create abnormal high brake tem-
peratures, excessive brake lining
and pad wear, and increased
stopping distances.
(Continued)
Page 230 of 342
Driving your vehicle
24
5
E070102AHM
Disc brakes wear indicator
When your brake pads are worn and new
pads are required, you will hear a high-
pitched warning sound from your front
brakes or rear brakes (if equipped). You
may hear this sound come and go or it
may occur whenever you depress the
brake pedal.
Please remember that some driving con-
ditions or climates may cause a brake
squeal when you first apply (or lightly
apply) the brakes. This is normal and
does not indicate a problem with your
brakes.
E070106APB
Rear drum brakes (if equipped)
Your rear drum brakes do not have wear
indicators. Therefore, have the rear brake
linings inspected if you hear a rubbing
noise. Also have your rear brakes
inspected each time you change or
rotate your tires and when you have the
front brakes replaced.
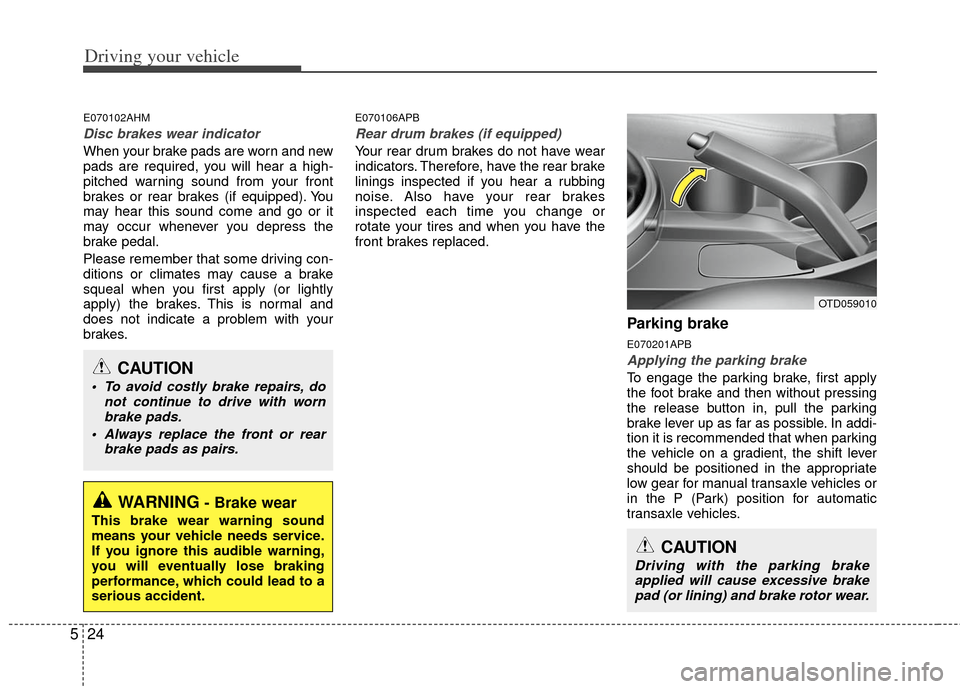
Parking brake
E070201APB
Applying the parking brake
To engage the parking brake, first apply
the foot brake and then without pressing
the release button in, pull the parking
brake lever up as far as possible. In addi-
tion it is recommended that when parking
the vehicle on a gradient, the shift lever
should be positioned in the appropriate
low gear for manual transaxle vehicles or
in the P (Park) position for automatic
transaxle vehicles.
WARNING- Brake wear
This brake wear warning sound
means your vehicle needs service.
If you ignore this audible warning,
you will eventually lose braking
performance, which could lead to a
serious accident.
CAUTION
To avoid costly brake repairs, do
not continue to drive with wornbrake pads.
Always replace the front or rear brake pads as pairs.
CAUTION
Driving with the parking brakeapplied will cause excessive brakepad (or lining) and brake rotor wear.
OTD059010