climate control KIA Forte 2014 2.G User Guide
[x] Cancel search | Manufacturer: KIA, Model Year: 2014, Model line: Forte, Model: KIA Forte 2014 2.GPages: 446, PDF Size: 7.32 MB
Page 188 of 446
4119
Features of your vehicle
✽
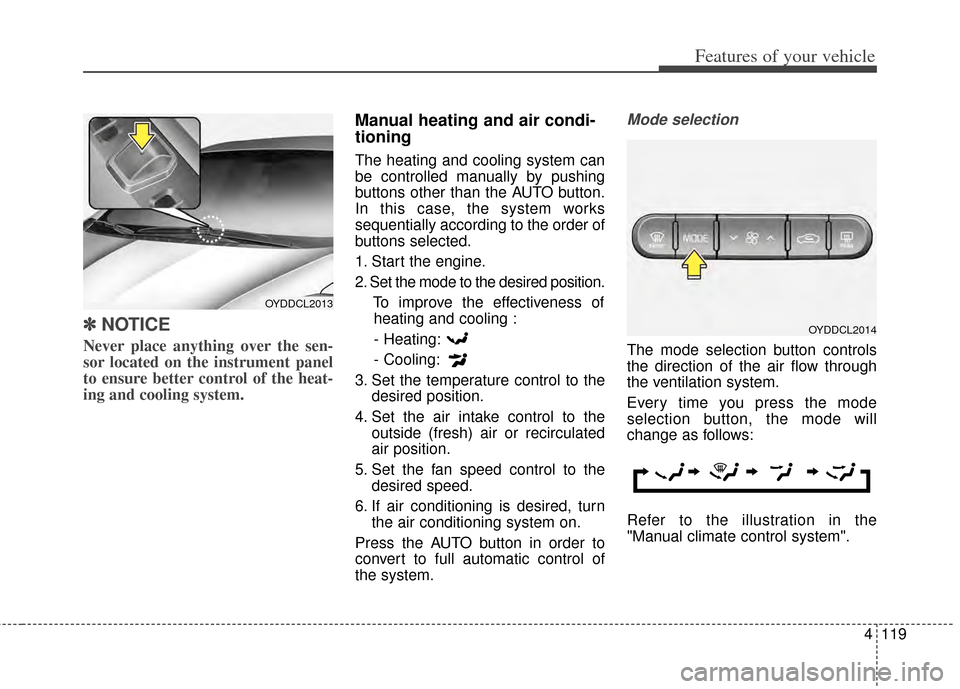
✽NOTICE
Never place anything over the sen-
sor located on the instrument panel
to ensure better control of the heat-
ing and cooling system.
Manual heating and air condi-
tioning
The heating and cooling system can
be controlled manually by pushing
buttons other than the AUTO button.
In this case, the system works
sequentially according to the order of
buttons selected.
1. Start the engine.
2. Set the mode to the desired position.
To improve the effectiveness ofheating and cooling :
- Heating:
- Cooling:
3. Set the temperature control to the desired position.
4. Set the air intake control to the outside (fresh) air or recirculated
air position.
5. Set the fan speed control to the desired speed.
6. If air conditioning is desired, turn the air conditioning system on.
Press the AUTO button in order to
convert to full automatic control of
the system.
Mode selection
The mode selection button controls
the direction of the air flow through
the ventilation system.
Every time you press the mode
selection button, the mode will
change as follows:
Refer to the illustration in the
"Manual climate control system".
OYDDCL2013
OYDDCL2014
Page 192 of 446
4123
Features of your vehicle
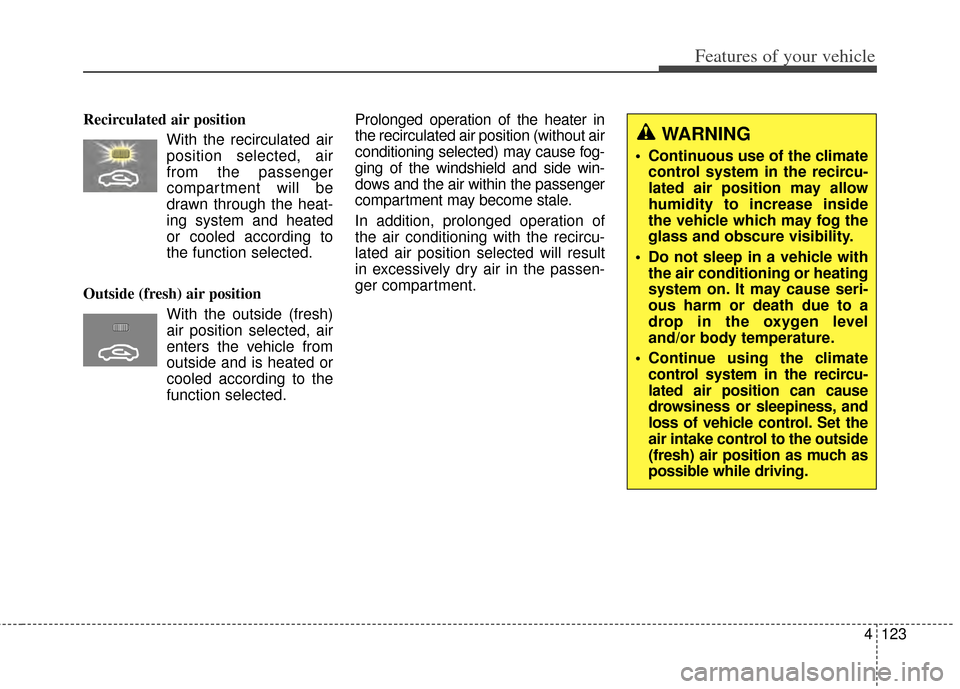
Recirculated air positionWith the recirculated airposition selected, air
from the passenger
compartment will be
drawn through the heat-
ing system and heated
or cooled according to
the function selected.
Outside (fresh) air position With the outside (fresh)
air position selected, air
enters the vehicle from
outside and is heated or
cooled according to the
function selected. Prolonged operation of the heater in
the recirculated air position (without air
conditioning selected) may cause fog-
ging of the windshield and side win-
dows and the air within the passenger
compartment may become stale.
In addition, prolonged operation of
the air conditioning with the recircu-
lated air position selected will result
in excessively dry air in the passen-
ger compartment.
WARNING
Continuous use of the climate
control system in the recircu-
lated air position may allow
humidity to increase inside
the vehicle which may fog the
glass and obscure visibility.
Do not sleep in a vehicle with the air conditioning or heating
system on. It may cause seri-
ous harm or death due to a
drop in the oxygen level
and/or body temperature.
Continue using the climate control system in the recircu-
lated air position can cause
drowsiness or sleepiness, and
loss of vehicle control. Set the
air intake control to the outside
(fresh) air position as much as
possible while driving.
Page 193 of 446
Features of your vehicle
124
4
Fan speed control
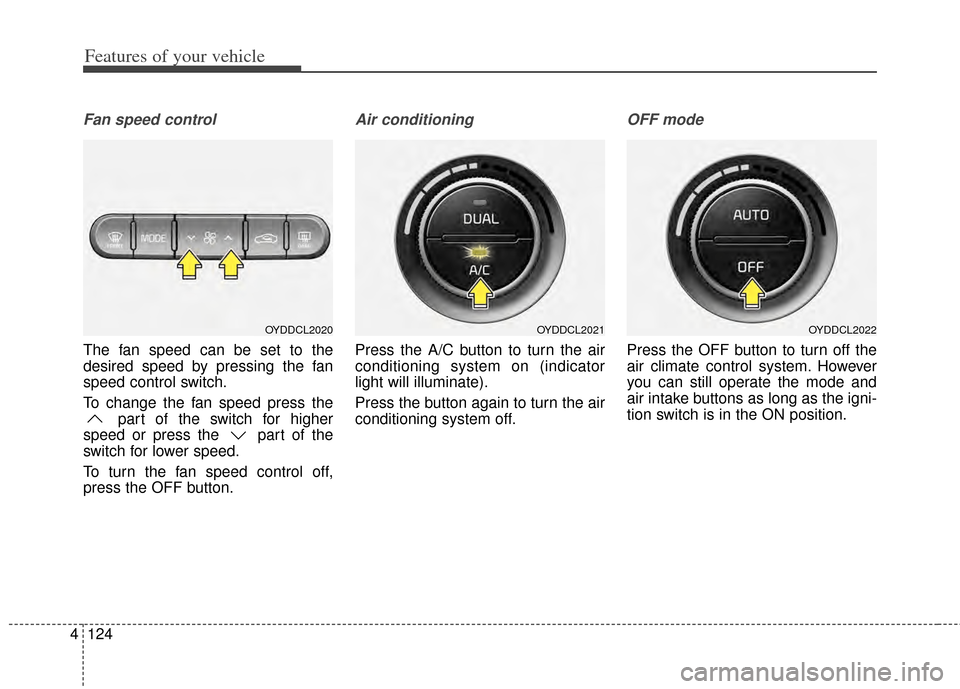
The fan speed can be set to the
desired speed by pressing the fan
speed control switch.
To change the fan speed press the
part of the switch for higher
speed or press the part of the
switch for lower speed.
To turn the fan speed control off,
press the OFF button.
Air conditioning
Press the A/C button to turn the air
conditioning system on (indicator
light will illuminate).
Press the button again to turn the air
conditioning system off.
OFF mode
Press the OFF button to turn off the
air climate control system. However
you can still operate the mode and
air intake buttons as long as the igni-
tion switch is in the ON position.
OYDDCL2022OYDDCL2021OYDDCL2020
Page 196 of 446
4127
Features of your vehicle
WINDSHIELD DEFROSTING AND DEFOGGING
For maximum defrosting, set thetemperature control to the extreme
right/hot position and the fan speed
control to the highest speed.
If warm air to the floor is desired while defrosting or defogging, set the
mode to the floor-defrost position.
Before driving, clear all snow and ice from the windshield, rear win-
dow, outside rear view mirrors, and
all side windows.
Clear all snow and ice from the hood and air inlet in the cowl grill to
improve heater and defroster effi-
ciency and to reduce the probabili-
ty of fogging up the inside of the
windshield.Manual climate control system
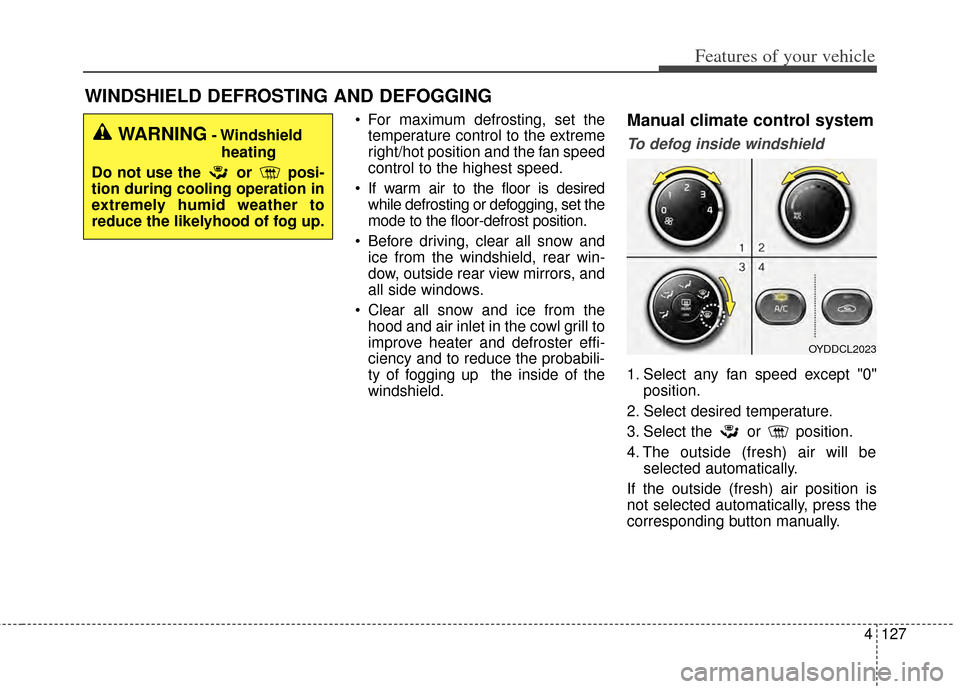
To defog inside windshield
1. Select any fan speed except "0" position.
2. Select desired temperature.
3. Select the or position.
4. The outside (fresh) air will be selected automatically.
If the outside (fresh) air position is
not selected automatically, press the
corresponding button manually.
WARNING- Windshield heating
Do not use the or posi-
tion during cooling operation in
extremely humid weather to
reduce the likelyhood of fog up.
OYDDCL2023
Page 197 of 446
Features of your vehicle
128
4
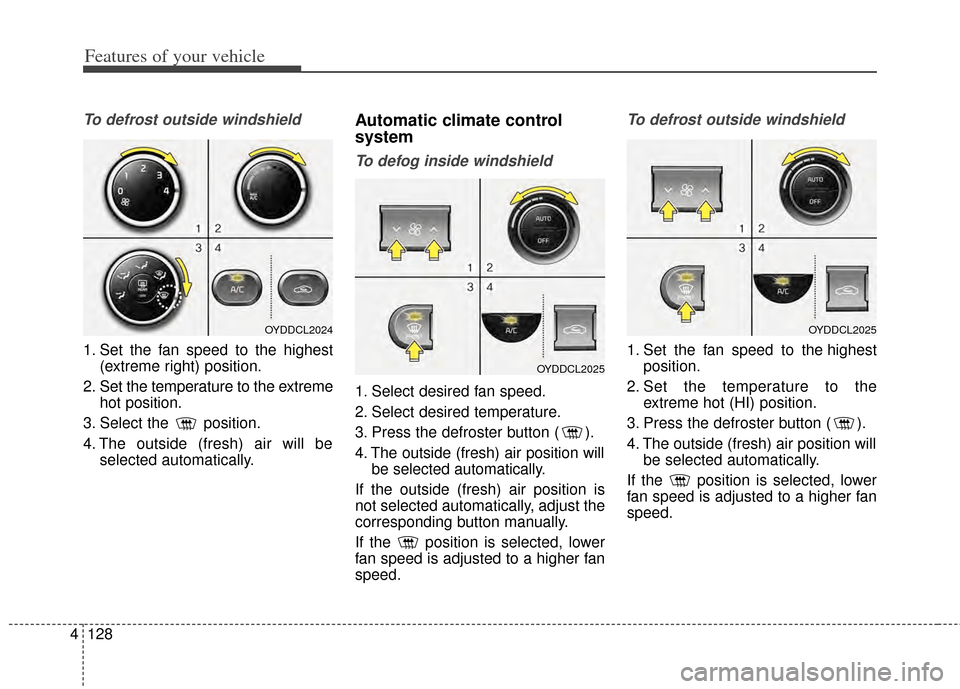
To defrost outside windshield
1. Set the fan speed to the highest
(extreme right) position.
2. Set the temperature to the extreme hot position.
3. Select the position.
4. The outside (fresh) air will be selected automatically.
Automatic climate control
system
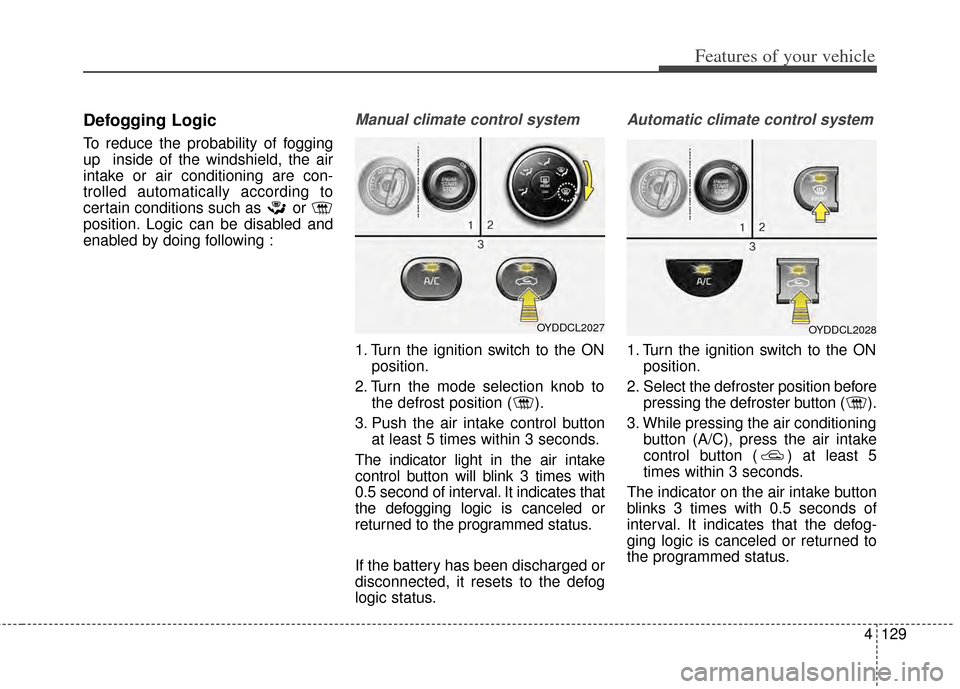
To defog inside windshield
1. Select desired fan speed.
2. Select desired temperature.
3. Press the defroster button ( ).
4. The outside (fresh) air position willbe selected automatically.
If the outside (fresh) air position is
not selected automatically, adjust the
corresponding button manually.
If the position is selected, lower
fan speed is adjusted to a higher fan
speed.
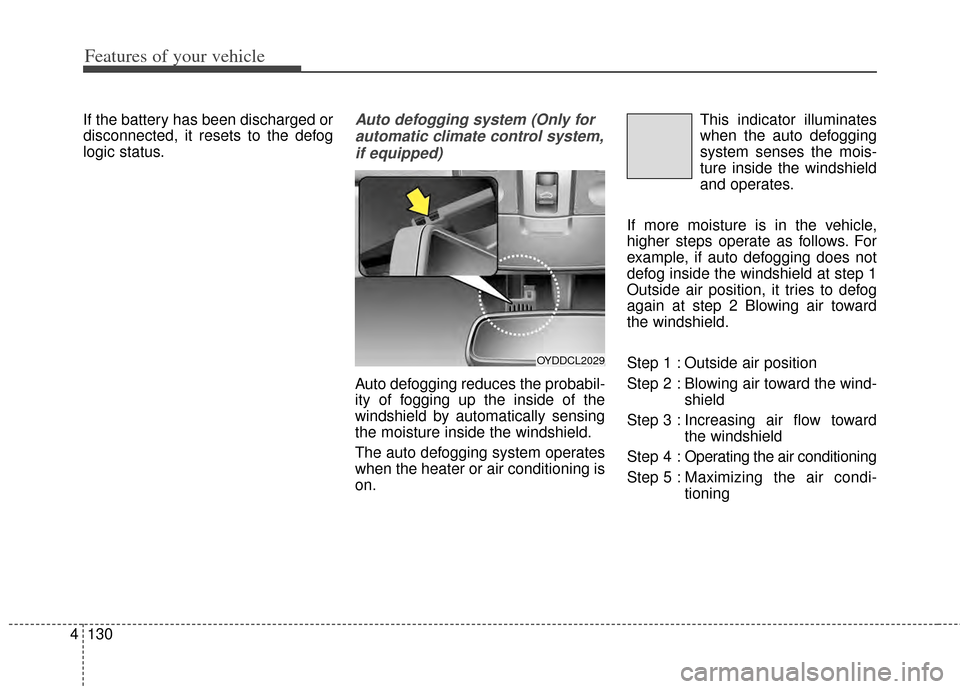
To defrost outside windshield
1. Set the fan speed to the highest position.
2. Set the temperature to the extreme hot (HI) position.
3. Press the defroster button ( ).
4. The outside (fresh) air position will be selected automatically.
If the position is selected, lower
fan speed is adjusted to a higher fan
speed.
OYDDCL2024
OYDDCL2025
OYDDCL2025
Page 198 of 446
4129
Features of your vehicle
Defogging Logic
To reduce the probability of fogging
up inside of the windshield, the air
intake or air conditioning are con-
trolled automatically according to
certain conditions such as or
position. Logic can be disabled and
enabled by doing following :
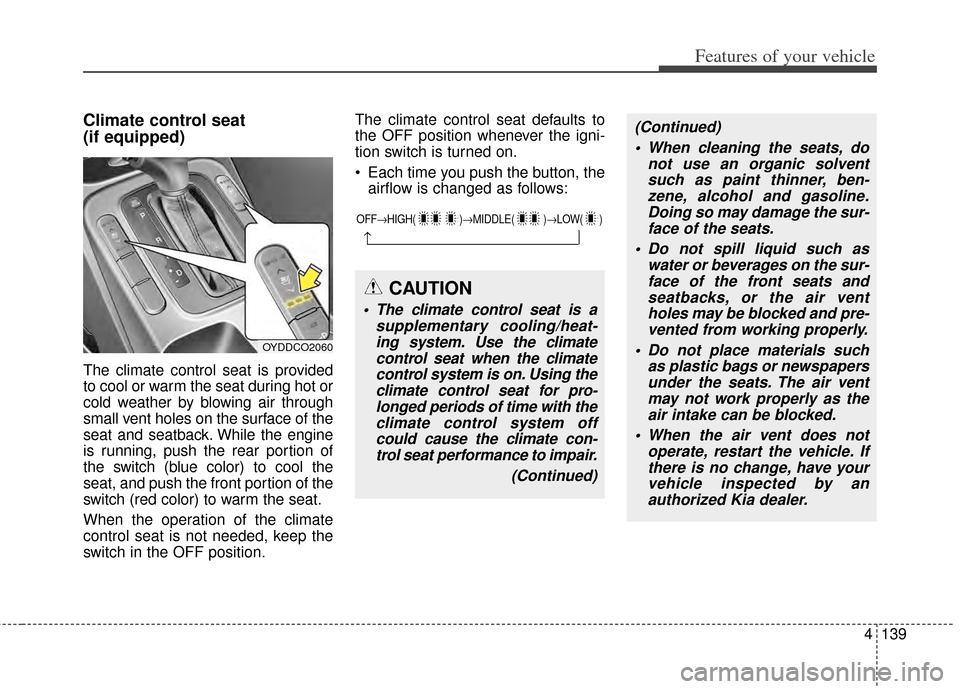
Manual climate control system
1. Turn the ignition switch to the ONposition.
2. Turn the mode selection knob to the defrost position ( ).
3. Push the air intake control button at least 5 times within 3 seconds.
The indicator light in the air intake
control button will blink 3 times with
0.5 second of interval. It indicates that
the defogging logic is canceled or
returned to the programmed status.
If the battery has been discharged or
disconnected, it resets to the defog
logic status.
Automatic climate control system
1. Turn the ignition switch to the ON position.
2. Select the defroster position before pressing the defroster button ( ).
3. While pressing the air conditioning button (A/C), press the air intake
control button ( ) at least 5
times within 3 seconds.
The indicator on the air intake button
blinks 3 times with 0.5 seconds of
interval. It indicates that the defog-
ging logic is canceled or returned to
the programmed status.
OYDDCL2027OYDDCL2028
Page 199 of 446
Features of your vehicle
130
4
If the battery has been discharged or
disconnected, it resets to the defog
logic status.Auto defogging system (Only for
automatic climate control system,if equipped)
Auto defogging reduces the probabil-
ity of fogging up the inside of the
windshield by automatically sensing
the moisture inside the windshield.
The auto defogging system operates
when the heater or air conditioning is
on. This indicator illuminates
when the auto defogging
system senses the mois-
ture inside the windshield
and operates.
If more moisture is in the vehicle,
higher steps operate as follows. For
example, if auto defogging does not
defog inside the windshield at step 1
Outside air position, it tries to defog
again at step 2 Blowing air toward
the windshield.
Step 1 : Outside air position
Step 2 : Blowing air toward the wind- shield
Step 3 : Increasing air flow toward the windshield
Step 4 : Operating the air conditioning
Step 5 : Maxim izing the air condi-
tioning
OYDDCL2029
Page 208 of 446
4139
Features of your vehicle
Climate control seat
(if equipped)
The climate control seat is provided
to cool or warm the seat during hot or
cold weather by blowing air through
small vent holes on the surface of the
seat and seatback. While the engine
is running, push the rear portion of
the switch (blue color) to cool the
seat, and push the front portion of the
switch (red color) to warm the seat.
When the operation of the climate
control seat is not needed, keep the
switch in the OFF position.The climate control seat defaults to
the OFF position whenever the igni-
tion switch is turned on.
Each time you push the button, the
airflow is changed as follows:
OYDDCO2060
OFF→ HIGH( )→ MIDDLE( )→LOW( )
→
CAUTION
The climate control seat is a
supplementary cooling/heat-ing system. Use the climatecontrol seat when the climatecontrol system is on. Using theclimate control seat for pro-longed periods of time with theclimate control system offcould cause the climate con-trol seat performance to impair.
(Continued)
(Continued) When cleaning the seats, do not use an organic solventsuch as paint thinner, ben-zene, alcohol and gasoline.Doing so may damage the sur-face of the seats.
Do not spill liquid such as water or beverages on the sur-face of the front seats andseatbacks, or the air ventholes may be blocked and pre-vented from working properly.
Do not place materials such as plastic bags or newspapersunder the seats. The air ventmay not work properly as theair intake can be blocked.
When the air vent does not operate, restart the vehicle. Ifthere is no change, have yourvehicle inspected by anauthorized Kia dealer.
Page 349 of 446
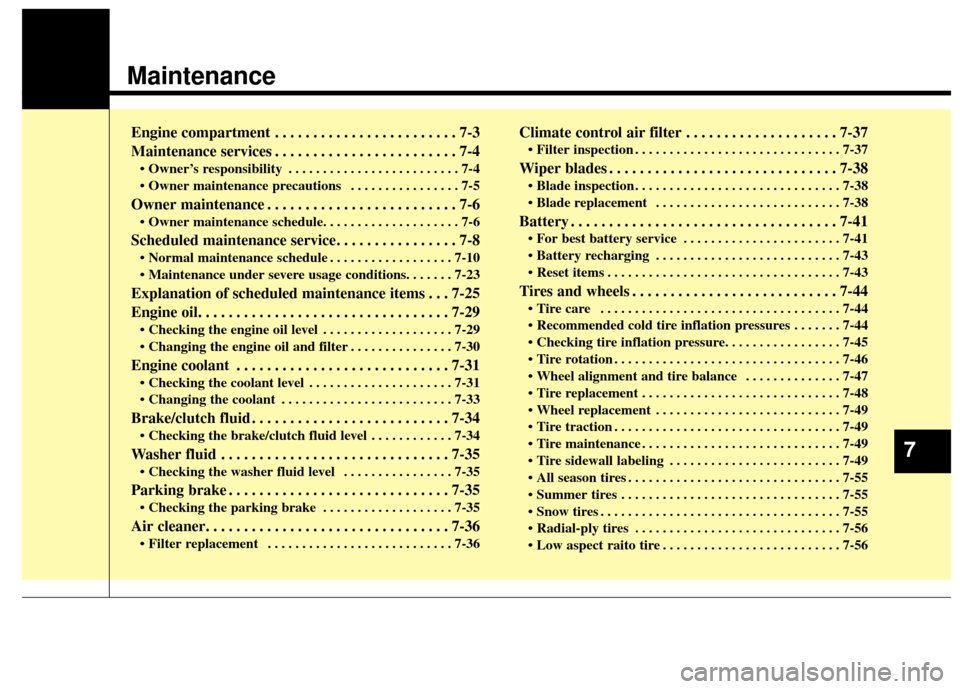
Maintenance
Engine compartment . . . . . . . . . . . . . . . . . . . . . . . . 7-3
Maintenance services . . . . . . . . . . . . . . . . . . . . . . . . 7-4
• Owner’s responsibility . . . . . . . . . . . . . . . . . . . . . . . . . 7-4
• Owner maintenance precautions . . . . . . . . . . . . . . . . 7-5
Owner maintenance . . . . . . . . . . . . . . . . . . . . . . . . . 7-6
• Owner maintenance schedule. . . . . . . . . . . . . . . . . . . . 7-6
Scheduled maintenance service. . . . . . . . . . . . . . . . 7-8
• Normal maintenance schedule . . . . . . . . . . . . . . . . . . 7-10
• Maintenance under severe usage conditions. . . . . . . 7-23
Explanation of scheduled maintenance items . . . 7-25
Engine oil. . . . . . . . . . . . . . . . . . . . . . . . . . . . . . . . . 7-29
• Checking the engine oil level . . . . . . . . . . . . . . . . . . . 7-29
• Changing the engine oil and filter . . . . . . . . . . . . . . . 7-30
Engine coolant . . . . . . . . . . . . . . . . . . . . . . . . . . . . 7-31
• Checking the coolant level . . . . . . . . . . . . . . . . . . . . . 7-31
• Changing the coolant . . . . . . . . . . . . . . . . . . . . . . . . . 7-33
Brake/clutch fluid . . . . . . . . . . . . . . . . . . . . . . . . . . 7-34
• Checking the brake/clutch fluid level . . . . . . . . . . . . 7-34
Washer fluid . . . . . . . . . . . . . . . . . . . . . . . . . . . . . . 7-35
. . . . . . . . . . . . . . . . 7-35
Parking brake . . . . . . . . . . . . . . . . . . . . . . . . . . . . . 7-35
• Checking the parking brake . . . . . . . . . . . . . . . . . . . 7-35
Air cleaner. . . . . . . . . . . . . . . . . . . . . . . . . . . . . . . . 7-36
• Filter replacement . . . . . . . . . . . . . . . . . . . . . . . . . . . 7-36
Climate control air filter . . . . . . . . . . . . . . . . . . . . 7-37
• Filter inspection . . . . . . . . . . . . . . . . . . . . . . . . . . . . . . 7-37
Wiper blades . . . . . . . . . . . . . . . . . . . . . . . . . . . . . . 7-38
• Blade inspection . . . . . . . . . . . . . . . . . . . . . . . . . . . . . . 7-38
• Blade replacement . . . . . . . . . . . . . . . . . . . . . . . . . . . 7-38
Battery . . . . . . . . . . . . . . . . . . . . . . . . . . . . . . . . . . . 7-\
41
• For best battery service . . . . . . . . . . . . . . . . . . . . . . . 7-41
• Battery recharging . . . . . . . . . . . . . . . . . . . . . . . . . . . 7-43
• Reset items . . . . . . . . . . . . . . . . . . . . . . . . . . . . . . . . . . 7-43\
Tires and wheels . . . . . . . . . . . . . . . . . . . . . . . . . . . 7-44
• Tire care . . . . . . . . . . . . . . . . . . . . . . . . . . . . . . . . . . . 7-\
44
• Recommended cold tire inflation pressures . . . . . . . 7-44
• Checking tire inflation pressure. . . . . . . . . . . . . . . . . 7-45
• Tire rotation . . . . . . . . . . . . . . . . . . . . . . . . . . . . . . . . . 7-46
• Wheel alignment and tire balance . . . . . . . . . . . . . . 7-47
• Tire replacement . . . . . . . . . . . . . . . . . . . . . . . . . . . . . 7-48
• Wheel replacement . . . . . . . . . . . . . . . . . . . . . . . . . . . 7-49
• Tire traction . . . . . . . . . . . . . . . . . . . . . . . . . . . . . . . . . 7-49
• Tire maintenance . . . . . . . . . . . . . . . . . . . . . . . . . . . . . 7-49
• Tire sidewall labeling . . . . . . . . . . . . . . . . . . . . . . . . . 7-49
• All season tires . . . . . . . . . . . . . . . . . . . . . . . . . . . . . . . 7-55
• Summer tires . . . . . . . . . . . . . . . . . . . . . . . . . . . . . . . . 7-55
• Snow tires . . . . . . . . . . . . . . . . . . . . . . . . . . . . . . . . . . . 7-\
55
• Radial-ply tires . . . . . . . . . . . . . . . . . . . . . . . . . . . . . . 7-56
• Low aspect raito tire . . . . . . . . . . . . . . . . . . . . . . . . . . 7-56
7
Page 358 of 446
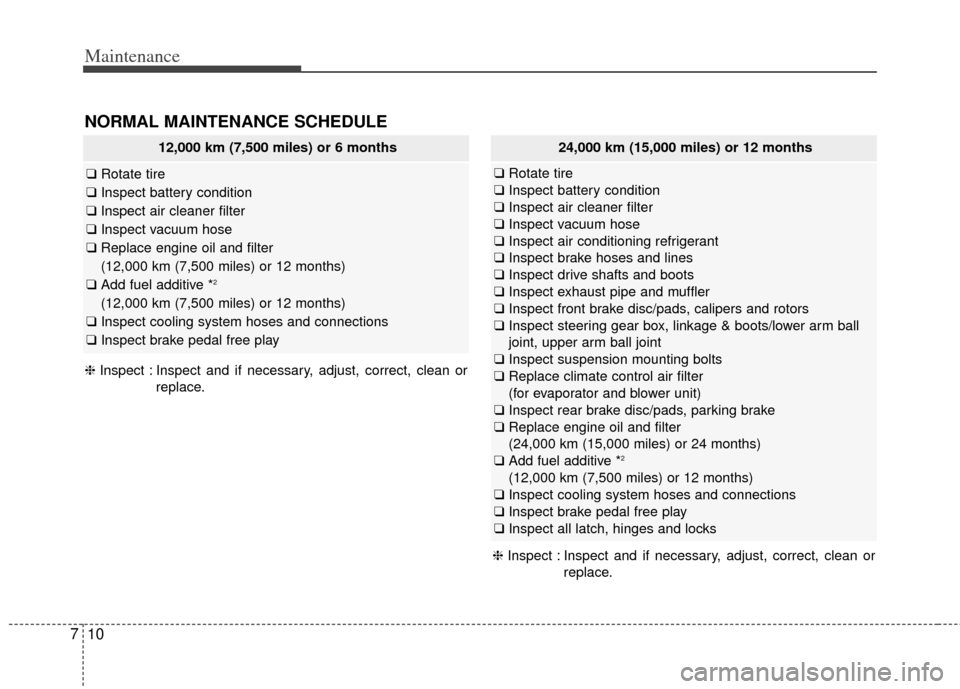
Maintenance
10
7
NORMAL MAINTENANCE SCHEDULE
12,000 km (7,500 miles) or 6 months
❑ Rotate tire
❑ Inspect battery condition
❑ Inspect air cleaner filter
❑ Inspect vacuum hose
❑ Replace engine oil and filter
(12,000 km (7,500 miles) or 12 months)
❑ Add fuel additive *
2
(12,000 km (7,500 miles) or 12 months)
❑ Inspect cooling system hoses and connections
❑ Inspect brake pedal free play
24,000 km (15,000 miles) or 12 months
❑Rotate tire
❑ Inspect battery condition
❑ Inspect air cleaner filter
❑ Inspect vacuum hose
❑ Inspect air conditioning refrigerant
❑ Inspect brake hoses and lines
❑ Inspect drive shafts and boots
❑ Inspect exhaust pipe and muffler
❑ Inspect front brake disc/pads, calipers and rotors
❑ Inspect steering gear box, linkage & boots/lower arm ball
joint, upper arm ball joint
❑ Inspect suspension mounting bolts
❑ Replace climate control air filter
(for evaporator and blower unit)
❑ Inspect rear brake disc/pads, parking brake
❑ Replace engine oil and filter
(24,000 km (15,000 miles) or 24 months)
❑ Add fuel additive *
2
(12,000 km (7,500 miles) or 12 months)
❑ Inspect cooling system hoses and connections
❑ Inspect brake pedal free play
❑ Inspect all latch, hinges and locks
❈ Inspect : Inspect and if necessary, adjust, correct, clean or
replace.
❈Inspect : Inspect and if necessary, adjust, correct, clean or
replace.