check engine light KIA FORTE 2018 Owner's Manual
[x] Cancel search | Manufacturer: KIA, Model Year: 2018, Model line: FORTE, Model: KIA FORTE 2018Pages: 584, PDF Size: 15.14 MB
Page 399 of 584
Driving your vehicle
58
5
The cruise control system allows you
to program the vehicle to maintain a
constant speed without depressing
the accelerator pedal.
This system is designed to function
above approximately 40 km/h (25
mph).
If the cruise control is left on,
(CRUISE indicator light in the instru-
ment cluster illuminated) the cruise
control can be switched on acciden-
tally. Keep the cruise control system
off (CRUISE indicator light OFF)
when the cruise control is not in use,
to avoid inadvertently setting a
speed.
Use the cruise control system only
when traveling on open highways in
good weather.
Do not use the cruise control when
driving in heavy or varying traffic, or
on slippery (rainy, icy or snow-cov-
ered) or winding roads or over 6%
up-hill or down-hill roads.✽ ✽
NOTICE
• During normal cruise control
operation, when the SET switch is
activated or reactivated after
applying the brakes, the cruise
control will energize after approx-
imately 3 seconds. This delay is
normal.
• To activate cruise control, depress the brake pedal at least once after
turning the ignition switch to the
ON position or starting the engine.
This is to check if the brake switch
which is important part to cancel
cruise control is in normal condi-
tion.
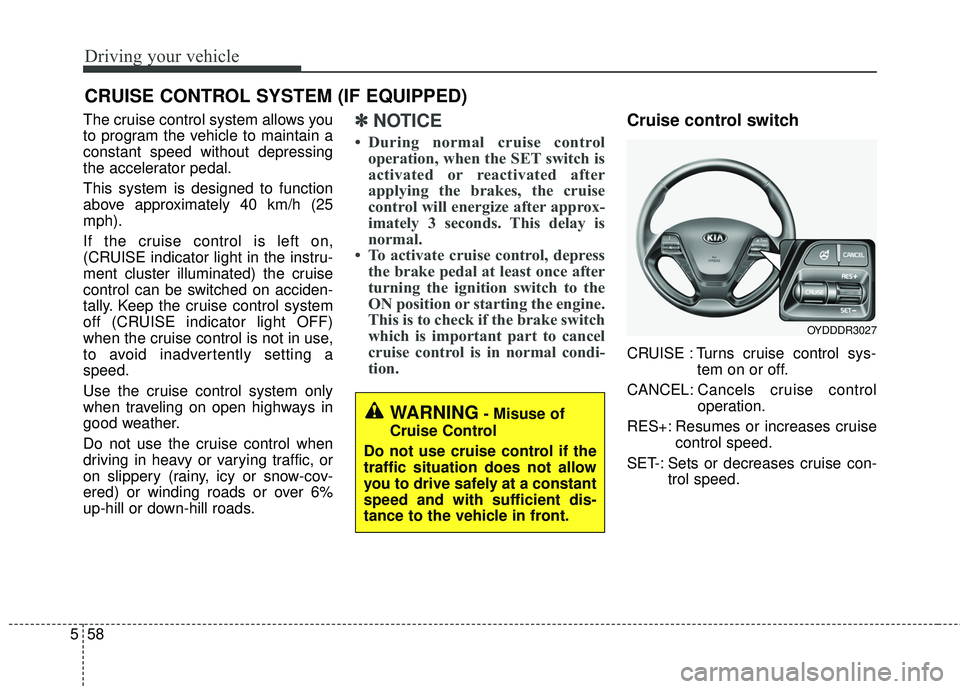
Cruise control switch
CRUISE : Turns cruise control sys-
tem on or off.
CANCEL: Cancels cruise control
operation.
RES+: Resumes or increases cruise control speed.
SET-: Sets or decreases cruise con- trol speed.
CRUISE CONTROL SYSTEM (IF EQUIPPED)
WARNING- Misuse of
Cruise Control
Do not use cruise control if the
traffic situation does not allow
you to drive safely at a constant
speed and with sufficient dis-
tance to the vehicle in front.
OYDDDR3027
Page 423 of 584
Driving your vehicle
82
5
Your vehicle's fuel economy depends
mainly on your style of driving, where
you drive and when you drive.
Each of these factors affects how
many kilometers (miles) you can get
from a liter (gallon) of fuel. To operate
your vehicle as economically as pos-
sible, use the following driving sug-
gestions to help save money in both
fuel and repairs:
Drive smoothly. Accelerate at a
moderate rate. Don't make "jack-
rabbit" starts or full-throttle shifts
and maintain a steady cruising
speed. Don't race between stop-
lights. Try to adjust your speed to
the traffic so you don't have to
change speeds unnecessarily.
Avoid heavy traffic whenever pos-
sible. Always maintain a safe dis-
tance from other vehicles so you
can avoid unnecessary braking.
This also reduces brake wear.
Drive at a moderate speed. The faster you drive, the more fuel your
vehicle uses. Driving at a moderate
speed, especially on the highway,
is one of the most effective ways to
reduce fuel consumption. Don't "ride" the brake pedal. This
can increase fuel consumption and
also increase wear on these com-
ponents. In addition, driving with
your foot resting on the brake pedal
may cause the brakes to overheat,
which reduces their effectiveness
and may lead to more serious con-
sequences.
Take care of your tires. Keep them inflated to the recommended pres-
sure. Incorrect inflation, either too
much or too little, results in unnec-
essary tire wear. Check the tire
pressures at least once a month.
Be sure that the wheels are aligned correctly. Improper align-
ment can result from hitting curbs
or driving too fast over irregular
surfaces. Poor alignment causes
faster tire wear and may also result
in other problems as well as
greater fuel consumption. Keep your vehicle in good condi-
tion. For better fuel economy and
reduced maintenance costs, main-
tain your vehicle in accordance
with the maintenance schedule in
section 7. If you drive your vehicle
in severe conditions, more frequent
maintenance is required (see sec-
tion 7 for details).
Keep your vehicle clean. For maxi- mum service, your vehicle should
be kept clean and free of corrosive
materials. It is especially important
that mud, dirt, ice, etc. not be
allowed to accumulate on the
underside of the vehicle. This extra
weight can result in increased fuel
consumption and also contribute to
corrosion.
Travel lightly. Don't carry unneces- sary weight in your vehicle. Weight
reduces fuel economy.
Don't let the engine idle longer than necessary. If you are waiting
(and not in traffic), turn off your
engine and restart only when
you're ready to go.
ECONOMICAL OPERATION
Page 441 of 584
What to do in an emergency
46
IF THE ENGINE WILL NOT START
If the engine doesn't turn over
or turns over slowly
1.If your vehicle has an Automatictransaxle/ Dual Clutch Transaxle,
be sure the shift lever is in N
(Neutral) or P (Park) and the emer-
gency brake is set.
2.Check the battery connections to be sure they are clean and tight.
3.Turn on the interior light. If the light dims or goes out when you operate
the starter, the battery is dis-
charged.
4.Check the starter connections to be sure they are securely tight-
ened.
5.Do not push or pull the vehicle to start it. See instructions for "Jump
starting".
If engine turns over normally
but does not start
1.Check fuel level.
2.With the ignition switch in theLOCK position, check all connec-
tors at the ignition coil and spark
plugs. Reconnect any that may be
disconnected or loose.
3.Check the fuel line in the engine compartment.
4.If the engine still does not start, call an authorized Kia dealer or seek
other qualified assistance.
WARNING - Push/pull start
Do not push or pull the vehicle
to start it. Push or pull starting
may cause the catalytic con-
verter to overload and create a
fire hazard.
Page 469 of 584
77
Maintenance
OWNER MAINTENANCE
The following lists are vehicle checks
and inspections that should be per-
formed by the owner or an author-
ized Kia dealer at the frequencies
indicated to help ensure safe,
dependable operation of your vehi-
cle.
Any adverse conditions should be
brought to the attention of your deal-
er as soon as possible.
These Owner Maintenance Checks
are generally not covered by war-
ranties and you may be charged for
labor, parts and lubricants used.Owner maintenance schedule
When you stop for fuel:
Check the engine oil level.
Check the coolant level in coolantreservoir.
Check the windshield washer fluid level.
Look for low or under-inflated tires.
While operating your vehicle:
Note any changes in the sound of the exhaust or any smell of
exhaust fumes in the vehicle.
Check for vibrations in the steering wheel. Notice any increased steer-
ing effort or looseness in the steer-
ing wheel, or change in its straight-
ahead position.
Notice if your vehicle constantly turns slightly or “pulls” to one side
when traveling on smooth, level
road.
When stopping, listen and check for unusual sounds, pulling to one
side, increased brake pedal travel
or “hard-to-push” brake pedal.
If any slipping or changes in the operation of your transaxle occurs,
check the transaxle fluid level.
Check the automatic transaxle P (Park) function.
Check the parking brake.
Check for fluid leaks under your vehicle (water dripping from the air
conditioning system during or after
use is normal).
WARNING- Hot coolant
Be careful when checking your
engine coolant level when the
engine is hot. Scalding hot
coolant and steam may blow
out under pressure.
Page 470 of 584
Maintenance
87
At least monthly:
Check the coolant level in theengine coolant reservoir.
Check the operation of all exterior lights, including the stoplights, turn
signals and hazard warning flash-
ers.
Check the inflation pressures of all tires including the spare.
At least twice a year
(i.e., every Spring and Fall) :
Check the radiator, heater and air conditioning hoses for leaks or
damage.
Check the windshield washer spray and wiper operation. Clean
the wiper blades with clean cloth
dampened with washer fluid.
Check the headlight alignment.
Check the muffler, exhaust pipes, shields and clamps.
Check the lap/shoulder belts for wear and function.
Check for worn tires and loose wheel lug nuts.
At least once a year :
Clean the body and door drainholes.
Lubricate the door hinges and check the hood hinges.
Lubricate the door and hood locks and latches.
Lubricate the door rubber weather- strips.
Check the air conditioning system.
Check the power steering fluid level.
Inspect and lubricate automatic transaxle linkage and controls.
Clean the battery and terminals.
Check the brake/clutch fluid level.
Page 526 of 584
Maintenance
64
7
FUSES
A vehicle's electrical system is protect-
ed from electrical overload damage by
fuses.
This vehicle has 2 fuse panels, one
located in the driver's side panel bol-
ster, others in the engine compart-
ment near the battery.
If any of your vehicle's lights, acces-
sories, or controls do not work, check
the appropriate circuit fuse. If a fuse
has blown, the element inside the fuse
will be melted.
If the electrical system does not work,
first check the driver's side fuse panel.
Always replace a blown fuse with one
of the same rating.
Before replacing a blown fuse, move
to safe place, turn off the engine and
all electric devices, and disconnect the
negative battery cable.
If the replacement fuse blows, this
indicates an electrical problem. Avoid
using the system involved and we rec-
ommend that you consult an author-
ized Kia dealer.
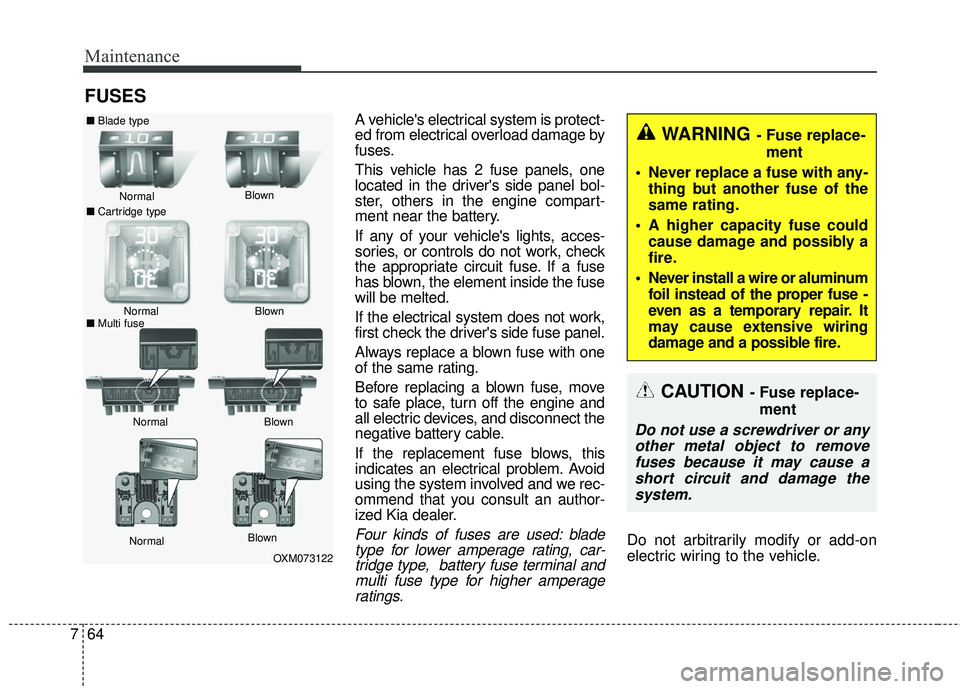
Four kinds of fuses are used: blade
type for lower amperage rating, car-tridge type, battery fuse terminal andmulti fuse type for higher amperageratings.Do not arbitrarily modify or add-on
electric wiring to the vehicle.
WARNING - Fuse replace-
ment
Never replace a fuse with any- thing but another fuse of the
same rating.
A higher capacity fuse could cause damage and possibly a
fire.
Never install a wire or aluminum foil instead of the proper fuse -
even as a temporary repair. It
may cause extensive wiring
damage and a possible fire.
CAUTION - Fuse replace-
ment
Do not use a screwdriver or anyother metal object to removefuses because it may cause ashort circuit and damage thesystem.
OXM073122
Normal
Normal
■
Blade type
■ Cartridge type
■ Multi fuse Blown
Blown
Normal Blown
Normal Blown
Page 528 of 584
Maintenance
66
7
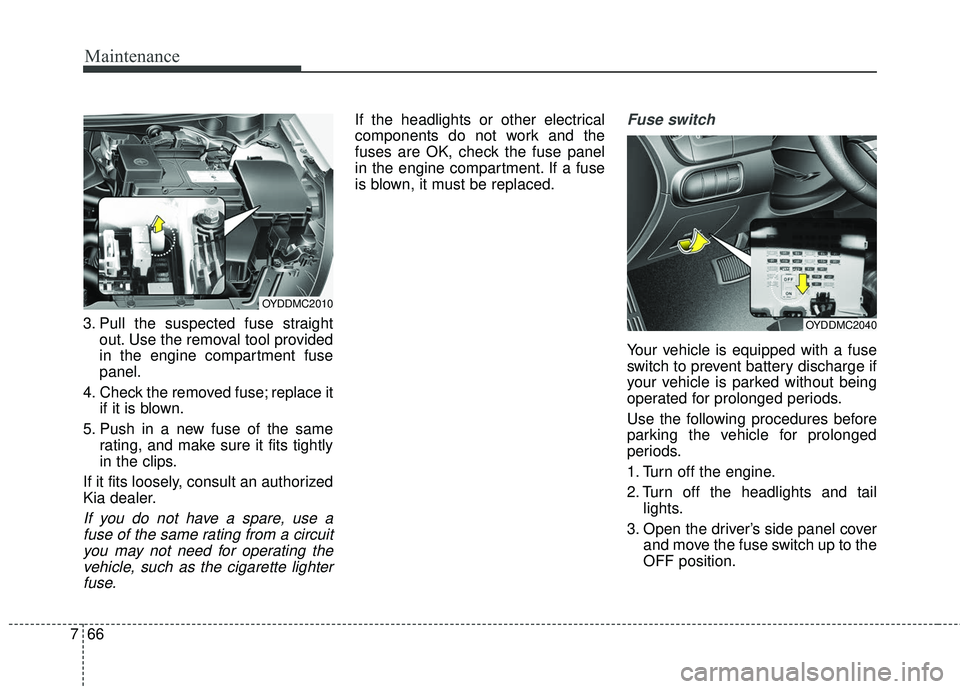
3. Pull the suspected fuse straight
out. Use the removal tool provided
in the engine compartment fuse
panel.
4. Check the removed fuse; replace it if it is blown.
5. Push in a new fuse of the same rating, and make sure it fits tightly
in the clips.
If it fits loosely, consult an authorized
Kia dealer.
If you do not have a spare, use a fuse of the same rating from a circuityou may not need for operating thevehicle, such as the cigarette lighterfuse.
If the headlights or other electrical
components do not work and the
fuses are OK, check the fuse panel
in the engine compartment. If a fuse
is blown, it must be replaced.Fuse switch
Your vehicle is equipped with a fuse
switch to prevent battery discharge if
your vehicle is parked without being
operated for prolonged periods.
Use the following procedures before
parking the vehicle for prolonged
periods.
1. Turn off the engine.
2. Turn off the headlights and tail lights.
3. Open the driver’s side panel cover and move the fuse switch up to the
OFF position.
OYDDMC2040
OYDDMC2010
Page 529 of 584
767
Maintenance
✽ ✽NOTICE
• If the fuse switch is in the OFF
position, the warning chime,
audio, clock and interior lamps,
etc., will not operate. Some items
must be reset after replacement.
Refer to “Battery” in this chapter.
• Even when the fuse switch is in the OFF position, the battery can still
be discharged by operation of the
headlights or other electrical
devices.
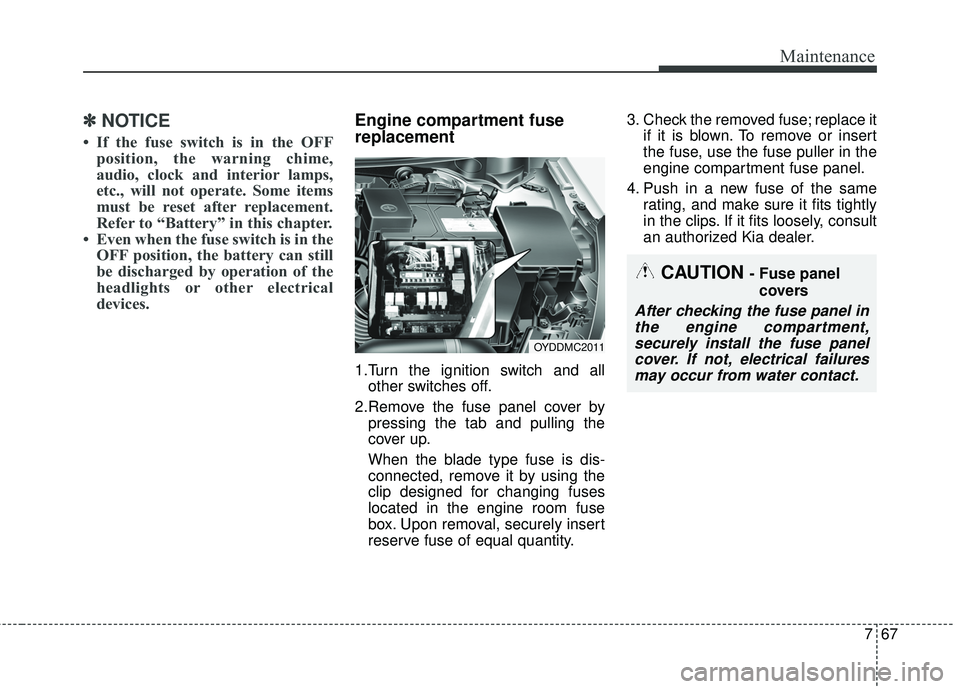
Engine compartment fuse
replacement
1.Turn the ignition switch and all
other switches off.
2.Remove the fuse panel cover by pressing the tab and pulling the
cover up.
When the blade type fuse is dis-
connected, remove it by using the
clip designed for changing fuses
located in the engine room fuse
box. Upon removal, securely insert
reserve fuse of equal quantity. 3. Check the removed fuse; replace it
if it is blown. To remove or insert
the fuse, use the fuse puller in the
engine compartment fuse panel.
4. Push in a new fuse of the same rating, and make sure it fits tightly
in the clips. If it fits loosely, consult
an authorized Kia dealer.
CAUTION - Fuse panel
covers
After checking the fuse panel inthe engine compartment,securely install the fuse panelcover. If not, electrical failuresmay occur from water contact.
OYDDMC2011
Page 547 of 584
785
Maintenance
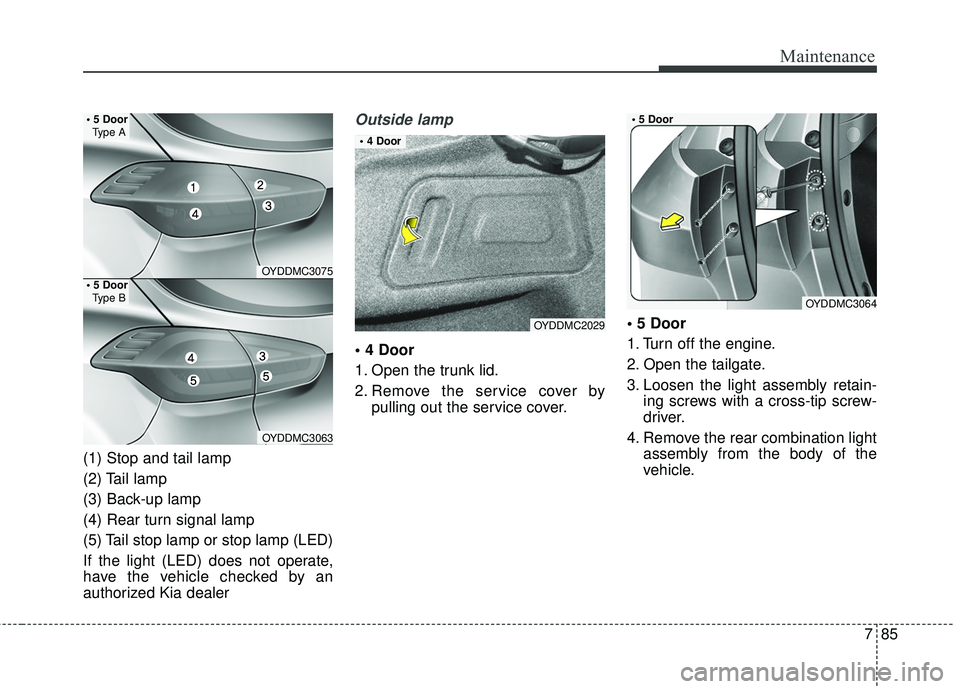
(1) Stop and tail lamp
(2) Tail lamp
(3) Back-up lamp
(4) Rear turn signal lamp
(5) Tail stop lamp or stop lamp (LED)
If the light (LED) does not operate,
have the vehicle checked by an
authorized Kia dealer
Outside lamp
1. Open the trunk lid.
2. Remove the service cover bypulling out the service cover.
1. Turn off the engine.
2. Open the tailgate.
3. Loosen the light assembly retain-
ing screws with a cross-tip screw-
driver.
4. Remove the rear combination light assembly from the body of the
vehicle.
OYDDMC2029
OYDDMC3064
OYDDMC3075
OYDDMC3063
Type A
Type B
Page 580 of 584
I5
Index
If the engine doesn't turn over or turns over slowly. . 6-4
If you have a flat tire . . . . . . . . . . . . . . . . . . . . . . . . . . . 6-13 Changing tires . . . . . . . . . . . . . . . . . . . . . . . . . . . . . . 6-14
Jack and tools . . . . . . . . . . . . . . . . . . . . . . . . . . . . . . 6-13
Jack label . . . . . . . . . . . . . . . . . . . . . . . . . . . . . . . . . 6-21
Removing and storing the spare tire . . . . . . . . . . . . . 6-14
If you have a flat tire (with tire mobility kit) . . . . . . . . . 6-7 Checking the tire inflation pressure . . . . . . . . . . . . . 6-11
Components of the Tire Mobility Kit . . . . . . . . . . . . . 6-9
Distributing the sealant . . . . . . . . . . . . . . . . . . . . . . . 6-11
Introduction. . . . . . . . . . . . . . . . . . . . . . . . . . . . . . . . . 6-7
Notes on the safe use of the Tire Mobility Kit . . . . . . 6-8
Technical Data . . . . . . . . . . . . . . . . . . . . . . . . . . . . . 6-12
Using the Tire Mobility Kit . . . . . . . . . . . . . . . . . . . 6-10
In case of an emergency while driving . . . . . . . . . . . . . . 6-3 If engine stalls while driving . . . . . . . . . . . . . . . . . . . 6-3
If the engine stalls at a crossroad or crossing. . . . . . . 6-3
If you have a flat tire while driving . . . . . . . . . . . . . . 6-3
Instrument cluster . . . . . . . . . . . . . . . . . . . . . . . . . . . . . 4-56 Gauges . . . . . . . . . . . . . . . . . . . . . . . . . . . . . . . . . . . 4-\
58
Instrument Cluster Control . . . . . . . . . . . . . . . . . . . . 4-57
LCD window Control . . . . . . . . . . . . . . . . . . . . . . . . 4-58
Transaxle Shift Indicator . . . . . . . . . . . . . . . . . . . . . 4-61
Instrument panel overview . . . . . . . . . . . . . . . . . . . . . . . 2-5
Interior features . . . . . . . . . . . . . . . . . . . . . . . . . . . . . . 4-136 Ashtray . . . . . . . . . . . . . . . . . . . . . . . . . . . . . . . . . . 4-13\
6
Clothes hanger . . . . . . . . . . . . . . . . . . . . . . . . . . . . 4-143
Covering shelf (5 Door) . . . . . . . . . . . . . . . . . . . . . 4-145 Cup holder . . . . . . . . . . . . . . . . . . . . . . . . . . . . . . . 4-136
Floor mat anchor(s) . . . . . . . . . . . . . . . . . . . . . . . . 4-143
LCD monitor (clock) . . . . . . . . . . . . . . . . . . . . . . . 4-142
Luggage net (holder) . . . . . . . . . . . . . . . . . . . . . . . 4-144
Navigation system . . . . . . . . . . . . . . . . . . . . . . . . . 4-146
Power outlet . . . . . . . . . . . . . . . . . . . . . . . . . . . . . . 4-141
Seat warmer . . . . . . . . . . . . . . . . . . . . . . . . . . . . . . 4-138
Sliding armrest . . . . . . . . . . . . . . . . . . . . . . . . . . . . 4-137
Sunvisor . . . . . . . . . . . . . . . . . . . . . . . . . . . . . . . . . 4-138
Ventilated seat . . . . . . . . . . . . . . . . . . . . . . . . . . . . . 4-140
Interior light. . . . . . . . . . . . . . . . . . . . . . . . . . . . . . . . . 4-103 Automatic turn off function . . . . . . . . . . . . . . . . . . 4-103
Glove box lamp . . . . . . . . . . . . . . . . . . . . . . . . . . . 4-106
Luggage room lamp . . . . . . . . . . . . . . . . . . . . . . . . 4-105
Map lamp . . . . . . . . . . . . . . . . . . . . . . . . . . . . . . . . 4-103
Room lamp . . . . . . . . . . . . . . . . . . . . . . . . . . . . . . . 4-104
Vanity mirror lamp . . . . . . . . . . . . . . . . . . . . . . . . . 4-106
Interior overview . . . . . . . . . . . . . . . . . . . . . . . . . . . . . . . 2-4
Key positions . . . . . . . . . . . . . . . . . . . . . . . . . . . . . . . . . . 5-6 Ignition switch position . . . . . . . . . . . . . . . . . . . . . . . 5-6
Illuminated ignition switch . . . . . . . . . . . . . . . . . . . . . 5-6
Keys . . . . . . . . . . . . . . . . . . . . . . . . . . . . . . . . . . . . \
. . . . . 4-4 Key operations . . . . . . . . . . . . . . . . . . . . . . . . . . . . . . 4-4
Record your key number . . . . . . . . . . . . . . . . . . . . . . 4-4
K
YDM CAN (ENG) Index.qxp 9/11/2017 12:44 PM Page 5