service KIA FORTE 2019 Service Manual
[x] Cancel search | Manufacturer: KIA, Model Year: 2019, Model line: FORTE, Model: KIA FORTE 2019Pages: 550, PDF Size: 11.66 MB
Page 460 of 550
737
Maintenance
BATTERY
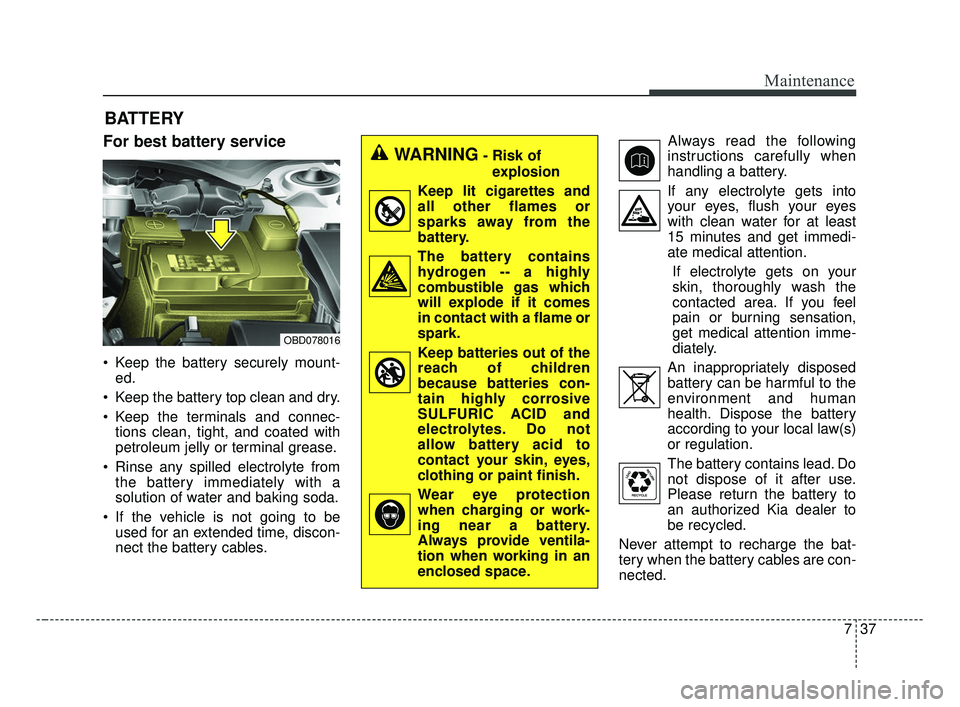
For best battery service
Keep the battery securely mount-ed.
Keep the battery top clean and dry.
Keep the terminals and connec- tions clean, tight, and coated with
petroleum jelly or terminal grease.
Rinse any spilled electrolyte from the battery immediately with a
solution of water and baking soda.
If the vehicle is not going to be used for an extended time, discon-
nect the battery cables. Always read the following
instructions carefully when
handling a battery.
If any electrolyte gets into your eyes, flush your eyes
with clean water for at least
15 minutes and get immedi-
ate medical attention.
If electrolyte gets on your
skin, thoroughly wash the
contacted area. If you feel
pain or burning sensation,
get medical attention imme-
diately.
An inappropriately disposed battery can be harmful to the
environment and human
health. Dispose the battery
according to your local law(s)
or regulation.
The battery contains lead. Do
not dispose of it after use.
Please return the battery to
an authorized Kia dealer to
be recycled.
Never attempt to recharge the bat-
tery when the battery cables are con-
nected.
WARNING- Risk of explosion
Keep lit cigarettes and
all other flames or
sparks away from the
battery.
The battery contains hydrogen -- a highly
combustible gas which
will explode if it comes
in contact with a flame or
spark.
Keep batteries out of the reach of children
because batteries con-
tain highly corrosive
SULFURIC ACID and
electrolytes. Do not
allow battery acid to
contact your skin, eyes,
clothing or paint finish.
Wear eye protection when charging or work-
ing near a battery.
Always provide ventila-
tion when working in an
enclosed space.
OBD078016
BDm CAN (ENG) 7.qxp 7/4/2018 10:25 AM Page 37
Page 471 of 550
Maintenance
48
7
Tread wear
The tread wear grade is a compara-
tive rating based on the wear rate of
the tire when tested under controlled
conditions on a specified govern-
ment test course. For example, a tire
graded 150 would wear one-and-a-
half times (1½) as well on the gov-
ernment course as a tire graded 100.
The relative performance of tires
depends upon the actual conditions
of their use, however, and may
depart significantly from the norm
due to variations in driving habits,
service practices and differences in
road characteristics and climate. Tires degrade over time, even when
they are not being used. Regardless
of the remaining tread, we recom-
mend that tires be replaced after
approximately six (6) years of normal
service. Heat caused by hot climates
or frequent high loading conditions
can accelerate the aging process.
These grades are molded on the
side-walls of passenger vehicle tires.
The tires available as standard or
optional equipment on your vehicles
may vary with respect to grade.
Traction - AA, A, B & C
The traction grades, from highest to
lowest, are AA, A, B and C. Those
grades represent the tires ability to
stop on wet pavement as measured
under controlled conditions on spec-
ified government test surfaces of
asphalt and concrete. A tire marked
C may have poor traction perform-
ance.
The traction grade assigned to this
tire is based on straight-ahead brak-
ing traction tests, and does not
include acceleration, cornering,
hydroplaning, or peak traction char-
acteristics.
BDm CAN (ENG) 7.qxp 7/4/2018 10:25 AM Page 48
Page 494 of 550
771
Maintenance
LIGHT BULBS
Bulb replacement precaution
Please keep extra bulbs on hand
with appropriate wattage ratings in
case of emergencies.
Refer to “Bulb Wattage” in chapter 8.
When changing lamps, first turn off
the engine at a safe place, firmly
apply the parking brake and detach
the battery’s negative (-) terminal.
net-work failure
The headlamp, taillight, and fog light
may light up when the head lamp
switch is turned ON, and not light up
when the taillight or for light switch is
turned ON. This may be cause by
network failure or vehicle electrical
control system malfunction. If there is
a problem, we recommend the sys-
tem be serviced by an authorized Kia
dealer.
trical control system stabilization
A normally functioning lamp may
flicker momentarily. This momentary
occurrence is due to the stabilization
function of the vehicle's electrical
control system. If the lamp stops
flickering after a few moments, the
vehicle does not require service.
However, if the lamp goes out after
the momentary flickering, or the flick-
ering continues, we recommend the
system be serviced by an authorized
Kia dealer.
WARNING- Working on the lights
Prior to working on the light,
firmly apply the parking brake,
ensure that the ignition switch
is turned to the LOCK position
and turn off the lights to avoid
sudden movement of the vehi-
cle , burns to your skin for fin-
gers, or an electric shock.
CAUTION -Light replace-
ment
Be sure to replace the burned- out bulb with one of the samewattage rating. Otherwise, itmay cause damage to the fuseor electric wiring system.
CAUTION -Headlamp
Lens
To prevent damage, do notclean the headlamp lens withchemical solvents or strongdetergents.
BDm CAN (ENG) 7.qxp 7/4/2018 10:26 AM Page 71
Page 504 of 550
781
Maintenance
5. Insert a new bulb in the socket.
6. Reassemble the socket and thelens part.
7. Connect the bulb electrical con- nector.
8. Reinstall the lamp assembly to the body of the vehicle.Stop and tail lamp/side marker
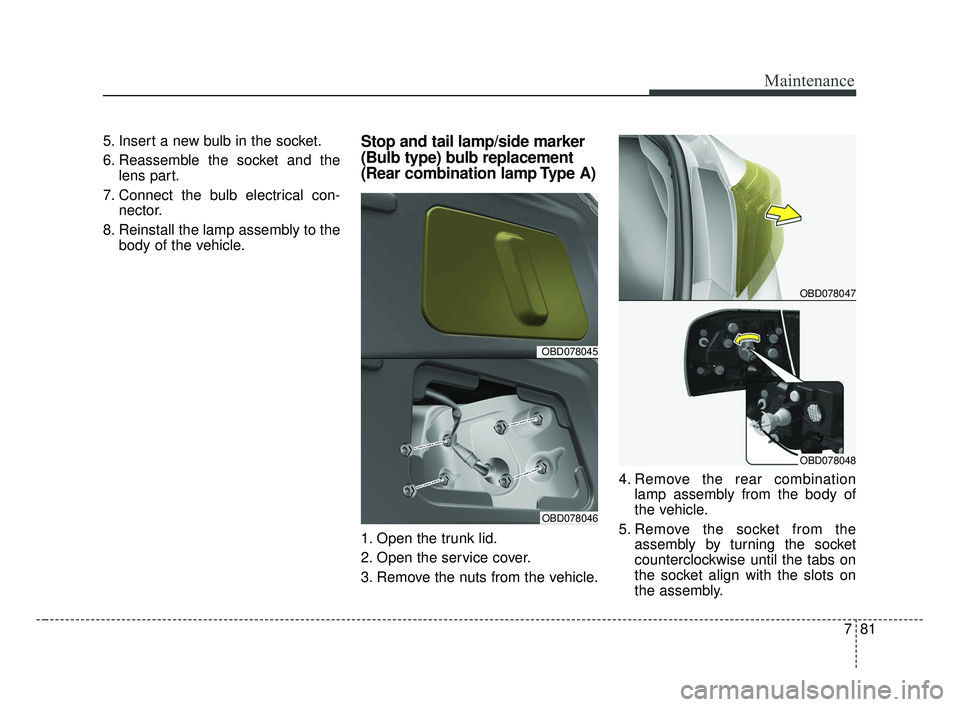
(Bulb type) bulb replacement
(Rear combination lamp Type A)
1. Open the trunk lid.
2. Open the service cover.
3. Remove the nuts from the vehicle. 4. Remove the rear combination
lamp assembly from the body of
the vehicle.
5. Remove the socket from the assembly by turning the socket
counterclockwise until the tabs on
the socket align with the slots on
the assembly.
OBD078045
OBD078046
OBD078047
OBD078048
BDm CAN (ENG) 7.qxp 7/4/2018 10:27 AM Page 81
Page 505 of 550
Maintenance
82
7
6. Remove the bulb from the socket
by pressing it in and rotating it
counterclockwise until the tabs on
the bulb align with the slots in the
socket. Pull the bulb out of the
socket.
7. Insert a new bulb by inserting it into the socket and rotating it until
it locks into place.
8. Install the socket in the assembly by aligning the tabs on the socket
with the slots in the assembly.
Push the socket into the assembly
and turn the socket clockwise.
9. Install the rear combination lamp assembly to the body of the vehicle.
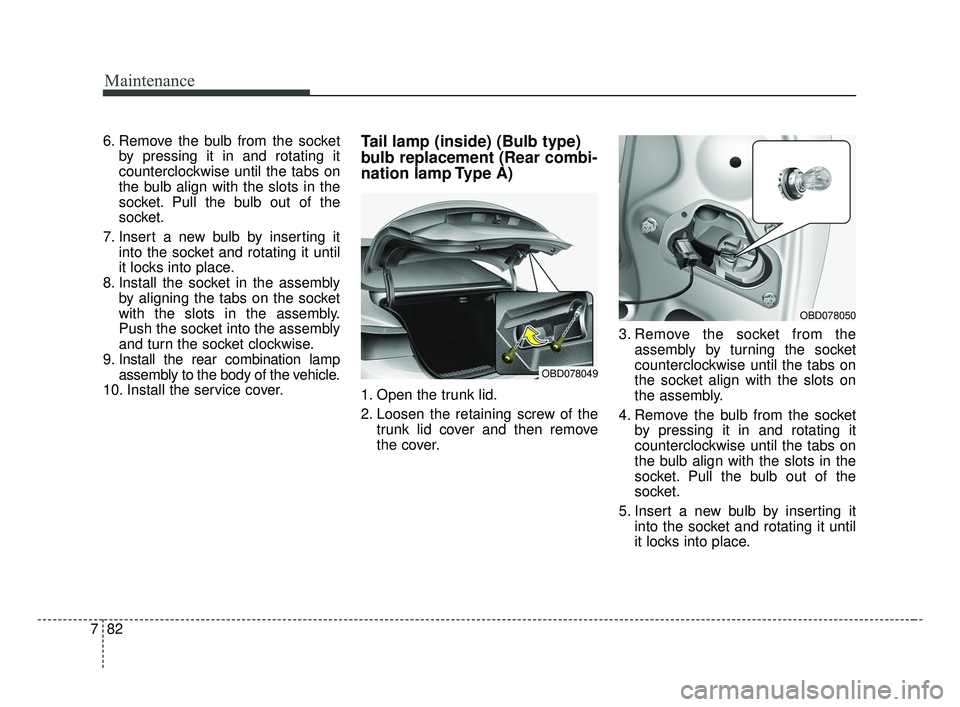
10. Install the service cover.Tail lamp (inside) (Bulb type)
bulb replacement (Rear combi-
nation lamp Type A)
1. Open the trunk lid.
2. Loosen the retaining screw of the trunk lid cover and then remove
the cover. 3. Remove the socket from the
assembly by turning the socket
counterclockwise until the tabs on
the socket align with the slots on
the assembly.
4. Remove the bulb from the socket by pressing it in and rotating it
counterclockwise until the tabs on
the bulb align with the slots in the
socket. Pull the bulb out of the
socket.
5. Insert a new bulb by inserting it into the socket and rotating it until
it locks into place.
OBD078049
OBD078050
BDm CAN (ENG) 7.qxp 7/4/2018 10:27 AM Page 82
Page 517 of 550
Maintenance
94
7
Do a thorough washing of the
undercarriage at the end of the
winter.
Use professional service techni- cians or governmental inspection
stations to annually inspect for cor-
rosion.
Immediately seek an inspection of your vehicle if you become visually
aware of corrosion flaking or scal-
ing or if you become aware of a
change in vehicle performance,
such as soft or spongey brakes,
fluids leaking, impairment of direc-
tional control, suspension noises
or rattling metal straps.Aluminum wheel maintenance
The aluminum wheels are coated
with a clear protective finish.
Do not use any abrasive cleaner,polishing compound, solvent, or
wire brushes on aluminum wheels.
They may scratch the finish.
Clean the wheel when it has cooled.
Use only a mild soap or neutral detergent, and rinse thoroughly
with water. Also, be sure to clean
the wheels after driving on salted
roads. This helps prevent corro-
sion.
Avoid washing the wheels with highspeed vehicle wash brushes.
Do not use any alkaline or acid detergents It may damage and cor-
rode the aluminum wheels coated
with a clear protective finish.
Corrosion protection
Protecting your vehicle from corrosion
By using the most advanced design
and construction practices to combat
corrosion, we produce vehicles of
the highest quality. However, this is
only part of the job. To achieve the
long-term corrosion resistance your
vehicle can deliver, the owner's
cooperation and assistance is also
required.
Common causes of corrosion
The most common causes of corro-
sion on your vehicle are:
Road salt, dirt and moisture that isallowed to accumulate underneath
the vehicle.
Removal of paint or protective coatings by stones, gravel, abra-
sion or minor scrapes and dents
which leave unprotected metal
exposed to corrosion.
BDm CAN (ENG) 7.qxp 7/4/2018 10:27 AM Page 94
Page 531 of 550
Specifications, Consumer information, Reporting safety defects
68
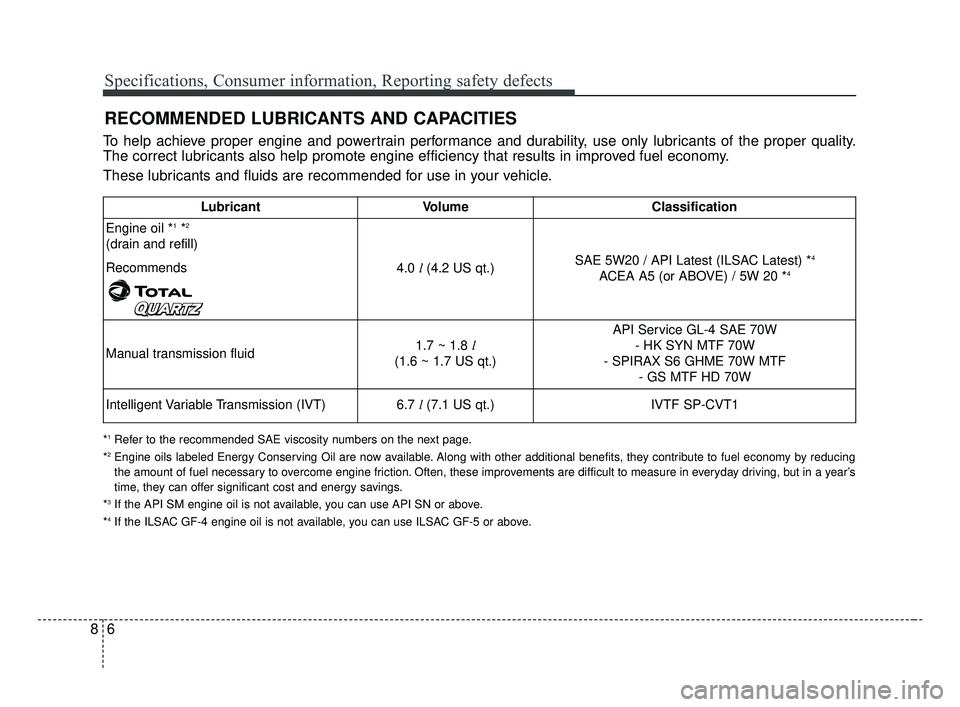
RECOMMENDED LUBRICANTS AND CAPACITIES
To help achieve proper engine and powertrain performance and durability, use only lubricants of the proper quality.
The correct lubricants also help promote engine efficiency that results in improved fuel economy.
These lubricants and fluids are recommended for use in your vehicle.
*1Refer to the recommended SAE viscosity numbers on the next page.
*2Engine oils labeled Energy Conserving Oil are now available. Along with other additional benefits, they contribute to fuel econo my by reducing
the amount of fuel necessary to overcome engine friction. Often, these improvements are difficult to measure in everyday driving, but in a year’s
time, they can offer significant cost and energy savings.
*
3If the API SM engine oil is not available, you can use API SN or above.
*4If the ILSAC GF-4 engine oil is not available, you can use ILSAC GF-5 or above.
LubricantVolume Classification
Engine oil *
1*2
(drain and refill)
Recommends
4.0 l(4.2 US qt.) SAE 5W20 / API Latest (ILSAC Latest) *4
ACEA A5 (or ABOVE) / 5W 20 *4
Manual transmission fluid1.7 ~ 1.8 l
(1.6 ~ 1.7 US qt.) API Service GL-4 SAE 70W
- HK SYN MTF 70W
- SPIRAX S6 GHME 70W MTF - GS MTF HD 70W
Intelligent Variable Transmission (IVT)
6.7 l(7.1 US qt.)
IVTF SP-CVT1
BDm CAN (ENG) 8.qxp 7/4/2018 5:40 PM Page 6
Page 537 of 550
Index
2I
Air bag warning label . . . . . . . . . . . . . . . . . . . . . . . . . . 3-69
Air bag warning light . . . . . . . . . . . . . . . . . . . . . . . . . . 3-46
Air bags. . . . . . . . . . . . . . . . . . . . . . . . . . . . . . . . . . . . \
. 3-43Air bag warning label. . . . . . . . . . . . . . . . . . . . . . . . 3-69
Air bag warning light . . . . . . . . . . . . . . . . . . . . . . . . 3-46
Curtain air bag . . . . . . . . . . . . . . . . . . . . . . . . . . . . . 3-62
Driver's and passenger's front air bag . . . . . . . . . . . 3-58
Inflation conditions . . . . . . . . . . . . . . . . . . . . . . . . . 3-64
Non-inflation conditions . . . . . . . . . . . . . . . . . . . . . 3-66
Occupant detection system. . . . . . . . . . . . . . . . . . . . 3-50
Operation . . . . . . . . . . . . . . . . . . . . . . . . . . . . . . . . . 3-44
Side air bag. . . . . . . . . . . . . . . . . . . . . . . . . . . . . . . . 3-60
SRS Care . . . . . . . . . . . . . . . . . . . . . . . . . . . . . . . . . 3-68
SRS components and functions . . . . . . . . . . . . . . . . 3-47
Air cleaner . . . . . . . . . . . . . . . . . . . . . . . . . . . . . . . . . . 7-29\
Filter replacement. . . . . . . . . . . . . . . . . . . . . . . . . . . 7-29
Air conditioning system lubricants. . . . . . . . . . . . . . . . . 8-5
Air ventilation seat . . . . . . . . . . . . . . . . . . . . . . . . . . . 4-146
Antenna . . . . . . . . . . . . . . . . . . . . . . . . . . . . . . . . . . . . \
4-155
Anti-lock Brake System (ABS) . . . . . . . . . . . . . . . . . . 5-36
Appearance care . . . . . . . . . . . . . . . . . . . . . . . . . . . . . . 7-91 Exterior care . . . . . . . . . . . . . . . . . . . . . . . . . . . . . . . 7-91
Interior care . . . . . . . . . . . . . . . . . . . . . . . . . . . . . . . 7-96
Armed stage . . . . . . . . . . . . . . . . . . . . . . . . . . . . . . . . . 4-16
Armrest (rear) . . . . . . . . . . . . . . . . . . . . . . . . . . . . . . . . 3-15 Audio system . . . . . . . . . . . . . . . . . . . . . . . . . . . . . . . 4-155
Antenna . . . . . . . . . . . . . . . . . . . . . . . . . . . . . . . . . 4-155
AUX, USB port . . . . . . . . . . . . . . . . . . . . . . . . . . . 4-156
How vehicle audio works. . . . . . . . . . . . . . . . . . . . 4-156
Auto defogging system . . . . . . . . . . . . . . . . . . . . . . . . 4-140
Auto light . . . . . . . . . . . . . . . . . . . . . . . . . . . . . . . . . . 4-10\
1
Automatic climate control system . . . . . . . . . . . . . . . 4-125 Automatic heating and air conditioning. . . . . . . . . 4-126
Checking the amount of air conditioner refrigerant and compressor lubricant . . . . . . . . . . . . . . . . . . . . . . 4-135
Climate control air filter. . . . . . . . . . . . . . . . . . . . . 4-135
Manual heating and air conditioning . . . . . . . . . . . 4-127
System operation . . . . . . . . . . . . . . . . . . . . . . . . . . 4-133
Automatic heating and air conditioning . . . . . . . . . . . 4-127
AUX, USB port . . . . . . . . . . . . . . . . . . . . . . . . . . . . . 4-156
Back up lamp bulb replacement . . . . . . . . . . . . . . . . . . 7-84
Battery. . . . . . . . . . . . . . . . . . . . . . . . . . . . . . . . . . . . \
. . 7-37 For best battery service . . . . . . . . . . . . . . . . . . . . . . 7-37
Recharging the battery . . . . . . . . . . . . . . . . . . . . . . . 7-38
Reset items . . . . . . . . . . . . . . . . . . . . . . . . . . . . . . . . 7-39
Battery replacement . . . . . . . . . . . . . . . . . . . . . . . . . . . 4-12
Battery saver function. . . . . . . . . . . . . . . . . . . . . . . . . 4-100
Before driving . . . . . . . . . . . . . . . . . . . . . . . . . . . . . . . . . 5-5
A
B
BDm CAN (ENG) Index.qxp 6/30/2018 2:03 PM Page 2
Page 542 of 550
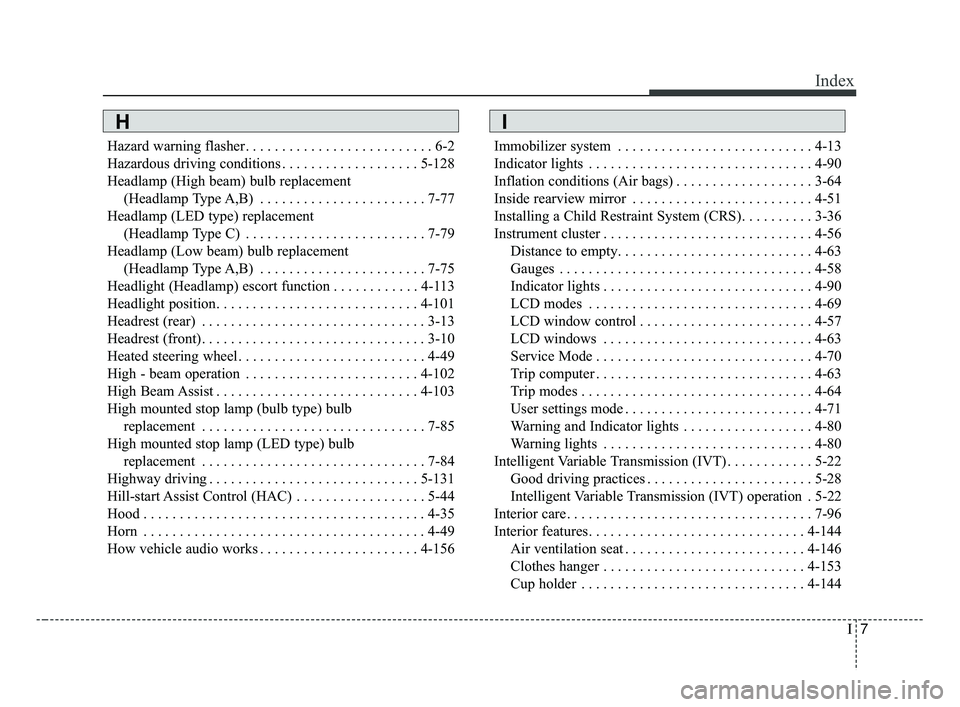
I7
Index
Hazard warning flasher. . . . . . . . . . . . . . . . . . . . . . . . . . 6-2
Hazardous driving conditions . . . . . . . . . . . . . . . . . . . 5-128
Headlamp (High beam) bulb replacement (Headlamp Type A,B) . . . . . . . . . . . . . . . . . . . . . . . 7-77
Headlamp (LED type) replacement (Headlamp Type C) . . . . . . . . . . . . . . . . . . . . . . . . . 7-79
Headlamp (Low beam) bulb replacement (Headlamp Type A,B) . . . . . . . . . . . . . . . . . . . . . . . 7-75
Headlight (Headlamp) escort function . . . . . . . . . . . . 4-113
Headlight position. . . . . . . . . . . . . . . . . . . . . . . . . . . . 4-101
Headrest (rear) . . . . . . . . . . . . . . . . . . . . . . . . . . . . . . . 3-13
Headrest (front). . . . . . . . . . . . . . . . . . . . . . . . . . . . . . . 3-10
Heated steering wheel. . . . . . . . . . . . . . . . . . . . . . . . . . 4-49
High - beam operation . . . . . . . . . . . . . . . . . . . . . . . . 4-102
High Beam Assist . . . . . . . . . . . . . . . . . . . . . . . . . . . . 4-103
High mounted stop lamp (bulb type) bulb replacement . . . . . . . . . . . . . . . . . . . . . . . . . . . . . . . 7-85
High mounted stop lamp (LED type) bulb replacement . . . . . . . . . . . . . . . . . . . . . . . . . . . . . . . 7-84
Highway driving . . . . . . . . . . . . . . . . . . . . . . . . . . . . . 5-131
Hill-start Assist Control (HAC) . . . . . . . . . . . . . . . . . . 5-44
Hood . . . . . . . . . . . . . . . . . . . . . . . . . . . . . . . . . . . . \
. . . 4-35
Horn . . . . . . . . . . . . . . . . . . . . . . . . . . . . . . . . . . . . \
. . . 4-49
How vehicle audio works . . . . . . . . . . . . . . . . . . . . . . 4-156 Immobilizer system . . . . . . . . . . . . . . . . . . . . . . . . . . . 4-13
Indicator lights . . . . . . . . . . . . . . . . . . . . . . . . . . . . . . . 4-90
Inflation conditions (Air bags) . . . . . . . . . . . . . . . . . . . 3-64
Inside rearview mirror . . . . . . . . . . . . . . . . . . . . . . . . . 4-51
Installing a Child Restraint System (CRS). . . . . . . . . . 3-36
Instrument cluster . . . . . . . . . . . . . . . . . . . . . . . . . . . . . 4-56
Distance to empty. . . . . . . . . . . . . . . . . . . . . . . . . . . 4-63
Gauges . . . . . . . . . . . . . . . . . . . . . . . . . . . . . . . . . . . 4-\
58
Indicator lights . . . . . . . . . . . . . . . . . . . . . . . . . . . . . 4-90
LCD modes . . . . . . . . . . . . . . . . . . . . . . . . . . . . . . . 4-69
LCD window control . . . . . . . . . . . . . . . . . . . . . . . . 4-57
LCD windows . . . . . . . . . . . . . . . . . . . . . . . . . . . . . 4-63
Service Mode . . . . . . . . . . . . . . . . . . . . . . . . . . . . . . 4-70
Trip computer . . . . . . . . . . . . . . . . . . . . . . . . . . . . . . 4-63
Trip modes . . . . . . . . . . . . . . . . . . . . . . . . . . . . . . . . 4-64
User settings mode . . . . . . . . . . . . . . . . . . . . . . . . . . 4-71
Warning and Indicator lights . . . . . . . . . . . . . . . . . . 4-80
Warning lights . . . . . . . . . . . . . . . . . . . . . . . . . . . . . 4-80
Intelligent Variable Transmission (IVT) . . . . . . . . . . . . 5-22 Good driving practices . . . . . . . . . . . . . . . . . . . . . . . 5-28
Intelligent Variable Transmission (IVT) operation . 5-22
Interior care. . . . . . . . . . . . . . . . . . . . . . . . . . . . . . . . . . 7-96\
Interior features. . . . . . . . . . . . . . . . . . . . . . . . . . . . . . 4-144 Air ventilation seat . . . . . . . . . . . . . . . . . . . . . . . . . 4-146
Clothes hanger . . . . . . . . . . . . . . . . . . . . . . . . . . . . 4-153
Cup holder . . . . . . . . . . . . . . . . . . . . . . . . . . . . . . . 4-144
HI
BDm CAN (ENG) Index.qxp 6/30/2018 2:03 PM Page 7
Page 544 of 550
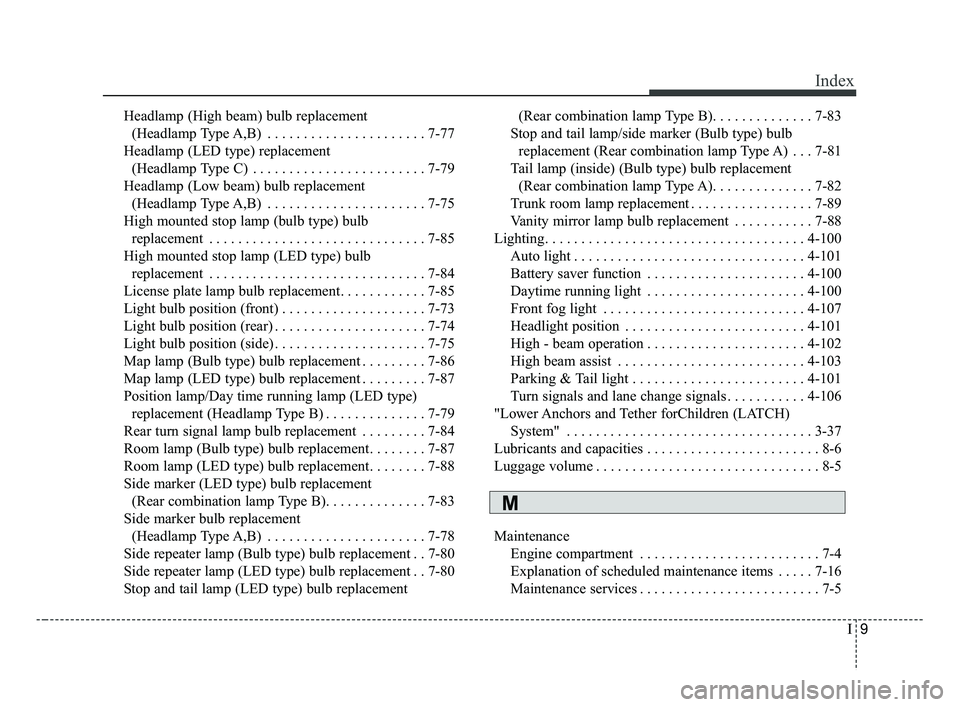
I9
Index
Headlamp (High beam) bulb replacement (Headlamp Type A,B) . . . . . . . . . . . . . . . . . . . . . . 7-77
Headlamp (LED type) replacement (Headlamp Type C) . . . . . . . . . . . . . . . . . . . . . . . . 7-79
Headlamp (Low beam) bulb replacement (Headlamp Type A,B) . . . . . . . . . . . . . . . . . . . . . . 7-75
High mounted stop lamp (bulb type) bulb replacement . . . . . . . . . . . . . . . . . . . . . . . . . . . . . . 7-85
High mounted stop lamp (LED type) bulb replacement . . . . . . . . . . . . . . . . . . . . . . . . . . . . . . 7-84
License plate lamp bulb replacement. . . . . . . . . . . . 7-85
Light bulb position (front) . . . . . . . . . . . . . . . . . . . . 7-73
Light bulb position (rear) . . . . . . . . . . . . . . . . . . . . . 7-74
Light bulb position (side) . . . . . . . . . . . . . . . . . . . . . 7-75
Map lamp (Bulb type) bulb replacement . . . . . . . . . 7-86
Map lamp (LED type) bulb replacement . . . . . . . . . 7-87
Position lamp/Day time running lamp (LED type) replacement (Headlamp Type B) . . . . . . . . . . . . . . 7-79
Rear turn signal lamp bulb replacement . . . . . . . . . 7-84
Room lamp (Bulb type) bulb replacement. . . . . . . . 7-87
Room lamp (LED type) bulb replacement. . . . . . . . 7-88
Side marker (LED type) bulb replacement (Rear combination lamp Type B). . . . . . . . . . . . . . 7-83
Side marker bulb replacement (Headlamp Type A,B) . . . . . . . . . . . . . . . . . . . . . . 7-78
Side repeater lamp (Bulb type) bulb replacement . . 7-80
Side repeater lamp (LED type) bulb replacement . . 7-80
Stop and tail lamp (LED type) bulb replacement (Rear combination lamp Type B). . . . . . . . . . . . . . 7-83
Stop and tail lamp/side marker (Bulb type) bulb replacement (Rear combination lamp Type A) . . . 7-81
Tail lamp (inside) (Bulb type) bulb replacement (Rear combination lamp Type A). . . . . . . . . . . . . . 7-82
Trunk room lamp replacement . . . . . . . . . . . . . . . . . 7-89
Vanity mirror lamp bulb replacement . . . . . . . . . . . 7-88
Lighting. . . . . . . . . . . . . . . . . . . . . . . . . . . . . . . . . . . . \
4-100 Auto light . . . . . . . . . . . . . . . . . . . . . . . . . . . . . . . . 4-101
Battery saver function . . . . . . . . . . . . . . . . . . . . . . 4-100
Daytime running light . . . . . . . . . . . . . . . . . . . . . . 4-100
Front fog light . . . . . . . . . . . . . . . . . . . . . . . . . . . . 4-107
Headlight position . . . . . . . . . . . . . . . . . . . . . . . . . 4-101
High - beam operation . . . . . . . . . . . . . . . . . . . . . . 4-102
High beam assist . . . . . . . . . . . . . . . . . . . . . . . . . . 4-103
Parking & Tail light . . . . . . . . . . . . . . . . . . . . . . . . 4-101
Turn signals and lane change signals . . . . . . . . . . . 4-106
"Lower Anchors and Tether forChildren (LATCH) System" . . . . . . . . . . . . . . . . . . . . . . . . . . . . . . . . . . 3-37\
Lubricants and capacities . . . . . . . . . . . . . . . . . . . . . . . . 8-6
Luggage volume . . . . . . . . . . . . . . . . . . . . . . . . . . . . . . . 8-5
Maintenance Engine compartment . . . . . . . . . . . . . . . . . . . . . . . . . 7-4
Explanation of scheduled maintenance items . . . . . 7-16
Maintenance services . . . . . . . . . . . . . . . . . . . . . . . . . 7-5
M
BDm CAN (ENG) Index.qxp 6/30/2018 2:03 PM Page 9