KIA FORTE 2019 Owners Manual
Manufacturer: KIA, Model Year: 2019, Model line: FORTE, Model: KIA FORTE 2019Pages: 550, PDF Size: 11.66 MB
Page 501 of 550
Maintenance
78
7
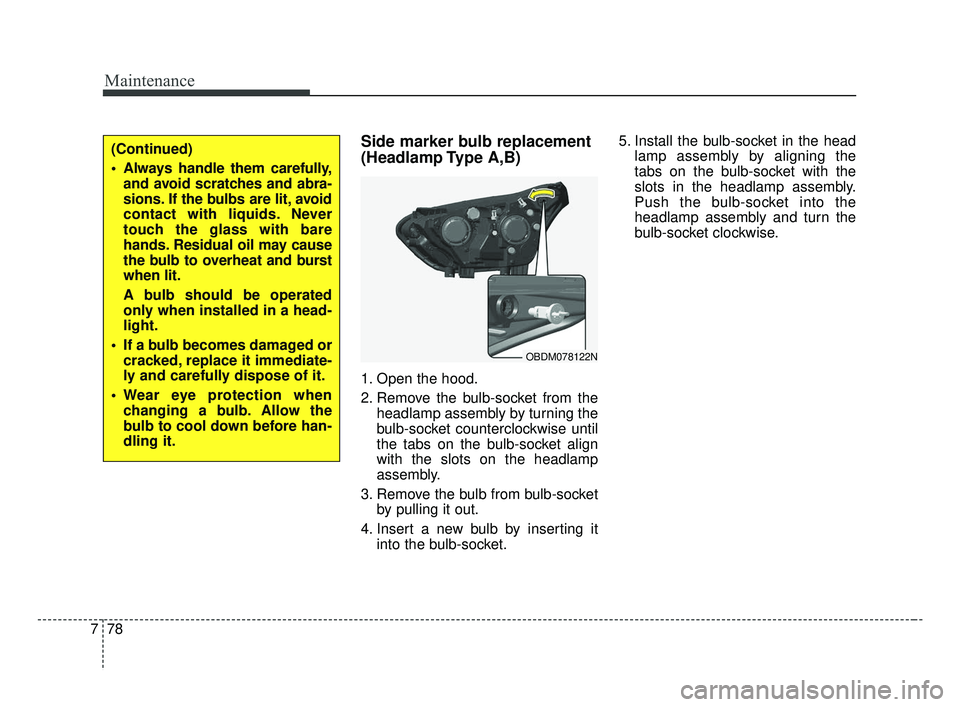
Side marker bulb replacement
(Headlamp Type A,B)
1. Open the hood.
2. Remove the bulb-socket from the
headlamp assembly by turning the
bulb-socket counterclockwise until
the tabs on the bulb-socket align
with the slots on the headlamp
assembly.
3. Remove the bulb from bulb-socket by pulling it out.
4. Insert a new bulb by inserting it into the bulb-socket. 5. Install the bulb-socket in the head
lamp assembly by aligning the
tabs on the bulb-socket with the
slots in the headlamp assembly.
Push the bulb-socket into the
headlamp assembly and turn the
bulb-socket clockwise.
(Continued)
Always handle them carefully,and avoid scratches and abra-
sions. If the bulbs are lit, avoid
contact with liquids. Never
touch the glass with bare
hands. Residual oil may cause
the bulb to overheat and burst
when lit.
A bulb should be operated
only when installed in a head-
light.
If a bulb becomes damaged or cracked, replace it immediate-
ly and carefully dispose of it.
Wear eye protection when changing a bulb. Allow the
bulb to cool down before han-
dling it.
OBDM078122N
BDm CAN (ENG) 7.qxp 7/4/2018 10:26 AM Page 78
Page 502 of 550
779
Maintenance
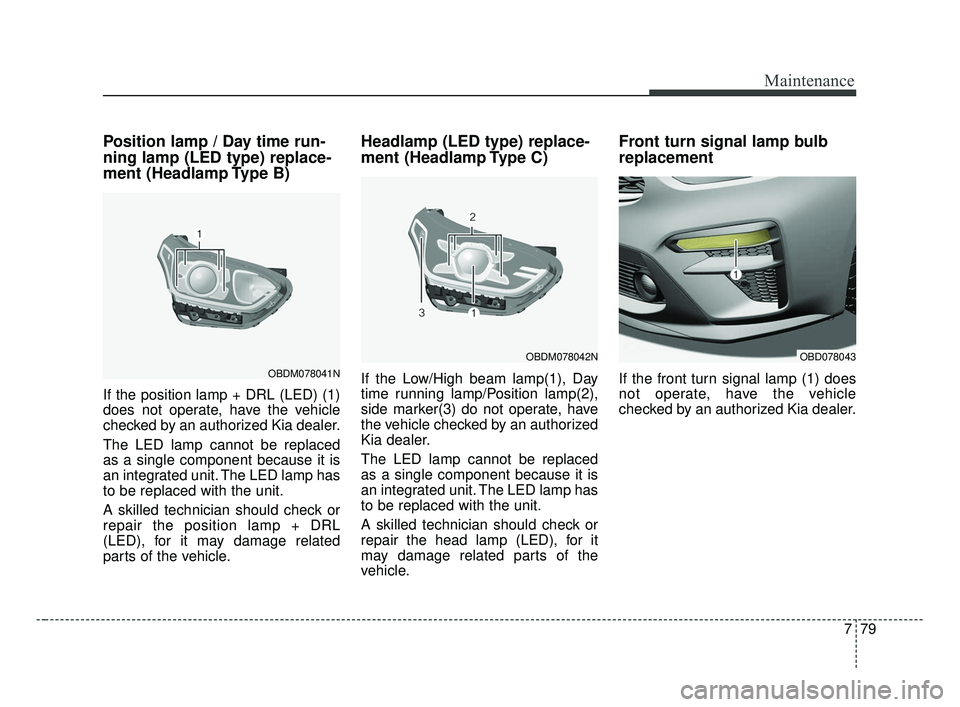
Position lamp / Day time run-
ning lamp (LED type) replace-
ment (Headlamp Type B)
If the position lamp + DRL (LED) (1)
does not operate, have the vehicle
checked by an authorized Kia dealer.
The LED lamp cannot be replaced
as a single component because it is
an integrated unit. The LED lamp has
to be replaced with the unit.
A skilled technician should check or
repair the position lamp + DRL
(LED), for it may damage related
parts of the vehicle.
Headlamp (LED type) replace-
ment (Headlamp Type C)
If the Low/High beam lamp(1), Day
time running lamp/Position lamp(2),
side marker(3) do not operate, have
the vehicle checked by an authorized
Kia dealer.
The LED lamp cannot be replaced
as a single component because it is
an integrated unit. The LED lamp has
to be replaced with the unit.
A skilled technician should check or
repair the head lamp (LED), for it
may damage related parts of the
vehicle.
Front turn signal lamp bulb
replacement
If the front turn signal lamp (1) does
not operate, have the vehicle
checked by an authorized Kia dealer.OBDM078041N
OBDM078042NOBD078043
BDm CAN (ENG) 7.qxp 7/4/2018 10:26 AM Page 79
Page 503 of 550
Maintenance
80
7
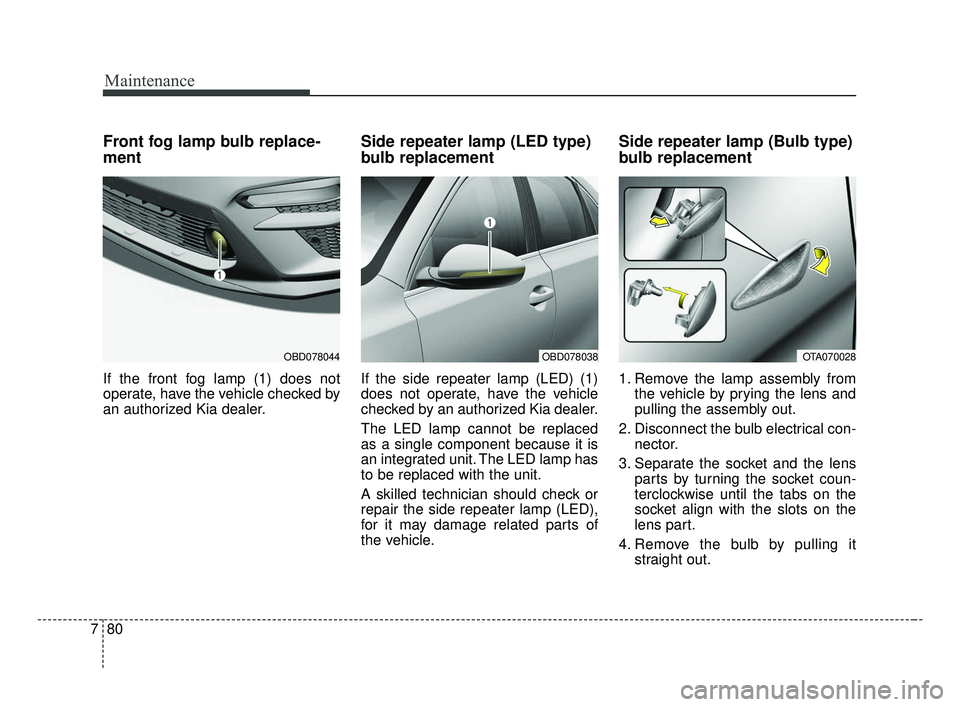
Front fog lamp bulb replace-
ment
If the front fog lamp (1) does not
operate, have the vehicle checked by
an authorized Kia dealer.
Side repeater lamp (LED type)
bulb replacement
If the side repeater lamp (LED) (1)
does not operate, have the vehicle
checked by an authorized Kia dealer.
The LED lamp cannot be replaced
as a single component because it is
an integrated unit. The LED lamp has
to be replaced with the unit.
A skilled technician should check or
repair the side repeater lamp (LED),
for it may damage related parts of
the vehicle.
Side repeater lamp (Bulb type)
bulb replacement
1. Remove the lamp assembly from
the vehicle by prying the lens and
pulling the assembly out.
2. Disconnect the bulb electrical con- nector.
3. Separate the socket and the lens parts by turning the socket coun-
terclockwise until the tabs on the
socket align with the slots on the
lens part.
4. Remove the bulb by pulling it straight out.
OBD078038OTA070028OBD078044
BDm CAN (ENG) 7.qxp 7/4/2018 10:27 AM Page 80
Page 504 of 550
781
Maintenance
5. Insert a new bulb in the socket.
6. Reassemble the socket and thelens part.
7. Connect the bulb electrical con- nector.
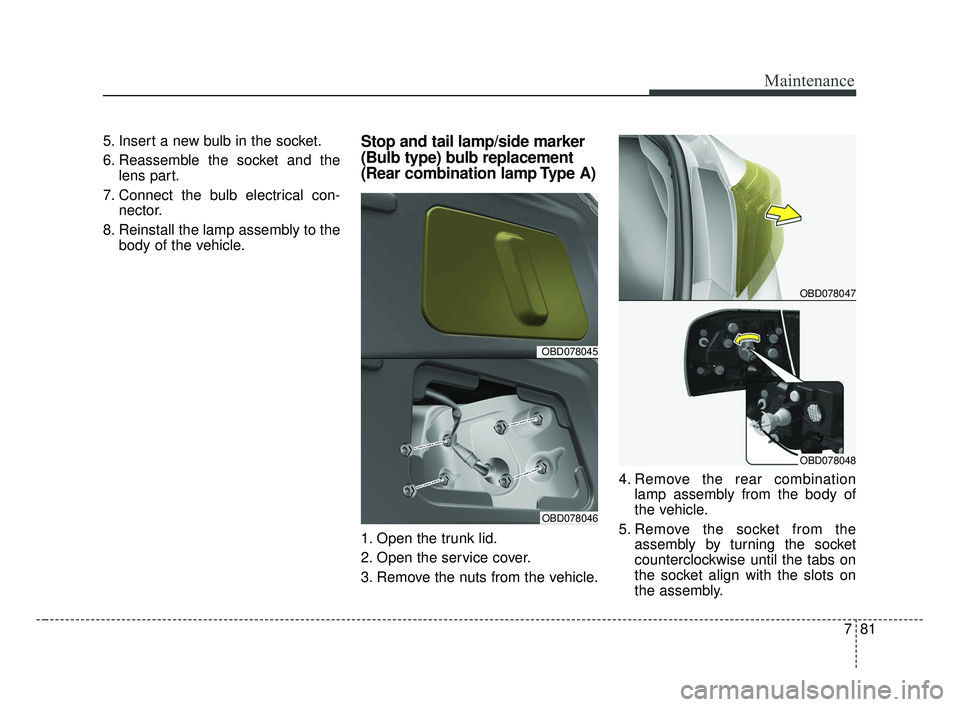
8. Reinstall the lamp assembly to the body of the vehicle.Stop and tail lamp/side marker
(Bulb type) bulb replacement
(Rear combination lamp Type A)
1. Open the trunk lid.
2. Open the service cover.
3. Remove the nuts from the vehicle. 4. Remove the rear combination
lamp assembly from the body of
the vehicle.
5. Remove the socket from the assembly by turning the socket
counterclockwise until the tabs on
the socket align with the slots on
the assembly.
OBD078045
OBD078046
OBD078047
OBD078048
BDm CAN (ENG) 7.qxp 7/4/2018 10:27 AM Page 81
Page 505 of 550
Maintenance
82
7
6. Remove the bulb from the socket
by pressing it in and rotating it
counterclockwise until the tabs on
the bulb align with the slots in the
socket. Pull the bulb out of the
socket.
7. Insert a new bulb by inserting it into the socket and rotating it until
it locks into place.
8. Install the socket in the assembly by aligning the tabs on the socket
with the slots in the assembly.
Push the socket into the assembly
and turn the socket clockwise.
9. Install the rear combination lamp assembly to the body of the vehicle.
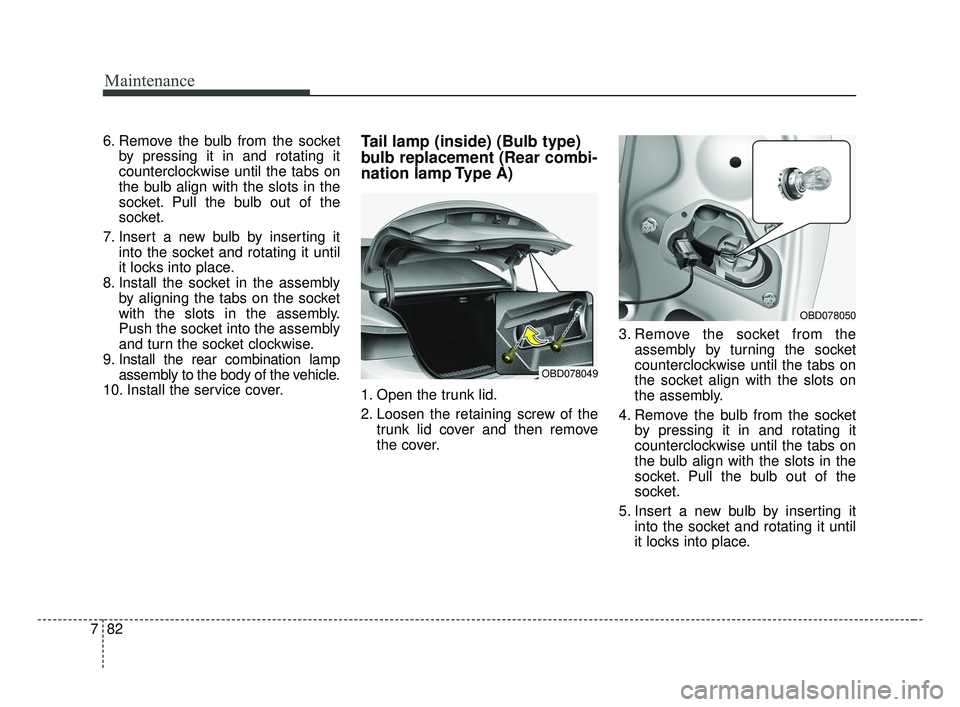
10. Install the service cover.Tail lamp (inside) (Bulb type)
bulb replacement (Rear combi-
nation lamp Type A)
1. Open the trunk lid.
2. Loosen the retaining screw of the trunk lid cover and then remove
the cover. 3. Remove the socket from the
assembly by turning the socket
counterclockwise until the tabs on
the socket align with the slots on
the assembly.
4. Remove the bulb from the socket by pressing it in and rotating it
counterclockwise until the tabs on
the bulb align with the slots in the
socket. Pull the bulb out of the
socket.
5. Insert a new bulb by inserting it into the socket and rotating it until
it locks into place.
OBD078049
OBD078050
BDm CAN (ENG) 7.qxp 7/4/2018 10:27 AM Page 82
Page 506 of 550
783
Maintenance
6. Install the socket in the assemblyby aligning the tabs on the socket
with the slots in the assembly.
Push the socket into the assembly
and turn the socket clockwise.
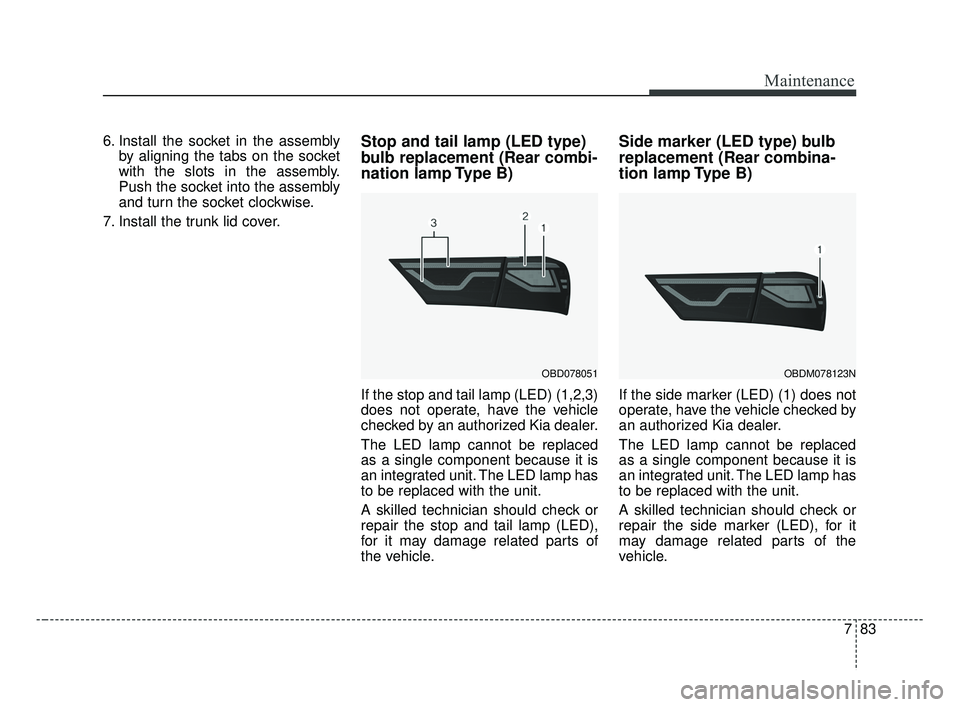
7. Install the trunk lid cover.Stop and tail lamp (LED type)
bulb replacement (Rear combi-
nation lamp Type B)
If the stop and tail lamp (LED) (1,2,3)
does not operate, have the vehicle
checked by an authorized Kia dealer.
The LED lamp cannot be replaced
as a single component because it is
an integrated unit. The LED lamp has
to be replaced with the unit.
A skilled technician should check or
repair the stop and tail lamp (LED),
for it may damage related parts of
the vehicle.
Side marker (LED type) bulb
replacement (Rear combina-
tion lamp Type B)
If the side marker (LED) (1) does not
operate, have the vehicle checked by
an authorized Kia dealer.
The LED lamp cannot be replaced
as a single component because it is
an integrated unit. The LED lamp has
to be replaced with the unit.
A skilled technician should check or
repair the side marker (LED), for it
may damage related parts of the
vehicle.
OBD078051OBDM078123N
BDm CAN (ENG) 7.qxp 7/4/2018 10:27 AM Page 83
Page 507 of 550
Maintenance
84
7
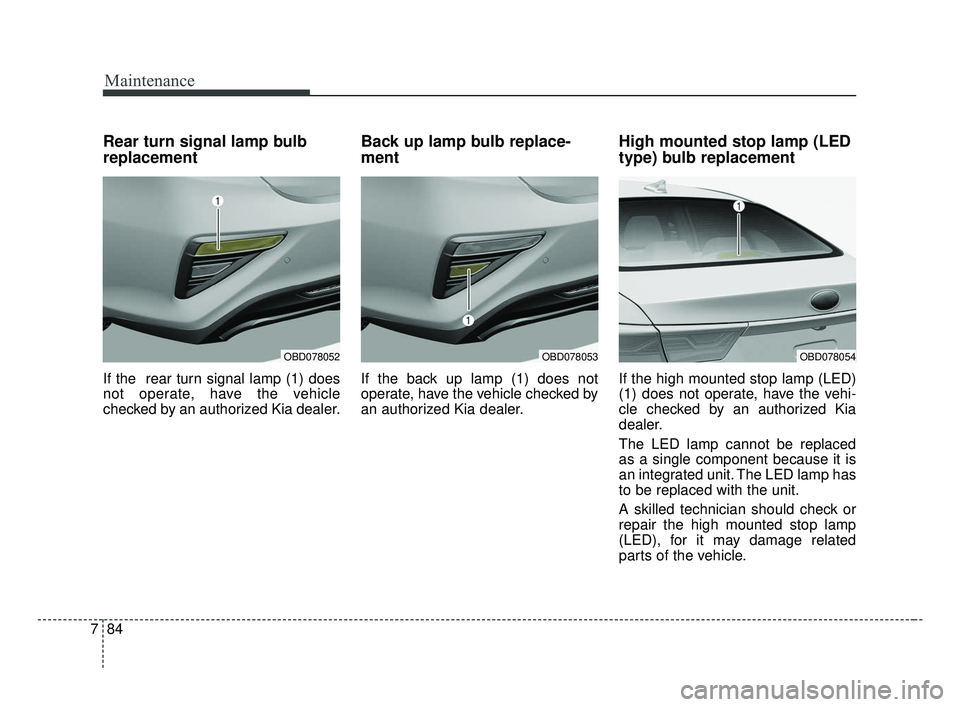
Rear turn signal lamp bulb
replacement
If the rear turn signal lamp (1) does
not operate, have the vehicle
checked by an authorized Kia dealer.
Back up lamp bulb replace-
ment
If the back up lamp (1) does not
operate, have the vehicle checked by
an authorized Kia dealer.
High mounted stop lamp (LED
type) bulb replacement
If the high mounted stop lamp (LED)
(1) does not operate, have the vehi-
cle checked by an authorized Kia
dealer.
The LED lamp cannot be replaced
as a single component because it is
an integrated unit. The LED lamp has
to be replaced with the unit.
A skilled technician should check or
repair the high mounted stop lamp
(LED), for it may damage related
parts of the vehicle.
OBD078052OBD078053OBD078054
BDm CAN (ENG) 7.qxp 7/4/2018 10:27 AM Page 84
Page 508 of 550
785
Maintenance
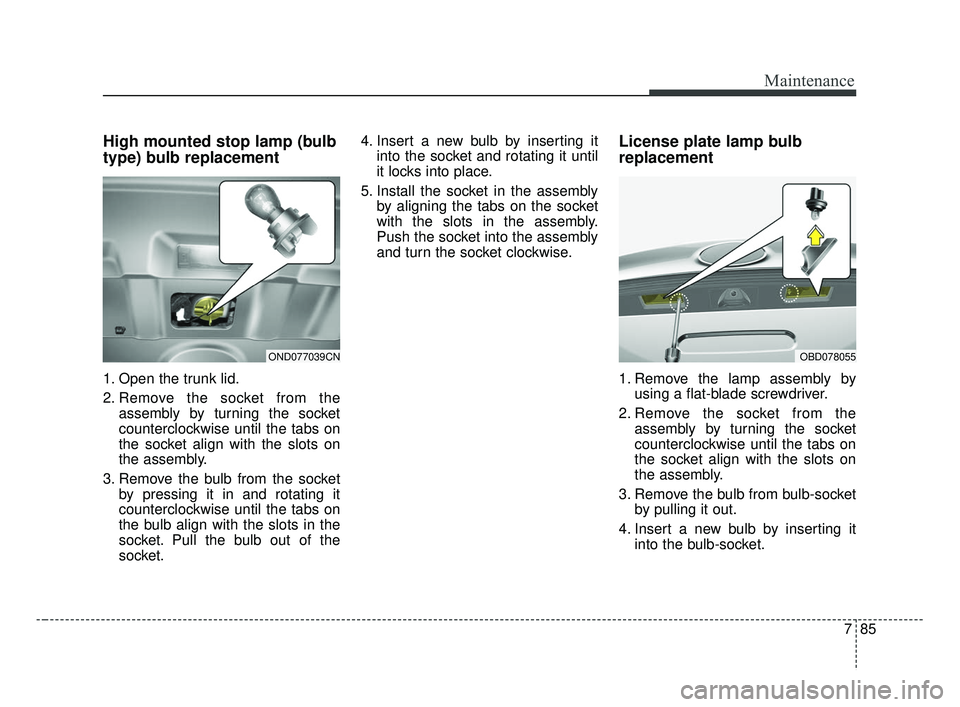
High mounted stop lamp (bulb
type) bulb replacement
1. Open the trunk lid.
2. Remove the socket from theassembly by turning the socket
counterclockwise until the tabs on
the socket align with the slots on
the assembly.
3. Remove the bulb from the socket by pressing it in and rotating it
counterclockwise until the tabs on
the bulb align with the slots in the
socket. Pull the bulb out of the
socket. 4. Insert a new bulb by inserting it
into the socket and rotating it until
it locks into place.
5. Install the socket in the assembly by aligning the tabs on the socket
with the slots in the assembly.
Push the socket into the assembly
and turn the socket clockwise.
License plate lamp bulb
replacement
1. Remove the lamp assembly byusing a flat-blade screwdriver.
2. Remove the socket from the assembly by turning the socket
counterclockwise until the tabs on
the socket align with the slots on
the assembly.
3. Remove the bulb from bulb-socket by pulling it out.
4. Insert a new bulb by inserting it into the bulb-socket.
OND077039CNOBD078055
BDm CAN (ENG) 7.qxp 7/4/2018 10:27 AM Page 85
Page 509 of 550
Maintenance
86
7
5. Install the socket in the assembly
by aligning the tabs on the socket
with the slots in the assembly.
Push the socket into the assembly
and turn the socket clockwise.
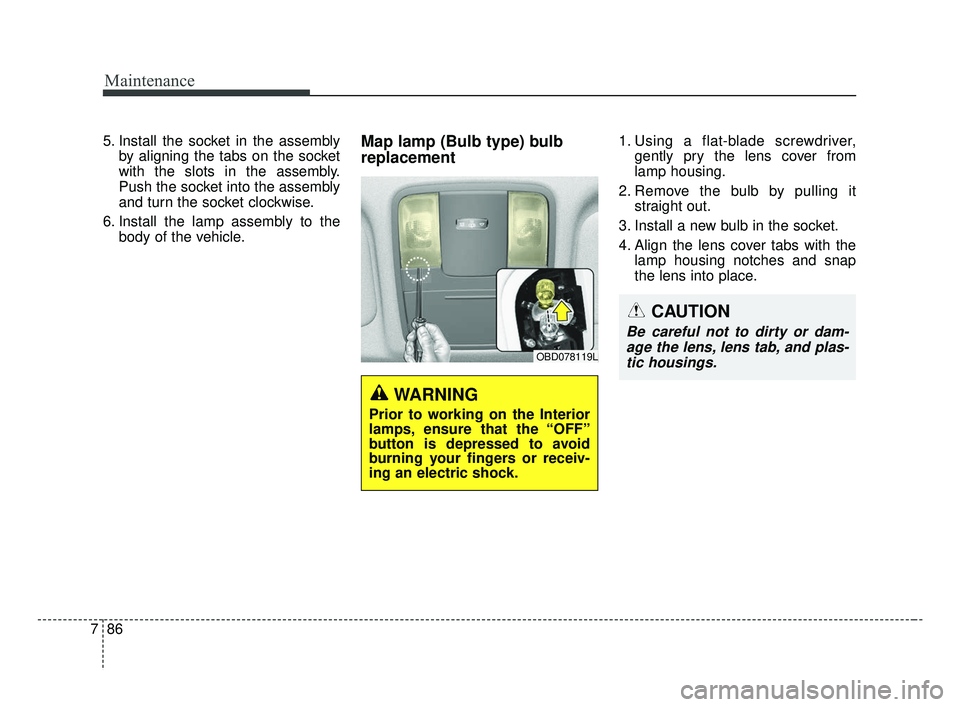
6. Install the lamp assembly to the body of the vehicle.Map lamp (Bulb type) bulb
replacement1. Using a flat-blade screwdriver,gently pry the lens cover from
lamp housing.
2. Remove the bulb by pulling it straight out.
3. Install a new bulb in the socket.
4. Align the lens cover tabs with the lamp housing notches and snap
the lens into place.
OBD078119L
WARNING
Prior to working on the Interior
lamps, ensure that the “OFF”
button is depressed to avoid
burning your fingers or receiv-
ing an electric shock.
CAUTION
Be careful not to dirty or dam-age the lens, lens tab, and plas-tic housings.
BDm CAN (ENG) 7.qxp 7/4/2018 10:27 AM Page 86
Page 510 of 550
787
Maintenance
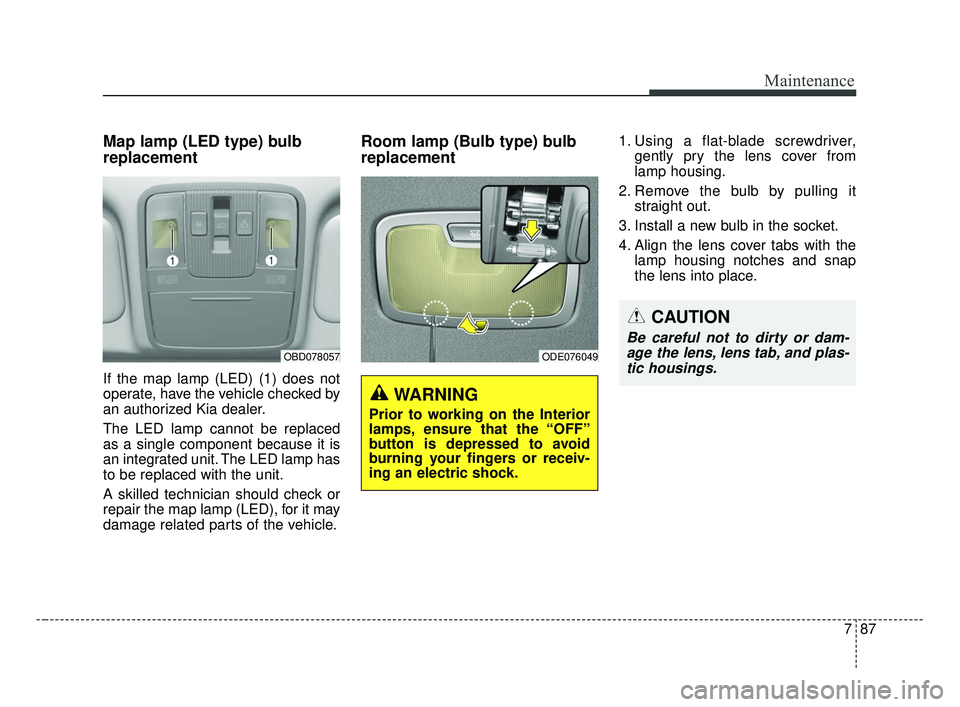
Map lamp (LED type) bulb
replacement
If the map lamp (LED) (1) does not
operate, have the vehicle checked by
an authorized Kia dealer.
The LED lamp cannot be replaced
as a single component because it is
an integrated unit. The LED lamp has
to be replaced with the unit.
A skilled technician should check or
repair the map lamp (LED), for it may
damage related parts of the vehicle.
Room lamp (Bulb type) bulb
replacement1. Using a flat-blade screwdriver,gently pry the lens cover from
lamp housing.
2. Remove the bulb by pulling it straight out.
3. Install a new bulb in the socket.
4. Align the lens cover tabs with the lamp housing notches and snap
the lens into place.
OBD078057ODE076049
WARNING
Prior to working on the Interior
lamps, ensure that the “OFF”
button is depressed to avoid
burning your fingers or receiv-
ing an electric shock.
CAUTION
Be careful not to dirty or dam-age the lens, lens tab, and plas-tic housings.
BDm CAN (ENG) 7.qxp 7/4/2018 10:27 AM Page 87