warning KIA FORTE 2022 Navigation System Quick Reference Guide
[x] Cancel search | Manufacturer: KIA, Model Year: 2022, Model line: FORTE, Model: KIA FORTE 2022Pages: 316, PDF Size: 10.52 MB
Page 47 of 316
2-9
Viewing the driving assistance screen
You can see the view around the vehicle through the system screen.0000
A
The displayed screen may differ depending on the vehicle model.
\335Warning
When backing up, make sure to follow the guidelines below:
\225Before entering your vehicle, always check the area behind your vehicle.
\225Do not solely rely on the rear view camera when backing up. Always ensure that it is safe
to back up by checking behind you and looking in the rearview mirrors.
\225Always back up slowly and stop immediately if you suspect that a person, especially a
child, might be behind you.
\334\334Caution
Objects on the screen may not be as close or far as they appear. Be sure to check the rear,
left, and right sides with your own eyes for safety.
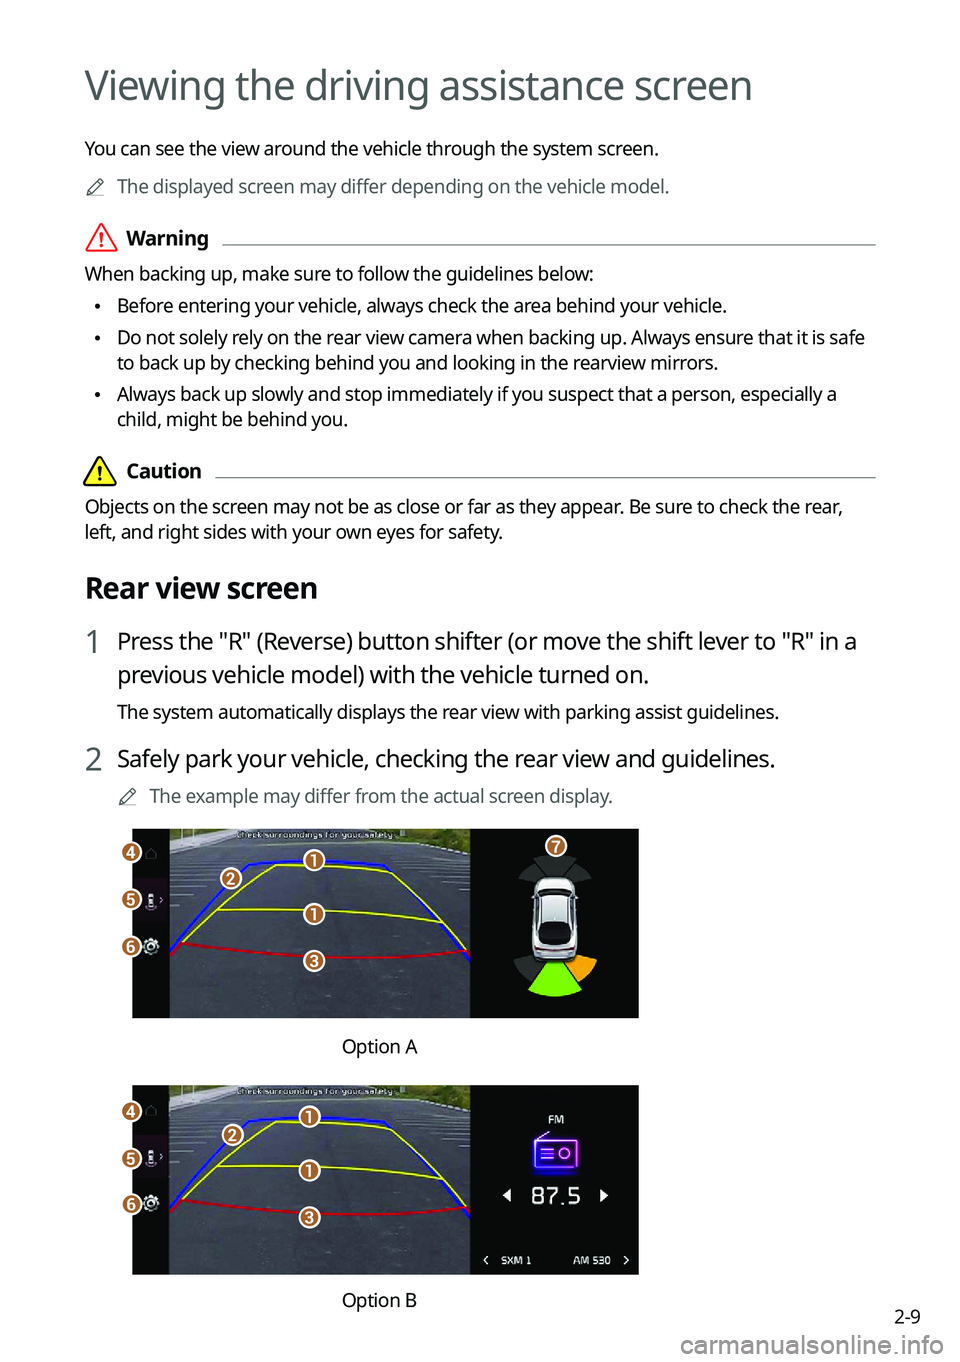
Rear view screen
1 Press the "R" (Reverse) button shifter (or move the shift lever to "R" in a
previous vehicle model) with the vehicle turned on.
The system automatically displays the rear view with parking assist guidelines.
2 Safely park your vehicle, checking the rear view and guidelines.
0000
A
The example may differ from the actual screen display.
\037
\037
\036
\035
\034\033
\032
\031
Option A
\037
\037\036
\035
\034
\033
\037
\032
Option B
Page 48 of 316
2-10
a a Moving direction lines (yellow)
Displays the vehicle's moving direction based on the steering angle.
b b Neutral steering lines (blue)
Displays the moving direction if you reverse the vehicle in neutral. Noting these
lines, you can determine whether the vehicle is stopped in correct direction and the
distances to the neighboring vehicles are adequate.
c c Collision warning lines (red)
Used to prevent collision.
d d Home button (if equipped)
Displays the Home screen.
e e Rear top/wide view button (if equipped)
Press the button to display the rear top view or rear wide view icon. Press the icon to
get a view in the desired direction.
f f Rear view screen environment (if equipped)
\225Used to adjust the brightness and contrast of camera images.
\225To select the information to display on the screen, press Display Contents (Rear
View Parking Guidance) (if equipped).
g g Parking distance warning (if equipped)
Depending on the distance to obstacles, the warning color and alert soun\
d change
along with the level (1/2/3) to notify of the distance.
0000
A
Available settings may differ depending on the vehicle model and specifications.
0000
A
You can set to display the rear camera display even when you change the shift position
other than "R" (Reverse) after reversing. To change rear camera operation settings, On
the All Menus screen, press Setup >
Display >
Extend Rear Camera Use (if equipped).
0000
A
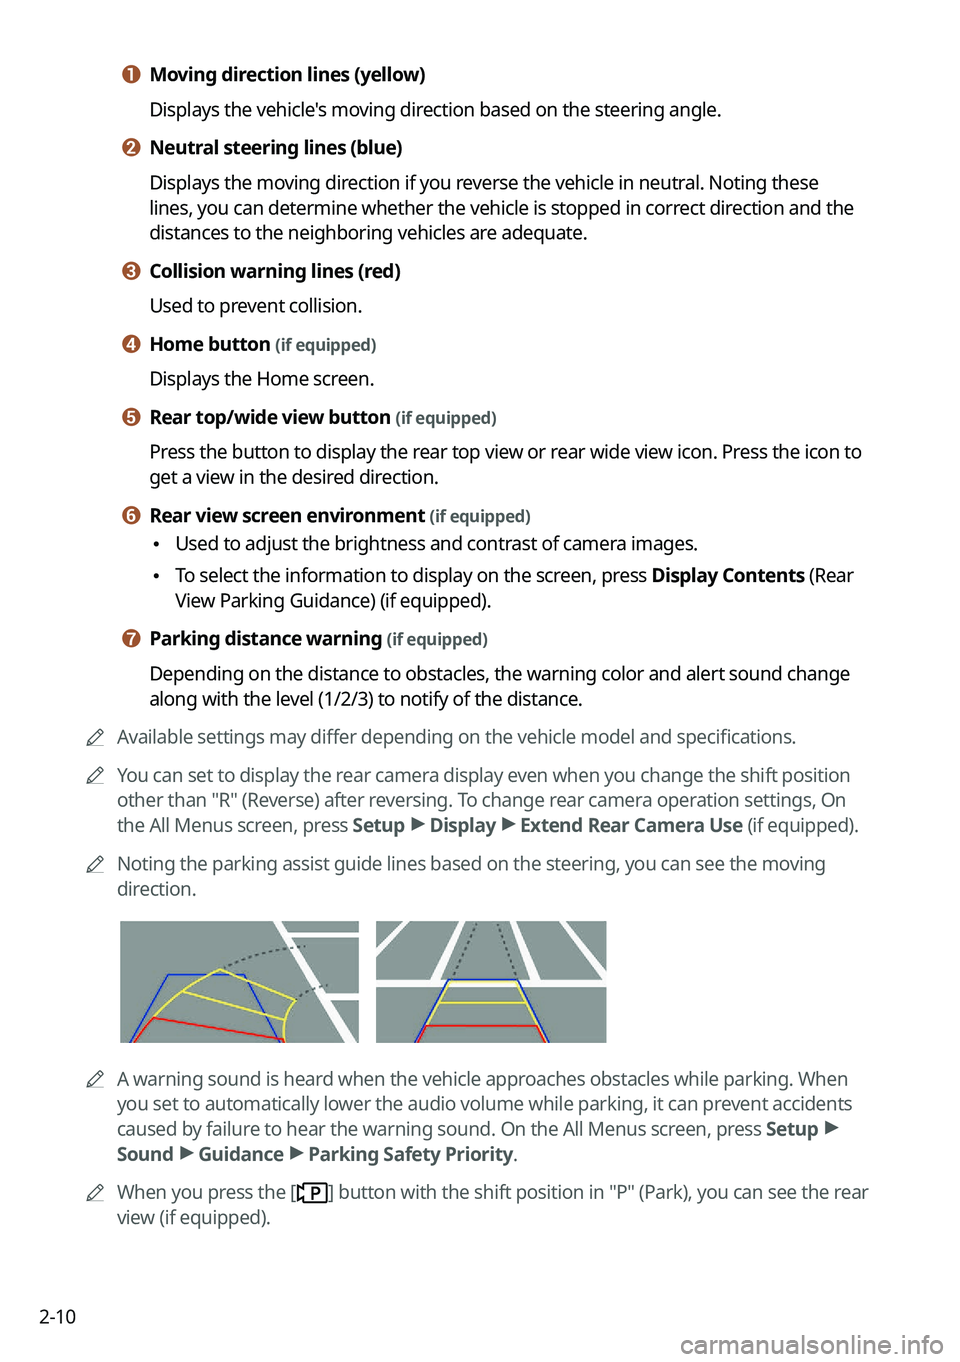
Noting the parking assist guide lines based on the steering, you can see\
the moving
direction.
0000AA warning sound is heard when the vehicle approaches obstacles while parking. When
you set to automatically lower the audio volume while parking, it can prevent accidents
caused by failure to hear the warning sound. On the All Menus screen, press Setup >
Sound >
Guidance >
Parking Safety Priority.
0000
A
When you press the [
] button with the shift position in "P" (Park), you can see the rear
view (if equipped).
Page 51 of 316
2-13
Viewing the surround view while reversing
1 Press the "R" (Reverse) button shifter (or move the shift lever to "R" in a
previous vehicle model) with the vehicle turned on.
The system displays the rear view of the vehicle.0000
A
The surround view monitor function is not available when you change the shift
position to "P" (Park).
0000
A
When you press the [
] button with the shift position in "P" (Park), you can see the
rear view (if equipped).
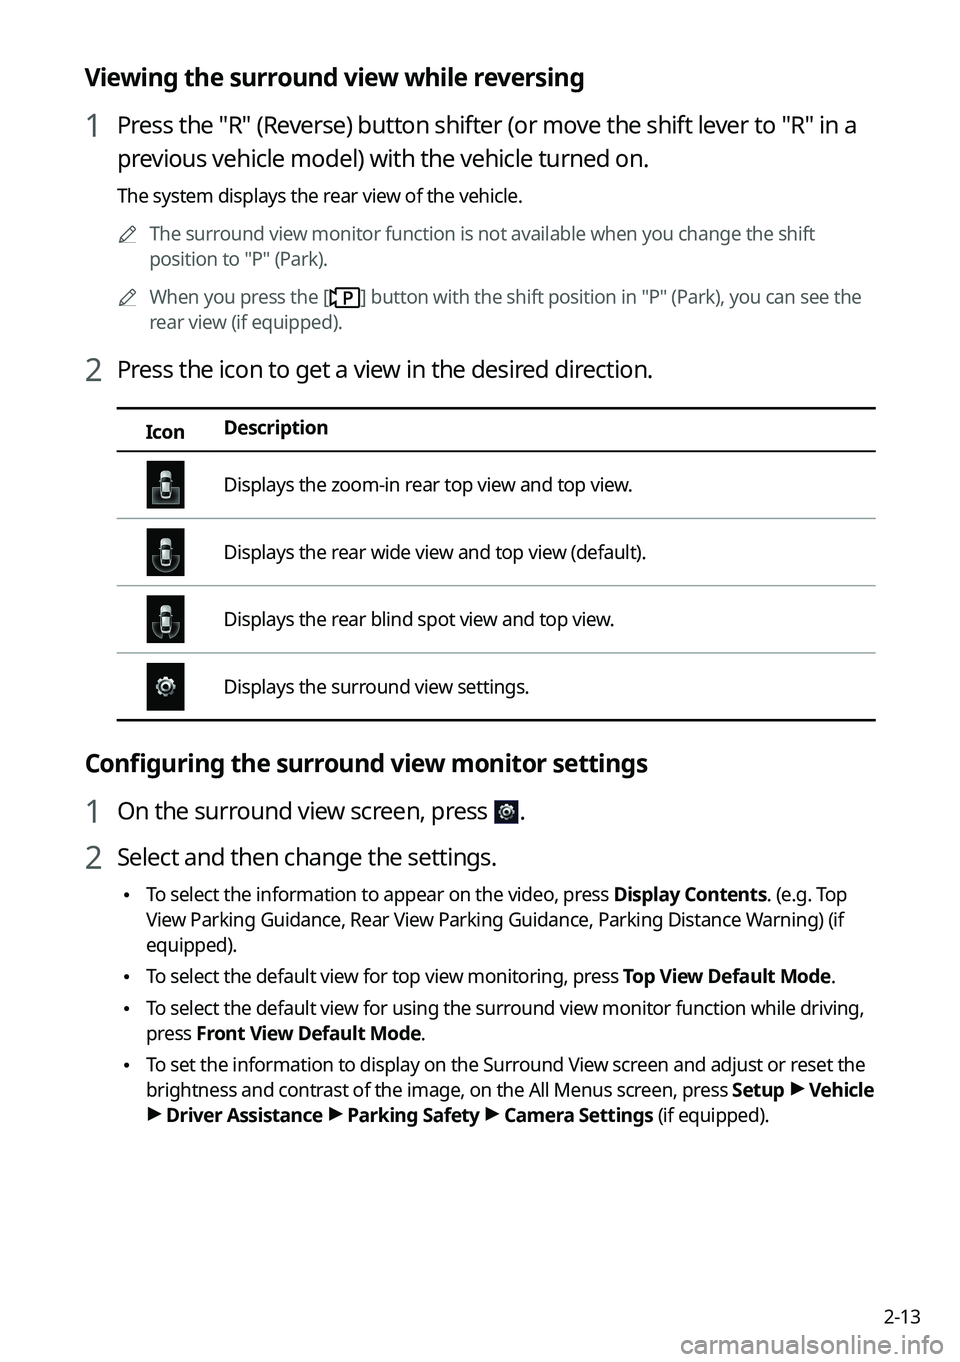
2 Press the icon to get a view in the desired direction.
Icon Description
Displays the zoom-in rear top view and top view.
Displays the rear wide view and top view (default).
Displays the rear blind spot view and top view.
Displays the surround view settings.
Configuring the surround view monitor settings
1 On the surround view screen, press .
2 Select and then change the settings.
\225
To select the information to appear on the video, press Display Contents. (e.g. Top
View Parking Guidance, Rear View Parking Guidance, Parking Distance Warning) (if
equipped).
\225To select the default view for top view monitoring, press Top View Default Mode.
\225To select the default view for using the surround view monitor function while driving,
press
Front View Default Mode.
\225To set the information to display on the Surround View screen and adjust or reset the
brightness and contrast of the image, on the All Menus screen, press Setup >
Vehicle
> Driver Assistance >
Parking Safety >
Camera Settings (if equipped).
Page 56 of 316
2-18
Using the Rear-seat View (if equipped)
You can check the status and safety of rear-seat occupants through the rear-seat camera feed
displayed on the system screen.
\335Warning
A car accident may occur when focusing on the vehicle display and not pa\
ying attention to
the road while driving.
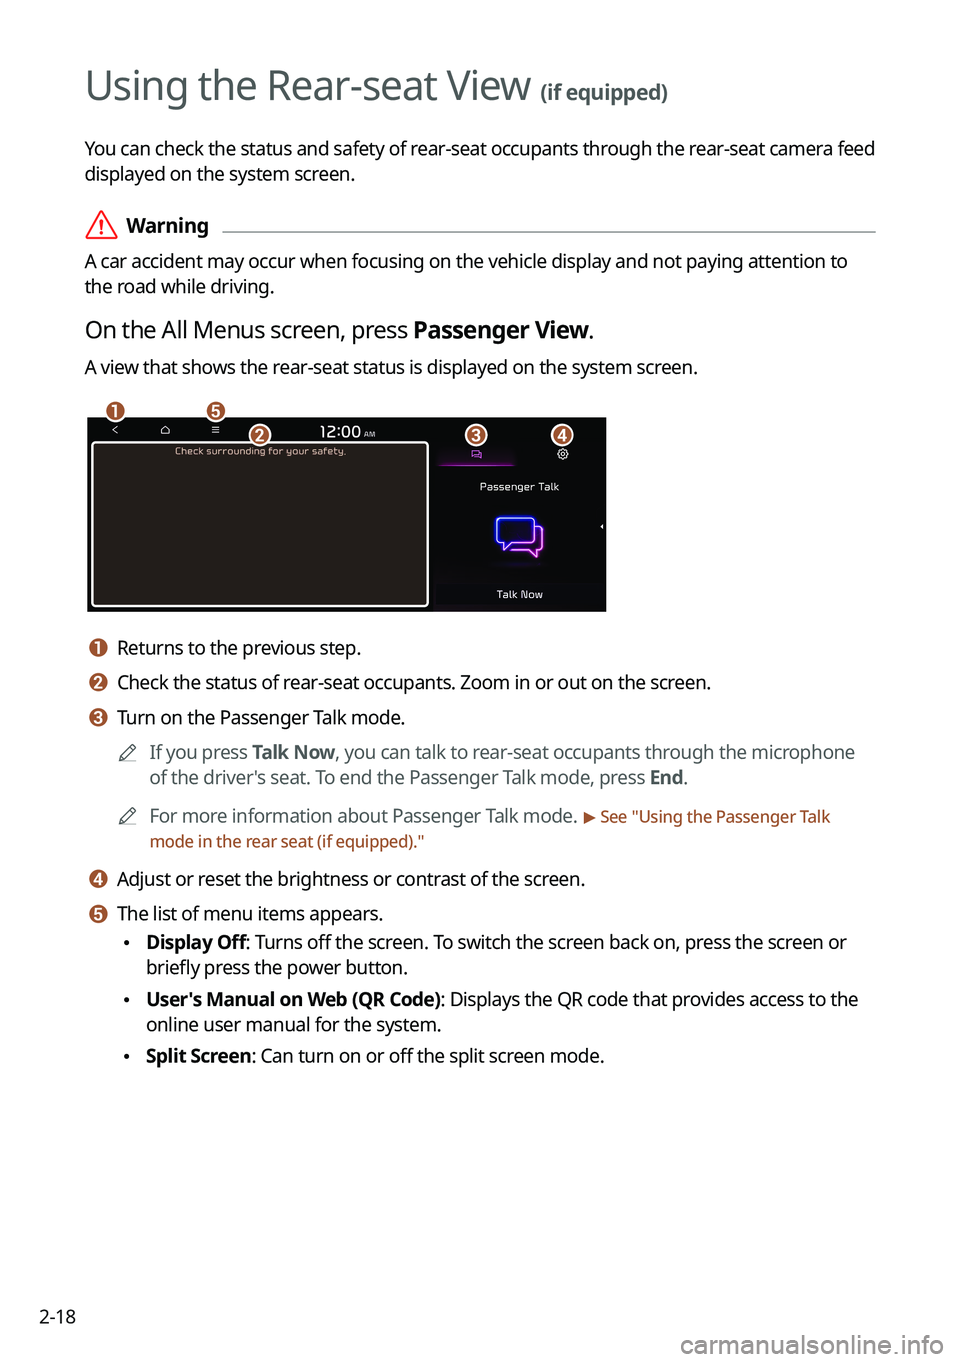
On the All Menus screen, press Passenger View.
A view that shows the rear-seat status is displayed on the system screen.
\037\036
\035\034\033
a a Returns to the previous step.
b b Check the status of rear-seat occupants. Zoom in or out on the screen.
c c Turn on the Passenger Talk mode.0000
A
If you press Talk Now, you can talk to rear-seat occupants through the microphone
of the driver's seat. To end the Passenger Talk mode, press End.
0000
A
For more information about Passenger Talk mode.
> See "Using the Passenger Talk
mode in the rear seat (if equipped)."
d d Adjust or reset the brightness or contrast of the screen.
e e The list of menu items appears.
\225 Display Off: Turns off the screen. To switch the screen back on, press the screen or
briefly press the power button.
\225User's Manual on Web (QR Code): Displays the QR code that provides access to the
online user manual for the system.
\225Split Screen: Can turn on or off the split screen mode.
Page 69 of 316
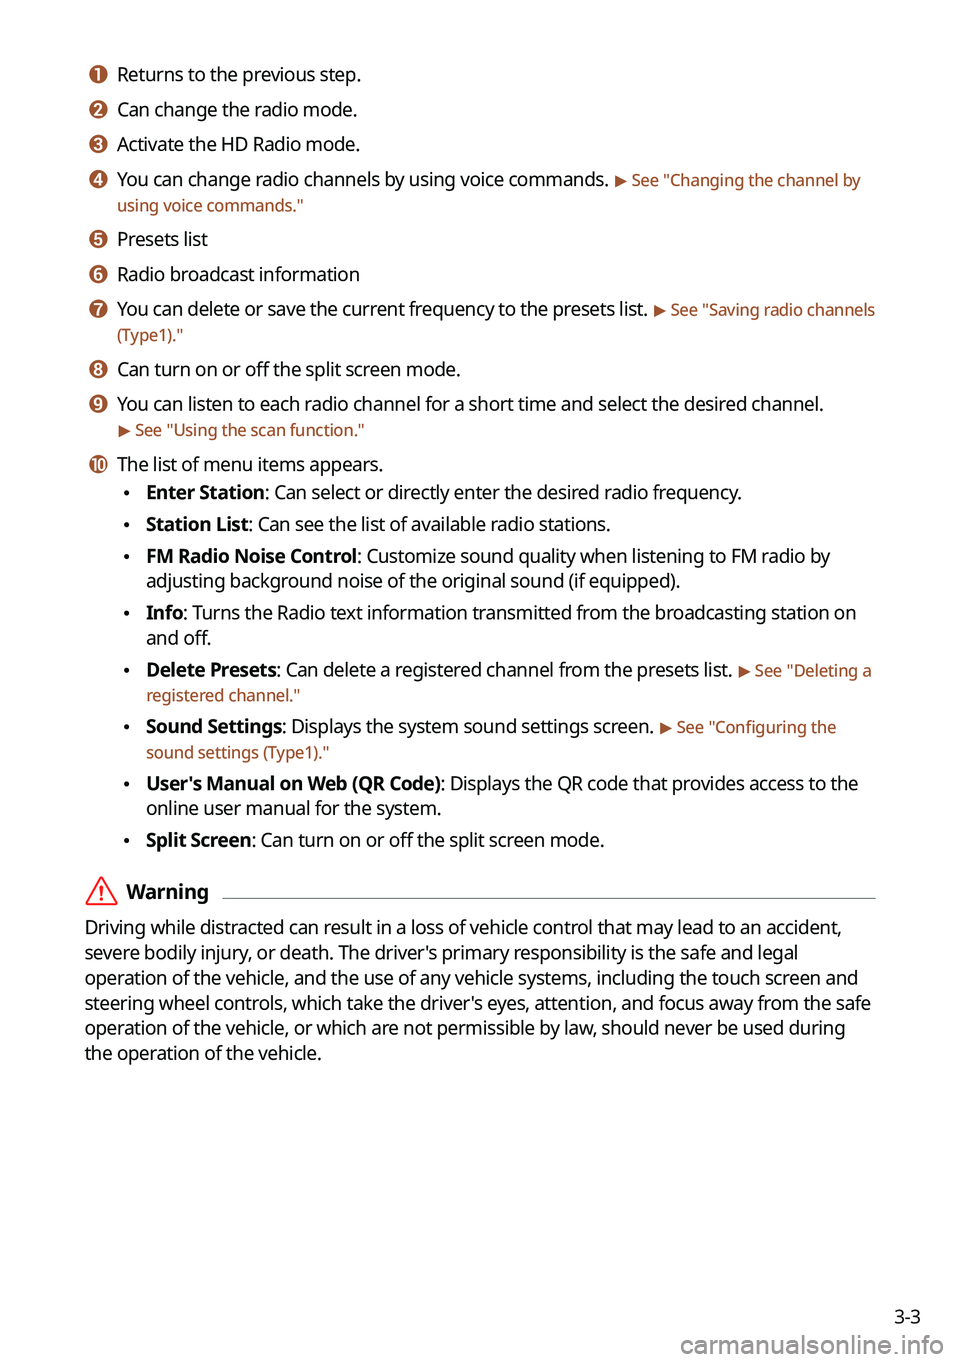
3-3
a a Returns to the previous step.
b b Can change the radio mode.
c c Activate the HD Radio mode.
d d You can change radio channels by using voice commands. > See "Changing the channel by
using voice commands."
e e Presets list
f f Radio broadcast information
g g You can delete or save the current frequency to the presets list. > See " Saving radio channels
(Type1)."
h h Can turn on or off the split screen mode.
i i You can listen to each radio channel for a short time and select the desired channel.
> See " Using the scan function."
j j The list of menu items appears.
\225 Enter Station: Can select or directly enter the desired radio frequency.
\225Station List: Can see the list of available radio stations.
\225FM Radio Noise Control: Customize sound quality when listening to FM radio by
adjusting background noise of the original sound (if equipped).
\225Info: Turns the Radio text information transmitted from the broadcasting station on
and off.
\225Delete Presets: Can delete a registered channel from the presets list. > See "
Deleting a
registered channel."
\225 Sound Settings: Displays the system sound settings screen. > See "
Configuring the
sound settings (Type1)."
\225 User's Manual on Web (QR Code): Displays the QR code that provides access to the
online user manual for the system.
\225Split Screen: Can turn on or off the split screen mode.
\335Warning
Driving while distracted can result in a loss of vehicle control that may lead to an accident,
severe bodily injury, or death. The driver's primary responsibility is the safe and legal
operation of the vehicle, and the use of any vehicle systems, including the \
touch screen and
steering wheel controls, which take the driver's eyes, attention, and focus away from the safe
operation of the vehicle, or which are not permissible by law, should never be used during
the operation of the vehicle.
Page 71 of 316
3-5
\225Radio Noise: Customize sound quality when listening to FM radio by adjusting
background noise of the original sound (if equipped).
\225Sound Settings: Displays the system sound settings screen. > See "
Configuring the
sound settings (Type2)."
\225 User's Manual on Web (QR Code): Displays the QR code that provides access to the
online user manual for the system.
\225Split Screen: Can turn on or off the split screen mode.
0000
A
The screen may differ depending on the vehicle model and specifications.
0000
A
The sound effect settings button may appear on the screen depending on the amp
specifications.
\335Warning
Driving while distracted can result in a loss of vehicle control that may lead to an accident,
severe bodily injury, or death. The driver's primary responsibility is the safe and legal
operation of the vehicle, and the use of any vehicle systems, including the \
touch screen and
steering wheel controls, which take the driver's eyes, attention, and focus away from the safe
operation of the vehicle, or which are not permissible by law, should never be used during
the operation of the vehicle.
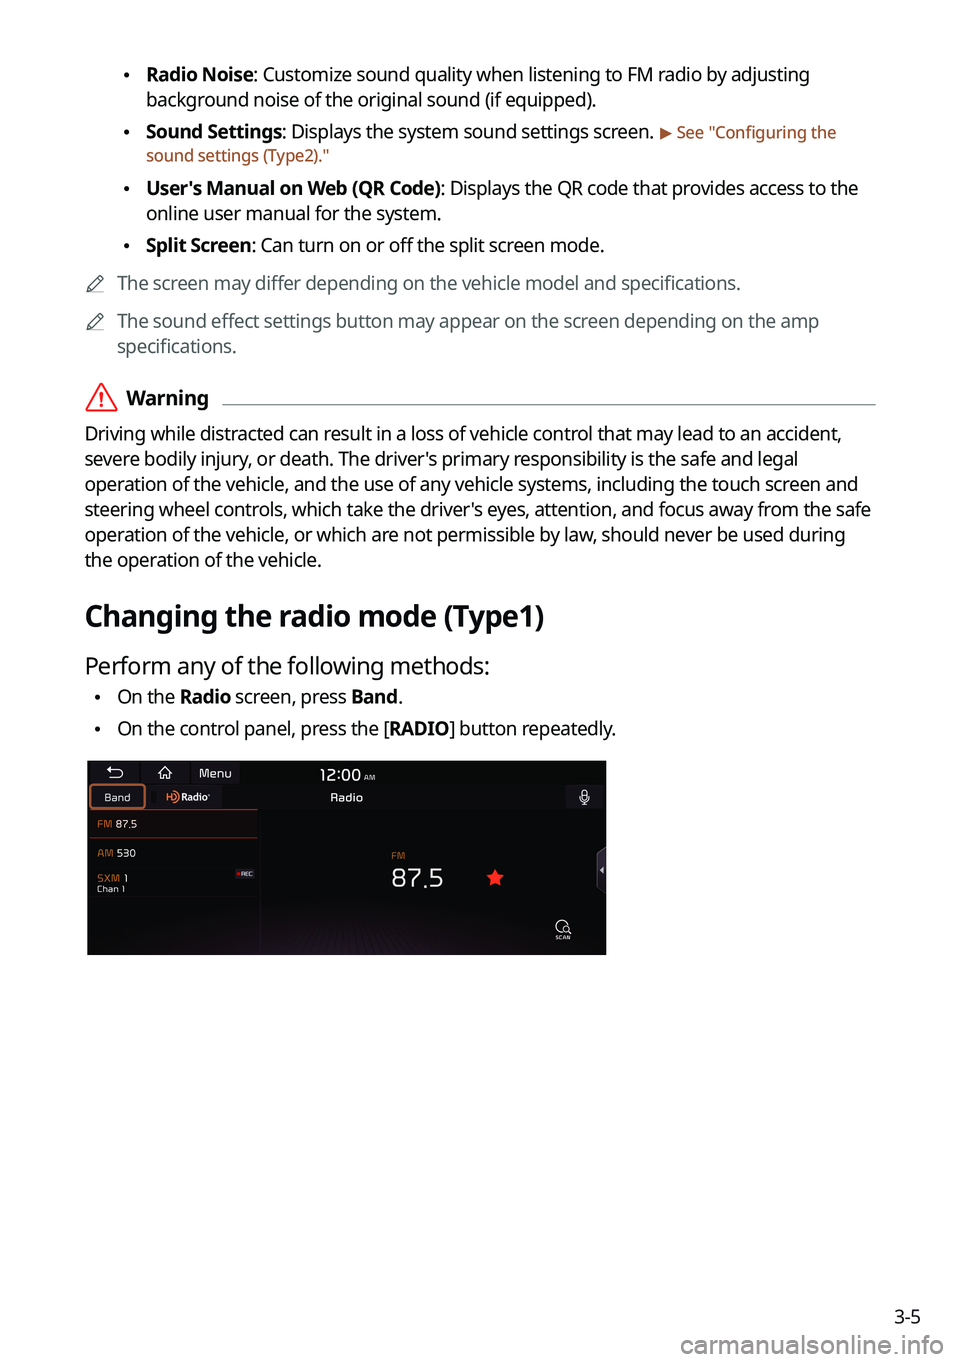
Changing the radio mode (Type1)
Perform any of the following methods:
\225On the Radio screen, press Band.
\225On the control panel, press the [
RADIO] button repeatedly.
Page 87 of 316
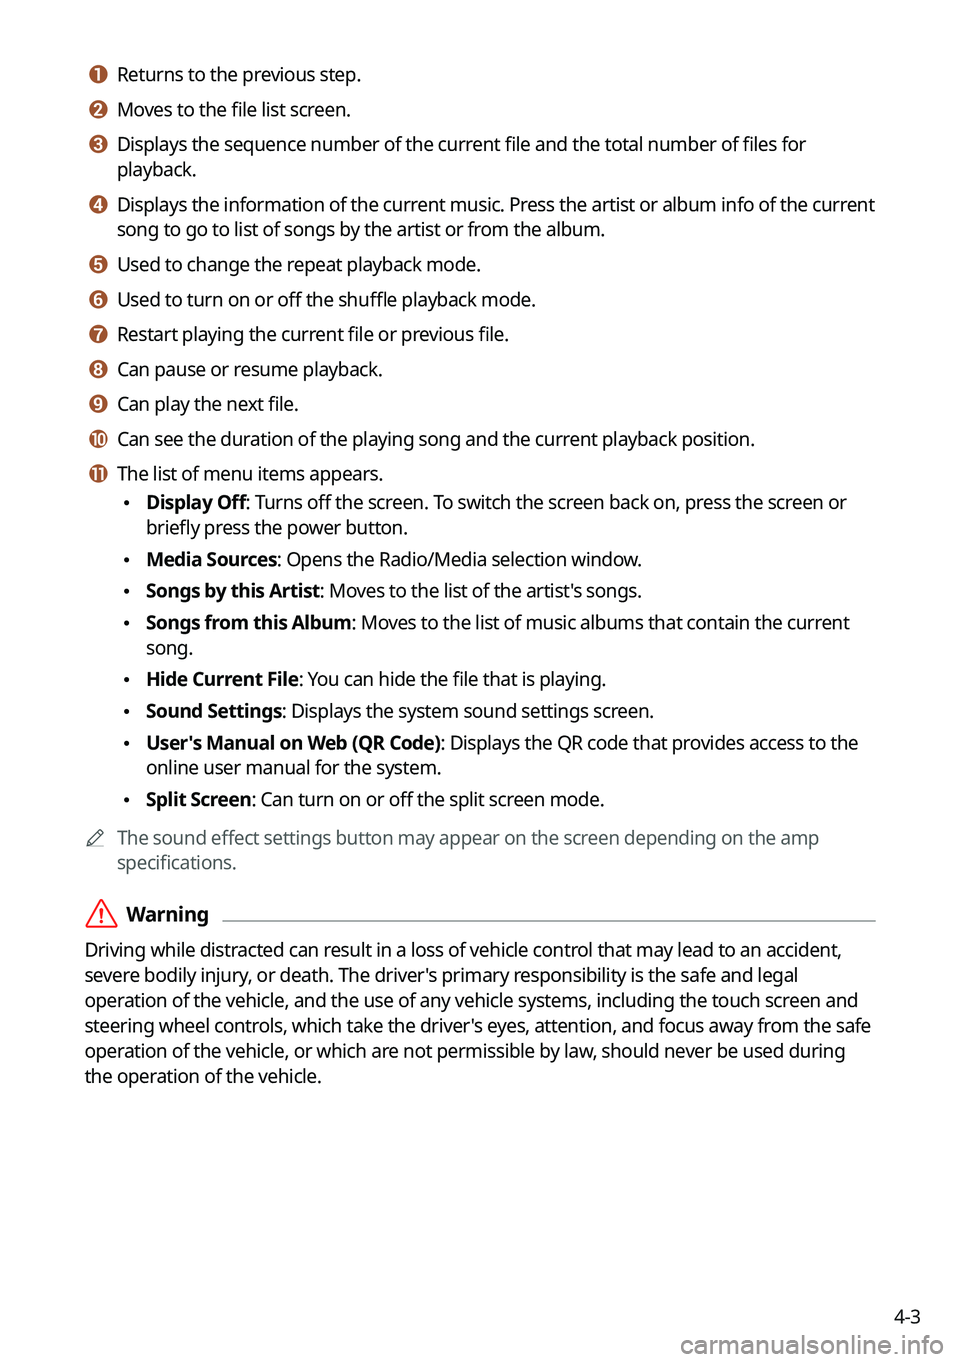
4-3
a a Returns to the previous step.
b b Moves to the file list screen.
c c Displays the sequence number of the current file and the total number of files for
playback.
d d Displays the information of the current music. Press the artist or album info of the current
song to go to list of songs by the artist or from the album.
e e Used to change the repeat playback mode.
f f Used to turn on or off the shuffle playback mode.
g g Restart playing the current file or previous file.
h h Can pause or resume playback.
i i Can play the next file.
j j Can see the duration of the playing song and the current playback position.
k k The list of menu items appears.
\225Display Off: Turns off the screen. To switch the screen back on, press the screen or
briefly press the power button.
\225Media Sources: Opens the Radio/Media selection window.
\225Songs by this Artist: Moves to the list of the artist's songs.
\225Songs from this Album: Moves to the list of music albums that contain the current
song.
\225Hide Current File: You can hide the file that is playing.
\225Sound Settings: Displays the system sound settings screen.
\225User's Manual on Web (QR Code): Displays the QR code that provides access to the
online user manual for the system.
\225Split Screen: Can turn on or off the split screen mode.
0000
A
The sound effect settings button may appear on the screen depending on the amp
specifications.
\335Warning
Driving while distracted can result in a loss of vehicle control that may lead to an accident,
severe bodily injury, or death. The driver's primary responsibility is the safe and legal
operation of the vehicle, and the use of any vehicle systems, including the touch screen and
steering wheel controls, which take the driver's eyes, attention, and focus away from the safe
operation of the vehicle, or which are not permissible by law, should never be used during
the operation of the vehicle.
Page 97 of 316
5-3
l l You can register your home, office, or other frequently visited places as a favorite for ease
of search.
> See "Registering a frequently visited place as a favorite place ."
m m The list of menu items appears.
\225Reorder Icons: Can change the location of an icon on the Navigation Menu screen.
\225Display Off: Turns off the screen. To switch the screen back on, press the screen or
briefly press the power button.
\225User's Manual on Web (QR Code): Displays the QR code that provides access to the
online user manual for the system.
0000
A
Available icons and their arrangement may differ depending on the vehicle model and
specifications.
Finding a route easily
\335Warning
Driving while distracted may cause a loss of vehicle control that may lead to an accident,
severe bodily injury, or death. The driver's primary responsibility is the safe and legal
operation of the vehicle, and the use of any devices or systems that take the driver's attention
away from driving.
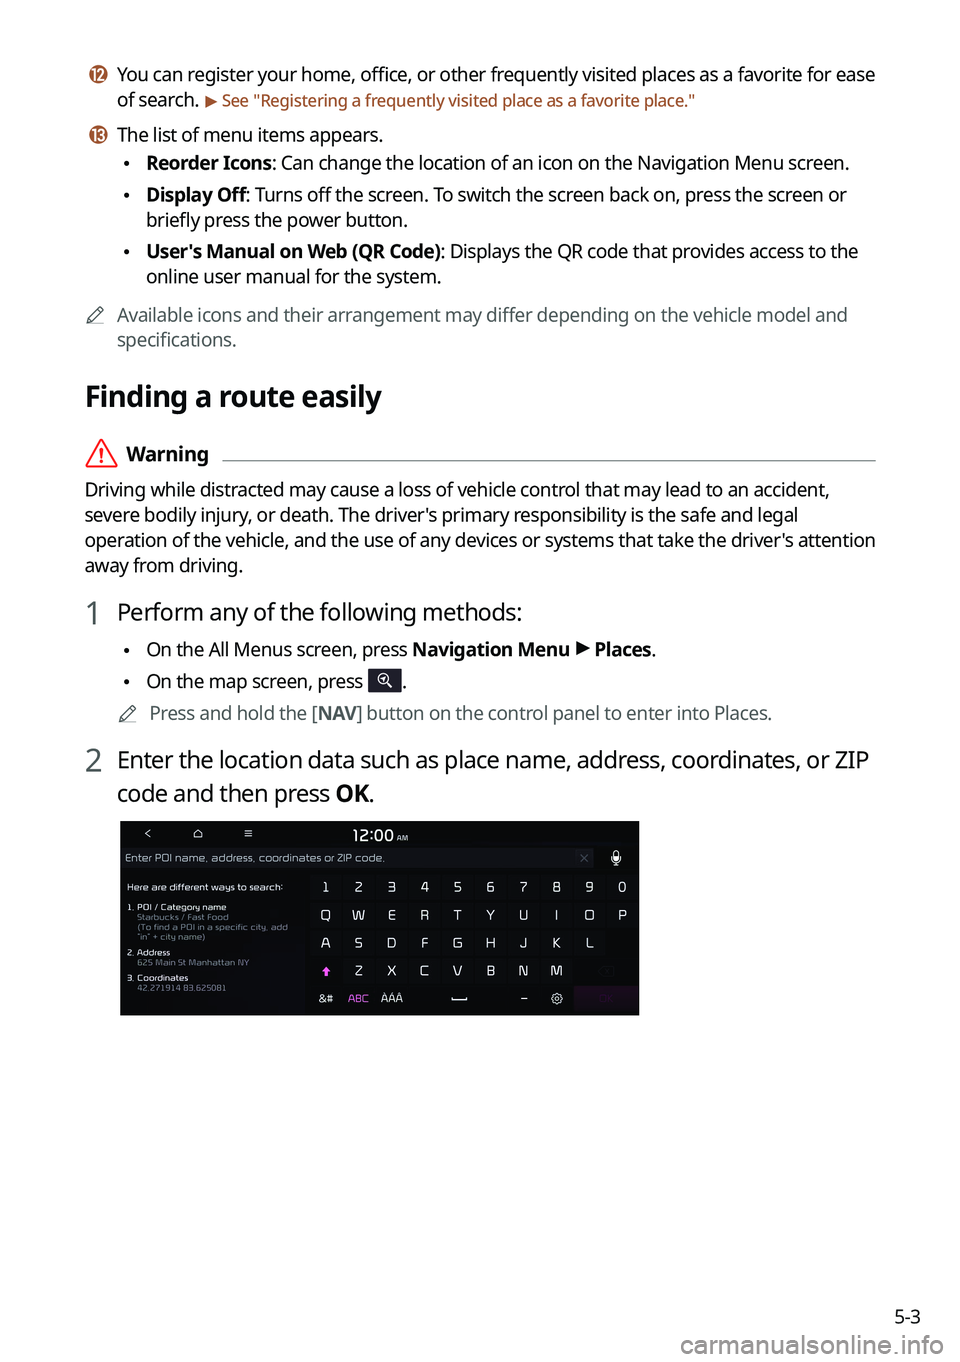
1 Perform any of the following methods:
\225On the All Menus screen, press Navigation Menu >
Places.
\225 On the map screen, press .
0000
A
Press and hold the [ NAV] button on the control panel to enter into Places.
2 Enter the location data such as place name, address, coordinates, or ZIP
code and then press OK.
Page 98 of 316
5-4
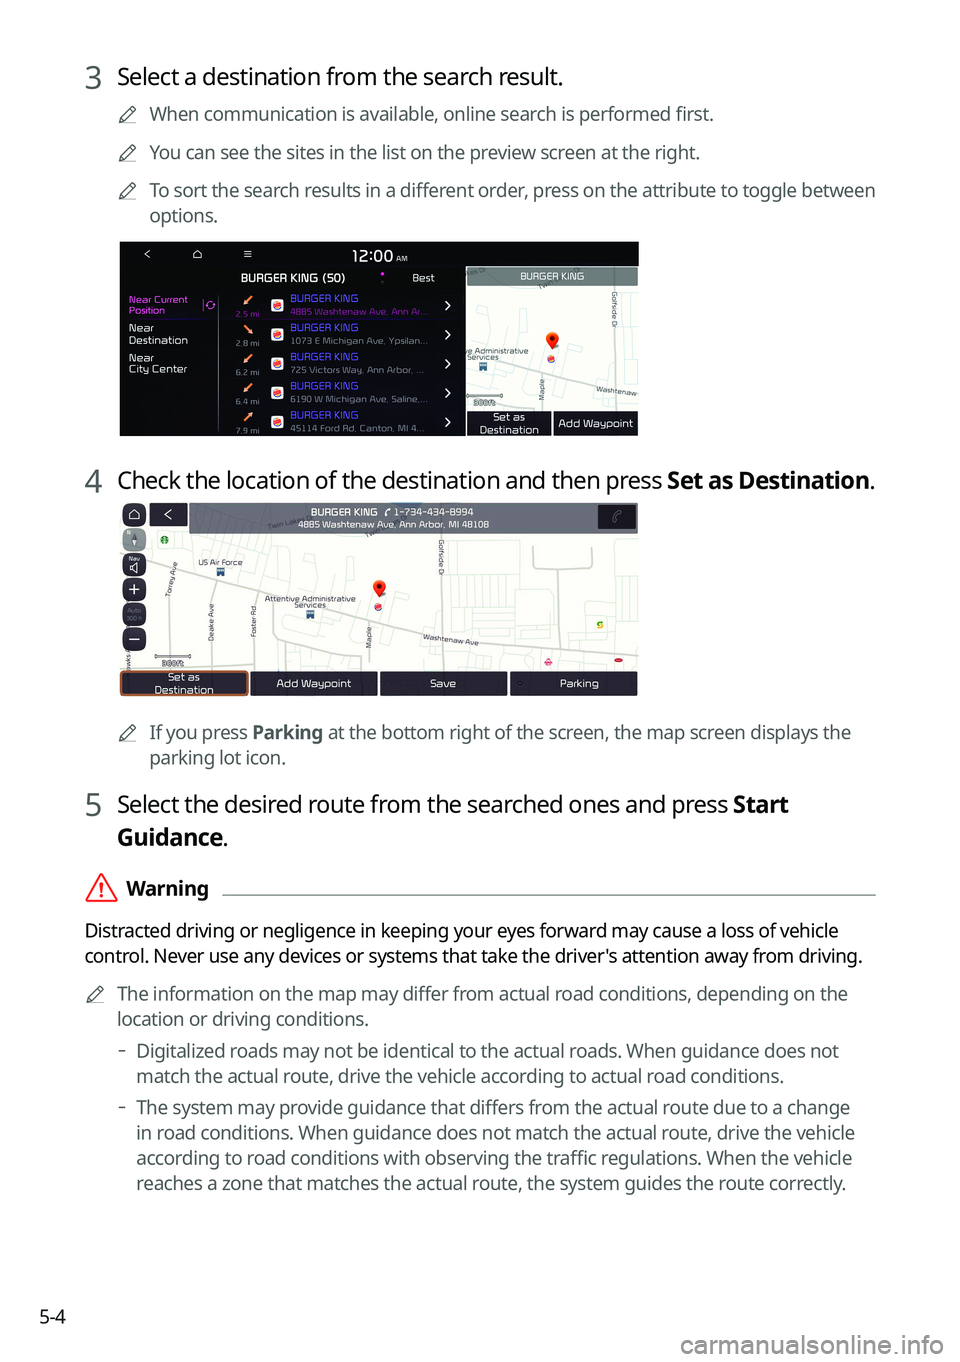
3 Select a destination from the search result.
0000
A
When communication is available, online search is performed first.
0000
A
You can see the sites in the list on the preview screen at the right.
0000
A
To sort the search results in a different order, press on the attribute to toggle between
options.
4 Check the location of the destination and then press Set as Destination.
0000A
If you press Parking at the bottom right of the screen, the map screen displays the
parking lot icon.
5 Select the desired route from the searched ones and press Start
Guidance.
\335Warning
Distracted driving or negligence in keeping your eyes forward may cause a loss of vehicle
control. Never use any devices or systems that take the driver's attention away from driving.
0000
A
The information on the map may differ from actual road conditions, depending on the
location or driving conditions.
000DDigitalized roads may not be identical to the actual roads. When guidance does not
match the actual route, drive the vehicle according to actual road conditions.
000DThe system may provide guidance that differs from the actual route due to a change
in road conditions. When guidance does not match the actual route, drive the vehicle
according to road conditions with observing the traffic regulations. When the vehicle
reaches a zone that matches the actual route, the system guides the route correctly.
Page 100 of 316
5-6
Map screen
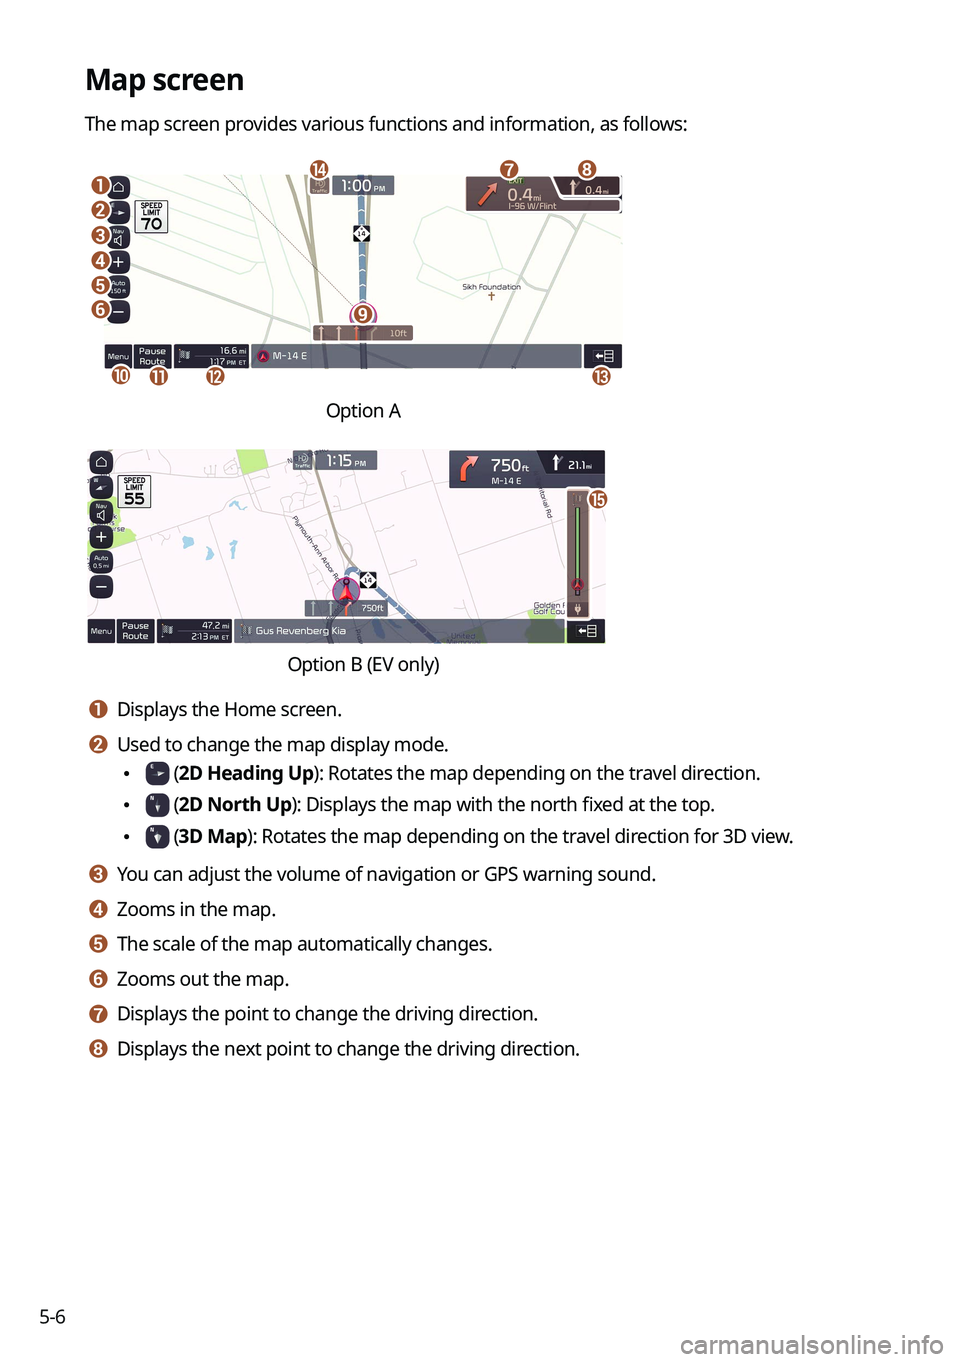
The map screen provides various functions and information, as follows:
\037
\036\035
\034
\033
\032
\031
\030
\027
\026
\025\024\023
\022
Option A
o
\0002\000S\000W\000L\000R\000Q\000\003\000%\000\003\000\013\000\(\0009\000\
\003\000R\000Q\000O\000\\\000\f
a a Displays the Home screen.
b b Used to change the map display mode.
\225 (2D Heading Up): Rotates the map depending on the travel direction.
\225 (2D North Up): Displays the map with the north fixed at the top.
\225 (3D Map): Rotates the map depending on the travel direction for 3D view.
c c You can adjust the volume of navigation or GPS warning sound.
d d Zooms in the map.
e e The scale of the map automatically changes.
f f Zooms out the map.
g g Displays the point to change the driving direction.
h h Displays the next point to change the driving direction.