child seat KIA FORTE 5 2018 User Guide
[x] Cancel search | Manufacturer: KIA, Model Year: 2018, Model line: FORTE 5, Model: KIA FORTE 5 2018Pages: 584, PDF Size: 15.16 MB
Page 47 of 584
Safety features of your vehicle
30
3
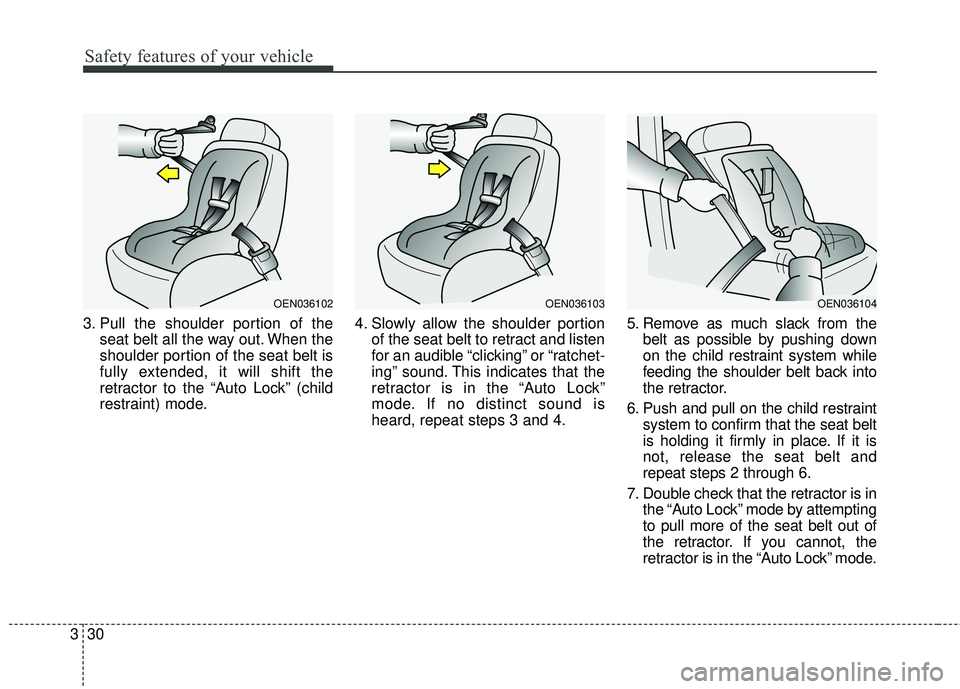
3. Pull the shoulder portion of the
seat belt all the way out. When the
shoulder portion of the seat belt is
fully extended, it will shift the
retractor to the “Auto Lock” (child
restraint) mode. 4. Slowly allow the shoulder portion
of the seat belt to retract and listen
for an audible “clicking” or “ratchet-
ing” sound. This indicates that the
retractor is in the “Auto Lock”
mode. If no distinct sound is
heard, repeat steps 3 and 4. 5. Remove as much slack from the
belt as possible by pushing down
on the child restraint system while
feeding the shoulder belt back into
the retractor.
6. Push and pull on the child restraint system to confirm that the seat belt
is holding it firmly in place. If it is
not, release the seat belt and
repeat steps 2 through 6.
7. Double check that the retractor is in the “Auto Lock” mode by attempting
to pull more of the seat belt out of
the retractor. If you cannot, the
retractor is in the “Auto Lock” mode.
OEN036102OEN036103OEN036104
Page 48 of 584
331
Safety features of your vehicle
The lap/shoulder belt automatically
returns to the “emergency lock
mode” whenever the belt is allowed
to retract fully.
Therefore, the preceding seven
steps must be followed each time a
child restraint is installed.
To remove the child restraint, press
the release button on the buckle and
then pull the lap/shoulder belt out of
the restraint and allow the seat belt
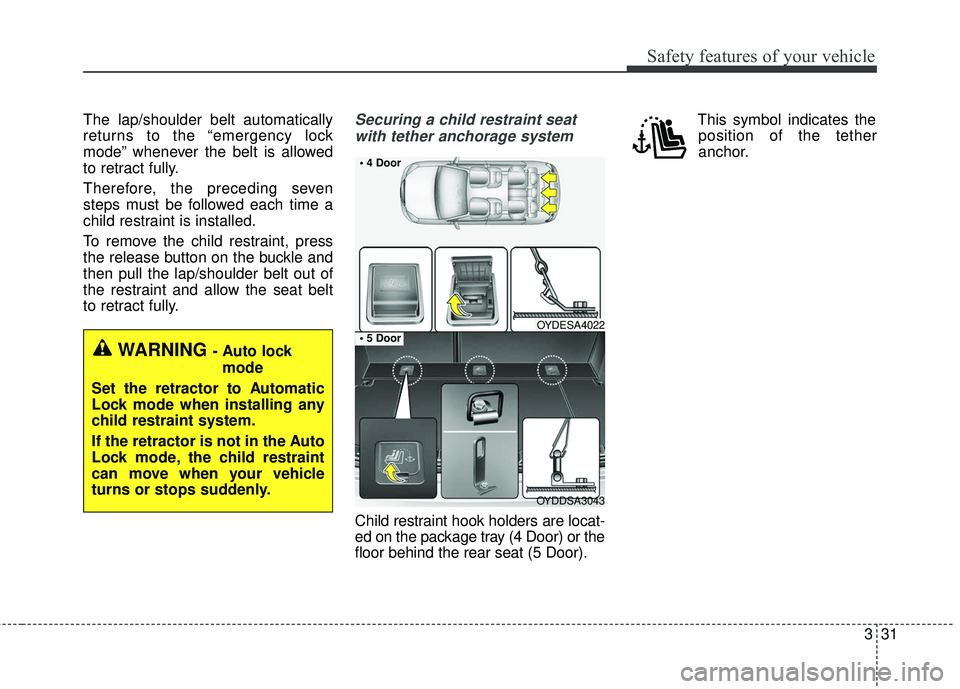
to retract fully.Securing a child restraint seatwith tether anchorage system
Child restraint hook holders are locat-
ed on the package tray (4 Door) or the
floor behind the rear seat (5 Door). This symbol indicates the
position of the tether
anchor.
WARNING - Auto lock
mode
Set the retractor to Automatic
Lock mode when installing any
child restraint system.
If the retractor is not in the Auto
Lock mode, the child restraint
can move when your vehicle
turns or stops suddenly.
OYDESA4022
OYDDSA3043
Page 49 of 584
Safety features of your vehicle
32
3
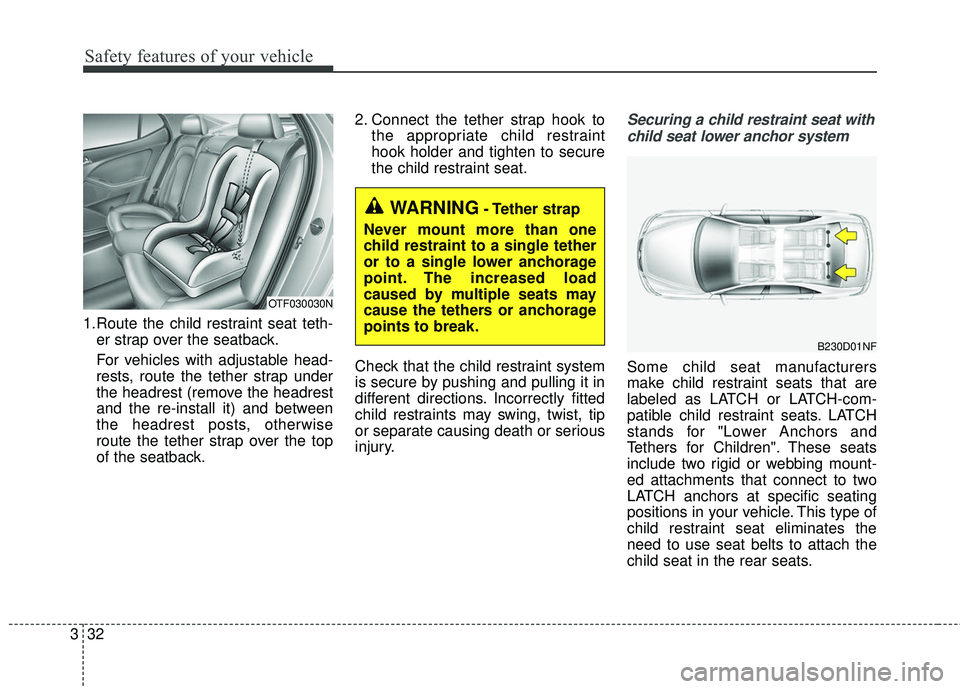
1.Route the child restraint seat teth-
er strap over the seatback.
For vehicles with adjustable head-
rests, route the tether strap under
the headrest (remove the headrest
and the re-install it) and between
the headrest posts, otherwise
route the tether strap over the top
of the seatback. 2. Connect the tether strap hook to
the appropriate child restraint
hook holder and tighten to secure
the child restraint seat.
Check that the child restraint system
is secure by pushing and pulling it in
different directions. Incorrectly fitted
child restraints may swing, twist, tip
or separate causing death or serious
injury.
Securing a child restraint seat with child seat lower anchor system
Some child seat manufacturers
make child restraint seats that are
labeled as LATCH or LATCH-com-
patible child restraint seats. LATCH
stands for "Lower Anchors and
Tethers for Children". These seats
include two rigid or webbing mount-
ed attachments that connect to two
LATCH anchors at specific seating
positions in your vehicle. This type of
child restraint seat eliminates the
need to use seat belts to attach the
child seat in the rear seats.
OTF030030N
WARNING- Tether strap
Never mount more than one
child restraint to a single tether
or to a single lower anchorage
point. The increased load
caused by multiple seats may
cause the tethers or anchorage
points to break.
B230D01NF
Page 50 of 584
333
Safety features of your vehicle
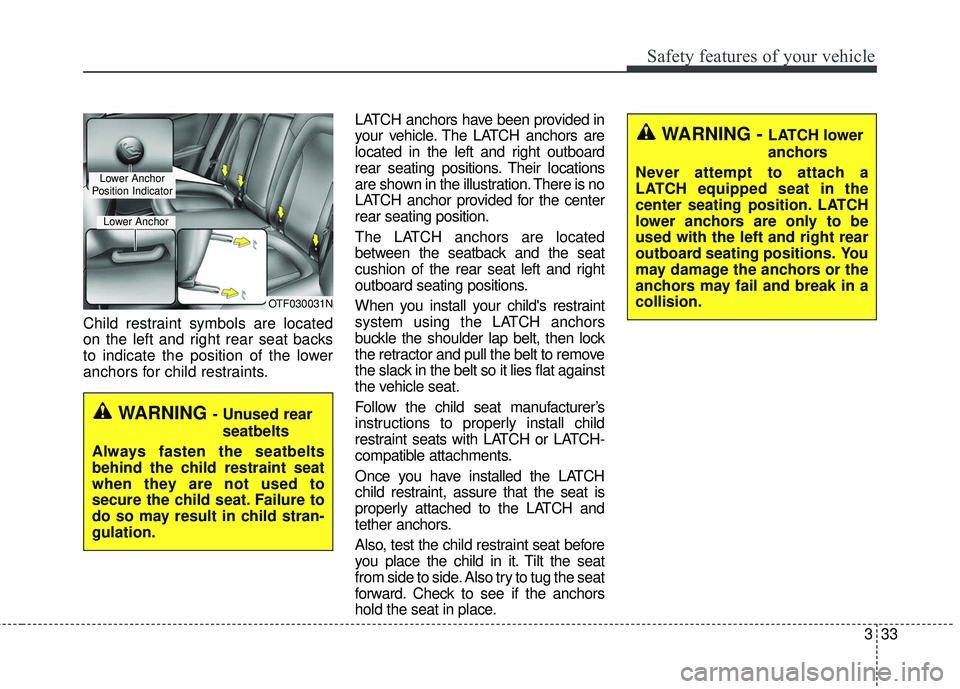
Child restraint symbols are located
on the left and right rear seat backs
to indicate the position of the lower
anchors for child restraints.LATCH anchors have been provided in
your vehicle. The LATCH anchors are
located in the left and right outboard
rear seating positions. Their locations
are shown in the illustration. There is no
LATCH anchor provided for the center
rear seating position.
The LATCH anchors are located
between the seatback and the seat
cushion of the rear seat left and right
outboard seating positions.
When you install your child's restraint
system using the LATCH anchors
buckle the shoulder lap belt, then lock
the retractor and pull the belt to remove
the slack in the belt so it lies flat against
the vehicle seat.
Follow the child seat manufacturer’s
instructions to properly install child
restraint seats with LATCH or LATCH-
compatible attachments.
Once you have installed the LATCH
child restraint, assure that the seat is
properly attached to the LATCH and
tether anchors.
Also, test the child restraint seat before
you place the child in it. Tilt the seat
from side to side. Also try to tug the seat
forward. Check to see if the anchors
hold the seat in place.
OTF030031N
Lower Anchor
Position Indicator
Lower Anchor
WARNING - Unused rear seatbelts
Always fasten the seatbelts
behind the child restraint seat
when they are not used to
secure the child seat. Failure to
do so may result in child stran-
gulation.
WARNING - LATCH lower
anchors
Never attempt to attach a
LATCH equipped seat in the
center seating position. LATCH
lower anchors are only to be
used with the left and right rear
outboard seating positions. You
may damage the anchors or the
anchors may fail and break in a
collision.
Page 54 of 584
337
Safety features of your vehicle
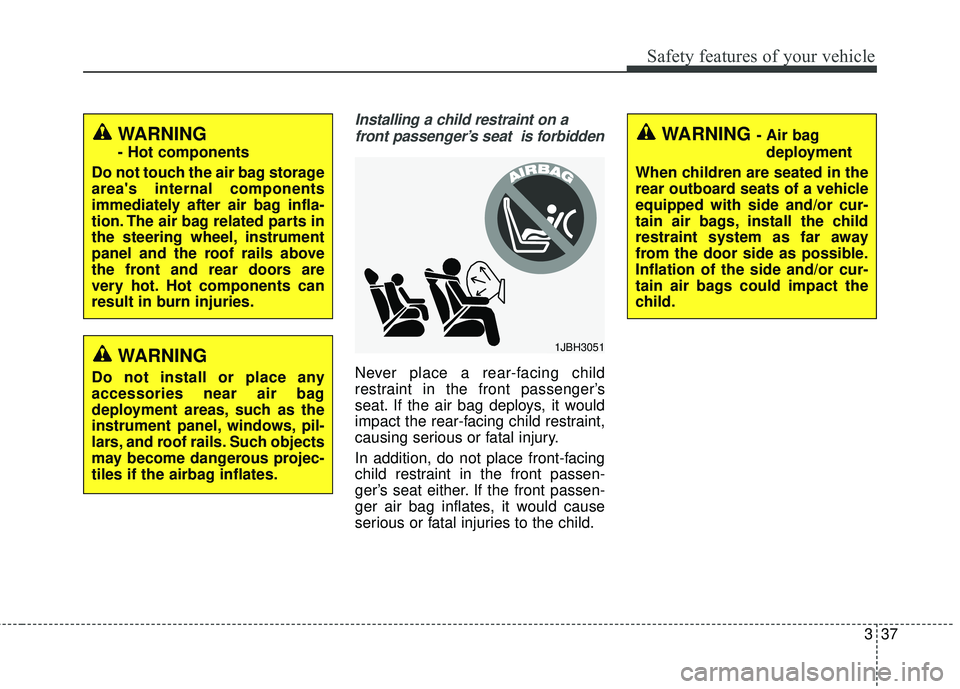
Installing a child restraint on afront passenger’s seat is forbidden
Never place a rear-facing child
restraint in the front passenger’s
seat. If the air bag deploys, it would
impact the rear-facing child restraint,
causing serious or fatal injury.
In addition, do not place front-facing
child restraint in the front passen-
ger’s seat either. If the front passen-
ger air bag inflates, it would cause
serious or fatal injuries to the child.
WARNING
- Hot components
Do not touch the air bag storage
area's internal components
immediately after air bag infla-
tion. The air bag related parts in
the steering wheel, instrument
panel and the roof rails above
the front and rear doors are
very hot. Hot components can
result in burn injuries.
1JBH3051
WARNING - Air bag deployment
When children are seated in the
rear outboard seats of a vehicle
equipped with side and/or cur-
tain air bags, install the child
restraint system as far away
from the door side as possible.
Inflation of the side and/or cur-
tain air bags could impact the
child.
WARNING
Do not install or place any
accessories near air bag
deployment areas, such as the
instrument panel, windows, pil-
lars, and roof rails. Such objects
may become dangerous projec-
tiles if the airbag inflates.
Page 60 of 584
343
Safety features of your vehicle
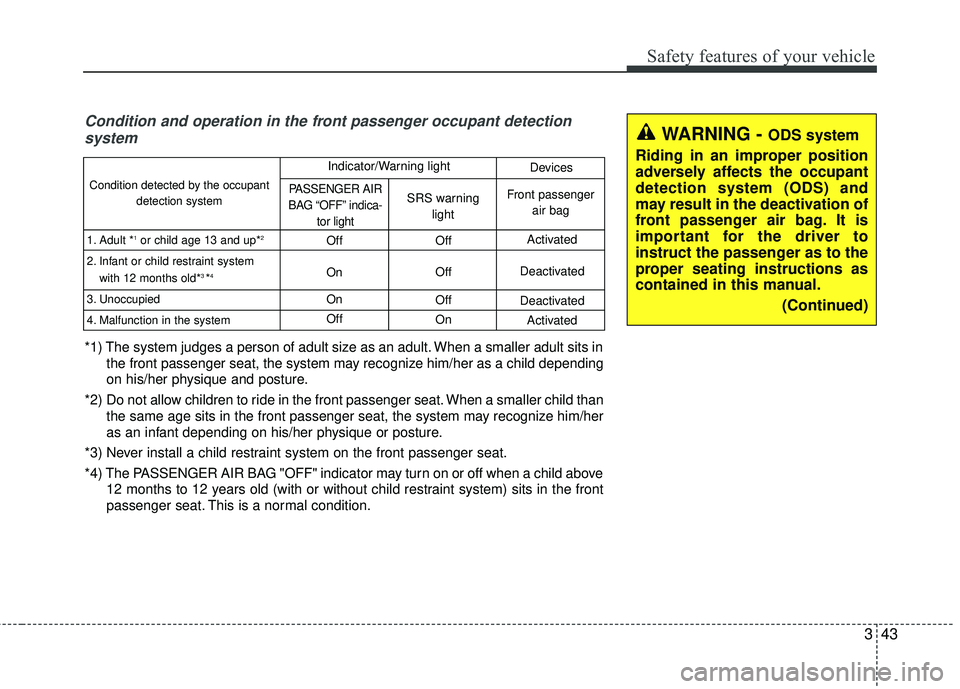
Condition and operation in the front passenger occupant detectionsystem
*1) The system judges a person of adult size as an adult. When a smaller adult sits in
the front passenger seat, the system may recognize him/her as a child depending
on his/her physique and posture.
*2) Do not allow children to ride in the front passenger seat. When a smaller child than the same age sits in the front passenger seat, the system may recognize him/her
as an infant depending on his/her physique or posture.
*3) Never install a child restraint system on the front passenger seat.
*4) The PASSENGER AIR BAG "OFF" indicator may turn on or off when a child above 12 months to 12 years old (with or without child restraint system) sits in the front
passenger seat. This is a normal condition.
Condition detected by the occupant
detection system
1. Adult *
1or child age 13 and up*2
2. Infant or child restraint system with 12 months old*3 *4
3. Unoccupied
4. Malfunction in the system
Off
On
On
Off Off
Off
Off
On Activated
Deactivated
Deactivated Activated
PASSENGER AIR
BAG “OFF” indica- tor lightSRS warninglightFront passenger air bag
Indicator/Warning light Devices
WARNING - ODS system
Riding in an improper position
adversely affects the occupant
detection system (ODS) and
may result in the deactivation of
front passenger air bag. It is
important for the driver to
instruct the passenger as to the
proper seating instructions as
contained in this manual. (Continued)
Page 62 of 584
345
Safety features of your vehicle
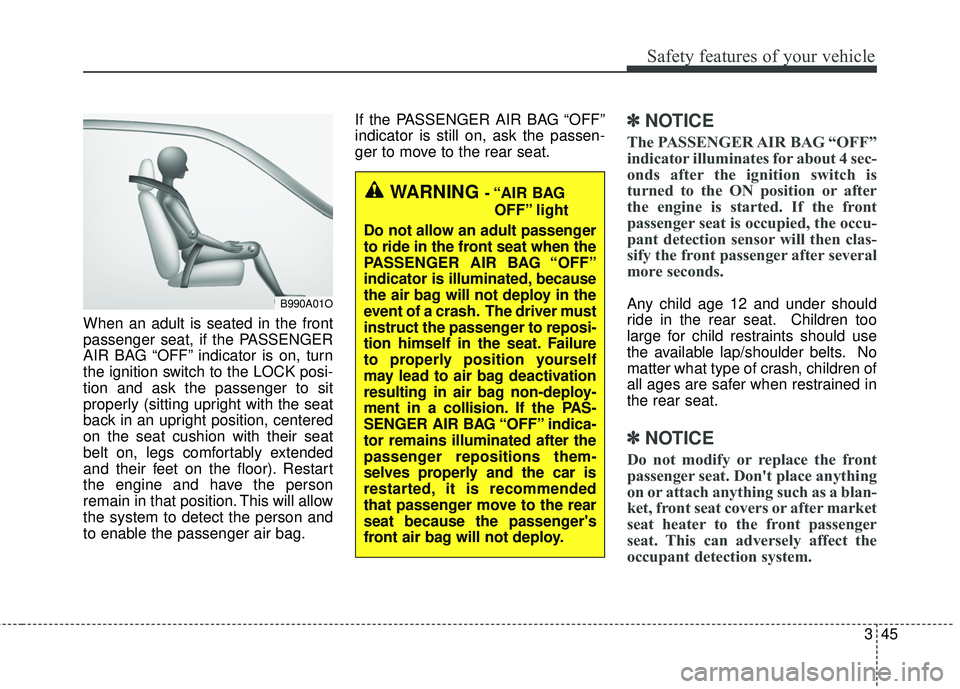
When an adult is seated in the front
passenger seat, if the PASSENGER
AIR BAG “OFF” indicator is on, turn
the ignition switch to the LOCK posi-
tion and ask the passenger to sit
properly (sitting upright with the seat
back in an upright position, centered
on the seat cushion with their seat
belt on, legs comfortably extended
and their feet on the floor). Restart
the engine and have the person
remain in that position. This will allow
the system to detect the person and
to enable the passenger air bag.If the PASSENGER AIR BAG “OFF”
indicator is still on, ask the passen-
ger to move to the rear seat.
✽ ✽
NOTICE
The PASSENGER AIR BAG “OFF”
indicator illuminates for about 4 sec-
onds after the ignition switch is
turned to the ON position or after
the engine is started. If the front
passenger seat is occupied, the occu-
pant detection sensor will then clas-
sify the front passenger after several
more seconds.
Any child age 12 and under should
ride in the rear seat. Children too
large for child restraints should use
the available lap/shoulder belts. No
matter what type of crash, children of
all ages are safer when restrained in
the rear seat.
✽ ✽NOTICE
Do not modify or replace the front
passenger seat. Don't place anything
on or attach anything such as a blan-
ket, front seat covers or after market
seat heater to the front passenger
seat. This can adversely affect the
occupant detection system.
B990A01O
WARNING - “AIR BAG
OFF” light
Do not allow an adult passenger
to ride in the front seat when the
PASSENGER AIR BAG “OFF”
indicator is illuminated, because
the air bag will not deploy in the
event of a crash. The driver must
instruct the passenger to reposi-
tion himself in the seat. Failure
to properly position yourself
may lead to air bag deactivation
resulting in air bag non-deploy-
ment in a collision. If the PAS-
SENGER AIR BAG “OFF” indica-
tor remains illuminated after the
passenger repositions them-
selves properly and the car is
restarted, it is recommended
that passenger move to the rear
seat because the passenger's
front air bag will not deploy.
Page 64 of 584
347
Safety features of your vehicle
The indications of the system's pres-
ence are the letters "AIR BAG"
embossed on the air bag pad cover
in the steering wheel and the pas-
senger's side front panel pad above
the glove box.
The SRS consists of air bags
installed under the pad covers in the
center of the steering wheel and the
passenger's side front panel above
the glove box.
The purpose of the SRS is to provide
the vehicle's driver and/or the front
passenger with additional protection
than that offered by the seat belt sys-
tem alone in case of a frontal impact
of sufficient severity. The SRS uses
sensors to gather information about
the driver's seat position, the driver's
and front passenger's seat belt
usage and impact severity.The advanced SRS offers the ability
to control the air bag inflation with
two levels. A first stage level is pro-
vided for moderate-severity impacts.
A second stage level is provided for
more severe impacts.
The passenger’s front air bag is
designed to help reduce the injury of
children sitting close to the instru-
ment panel in low speed collisions.
However, children are safer if they
are restraint in the rear seat.
According to the impact severity,
seating position and seat belt usage,
the SRSCM (SRS Control Module)
controls the air bag inflation. Failure
to properly wear seat belts can
increase the risk or severity of injury
in an accident.
Additionally, your vehicle is equipped
with an occupant detection system in
the front passenger's seat. The occu-
pant detection system detects the
presence of a passenger in the front
passenger's seat and will turn off the
front passenger's air bag under cer-
tain conditions. For more detail, see
"Occupant detection system" in this
section.
Do not place any objects that may
cause magnetic fields near the front
seat. These may cause a malfunction
of the seat track position sensor.
Page 214 of 584
4139
Features of your vehicle
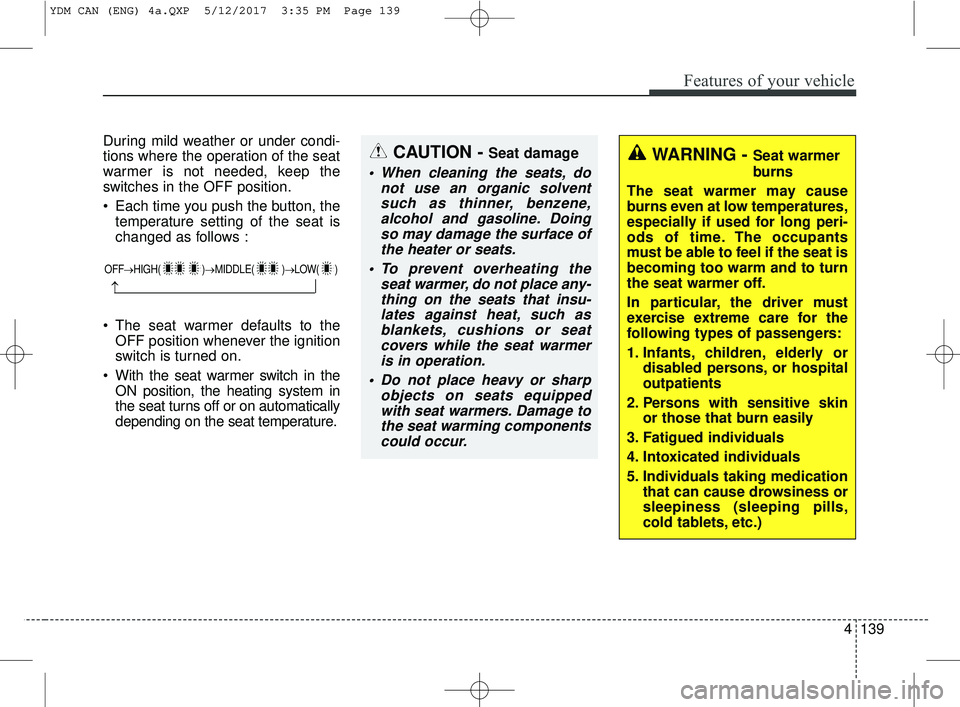
During mild weather or under condi-
tions where the operation of the seat
warmer is not needed, keep the
switches in the OFF position.
Each time you push the button, thetemperature setting of the seat is
changed as follows :
The seat warmer defaults to the OFF position whenever the ignition
switch is turned on.
With the seat warmer switch in the ON position, the heating system in
the seat turns off or on automatically
depending on the seat temperature.
OFF→ HIGH( )→ MIDDLE( )→LOW( )
→
CAUTION - Seat damage
When cleaning the seats, do
not use an organic solventsuch as thinner, benzene,alcohol and gasoline. Doingso may damage the surface ofthe heater or seats.
To prevent overheating the seat warmer, do not place any-thing on the seats that insu-lates against heat, such asblankets, cushions or seatcovers while the seat warmeris in operation.
Do not place heavy or sharp objects on seats equippedwith seat warmers. Damage tothe seat warming componentscould occur.
WARNING - Seat warmer
burns
The seat warmer may cause
burns even at low temperatures,
especially if used for long peri-
ods of time. The occupants
must be able to feel if the seat is
becoming too warm and to turn
the seat warmer off.
In particular, the driver must
exercise extreme care for the
following types of passengers:
1. Infants, children, elderly or disabled persons, or hospital
outpatients
2. Persons with sensitive skin or those that burn easily
3. Fatigued individuals
4. Intoxicated individuals
5. Individuals taking medication that can cause drowsiness or
sleepiness (sleeping pills,
cold tablets, etc.)
YDM CAN (ENG) 4a.QXP 5/12/2017 3:35 PM Page 139
Page 366 of 584
525
Driving your vehicle
The Dual Clutch Transmissiongives the driving feel of a manual
transmission, yet provides the
ease of a fully automatic transmis-
sion. Unlike a traditional automatic
transmission, the gear shifting can
be felt (and heard) on the dual
clutch transmission
- Think of it as an automaticallyshifting manual transmission.
- Shift into Drive range and get fully automatic shifting, similar to a con-
ventional automatic transmission.
Dual clutch transmission adopts dry-type dual clutch, which is dif-
ferent from torque converter of
automatic transmission, and
shows better acceleration perform-
ance during driving. But, initial
launch might be little bit slower
than Automatic Transmission.
The dry-type clutch transfers torque and provides a direct driv-
ing feeling which may feel different
from a conventional automatic
transmission with a torque convert-
er. This may be more noticeable
when starting from a stop or low
vehicle speed.CAUTION
To avoid damage to your transmission, do not try toaccelerate in R (Reverse) orany forward gear position withthe brakes on.
When stopped on slope, do not hold the vehicle withaccelerator pedal. Use theservice brake or the parkingbrake.
WARNING
To reduce the risk of serious
injury or death:
ALWAYS check the surround- ing areas near your vehicle for
people, especially children,
before shifting a vehicle into
D (Drive) or R (Reverse).
Before leaving the driver's seat, always make sure the
shift lever is in the P (Park)
position, then set the parking
brake, and place the ignition
switch in the LOCK/OFF posi-
tion. Unexpected and sudden
vehicle movement can occur
if these preNOTICEs are not
followed.
Do not use the engine braking (shifting from a high gear to
lower gear) rapidly on slip-
pery roads. The vehicle may
slip causing an accident.