audio KIA K5 2021 Features and Functions Guide
[x] Cancel search | Manufacturer: KIA, Model Year: 2021, Model line: K5, Model: KIA K5 2021Pages: 58, PDF Size: 4.9 MB
Page 37 of 58
35ALWAYS CHECK THE OWNER’S MANUAL FOR COMPLETE OPER ATING INFORMATION AND SAFET Y WARNINGS. *IF EQUIPPED †LEGAL DISCL AIMERS ON BACK INSIDE COVER
Driving while distracted is dangerous and should be avoided. Drivers should remain attentive to driving and always exercise caution when using the steering-wheel-mounted controls while driving. To help minimize driver distraction, some audio system functionalities have been modified while the vehicle is in Drive, Reverse or moved out of Park.
Sound Settings: To adjust the audio system sound settings:
1. Press the SETUP key on the audio head unit or the on-screen MENU button, when in MEDIA mode
2. Select the on-screen SOUND button
3. Select the menu item (Position, Volume, Tone, Priority, Navigation Volume, Advanced, Reset)
4. Use the on-screen buttons to adjust settings
Radio Presets: You can listen to FM, AM and SiriusXM® radio and save frequently used stations
How to Save a Preset: Press and hold the desired slot. This saves the current station in the selected slot in AM, FM, or SiriusXM®
Smart Favorites: For the first ten favorite SiriusXM® channels, you may play live or repeat from the beginning of a song or a program segment. In Radio mode, choose SiriusXM®, then select any of the first six favorites.
During song or program play, tap the Skip Backward icon to start from the beginning of the song or program. Tap the Play Live icon to return to the live broadcast
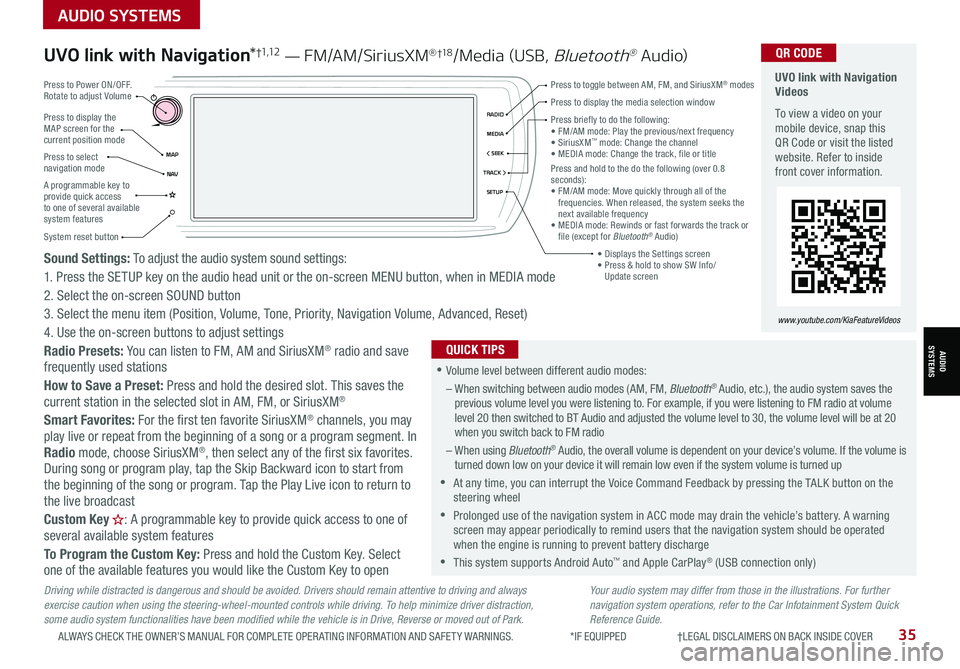
Custom Key H: A programmable key to provide quick access to one of several available system features
To Program the Custom Key: Press and hold the Custom Key. Select one of the available features you would like the Custom Key to open
Your audio system may differ from those in the illustrations. For further navigation system operations, refer to the Car Infotainment System Quick Reference Guide.
UVO link with Navigation*†1 ,1 2 — FM/AM/SiriusXM® †1 8/Media (USB, Bluetooth® Au dio) UVO link with Navigation Videos
To view a video on your mobile device, snap this QR Code or visit the listed website. Refer to inside front cover information.
www.youtube.com/KiaFeatureVideos
QR CODE
•Volume level between different audio modes:
– When switching between audio modes (AM, FM, Bluetooth® Audio, etc.), the audio system saves the previous volume level you were listening to. For example, if you were listening to FM radio at volume level 20 then switched to BT Audio and adjusted the volume level to 30, the volume level will be at 20 when you switch back to FM radio
– When using Bluetooth® Audio, the overall volume is dependent on your device’s volume. If the volume is turned down low on your device it will remain low even if the system volume is turned up
•At any time, you can interrupt the Voice Command Feedback by pressing the TALK button on the steering wheel
•Prolonged use of the navigation system in ACC mode may drain the vehicle’s battery. A warning screen may appear periodically to remind users that the navigation system should be operated when the engine is running to prevent battery discharge
•
This system supports Android Auto™ and Apple CarPlay® (USB connection only)
QUICK TIPS
Press to display the MAP screen for the current position mode
Press to select navigation mode
System reset button
MAP< SEEKMEDIARADIO
N AVTRACK >
SETUP
Press briefly to do the following:
Page 38 of 58
*IF EQUIPPED 36K5 FEATURES & FUNCTIONS GUIDE
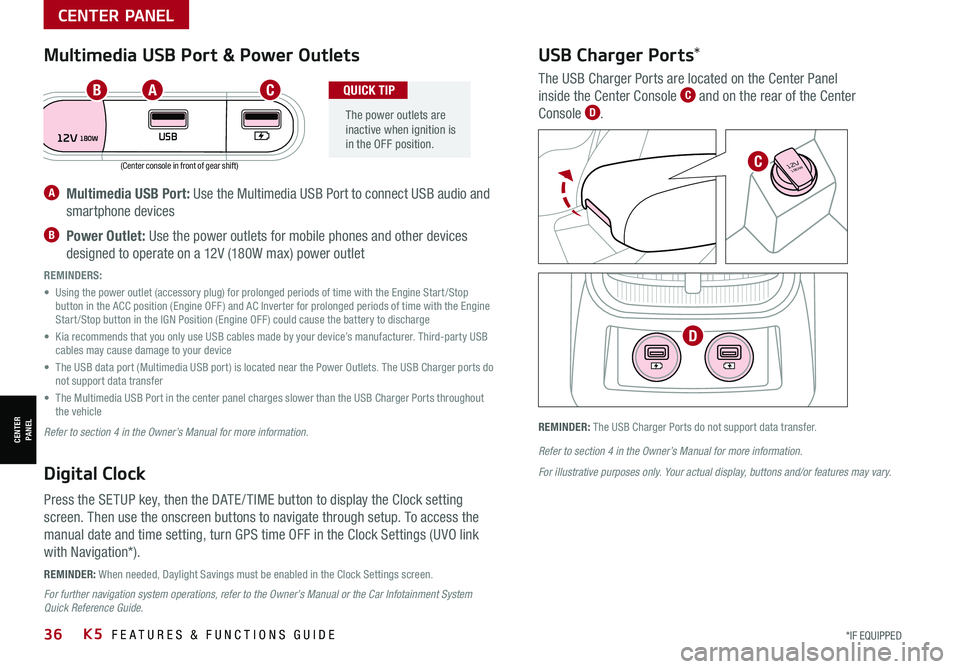
(Center console in front of gear shift)
REMINDER: When needed, Daylight Savings must be enabled in the Clock Settings screen.
REMINDER: The USB Charger Ports do not support data transfer.
A Multimedia USB Port: Use the Multimedia USB Port to connect USB audio and
smartphone devices
B Power Outlet: Use the power outlets for mobile phones and other devices
designed to operate on a 12V (180W max) power outlet
REMINDERS:
• Using the power outlet (accessory plug) for prolonged periods of time with the Engine Start /Stop button in the ACC position (Engine OFF ) and AC Inverter for prolonged periods of time with the Engine Start /Stop button in the IGN Position (Engine OFF ) could cause the battery to discharge
• Kia recommends that you only use USB cables made by your device’s manufacturer. Third-party USB cables may cause damage to your device
• The USB data port (Multimedia USB port) is located near the Power Outlets. The USB Charger ports do not support data transfer
• The Multimedia USB Port in the center panel charges slower than the USB Charger Ports throughout the vehicle
Refer to section 4 in the Owner’s Manual for more information.
Refer to section 4 in the Owner’s Manual for more information.
For illustrative purposes only. Your actual display, buttons and/or features may vary.
For further navigation system operations, refer to the Owner’s Manual or the Car Infotainment System Quick Reference Guide.
Digital Clock
Press the SETUP key, then the DATE / TIME button to display the Clock setting
screen. Then use the onscreen buttons to navigate through setup. To access the
manual date and time setting, turn GPS time OFF in the Clock Settings (UVO link
with Navigation*).
Multimedia USB Port & Power Outlets
The power outlets are inactive when ignition is in the OFF position.
QUICK TIP
USB Charger Ports*
The USB Charger Ports are located on the Center Panel
inside the Center Console C and on the rear of the Center
Console D.
12VUSB180W
AUTO
OFF SYNC
FRONT
REAR
180W12V
180W12V
ABC
C
D
CENTER PANEL
CENTER PANEL
Page 46 of 58

44*IF EQUIPPED †LEGAL DISCL AIMERS ON BACK INSIDE COVERK5 FEATURES & FUNCTIONS GUIDE
6-Way Manual Adjustable Driver’s Seat*†1 6
Pull lever A to slide Seat forward/backward.
Pull lever B up several times to raise Seat Height. Push lever B down several times to lower Seat Height.
Pull lever C to adjust Seatback recline.
Press D to adjust Lumbar support.
When adjusting seat forward or backward, ensure seat clicks or locks into place before driving vehicle.
QUICK TIP
Do not attempt to adjust the seat while the vehicle is moving. This could result in loss of control of the vehicle.
For illustrative purposes only. Your actual display, buttons and/or features may vary.
Refer to section 3 in the Owner’s Manual for more information.
Front Seat Headrest Adjustment†9
To raise headrest: Pull headrest up to the desired position.
To lower headrest: Press lock E, then press the headrest down.
REMINDERS:
• Button may be hard to see if headrest is in its lowest position
• Do not operate the vehicle with the headrests removed. Headrests can provide critical neck and head support in an accident
AB
C
D
E
Refer to section 3 in the Owner’s Manual for more information.
SEATING
SEATING
Check rear seats
: Alarm OffOK
Rear Occupant Alert (ROA) with Door Monitoring
The Rear Occupant Alert (ROA) with Door Monitoring can help alert the driver when
a rear passenger may be left in the vehicle. The alert will be a message on the
Instrument Cluster stating to “Check rear seats” F and a chime will sound.
The factory default is set to OFF. To turn the system ON or OFF, go to User Settings
in the Instrument cluster or Vehicle Settings*, on the audio head unit select
Convenience, then Rear Occupant Alert and check /uncheck the box.
REMINDER: Always be sure to check the passenger areas before leaving the vehicle.
ROA is not a substitute for one’s attention. Always check the vehicle’s interior before exiting.
See section 4 in the Owner’s Manual for more information.
Image is for illustrative purposes only and may not reflect actual feature or operation.
F
Page 50 of 58
48*IF EQUIPPED †LEGAL DISCL AIMERS ON BACK INSIDE COVERK5 FEATURES & FUNCTIONS GUIDE
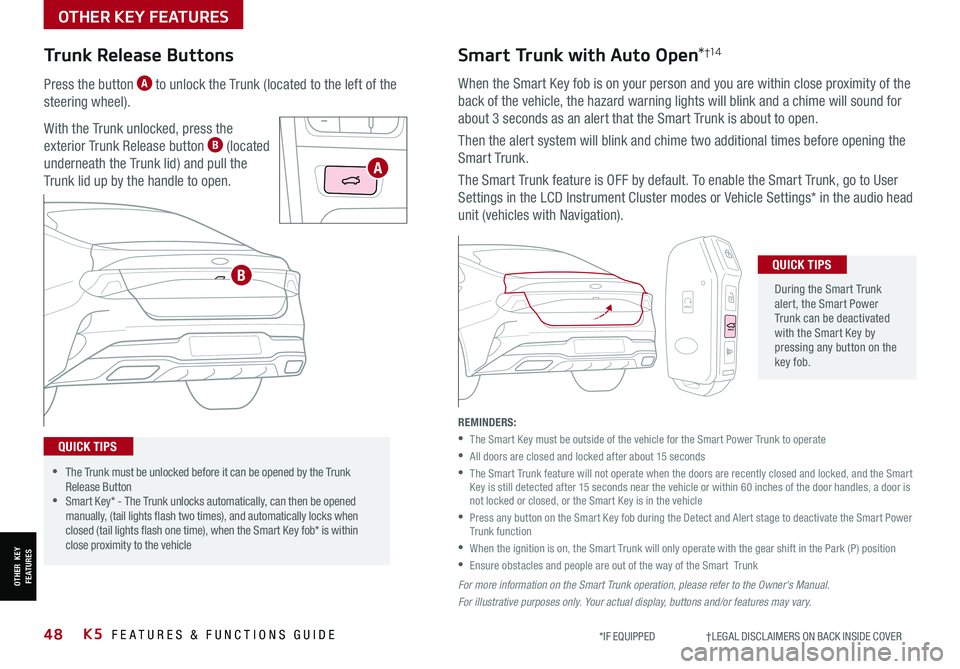
Trunk Release Buttons
Press the button A to unlock the Trunk (located to the left of the
steering wheel).
With the Trunk unlocked, press the
exterior Trunk Release button B (located
underneath the Trunk lid) and pull the
Trunk lid up by the handle to open.
Smart Trunk with Auto Open*†1 4
When the Smart Key fob is on your person and you are within close proximity of the
back of the vehicle, the hazard warning lights will blink and a chime will sound for
about 3 seconds as an alert that the Smart Trunk is about to open.
Then the alert system will blink and chime two additional times before opening the
Smart Trunk.
The Smart Trunk feature is OFF by default. To enable the Smart Trunk, go to User
Settings in the LCD Instrument Cluster modes or Vehicle Settings* in the audio head
unit (vehicles with Navigation).
During the Smart Trunk alert, the Smart Power Trunk can be deactivated with the Smart Key by pressing any button on the key fob.
QUICK TIPS
•The Trunk must be unlocked before it can be opened by the Trunk Release Button •Smart Key* - The Trunk unlocks automatically, can then be opened manually, (tail lights flash two times), and automatically locks when closed (tail lights flash one time), when the Smart Key fob* is within close proximity to the vehicle
QUICK TIPS
REMINDERS:
•
The Smart Key must be outside of the vehicle for the Smart Power Trunk to operate
•All doors are closed and locked after about 15 seconds
•
The Smart Trunk feature will not operate when the doors are recently closed and locked, and the Smart Key is still detected after 15 seconds near the vehicle or within 60 inches of the door handles, a door is not locked or closed, or the Smart Key is in the vehicle
•
Press any button on the Smart Key fob during the Detect and Alert stage to deactivate the Smart Power Trunk function
•
When the ignition is on, the Smart Trunk will only operate with the gear shift in the Park (P) position
•Ensure obstacles and people are out of the way of the Smart Trunk
For more information on the S mar t Trunk operation, please refer to the Owner's Manual.
For illustrative purposes only. Your actual display, buttons and/or features may vary.
HOLD
HOLD
HOLD
A
B
OTHER KEY FEATURES
OTHER KEY FEATURES
Page 51 of 58
49ALWAYS CHECK THE OWNER’S MANUAL FOR COMPLETE OPER ATING INFORMATION AND SAFET Y WARNINGS. *IF EQUIPPED †LEGAL DISCL AIMERS ON BACK INSIDE COVER
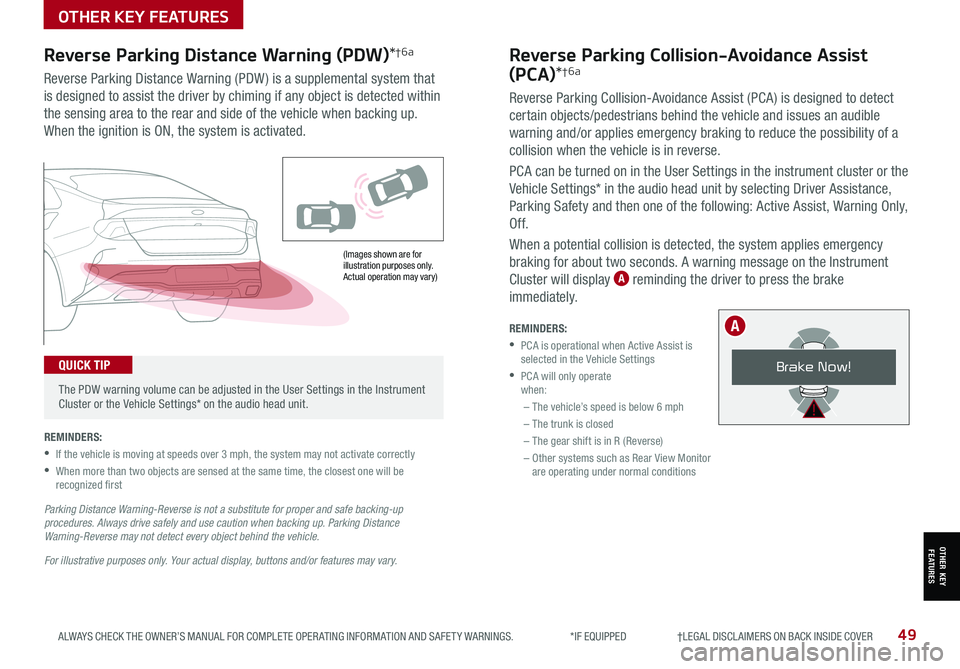
(Images shown are for illustration purposes only. Actual operation may vary)
Reverse Parking Distance Warning (PDW)*†6a
Reverse Parking Distance Warning (PDW ) is a supplemental system that
is designed to assist the driver by chiming if any object is detected within
the sensing area to the rear and side of the vehicle when backing up.
When the ignition is ON, the system is activated.
REMINDERS:
•
If the vehicle is moving at speeds over 3 mph, the system may not activate correctly
•
When more than two objects are sensed at the same time, the closest one will be recognized first
Parking Distance Warning-Reverse is not a substitute for proper and safe backing-up procedures. Always drive safely and use caution when backing up. Parking Distance Warning-Reverse may not detect every object behind the vehicle.
For illustrative purposes only. Your actual display, buttons and/or features may vary.
The PDW warning volume can be adjusted in the User Settings in the Instrument Cluster or the Vehicle Settings* on the audio head unit.
QUICK TIP
Reverse Parking Collision-Avoidance Assist
(PCA)*†6a
Reverse Parking Collision-Avoidance Assist (PCA) is designed to detect
certain objects/pedestrians behind the vehicle and issues an audible
warning and/or applies emergency braking to reduce the possibility of a
collision when the vehicle is in reverse.
PCA can be turned on in the User Settings in the instrument cluster or the
Vehicle Settings* in the audio head unit by selecting Driver Assistance,
Parking Safety and then one of the following: Active Assist, Warning Only,
Of f.
When a potential collision is detected, the system applies emergency
braking for about two seconds. A warning message on the Instrument
Cluster will display A reminding the driver to press the brake
immediately.
REMINDERS:
•
PCA is operational when Active Assist is selected in the Vehicle Settings
•
PCA will only operate when:
– The vehicle’s speed is below 6 mph
– The trunk is closed
– The gear shift is in R (Reverse)
– Other systems such as Rear View Monitor are operating under normal conditions
Brake Now!
A
OTHER KEY FEATURES
OTHER KEY FEATURES
Page 52 of 58

50K5 FEATURES & FUNCTIONS GUIDE*IF EQUIPPED †LEGAL DISCL AIMERS ON BACK INSIDE COVER
Sunvisor†2 2
Use the Sunvisor to shield direct light through the front
or side windows. Slide the Sunvisor out and adjust as
needed.
REMINDERS:
•The Sunvisor may impair visibility if not adjusted properly
•Sunvisor may not shield all direct light
•
Do not operate the vehicle if Sunvisor is impairing your visibility
•
Be aware of your seating position when adjusting or swinging Sunvisor around from the front or side windows
Rear View Monitor (RVM)†6a
RVM is a supplemental system that displays the view behind the vehicle through the
audio head unit screen while the vehicle is in Reverse.
RVM activates when the:
•Engine Start /Stop button* is in the ON position
•Gear Shift Lever is in the R (Reverse) position
REMINDERS:
•Rear View Monitor is ON by default when the ignition is cycled
•
The screen image above is for illustration purposes only. The actual image or graphics may differ in your vehicle
•
Through normal use and after inclement weather or washing, the rear camera may become dirty. Use a clean, microfiber cloth to remove any dirt, debris or spots that may have accumulated on the lens
•While the Rear View Monitor is active the volume will be lowered on all audio modes
Rear View Monitor is not a substitute for proper and safe backing-up procedures. Rear View Monitor may not display every object behind the vehicle.
For illustrative purposes only. Your actual display, buttons and/or features may vary.
(audio system control unit screen display shown)
OTHER KEY FEATURES
OTHER KEY FEATURES
Page 56 of 58
Sales Consultant:
______________________________________________________________
Date:
____________________
Sales Manager:
________________________________________________________________
Date:
____________________
Customer:
_____________________________________________________________________
Date:
____________________
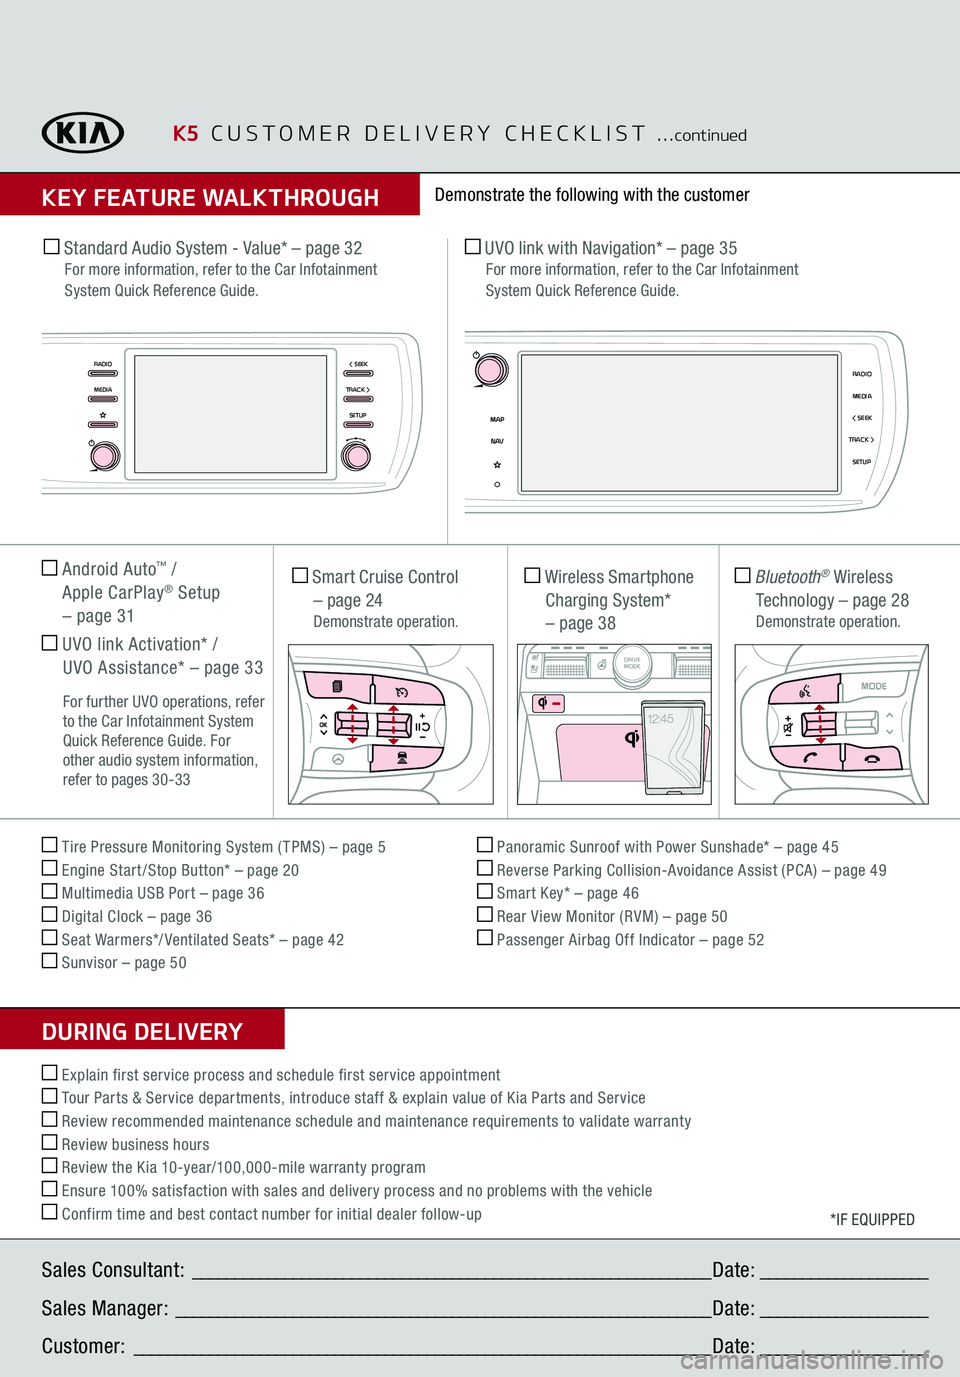
Tire Pressure Monitoring System ( TPMS) – page 5 Engine Start /Stop Button* – page 20 Multimedia USB Port – page 36 Digital Clock – page 36 Seat Warmers*/ Ventilated Seats* – page 42 Sunvisor – page 50
Panoramic Sunroof with Power Sunshade* – page 45 Reverse Parking Collision-Avoidance Assist (PCA) – page 49 Smart Key* – page 46 Rear View Monitor (RVM) – page 50 Passenger Airbag Off Indicator – page 52
*IF EQUIPPED
Explain first service process and schedule first service appointment Tour Parts & Service departments, introduce staff & explain value of Kia Parts and Service Review recommended maintenance schedule and maintenance requirements to validate warranty Review business hours Review the Kia 10-year/100,000-mile warranty program Ensure 100% satisfaction with sales and delivery process and no problems with the vehicle Confirm time and best contact number for initial dealer follow-up Standard Audio System - Value* – page 32
For more information, refer to the Car Infotainment
System Quick Reference Guide.
UVO link with Navigation* – page 35
For more information, refer to the Car Infotainment
System Quick Reference Guide.
Smart Cruise Control
– page 24 Demonstrate operation.
Wireless Smartphone Charging System*
– page 38
Bluetooth
® Wireless
Technology – page 28
Demonstrate operation.
Android Auto
™ /
Apple CarPlay
® Setup
– page 31 UVO link Activation* /
UVO Assistance* – page 33 For further UVO operations, refer
to the Car Infotainment System
Quick Reference Guide. For
other audio system information,
refer to pages 30-33
Demonstrate the following with the customer
K5
CUSTOMER DELIVERY CHECKLIST
...
continued
KEY FEATURE WALKTHROUGHDURING DELIVERY
RADIO < SEEKMEDIATRACK >
SETUP
MAP
< SEEKMEDIARADIO
N AV
TRACK >
SETUP
AUTO
HOLD
DRIVE
MODE
OFF
VIEW
SHIFT
LOCK
RELEASEP
R
N D
+
_