navigation KIA K5 2021 Navigation System Quick Reference Guide
[x] Cancel search | Manufacturer: KIA, Model Year: 2021, Model line: K5, Model: KIA K5 2021Pages: 300, PDF Size: 10.06 MB
Page 103 of 300
5-13
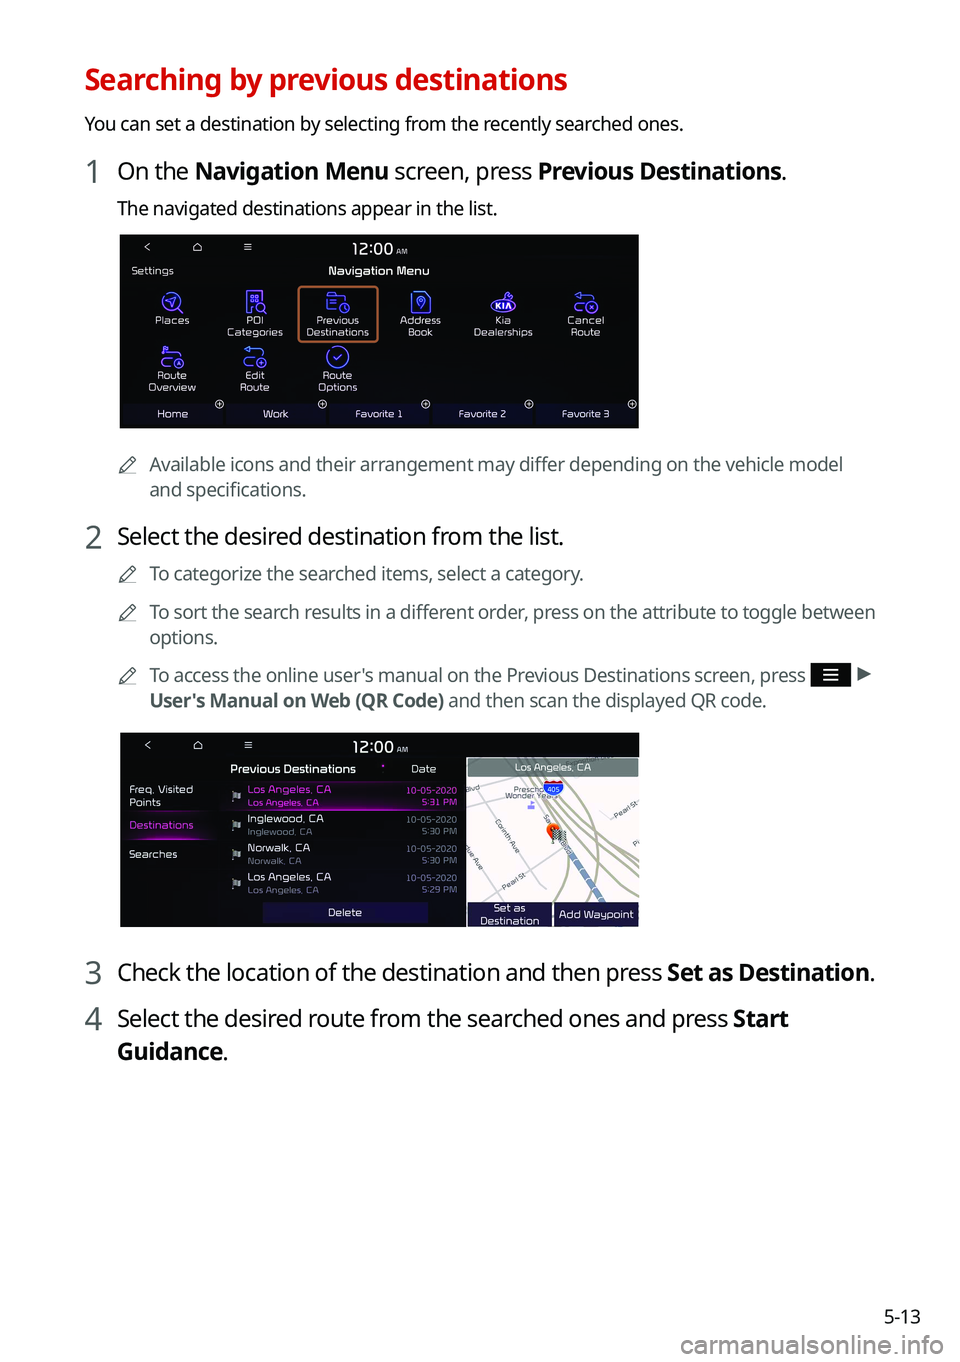
Searching by previous destinations
You can set a destination by selecting from the recently searched ones.
1 On the Navigation Menu screen, press Previous Destinations.
The navigated destinations appear in the list.
0000AAvailable icons and their arrangement may differ depending on the vehicle model
and specifications.
2 Select the desired destination from the list.
0000
A
To categorize the searched items, select a category.
0000
A
To sort the search results in a different order, press on the attribute to toggle between
options.
0000
A
To access the online user's manual on the Previous Destinations screen, press
>
User's Manual on Web (QR Code) and then scan the displayed QR code.
3 Check the location of the destination and then press Set as Destination.
4 Select the desired route from the searched ones and press Start
Guidance.
Page 104 of 300
5-14
Deleting a previous destination
1 On the Previous Destinations screen, press Delete.
2 Select the destination(s) to delete and press Delete.
You can delete the selected place(s) or all places.
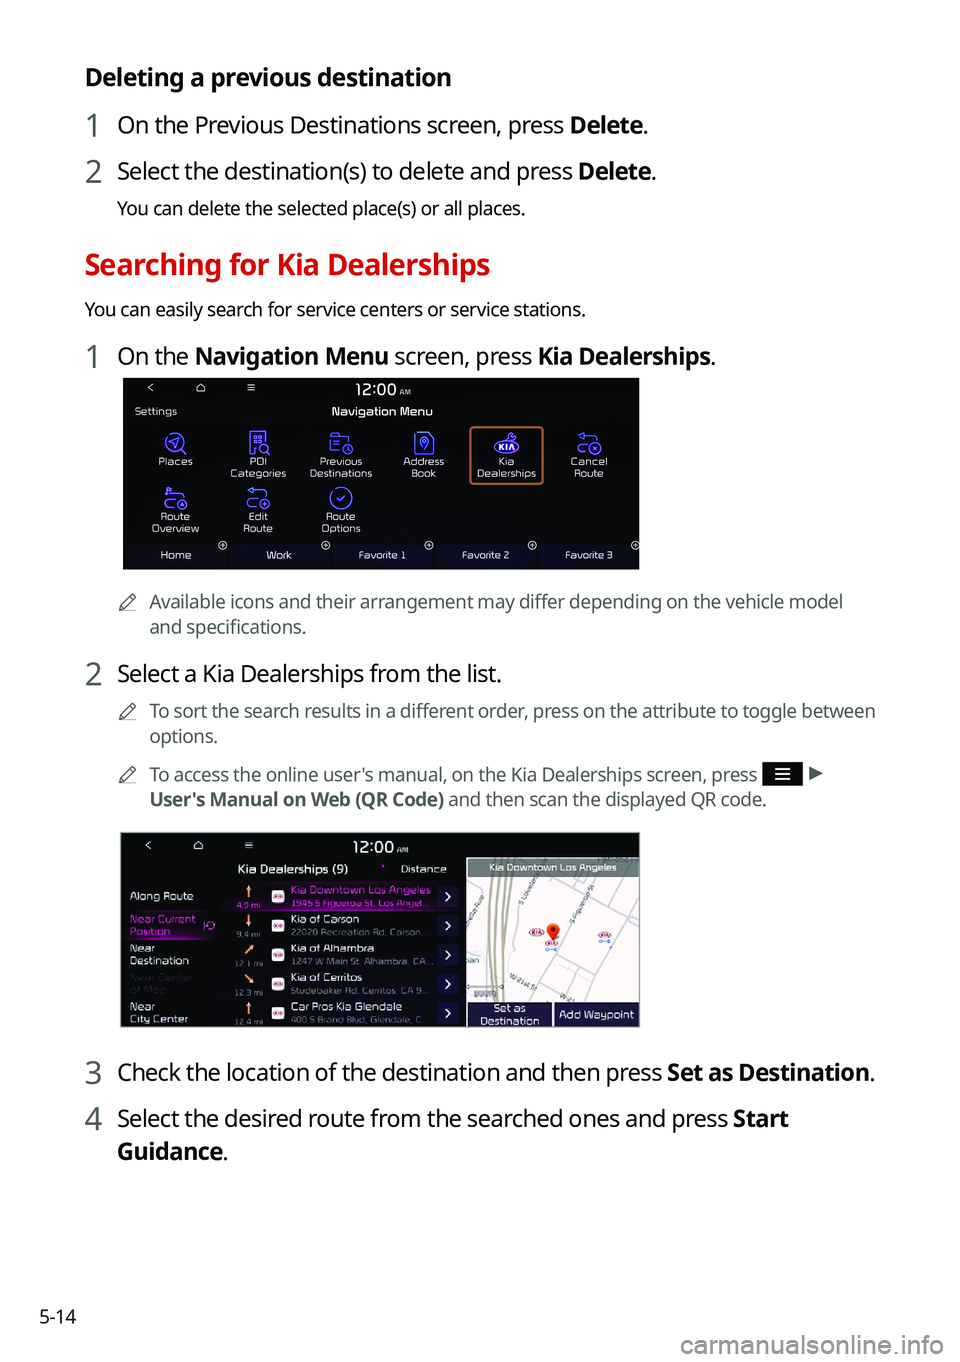
Searching for Kia Dealerships
You can easily search for service centers or service stations.
1 On the Navigation Menu screen, press Kia Dealerships.
0000AAvailable icons and their arrangement may differ depending on the vehicle model
and specifications.
2 Select a Kia Dealerships from the list.
0000
A
To sort the search results in a different order, press on the attribute to toggle between
options.
0000
A
To access the online user's manual, on the Kia Dealerships screen, press
>
User's Manual on Web (QR Code) and then scan the displayed QR code.
3 Check the location of the destination and then press Set as Destination.
4 Select the desired route from the searched ones and press Start
Guidance.
Page 105 of 300
5-15
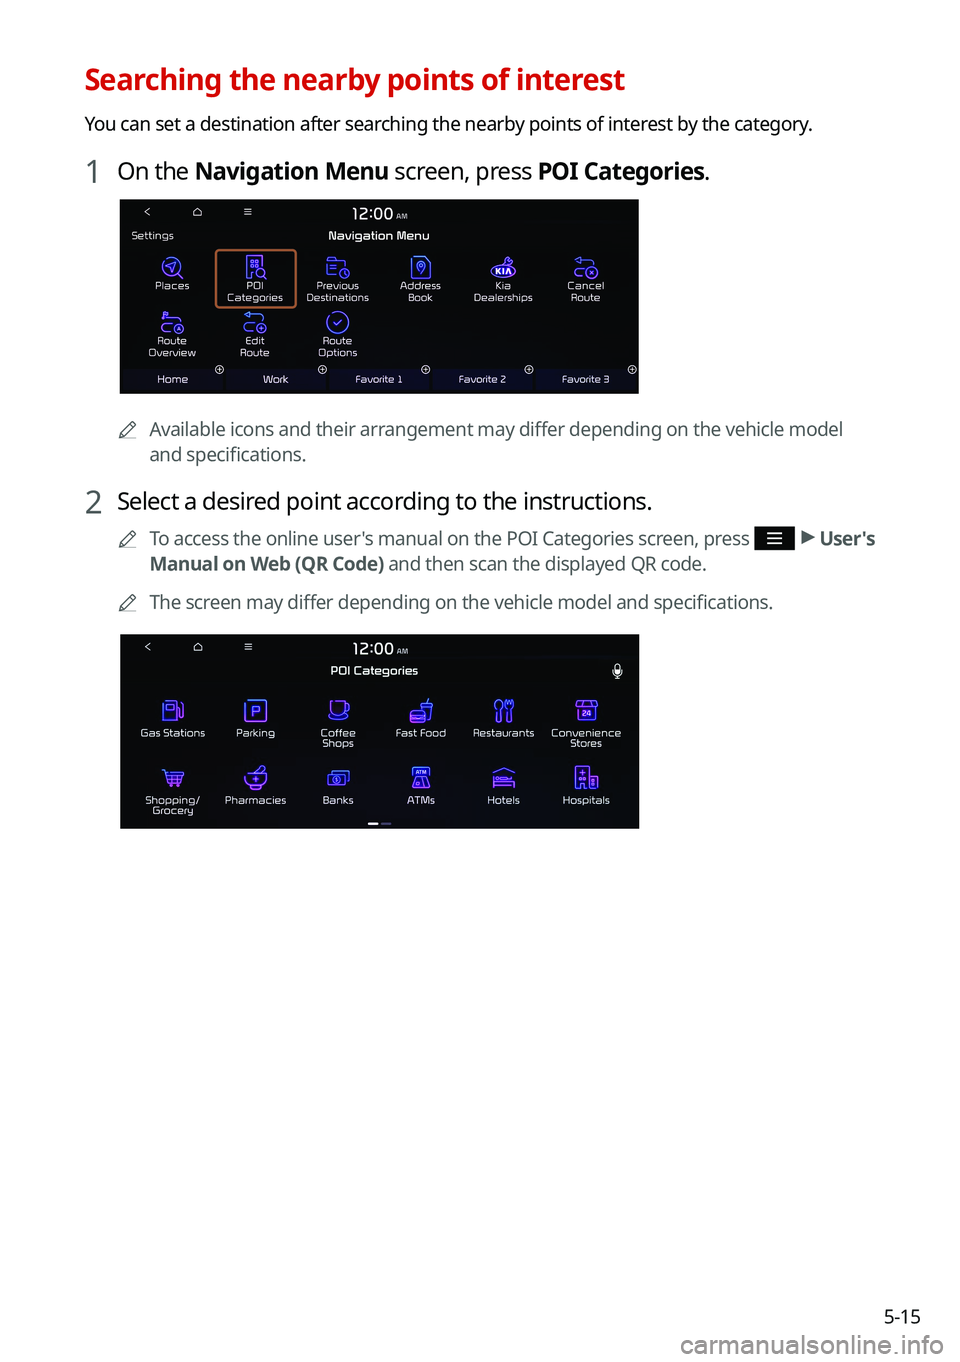
Searching the nearby points of interest
You can set a destination after searching the nearby points of interest by the category.
1 On the Navigation Menu screen, press POI Categories.
0000AAvailable icons and their arrangement may differ depending on the vehicle model
and specifications.
2 Select a desired point according to the instructions.
0000
A
To access the online user's manual on the POI Categories screen, press >
User's
Manual on Web (QR Code) and then scan the displayed QR code.
0000
A
The screen may differ depending on the vehicle model and specifications.
Page 107 of 300
5-17
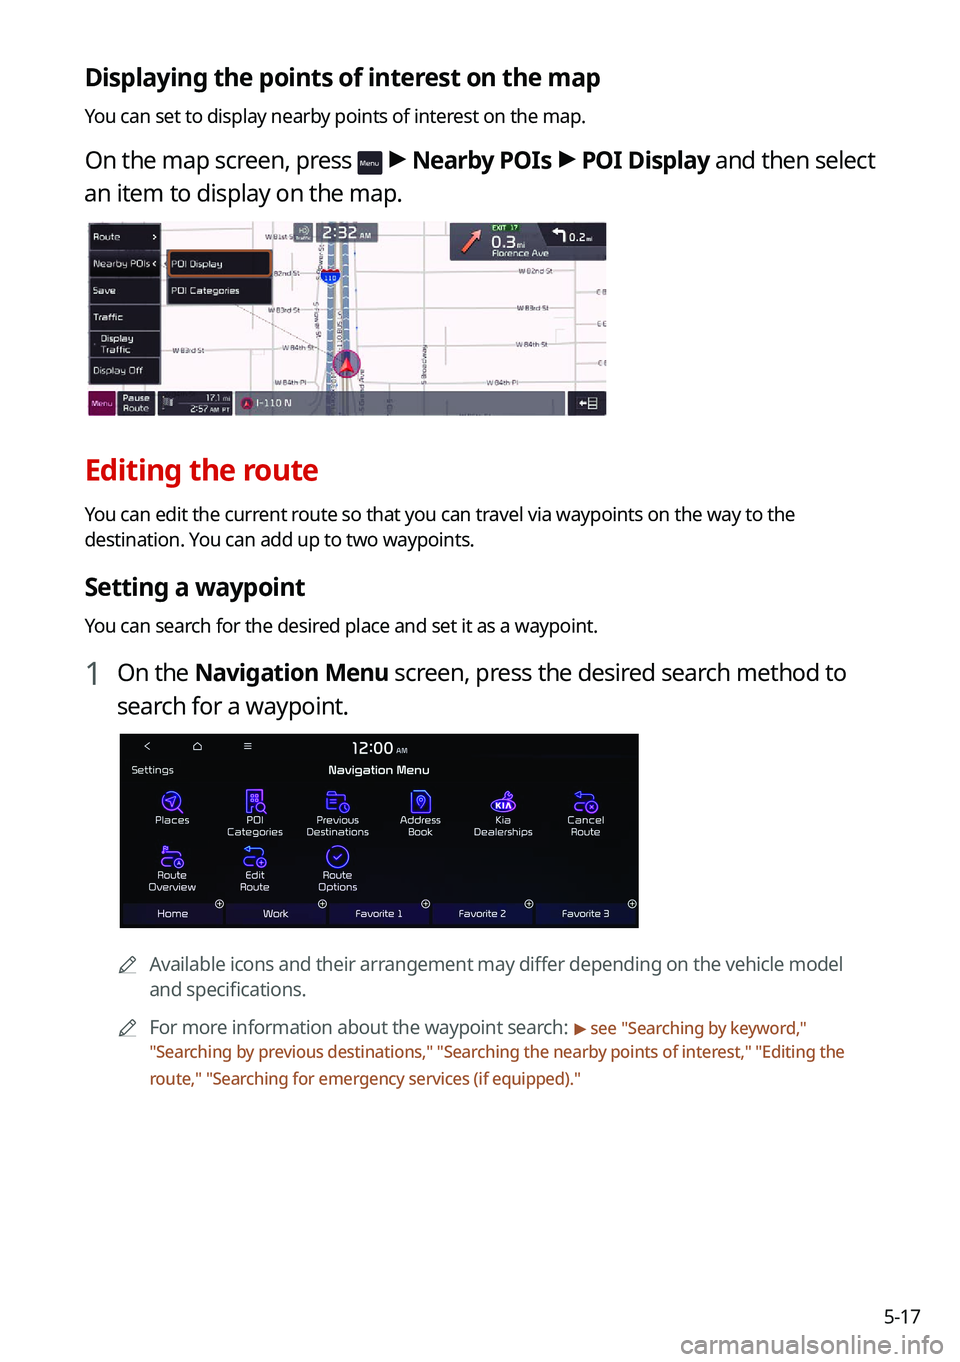
Displaying the points of interest on the map
You can set to display nearby points of interest on the map.
On the map screen, press > Nearby POIs >
POI Display and then select
an item to display on the map.
Editing the route
You can edit the current route so that you can travel via waypoints on the way to the
destination. You can add up to two waypoints.
Setting a waypoint
You can search for the desired place and set it as a waypoint.
1 On the Navigation Menu screen, press the desired search method to
search for a waypoint.
0000
A
Available icons and their arrangement may differ depending on the vehicle model
and specifications.
0000
A
For more information about the waypoint search:
> see "Searching by keyword,"
" Searching by previous destinations," "Searching the nearby points of interest ," "Editing the
route," "Searching for emergency services (if equipped)."
Page 108 of 300
5-18
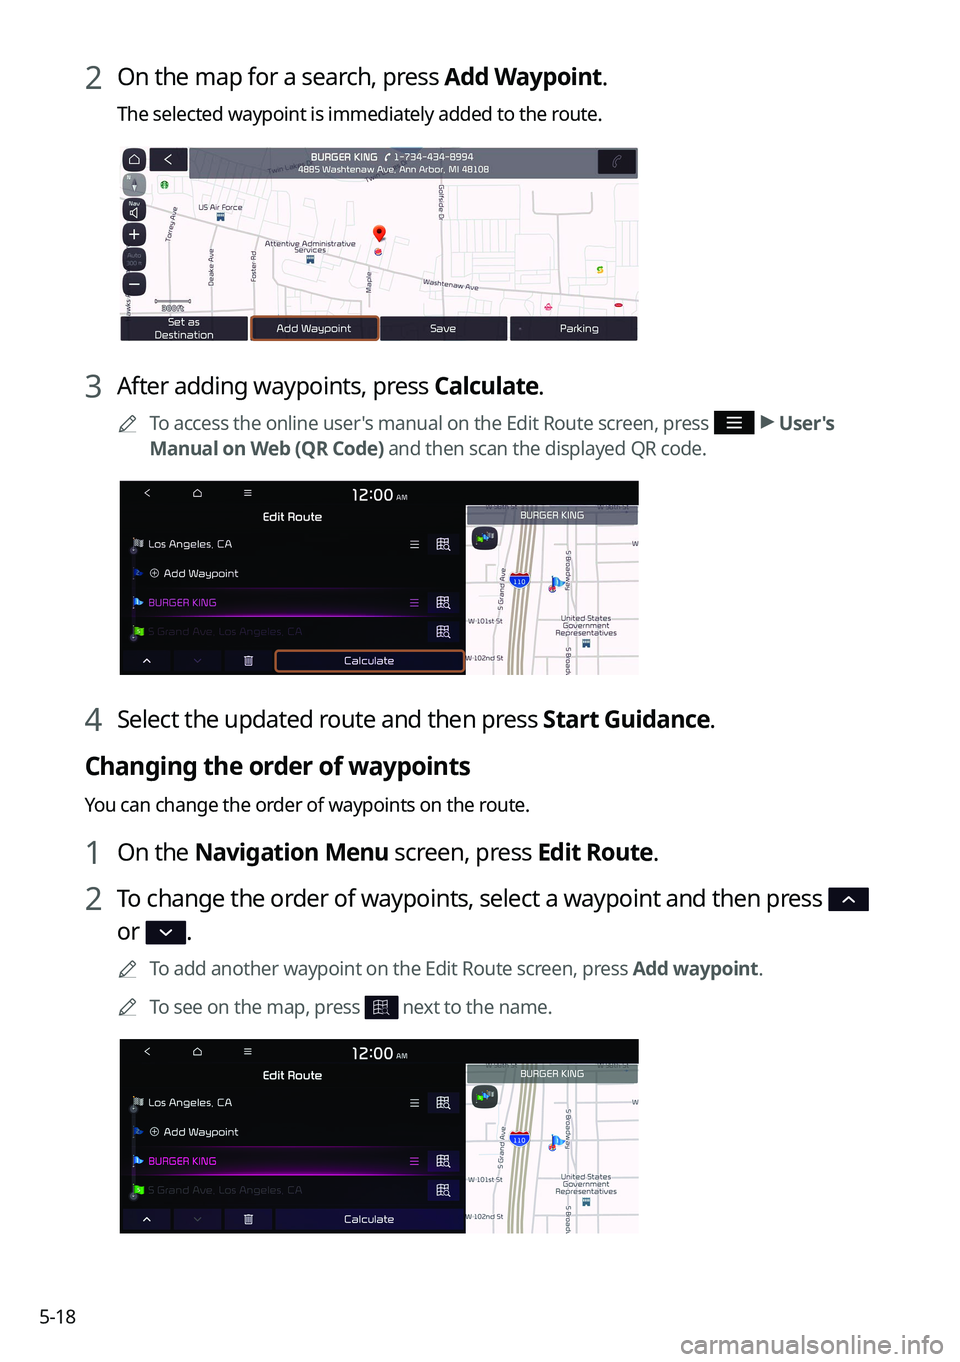
2 On the map for a search, press Add Waypoint.
The selected waypoint is immediately added to the route.
3 After adding waypoints, press Calculate.
0000
A
To access the online user's manual on the Edit Route screen, press >
User's
Manual on Web (QR Code) and then scan the displayed QR code.
4 Select the updated route and then press Start Guidance.
Changing the order of waypoints
You can change the order of waypoints on the route.
1 On the Navigation Menu screen, press Edit Route.
2 To change the order of waypoints, select a waypoint and then press
or .
0000
A
To add another waypoint on the Edit Route screen, press Add waypoint.
0000
A
To see on the map, press
next to the name.
Page 109 of 300
5-19
3 After editing the route, press Calculate.
4 Select the updated route and then press Start Guidance.
Deleting a waypoint
You can delete a waypoint from the route.
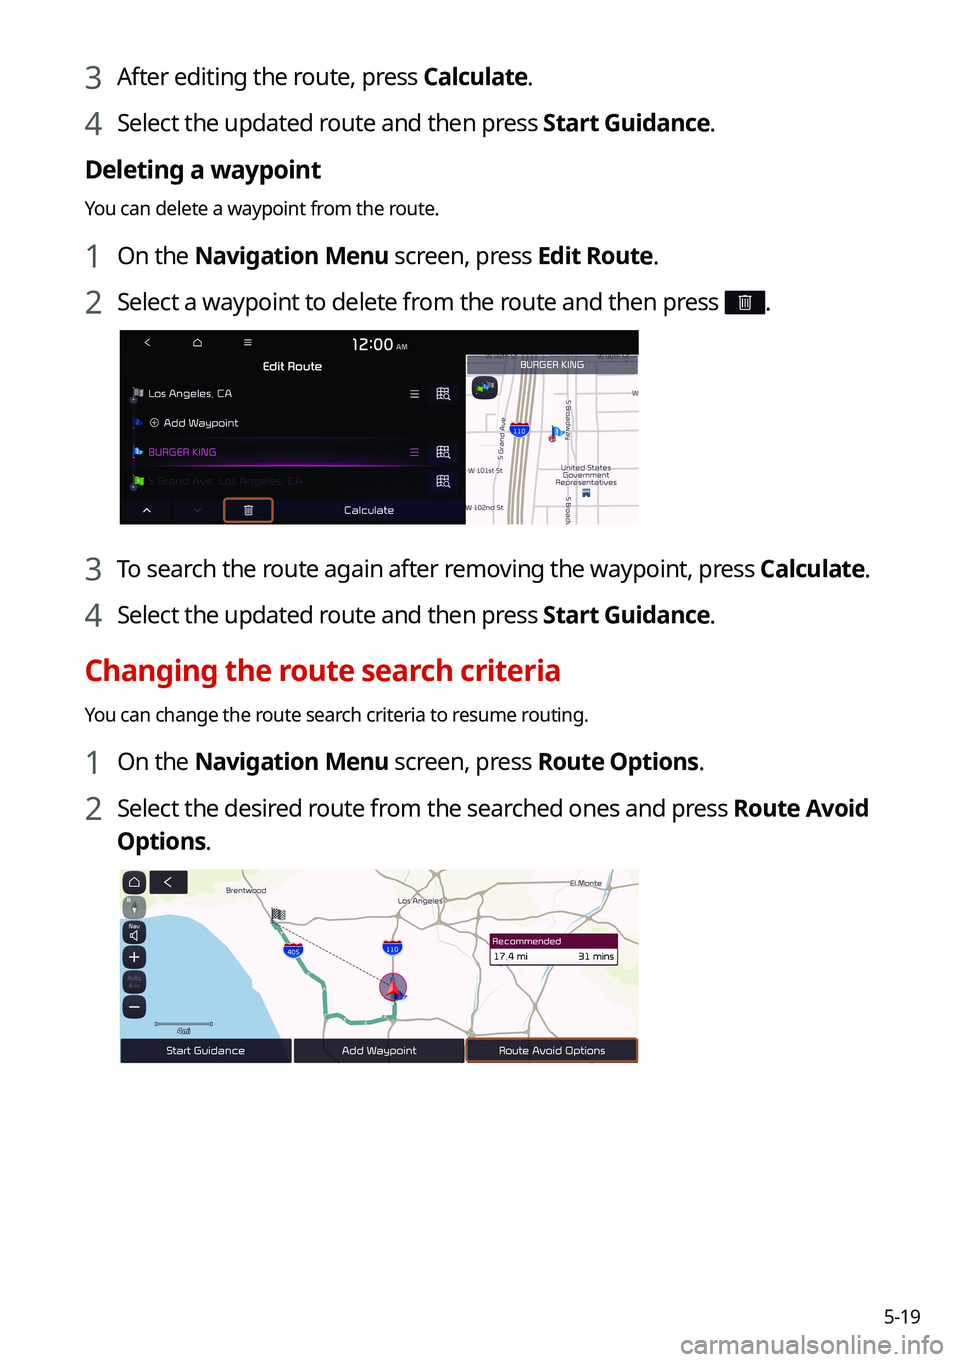
1 On the Navigation Menu screen, press Edit Route.
2 Select a waypoint to delete from the route and then press .
3 To search the route again after removing the waypoint, press Calculate.
4 Select the updated route and then press Start Guidance.
Changing the route search criteria
You can change the route search criteria to resume routing.
1 On the Navigation Menu screen, press Route Options.
2 Select the desired route from the searched ones and press Route Avoid
Options.
Page 110 of 300
5-20
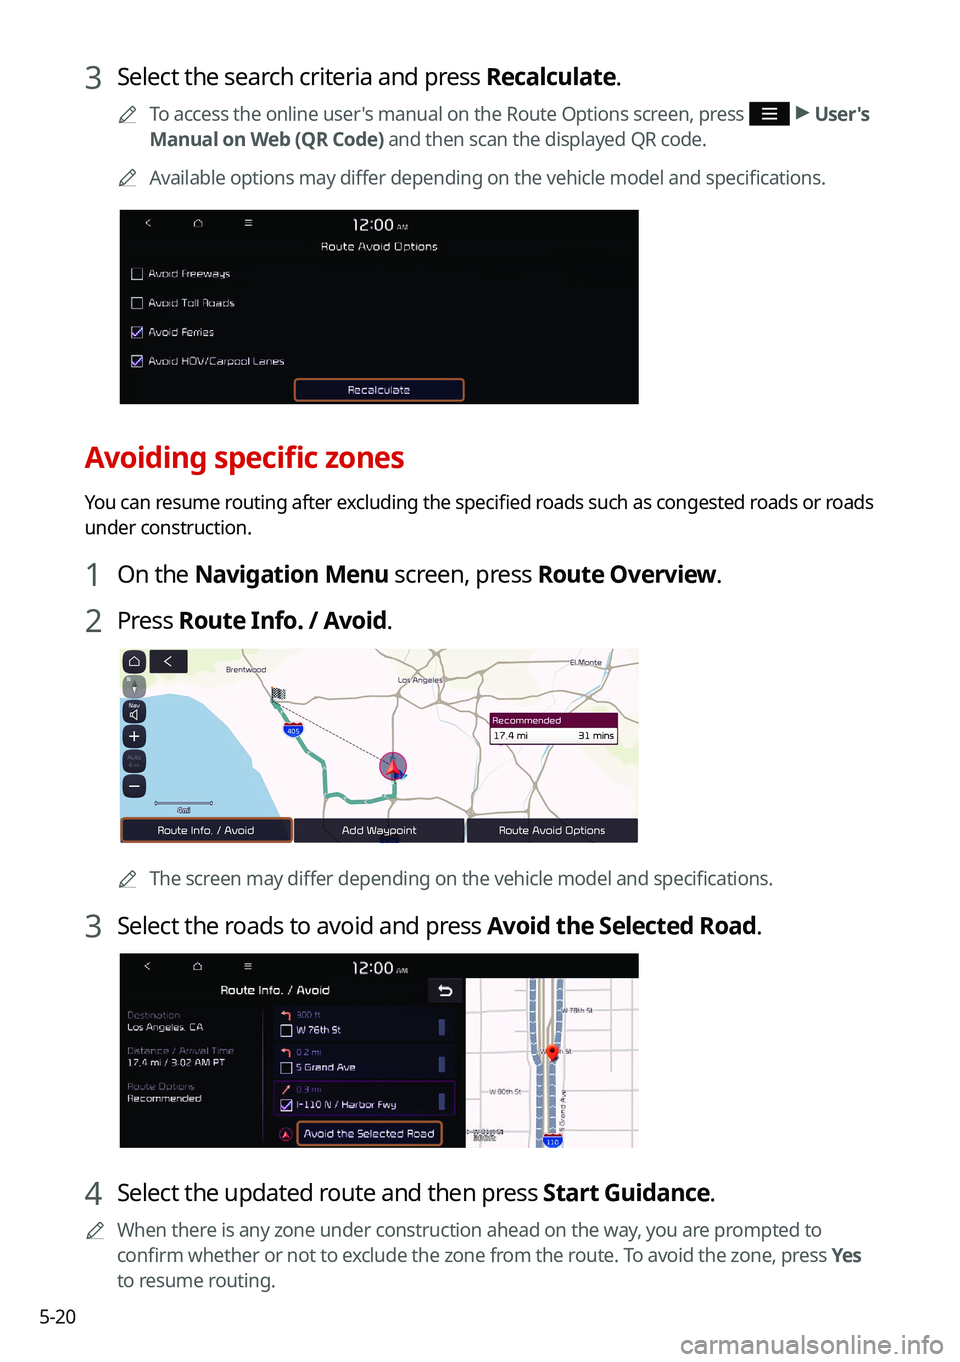
3 Select the search criteria and press Recalculate.
0000
A
To access the online user's manual on the Route Options screen, press >
User's
Manual on Web (QR Code) and then scan the displayed QR code.
0000
A
Available options may differ depending on the vehicle model and specifications.
Avoiding specific zones
You can resume routing after excluding the specified roads such as congested roads or roads
under construction.
1 On the Navigation Menu screen, press Route Overview.
2 Press Route Info. / Avoid.
0000AThe screen may differ depending on the vehicle model and specifications.
3 Select the roads to avoid and press Avoid the Selected Road.
4 Select the updated route and then press Start Guidance.
0000
A
When there is any zone under construction ahead on the way, you are prompted to
confirm whether or not to exclude the zone from the route. To avoid the zone, press Yes
to resume routing.
Page 111 of 300
5-21
Searching for restaurants
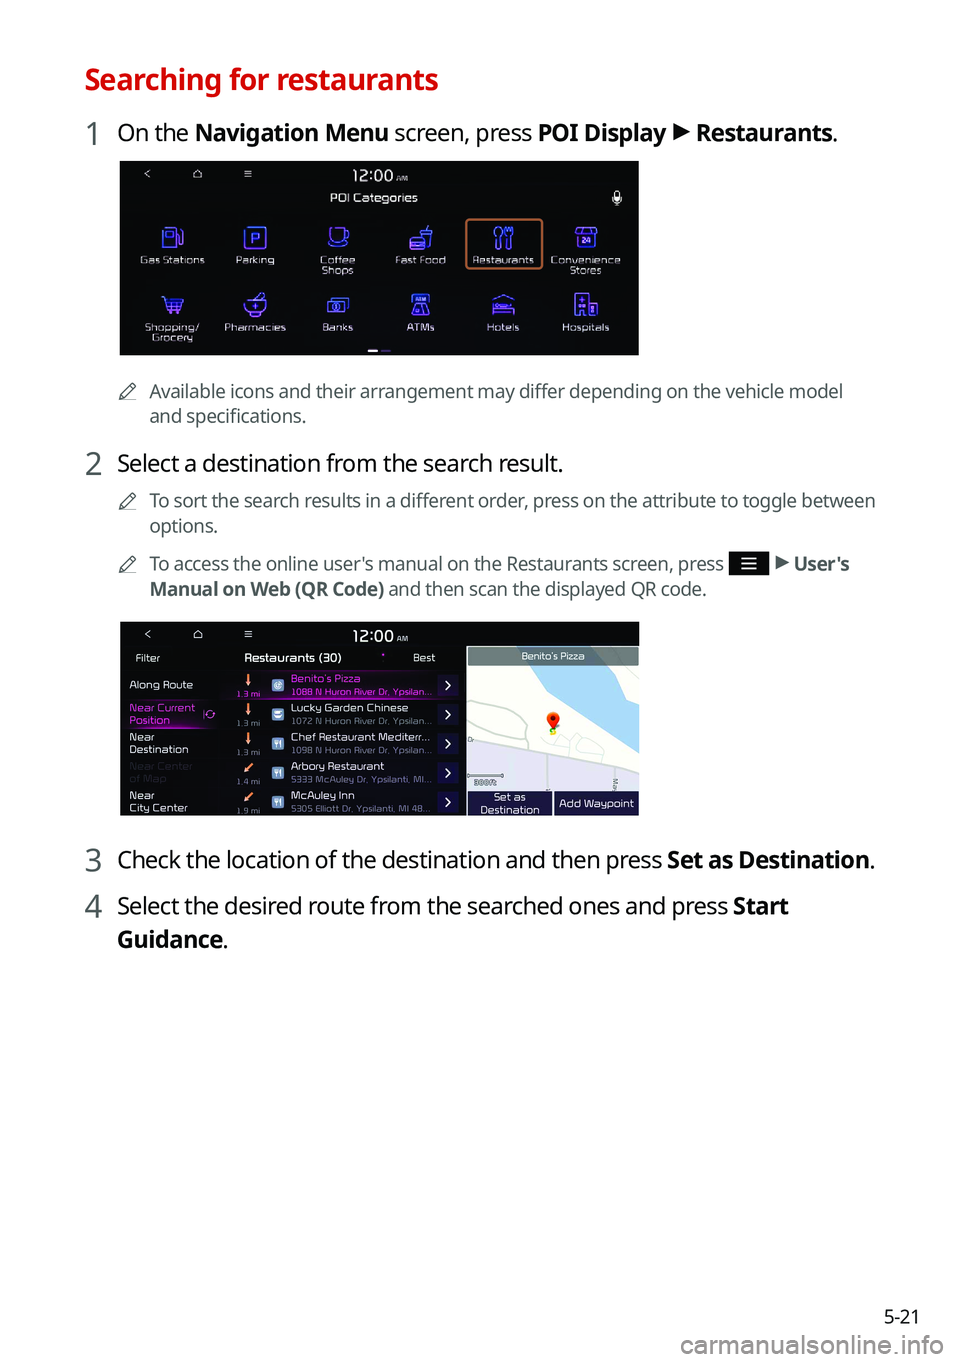
1 On the Navigation Menu screen, press POI Display >
Restaurants.
0000A
Available icons and their arrangement may differ depending on the vehicle model
and specifications.
2 Select a destination from the search result.
0000
A
To sort the search results in a different order, press on the attribute to toggle between
options.
0000
A
To access the online user's manual on the Restaurants screen, press
>
User's
Manual on Web (QR Code) and then scan the displayed QR code.
3 Check the location of the destination and then press Set as Destination.
4 Select the desired route from the searched ones and press Start
Guidance.
Page 112 of 300
5-22
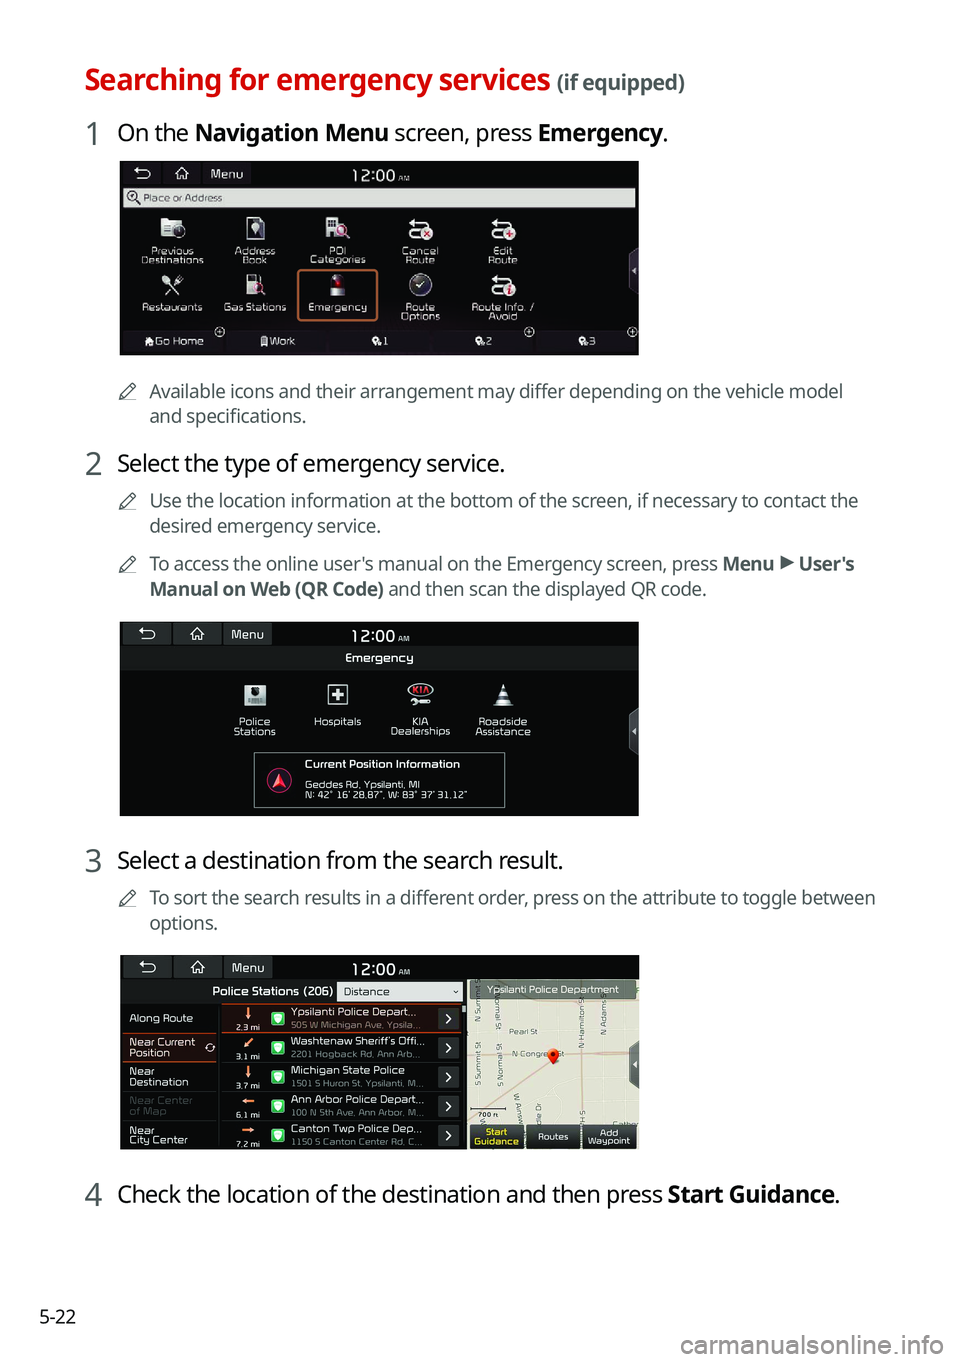
Searching for emergency services (if equipped)
1 On the Navigation Menu screen, press Emergency.
0000AAvailable icons and their arrangement may differ depending on the vehicle model
and specifications.
2 Select the type of emergency service.
0000
A
Use the location information at the bottom of the screen, if necessary to contact the
desired emergency service.
0000
A
To access the online user's manual on the Emergency screen, press Menu >
User's
Manual on Web (QR Code) and then scan the displayed QR code.
3 Select a destination from the search result.
0000
A
To sort the search results in a different order, press on the attribute to toggle between
options.
4 Check the location of the destination and then press Start Guidance.
Page 113 of 300
5-23
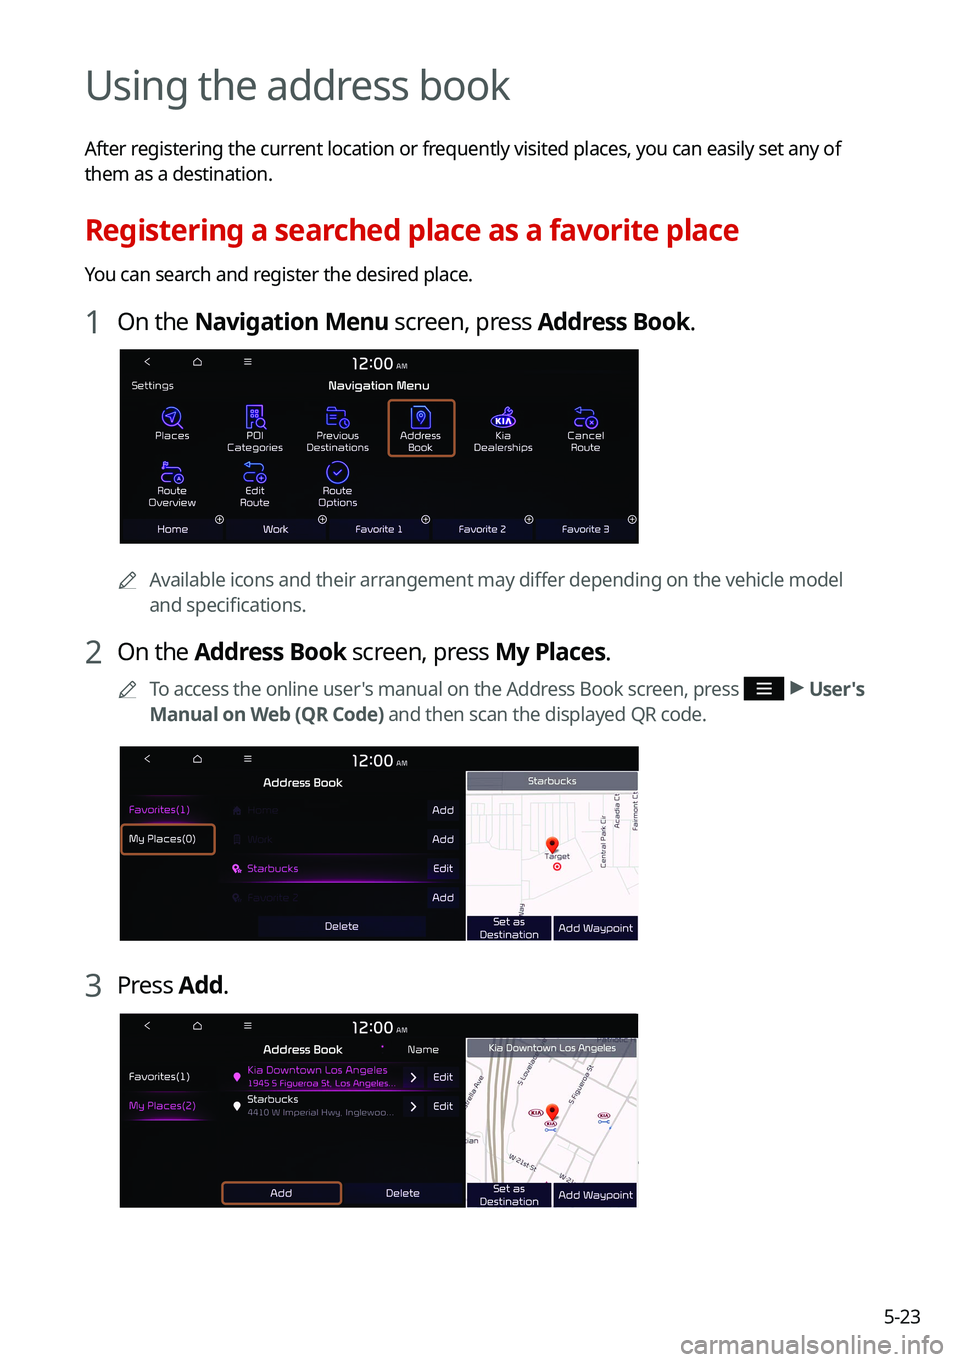
Using the address book
After registering the current location or frequently visited places, you can easily set any of
them as a destination.
Registering a searched place as a favorite place
You can search and register the desired place.
1 On the Navigation Menu screen, press Address Book.
0000AAvailable icons and their arrangement may differ depending on the vehicle model
and specifications.
2 On the Address Book screen, press My Places.
0000
A
To access the online user's manual on the Address Book screen, press >
User's
Manual on Web (QR Code) and then scan the displayed QR code.
3 Press Add.