light KIA K900 2019 Features and Functions Guide
[x] Cancel search | Manufacturer: KIA, Model Year: 2019, Model line: K900, Model: KIA K900 2019Pages: 64, PDF Size: 7.05 MB
Page 3 of 64
1*IF EQUIPPED ALWAYS CHECK THE OWNER’S MANUAL FOR COMPLE TE OPER ATING INFORMATION AND SAFE T Y WARNINGS.
TABLE OF CONTENTS
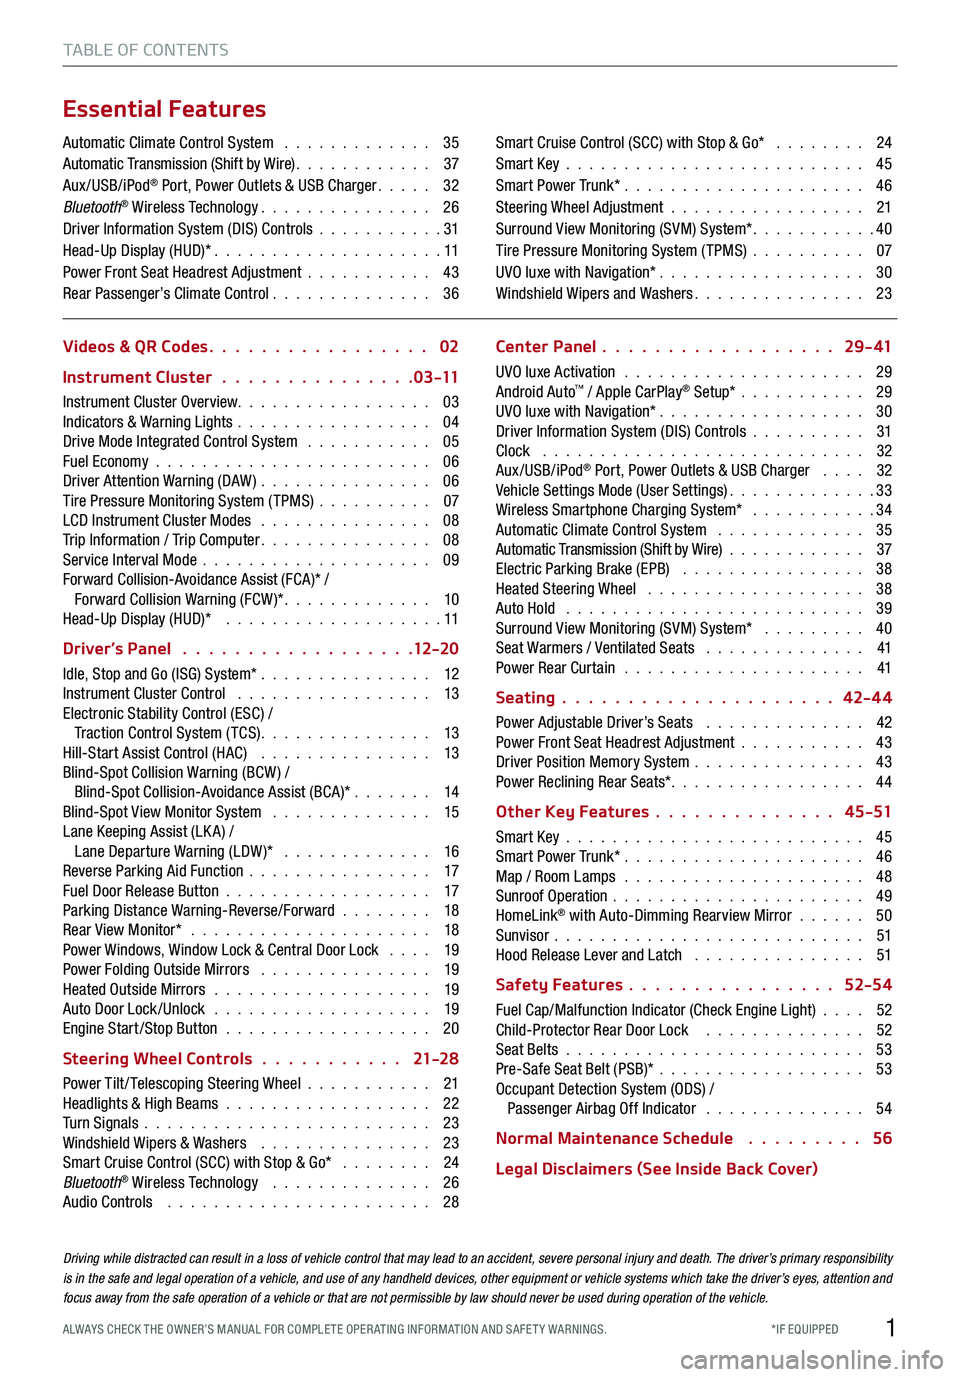
Essential Features
Automatic Climate Control System . . . . . . . . . . . . . 35Automatic Transmission (Shift by Wire) . . . . . . . . . . . . 37Aux/USB/iPod® Port, Power Outlets & USB Charger . . . . . 32Bluetooth® Wireless Technology . . . . . . . . . . . . . . . 26Driver Information System (DIS) Controls . . . . . . . . . . .31 Head-Up Display (HUD)* . . . . . . . . . . . . . . . . . . . . 11Power Front Seat Headrest Adjustment . . . . . . . . . . . 43Rear Passenger’s Climate Control . . . . . . . . . . . . . . 36
Smart Cruise Control (SCC) with Stop & Go* . . . . . . . . 24Smart Key . . . . . . . . . . . . . . . . . . . . . . . . . . 45Smart Power Trunk* . . . . . . . . . . . . . . . . . . . . . 46Steering Wheel Adjustment . . . . . . . . . . . . . . . . . 21Surround View Monitoring (SVM) System* . . . . . . . . . . .40Tire Pressure Monitoring System (TPMS) . . . . . . . . . . 07UVO luxe with Navigation* . . . . . . . . . . . . . . . . . . 30Windshield Wipers and Washers . . . . . . . . . . . . . . . 23
Videos & QR Codes 02
Instrument Cluster 0 3 -11
Instrument Cluster Overview . . . . . . . . . . . . . . . . . 03Indicators & Warning Lights . . . . . . . . . . . . . . . . . 04Drive Mode Integrated Control System . . . . . . . . . . . 05Fuel Economy . . . . . . . . . . . . . . . . . . . . . . . . 06Driver Attention Warning (DAW) . . . . . . . . . . . . . . . 06Tire Pressure Monitoring System (TPMS) . . . . . . . . . . 07LCD Instrument Cluster Modes . . . . . . . . . . . . . . . 08Trip Information / Trip Computer . . . . . . . . . . . . . . . 08Service Interval Mode . . . . . . . . . . . . . . . . . . . . 09Forward Collision-Avoidance Assist (FCA)* / Forward Collision Warning (FCW )* . . . . . . . . . . . . . 10Head-Up Display (HUD)* . . . . . . . . . . . . . . . . . . . 11
Driver’s Panel 12-2 0
Idle, Stop and Go (ISG) System* . . . . . . . . . . . . . . . 12Instrument Cluster Control . . . . . . . . . . . . . . . . . 13Electronic Stability Control (ESC) / Traction Control System ( TCS) . . . . . . . . . . . . . . . 13Hill-Start Assist Control (HAC) . . . . . . . . . . . . . . . 13Blind-Spot Collision Warning (BCW ) / Blind-Spot Collision-Avoidance Assist (BCA)* . . . . . . . 14Blind-Spot View Monitor System . . . . . . . . . . . . . . 15Lane Keeping Assist (LK A) / Lane Departure Warning (LDW )* . . . . . . . . . . . . . 16Reverse Parking Aid Function . . . . . . . . . . . . . . . . 17Fuel Door Release Button . . . . . . . . . . . . . . . . . . 17Parking Distance Warning-Reverse/Forward . . . . . . . . 18Rear View Monitor* . . . . . . . . . . . . . . . . . . . . . 18Power Windows, Window Lock & Central Door Lock . . . . 19Power Folding Outside Mirrors . . . . . . . . . . . . . . . 19Heated Outside Mirrors . . . . . . . . . . . . . . . . . . . 19Auto Door Lock /Unlock . . . . . . . . . . . . . . . . . . . 19Engine Start /Stop Button . . . . . . . . . . . . . . . . . . 20
Steering Wheel Controls 21-2 8
Power Tilt/ Telescoping Steering Wheel . . . . . . . . . . . 21Headlights & High Beams . . . . . . . . . . . . . . . . . . 22Turn Signals . . . . . . . . . . . . . . . . . . . . . . . . . 23Windshield Wipers & Washers . . . . . . . . . . . . . . . 23Smart Cruise Control (SCC) with Stop & Go* . . . . . . . . 24Bluetooth® Wireless Technology . . . . . . . . . . . . . . 26Audio Controls . . . . . . . . . . . . . . . . . . . . . . . 28
Center Panel 2 9 - 41
UVO luxe Activation . . . . . . . . . . . . . . . . . . . . . 29Android Auto™ / Apple CarPlay® Setup* . . . . . . . . . . . 29UVO luxe with Navigation* . . . . . . . . . . . . . . . . . . 30Driver Information System (DIS) Controls . . . . . . . . . . 31Clock . . . . . . . . . . . . . . . . . . . . . . . . . . . . 32Aux/USB/iPod® Port, Power Outlets & USB Charger . . . . 32Vehicle Settings Mode (User Settings) . . . . . . . . . . . . .33Wireless Smartphone Charging System* . . . . . . . . . . .34Automatic Climate Control System . . . . . . . . . . . . . 35Automatic Transmission (Shift by Wire) . . . . . . . . . . . . 37Electric Parking Brake (EPB) . . . . . . . . . . . . . . . . 38Heated Steering Wheel . . . . . . . . . . . . . . . . . . . 38Auto Hold . . . . . . . . . . . . . . . . . . . . . . . . . . 39Surround View Monitoring (SVM) System* . . . . . . . . . 40Seat Warmers / Ventilated Seats . . . . . . . . . . . . . . 41Power Rear Curtain . . . . . . . . . . . . . . . . . . . . . 41
Seating 42-4 4
Power Adjustable Driver’s Seats . . . . . . . . . . . . . . 42Power Front Seat Headrest Adjustment . . . . . . . . . . . 43Driver Position Memory System . . . . . . . . . . . . . . . 43Power Reclining Rear Seats*. . . . . . . . . . . . . . . . . 44
Other Key Features 4 5 -51
Smart Key . . . . . . . . . . . . . . . . . . . . . . . . . . 45Smart Power Trunk* . . . . . . . . . . . . . . . . . . . . . 46Map / Room Lamps . . . . . . . . . . . . . . . . . . . . . 48Sunroof Operation . . . . . . . . . . . . . . . . . . . . . . 49HomeLink® with Auto-Dimming Rearview Mirror . . . . . . 50Sunvisor . . . . . . . . . . . . . . . . . . . . . . . . . . . 51Hood Release Lever and Latch . . . . . . . . . . . . . . . 51
Safety Features 52-54
Fuel Cap/Malfunction Indicator (Check Engine Light) . . . . 52Child-Protector Rear Door Lock . . . . . . . . . . . . . . 52Seat Belts . . . . . . . . . . . . . . . . . . . . . . . . . . 53Pre-Safe Seat Belt (PSB)* . . . . . . . . . . . . . . . . . . 53Occupant Detection System (ODS) / Passenger Airbag Off Indicator . . . . . . . . . . . . . . 54
Normal Maintenance Schedule 56
Legal Disclaimers (See Inside Back Cover)
Driving while distracted can result in a loss of vehicle control that may lead to an accident, severe personal injury and death. The driver’s primary responsibility is in the safe and legal operation of a vehicle, and use of any handheld devices, other equipment or vehicle systems which take the driver’s eyes, attention and focus away from the safe operation of a vehicle or that are not permissible by law should never be used during operation of the vehicle.
Page 5 of 64
D
596mi
50 1234 mi
BRAKEEPBEFP
x1000rpm
C H
0
12
3
4
5
6
7
8
1
x1000rpm
C H
0
23
4
5
6
7
8
20
F
0
E
40 60
80
100
120
140
160
180
200
220
240
260
MPH
20
0
40 60
80
100
120
140
160
km/h
INSTRUMENT CLUSTER
3*IF EQUIPPED ALWAYS CHECK THE OWNER’S MANUAL FOR COMPLE TE OPER ATING INFORMATION AND SAFE T Y WARNINGS.
BB
F
D
E
E
I
H
G
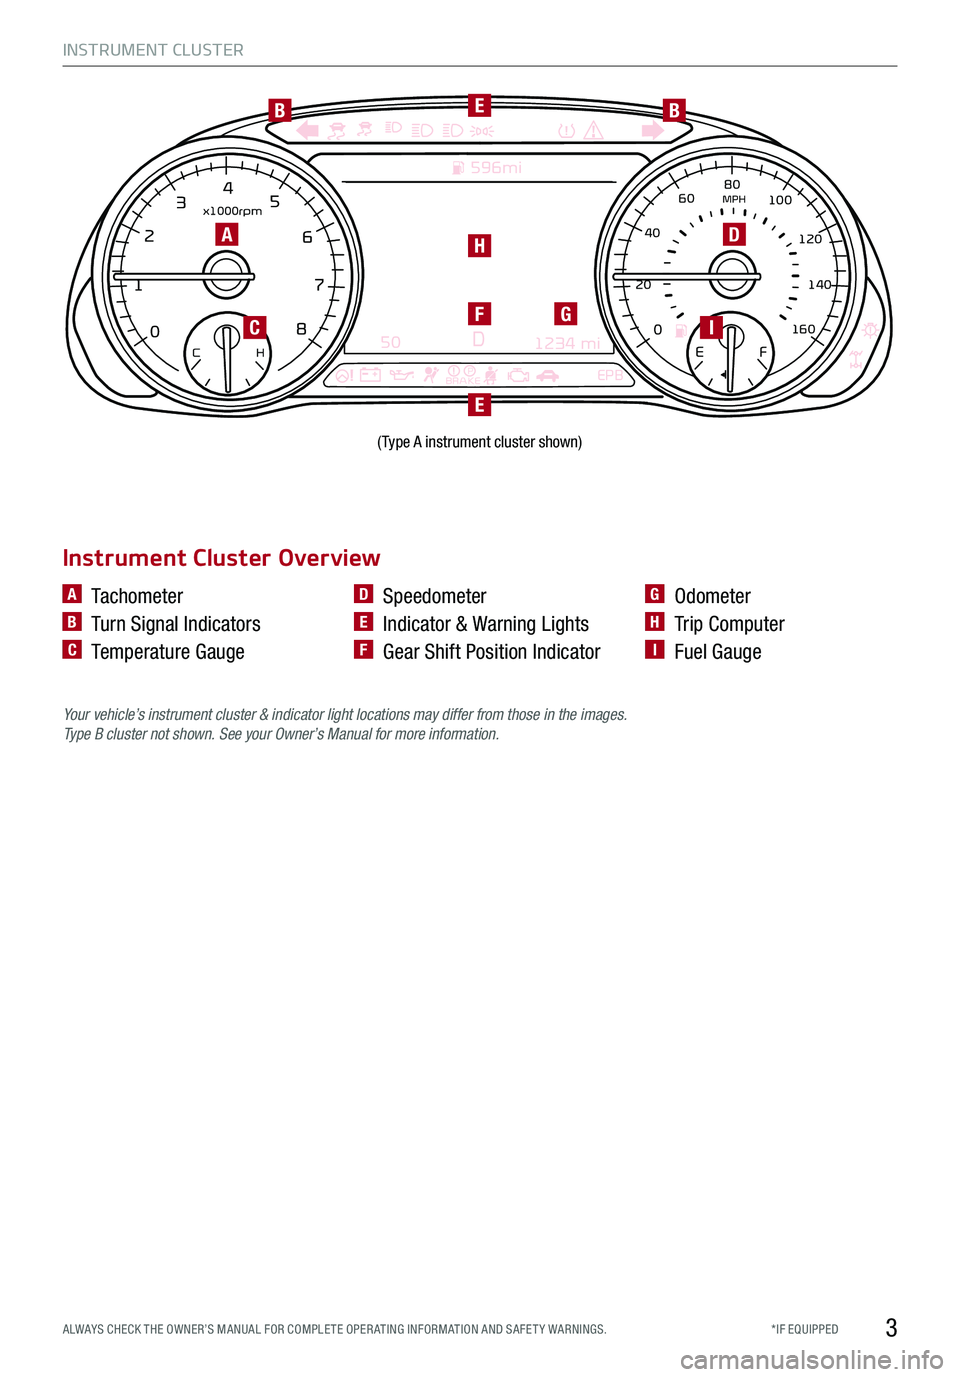
(Type A instrument cluster shown)
A
C
Your vehicle’s instrument cluster & indicator light locations may differ from those in the images. Ty p e B cluster not shown. See your Owner’s Manual for more information.
A Tachometer
B Turn Signal Indicators
C Temperature Gauge
D Speedometer
E Indicator & Warning Lights
F Gear Shift Position Indicator
G Odometer
H Trip Computer
I Fuel Gauge
Instrument Cluster Overview
Page 6 of 64
INSTRUMENT CLUSTER
4
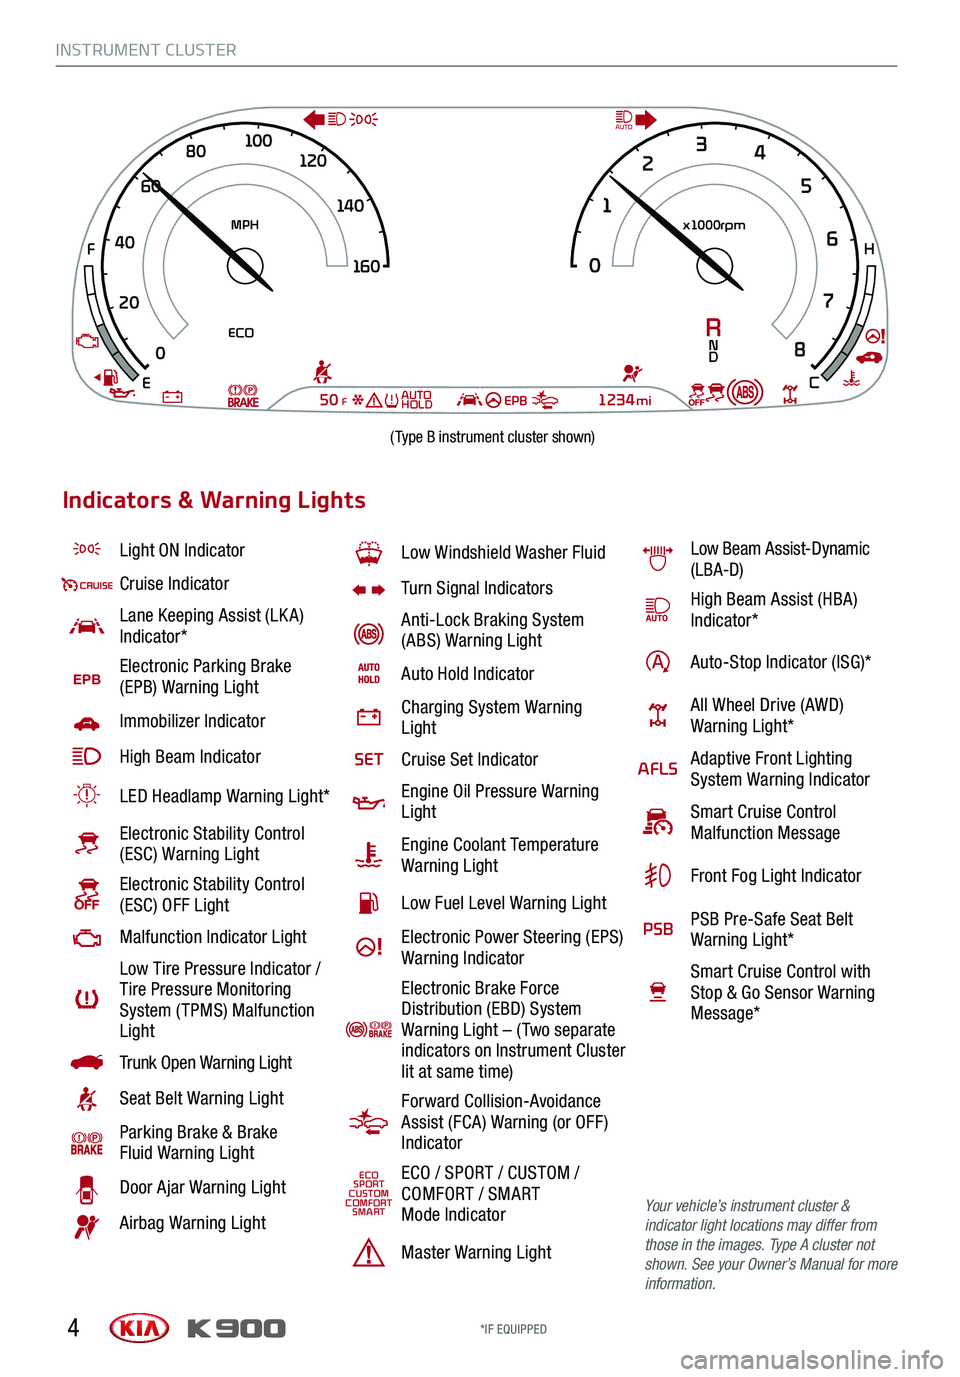
Light ON Indicator
Cruise Indicator
Lane Keeping Assist (LK A) Indicator*
EPBElectronic Parking Brake (EPB) Warning Light
Immobilizer Indicator
High Beam Indicator
LED Headlamp Warning Light*
Electronic Stability Control (ESC) Warning Light
Electronic Stability Control (ESC) OFF Light
Malfunction Indicator Light
Low Tire Pressure Indicator / Tire Pressure Monitoring System ( TPMS) Malfunction Light
Trunk Open Warning Light
Seat Belt Warning Light
Parking Brake & Brake Fluid Warning Light
Door Ajar Warning Light
Airbag Warning Light
Low Windshield Washer Fluid
Turn Signal Indicators
Anti-Lock Braking System (ABS) Warning Light
Auto Hold Indicator
Charging System Warning Light
SETCruise Set Indicator
Engine Oil Pressure Warning Light
Engine Coolant Temperature Warning Light
Low Fuel Level Warning Light
Electronic Power Steering (EPS) Warning Indicator
Electronic Brake Force Distribution (EBD) System Warning Light – ( Two separate indicators on Instrument Cluster lit at same time)
Forward Collision-Avoidance Assist (FCA) Warning (or OFF ) Indicator
ECOSPORTCUSTOMCOMFORTSMART
ECO / SPORT / CUSTOM / COMFORT / SMART Mode Indicator
Master Warning Light
Low Beam Assist-Dynamic (LBA-D)
High Beam Assist (HBA)Indicator*
Auto-Stop Indicator (ISG)*
All Wheel Drive (AWD) Warning Light*
AFLSAdaptive Front Lighting System Warning Indicator
Smart Cruise Control Malfunction Message
Front Fog Light Indicator
PSBPSB Pre-Safe Seat Belt Warning Light*
Smart Cruise Control with Stop & Go Sensor Warning Message*
Your vehicle’s instrument cluster & indicator light locations may differ from those in the images. Type A cluster not shown. See your Owner’s Manual for more information.
Indicators & Warning Lights
*IF EQUIPPED
0
20
40
60
80
1
00
120
140
1 60
0 1
2
3
4
5
6
7
8
MPH x1000rpm
ECO
50FEPB1234miE
F
H
C
RN
D
AUTO
AUTO
HOLD
(Type B instrument cluster shown)
Page 7 of 64
INSTRUMENT CLUSTER
5
COMFORT
ECOSMART
DRIVE MODE VIDEO
To view a video on your mobile device, snap this QR Code or visit the listed website. Refer to page 2 for more information.
CUSTOMSPORT
www.youtube.com/KiaFeatureVideos
DRIVEMODE AUTO
HOLDA
ALWAYS CHECK THE OWNER’S MANUAL FOR COMPLE TE OPERATING INFORMATION AND SAFETY WARNINGS.*IF EQUIPPED*IF EQUIPPED
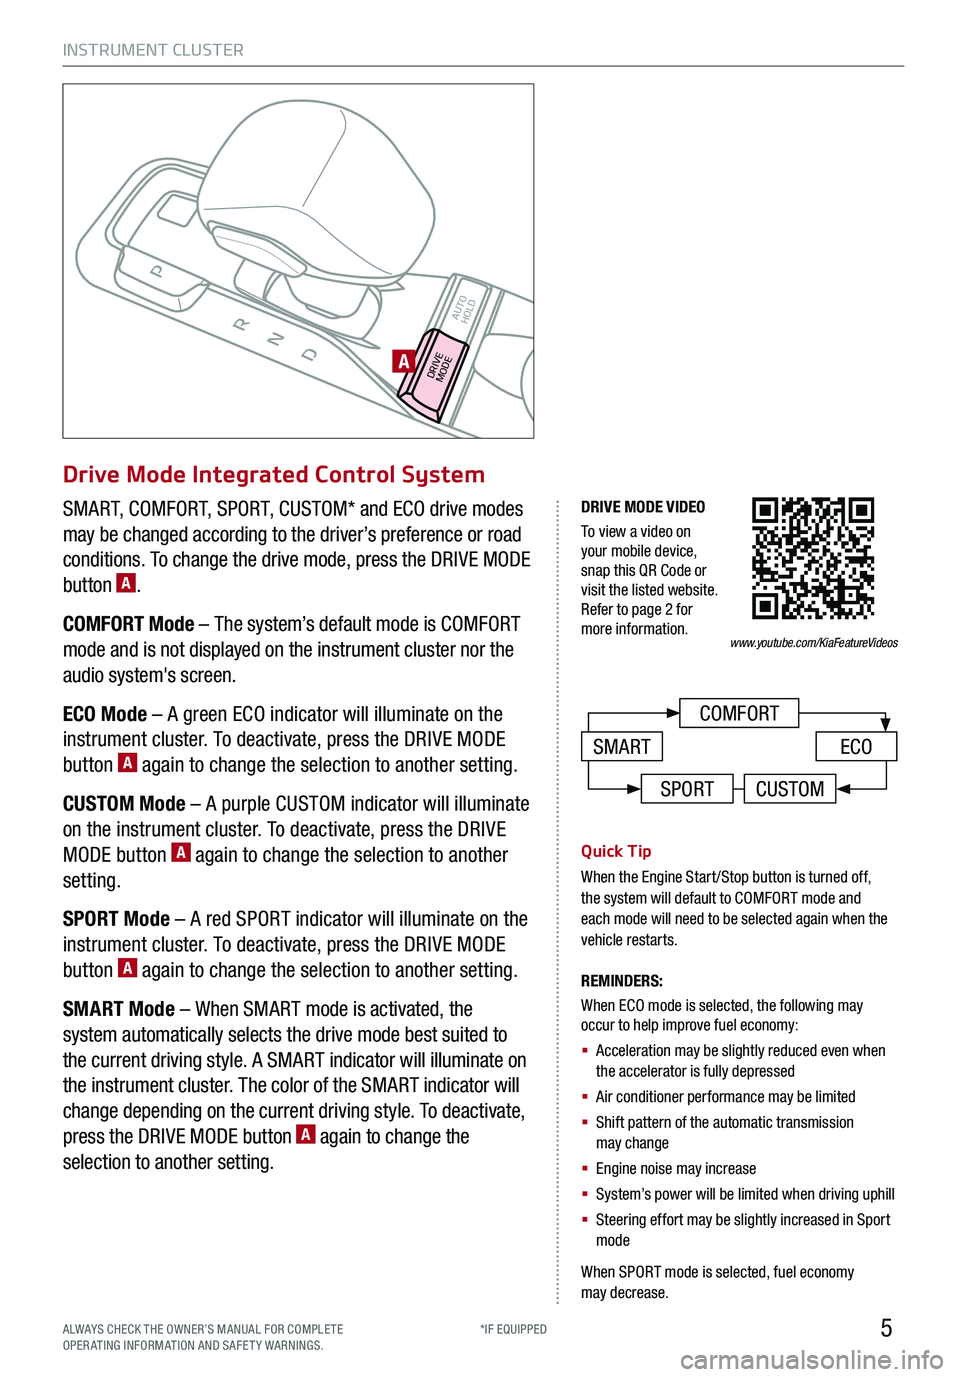
SMART, COMFORT, SPORT, CUSTOM* and ECO drive modes
may be changed according to the driver’s preference or road
conditions. To change the drive mode, press the DRIVE MODE
button A.
COMFORT Mode – The system’s default mode is COMFORT
mode and is not displayed on the instrument cluster nor the
audio system's screen.
ECO Mode – A green ECO indicator will illuminate on the
instrument cluster. To deactivate, press the DRIVE MODE
button A again to change the selection to another setting.
CUSTOM Mode – A purple CUSTOM indicator will illuminate
on the instrument cluster. To deactivate, press the DRIVE
MODE button A again to change the selection to another
setting.
SPORT Mode – A red SPORT indicator will illuminate on the
instrument cluster. To deactivate, press the DRIVE MODE
button A again to change the selection to another setting.
SMART Mode – When SMART mode is activated, the
system automatically selects the drive mode best suited to
the current driving style. A SMART indicator will illuminate on
the instrument cluster. The color of the SMART indicator will
change depending on the current driving style. To deactivate,
press the DRIVE MODE button A again to change the
selection to another setting.
Quick Tip
When the Engine Start/Stop button is turned off, the system will default to COMFORT mode and each mode will need to be selected again when the vehicle restarts.
REMINDERS:
When ECO mode is selected, the following may occur to help improve fuel economy:
§ Acceleration may be slightly reduced even when the accelerator is fully depressed
§ Air conditioner performance may be limited
§ Shift pattern of the automatic transmission may change
§ Engine noise may increase
§ System’s power will be limited when driving uphill
§ Steering effort may be slightly increased in Sport mode
When SPORT mode is selected, fuel economy may decrease.
Drive Mode Integrated Control System
Page 8 of 64
INSTRUMENT CLUSTER
6
FUEL ECONOMY VIDEO
To view a video on your mobile device, snap this QR Code or visit the listed website. Refer to page 2 for more information.
For more information on Fuel Economy, you can snap the QR Code above to view a video or refer to the Owner’s Manual.
Fuel Economy
Several factors contribute to your vehicle’s fuel economy,
including maintenance of your vehicle, driving style,
environmental conditions, vehicle weight and vehicle
aerodynamics. Below are tips on how to help improve
fuel economy:
§ Keep your vehicle in good condition with regular maintenance
§ Don’t let the engine idle longer than necessary
§ Drive at a moderate speed, accelerating smoothly
§ Keep tires inflated to the recommended pressure
§ Travel lightly, without carrying unnecessary weight in
your vehicle
§ Avoid placing large or heavy items on roof racks
§ Avoid hilly, winding or poorly maintained roads
Driver Attention Warning (DAW)†6
The DAW system is designed to detect a drowsy or fatigued
driver and, in certain situations, can give a warning signal to
take a break if needed.
The DAW System is set to OFF by default. To turn the DAW
System ON, turn the ignition on and then select Vehicle Settings
in the audio control unit on the Instrument Cluster. Then go to
Driving Assist and select Driver Attention Warning. Set the DAW
System to Normal or High Sensitivity.
Driver Attention Warning (DAW) System modes:
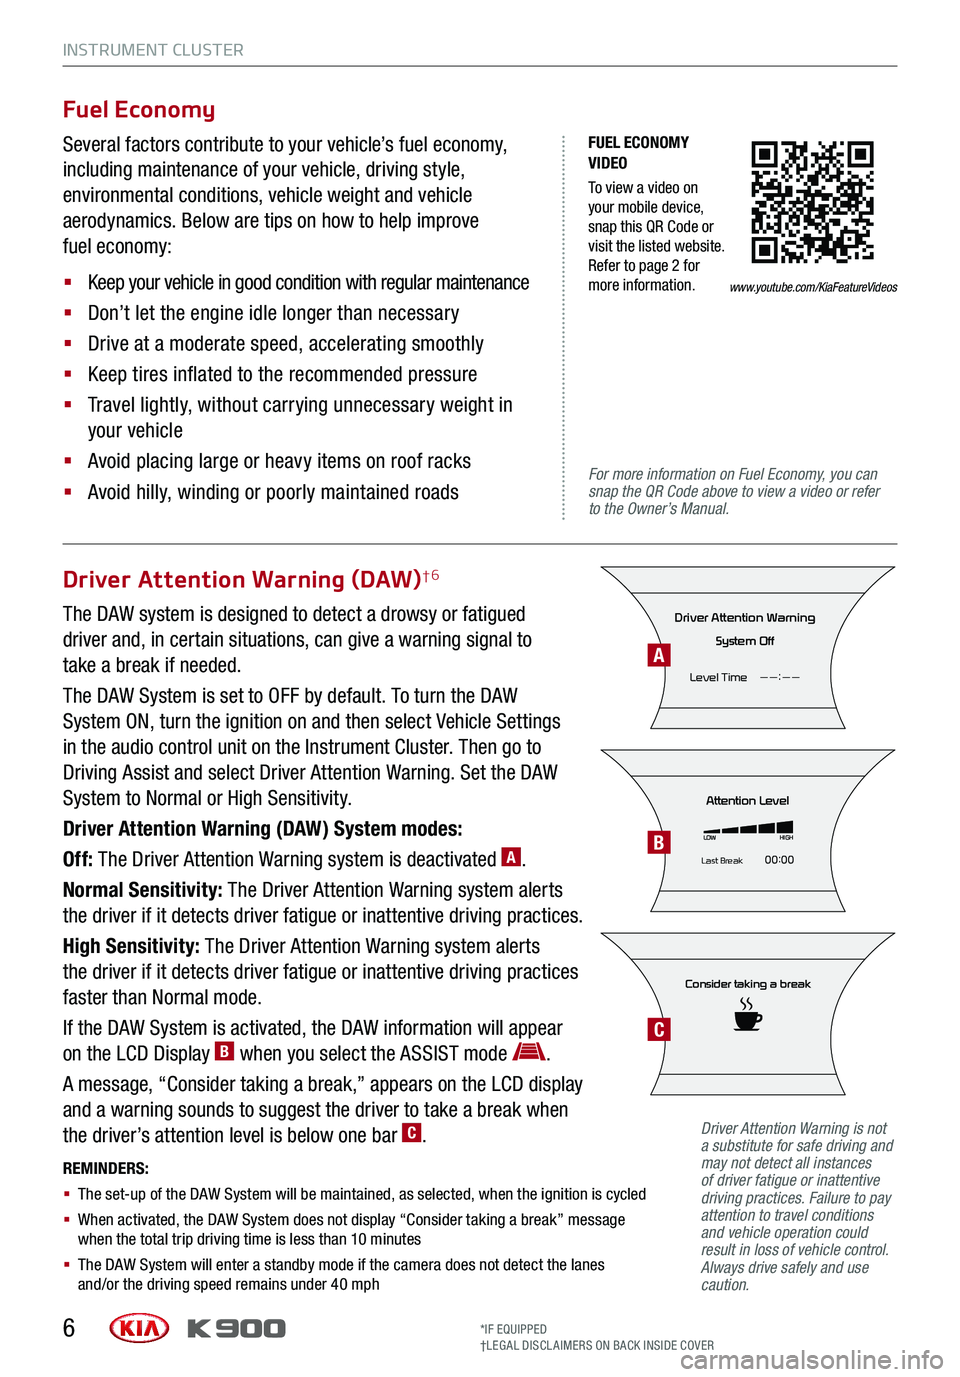
Off: The Driver Attention Warning system is deactivated A.
Normal Sensitivity: The Driver Attention Warning system alerts
the driver if it detects driver fatigue or inattentive driving practices.
High Sensitivity: The Driver Attention Warning system alerts
the driver if it detects driver fatigue or inattentive driving practices
faster than Normal mode.
If the DAW System is activated, the DAW information will appear
on the LCD Display B when you select the ASSIST mode .
A message, “Consider taking a break,” appears on the LCD display
and a warning sounds to suggest the driver to take a break when
the driver’s attention level is below one bar C.
REMINDERS:
§ The set-up of the DAW System will be maintained, as selected, when the ignition is cycled
§ When activated, the DAW System does not display “Consider taking a break” message when the total trip driving time is less than 10 minutes
§ The DAW System will enter a standby mode if the camera does not detect the lanes and/or the driving speed remains under 40 mph
Consider taking a break
Attention Level
LOWHIGH
Last Break 00:00
Driver Attention Warning
System Off
Level Time ——:——
*IF EQUIPPED†LEG AL DISCL AIMERS ON BACK INSIDE COVER
Driver Attention Warning is not a substitute for safe driving and may not detect all instances of driver fatigue or inattentive driving practices. Failure to pay attention to travel conditions and vehicle operation could result in loss of vehicle control. Always drive safely and use caution.
A
B
C
www.youtube.com/KiaFeatureVideos
Page 9 of 64
INSTRUMENT CLUSTER
7ALWAYS CHECK THE OWNER’S MANUAL FOR COMPLE TE OPERATING INFORMATION AND SAFETY WARNINGS.*IF EQUIPPED†LEG AL DISCL AIMERS ON BACK INSIDE COVER
TIRE PRESSURE MONITORING VIDEO
To view a video on your mobile device, snap this QR Code or visit the listed website. Refer to page 2 for more information.
Tire Pressure Monitoring System (TPMS)† 26
The TPMS indicator functions as both Low Tire Pressure
Light and TPMS Malfunction Indicator.
The TPMS indicator is designed to illuminate if it detects
one or more tires is significantly underinflated, if a spare
tire has been installed that does not have a TPMS device,
or when the outside temperature drops considerably.
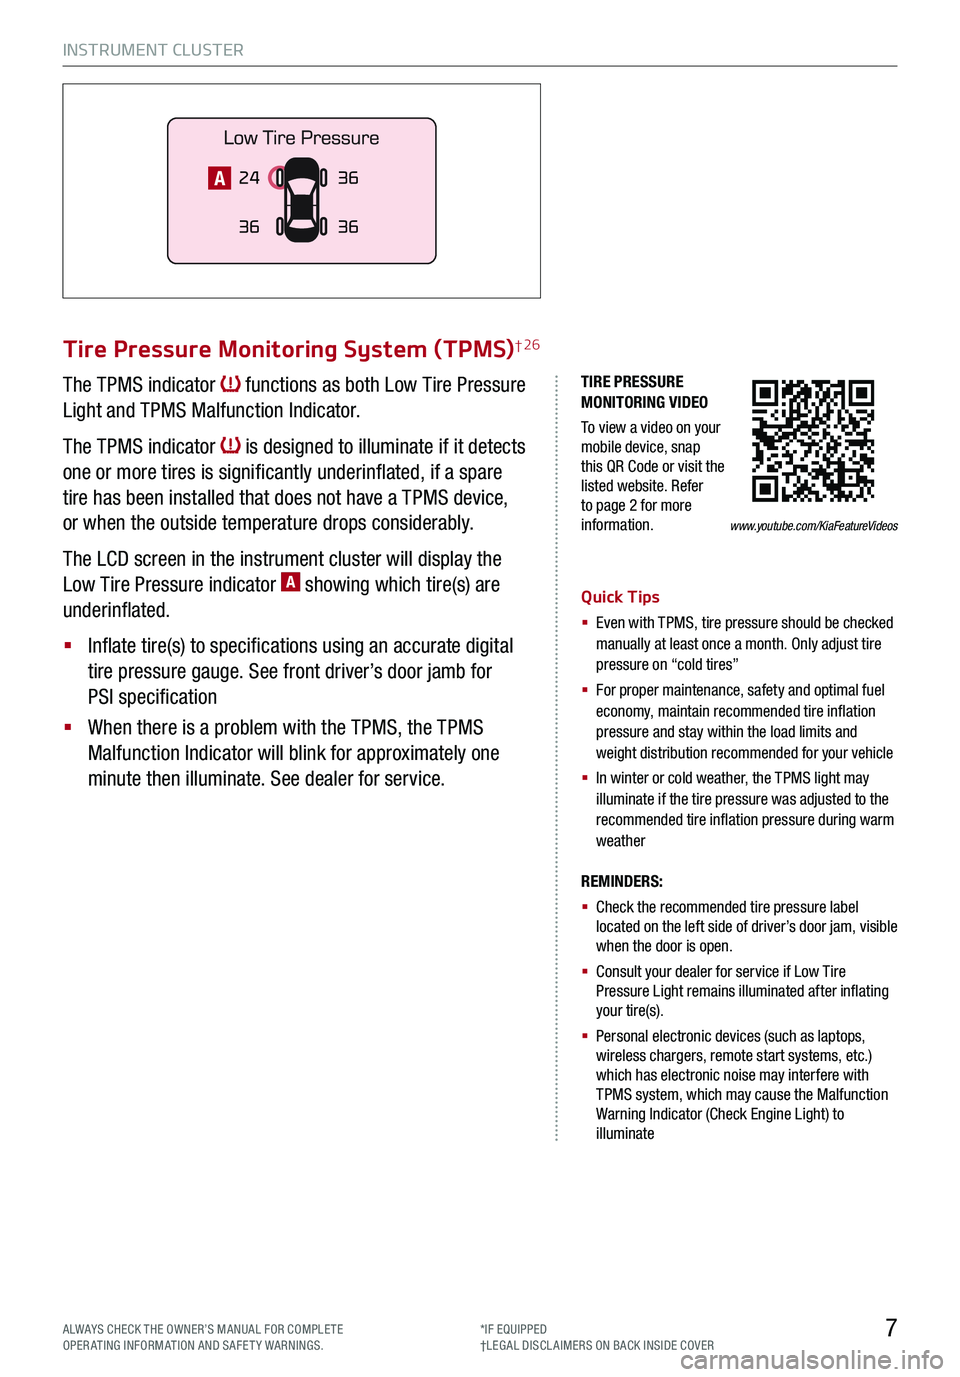
The LCD screen in the instrument cluster will display the
Low Tire Pressure indicator A showing which tire(s) are
underinflated.
§ Inflate tire(s) to specifications using an accurate digital
tire pressure gauge. See front driver’s door jamb for
PSI specification
§ When there is a problem with the TPMS, the TPMS
Malfunction Indicator will blink for approximately one
minute then illuminate. See dealer for service.
Quick Tips
§ Even with TPMS, tire pressure should be checked manually at least once a month. Only adjust tire pressure on “cold tires”
§
For proper maintenance, safety and optimal fuel economy, maintain recommended tire inflation pressure and stay within the load limits and weight distribution recommended for your vehicle
§
In winter or cold weather, the TPMS light may illuminate if the tire pressure was adjusted to the recommended tire inflation pressure during warm weather
REMINDERS:
§ Check the recommended tire pressure label located on the left side of driver’s door jam, visible when the door is open.
§ Consult your dealer for service if Low Tire Pressure Light remains illuminated after inflating your tire(s).
§ Personal electronic devices (such as laptops, wireless chargers, remote start systems, etc.) which has electronic noise may interfere with TPMS system, which may cause the Malfunction Warning Indicator (Check Engine Light) to illuminate
24
36 36
36A
www.youtube.com/KiaFeatureVideos
Page 13 of 64
INSTRUMENT CLUSTER
11ALWAYS CHECK THE OWNER’S MANUAL FOR COMPLE TE OPERATING INFORMATION AND SAFETY WARNINGS.*IF EQUIPPED†LEG AL DISCL AIMERS ON BACK INSIDE COVER
The Head-Up Display is a supplemental system. Do not solely rely on the system, always drive safely, and pay attention to the driving conditions on the road.
REMINDERS:
§
The HUD image on the windshield glass may not be visible when:
§
The driver has poor sitting posture
§ The driver is wearing polarized sunglasses
§ There is an object covering the HUD
§ Driving on a wet road
§ Excessive lighting inside or outside the vehicle
§ Modifications made to the windshield, such as tinting or other aftermarket treatments, could affect the HUD. When replacing the front windshield glass of vehicles equipped with the HUD, owners must replace it with windshield glass designed for HUD operation. Otherwise, duplicated images may be displayed on the windshield glass.
§ If Turn By Turn ( TBT ) navigation information is selected as HUD content, TBT information will not be displayed on the LCD.
Head-Up Display (HUD) User Settings
Drivers can adjust the HUD settings from the LCD Instrument
Cluster modes in User Settings. HUD settings include:
§ Display Height: Adjust the height of the HUD image on the
windshield glass
§ Rotation: Adjust the degree of HUD rotation
§ Brightness: Adjust the intensity of the HUD brightness
§ Contents Select: Activate or deactivate HUD content
( TBT**, SCC, LDW, BSCW )
§ Speedometer Size: Choose the size of the HUD
speedometer (Small, Medium, Large)
§ Speedometer Color: Choose the color of the HUD
speedometer (White, Amber, Green)
Head-Up Display (HUD)*† 12
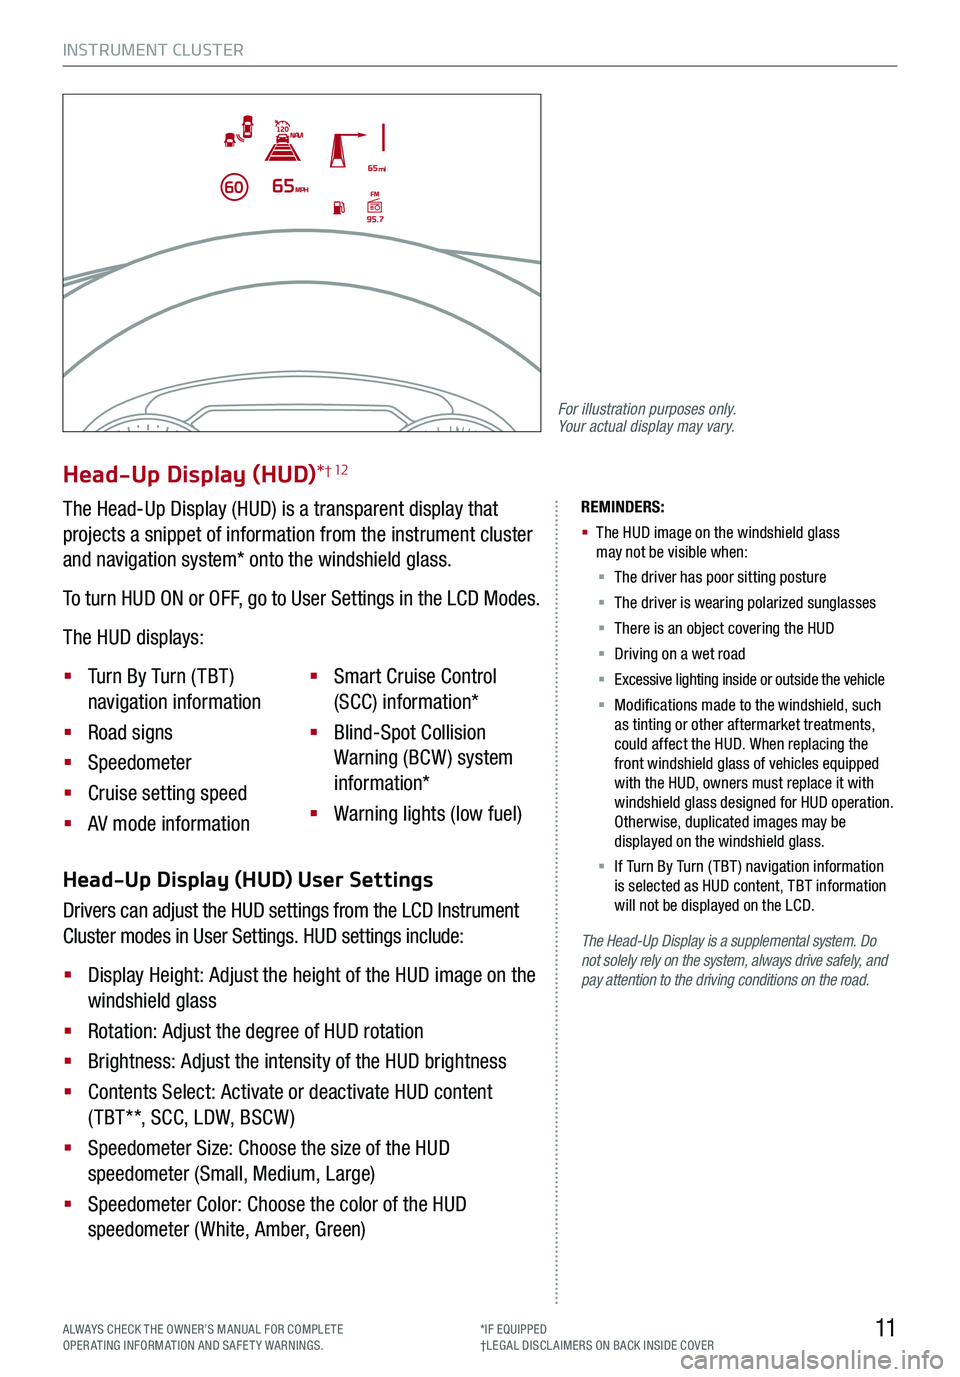
The Head-Up Display (HUD) is a transparent display that
projects a snippet of information from the instrument cluster
and navigation system* onto the windshield glass.
To turn HUD ON or OFF, go to User Settings in the LCD Modes.
The HUD displays:
§ Turn By Turn ( TBT )
navigation information
§ Road signs
§ Speedometer
§ Cruise setting speed
§ AV mode information
§ Smart Cruise Control
(SCC) information*
§ Blind-Spot Collision
Warning (BCW ) system
information*
§ Warning lights (low fuel)
For illustration purposes only. Your actual display may vary.
Page 15 of 64
DRIVER’S PANEL
13
AB
Electronic Stability Control (ESC) is designed to help stabilize the vehicle during certain cornering
maneuvers. Traction Control System ( TCS) can help improve traction. It is a good idea to keep both
ESC and TCS turned on for daily driving whenever possible.
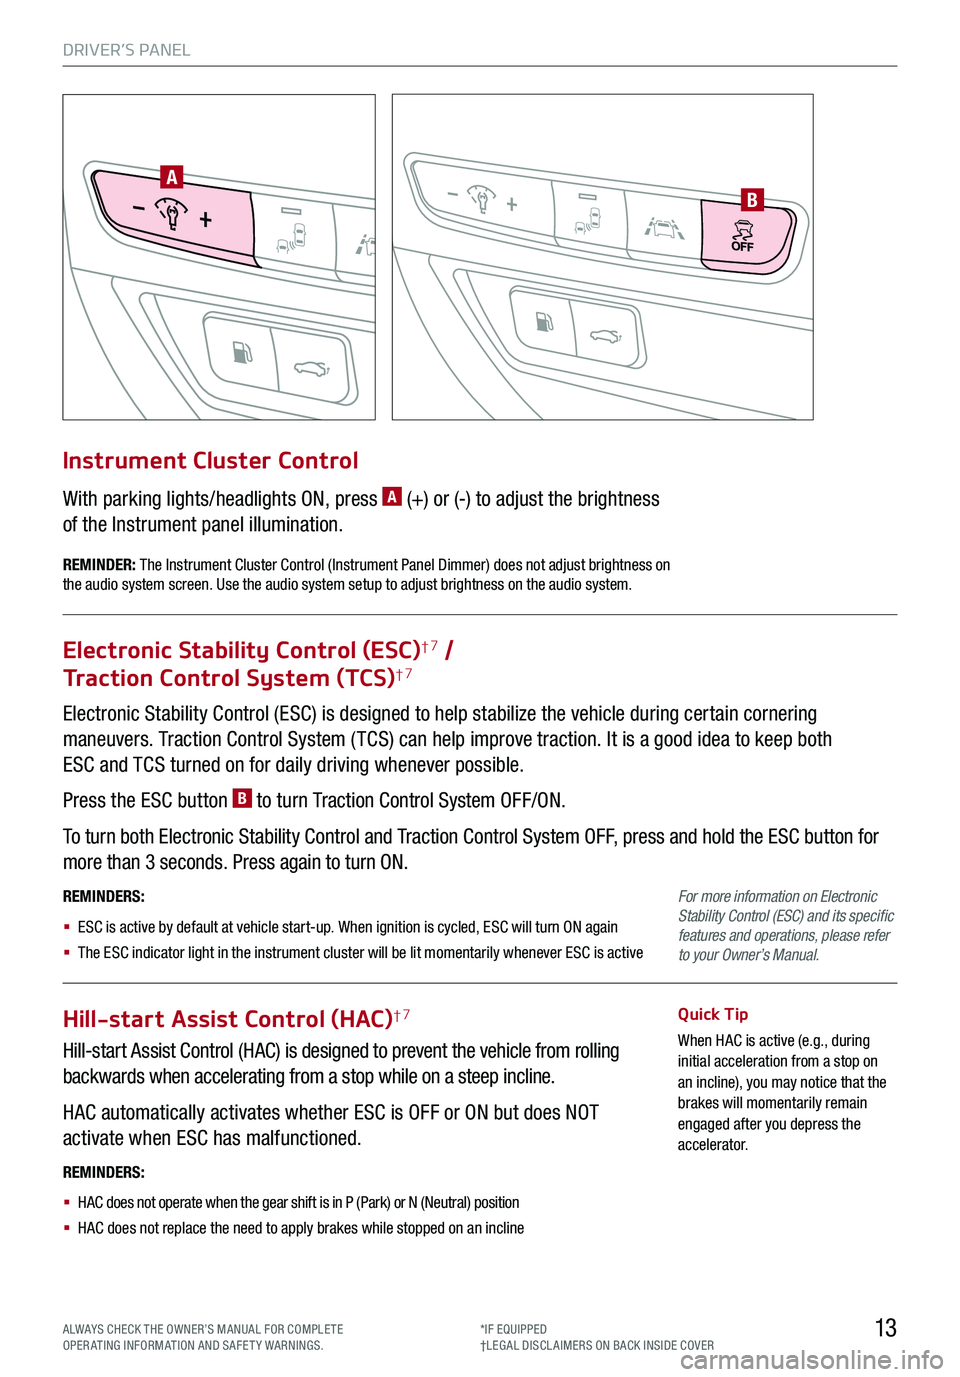
Press the ESC button B to turn Traction Control System OFF/ON.
To turn both Electronic Stability Control and Traction Control System OFF, press and hold the ESC button for
more than 3 seconds. Press again to turn ON.
REMINDERS:
§ ESC is active by default at vehicle start-up. When ignition is cycled, ESC will turn ON again
§ The ESC indicator light in the instrument cluster will be lit momentarily whenever ESC is active
Electronic Stability Control (ESC)†7 /
Traction Control System (TCS)†7
Hill-start Assist Control (HAC)†7
Hill-start Assist Control (HAC) is designed to prevent the vehicle from rolling
backwards when accelerating from a stop while on a steep incline.
HAC automatically activates whether ESC is OFF or ON but does NOT
activate when ESC has malfunctioned.
Quick Tip
When HAC is active (e.g., during initial acceleration from a stop on an incline), you may notice that the brakes will momentarily remain engaged after you depress the accelerator.
REMINDERS:
§ HAC does not operate when the gear shift is in P (Park) or N (Neutral) position
§ HAC does not replace the need to apply brakes while stopped on an incline
With parking lights/headlights ON, press A (+) or (-) to adjust the brightness
of the Instrument panel illumination.
Instrument Cluster Control
REMINDER: The Instrument Cluster Control (Instrument Panel Dimmer) does not adjust brightness on the audio system screen. Use the audio system setup to adjust brightness on the audio system.
For more information on Electronic Stability Control (ESC) and its specific features and operations, please refer to your Owner’s Manual.
ALWAYS CHECK THE OWNER’S MANUAL FOR COMPLE TE OPERATING INFORMATION AND SAFETY WARNINGS.*IF EQUIPPED†LEG AL DISCL AIMERS ON BACK INSIDE COVER
Page 16 of 64
DRIVER’S PANEL
14
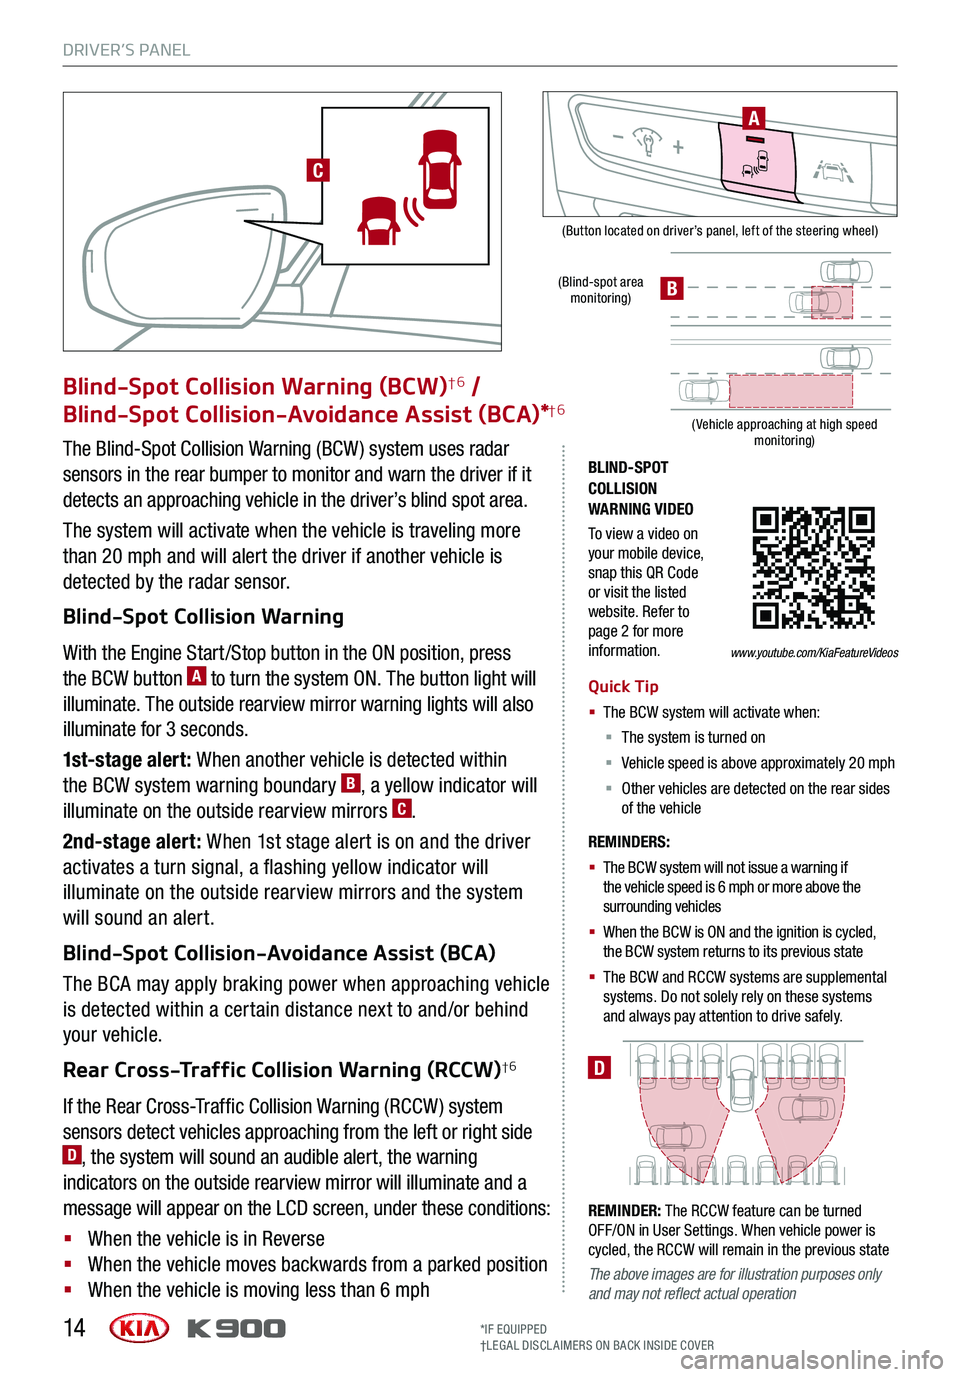
(Button located on driver’s panel, left of the steering wheel)
(Blind-spot area monitoring)
( Vehicle approaching at high speed monitoring)
BLIND-SPOT COLLISION WARNING VIDEO
To view a video on your mobile device, snap this QR Code or visit the listed website. Refer to page 2 for more information.
D
Blind-Spot Collision Warning (BCW)†6 /
Blind-Spot Collision-Avoidance Assist (BCA)*†6
The Blind-Spot Collision Warning (BCW ) system uses radar
sensors in the rear bumper to monitor and warn the driver if it
detects an approaching vehicle in the driver’s blind spot area.
The system will activate when the vehicle is traveling more
than 20 mph and will alert the driver if another vehicle is
detected by the radar sensor.
Blind-Spot Collision Warning
With the Engine Start /Stop button in the ON position, press
the BCW button A to turn the system ON. The button light will
illuminate. The outside rearview mirror warning lights will also
illuminate for 3 seconds.
1st-stage alert: When another vehicle is detected within
the BCW system warning boundary B, a yellow indicator will
illuminate on the outside rearview mirrors C.
2nd-stage alert: When 1st stage alert is on and the driver
activates a turn signal, a flashing yellow indicator will
illuminate on the outside rearview mirrors and the system
will sound an alert.
Blind-Spot Collision-Avoidance Assist (BCA)
The BCA may apply braking power when approaching vehicle
is detected within a certain distance next to and/or behind
your vehicle.
Rear Cross-Traffic Collision Warning (RCCW)†6
If the Rear Cross-Traffic Collision Warning (RCCW ) system
sensors detect vehicles approaching from the left or right side D, the system will sound an audible alert, the warning
indicators on the outside rearview mirror will illuminate and a
message will appear on the LCD screen, under these conditions:
§ When the vehicle is in Reverse
§ When the vehicle moves backwards from a parked position
§ When the vehicle is moving less than 6 mph
REMINDERS:
§ The BCW system will not issue a warning if the vehicle speed is 6 mph or more above the surrounding vehicles
§ When the BCW is ON and the ignition is cycled, the BCW system returns to its previous state
§
The BCW and RCCW systems are supplemental systems. Do not solely rely on these systems and always pay attention to drive safely.
Quick Tip
§ The BCW system will activate when:
§ The system is turned on
§ Vehicle speed is above approximately 20 mph
§ Other vehicles are detected on the rear sides of the vehicle
REMINDER: The RCCW feature can be turned OFF/ON in User Settings. When vehicle power is cycled, the RCCW will remain in the previous state
The above images are for illustration purposes only and may not reflect actual operation
A
B
*IF EQUIPPED†LEG AL DISCL AIMERS ON BACK INSIDE COVER
www.youtube.com/KiaFeatureVideos
C
Page 17 of 64
DRIVER’S PANEL
15
EFCH
0
12
3
4
5
6
7
8MPH
20
0
40 60
80
100
120
140
160
ALWAYS CHECK THE OWNER’S MANUAL FOR COMPLE TE OPERATING INFORMATION AND SAFETY WARNINGS.*IF EQUIPPED†LEG AL DISCL AIMERS ON BACK INSIDE COVER
Blind Spot View Monitor System*†6
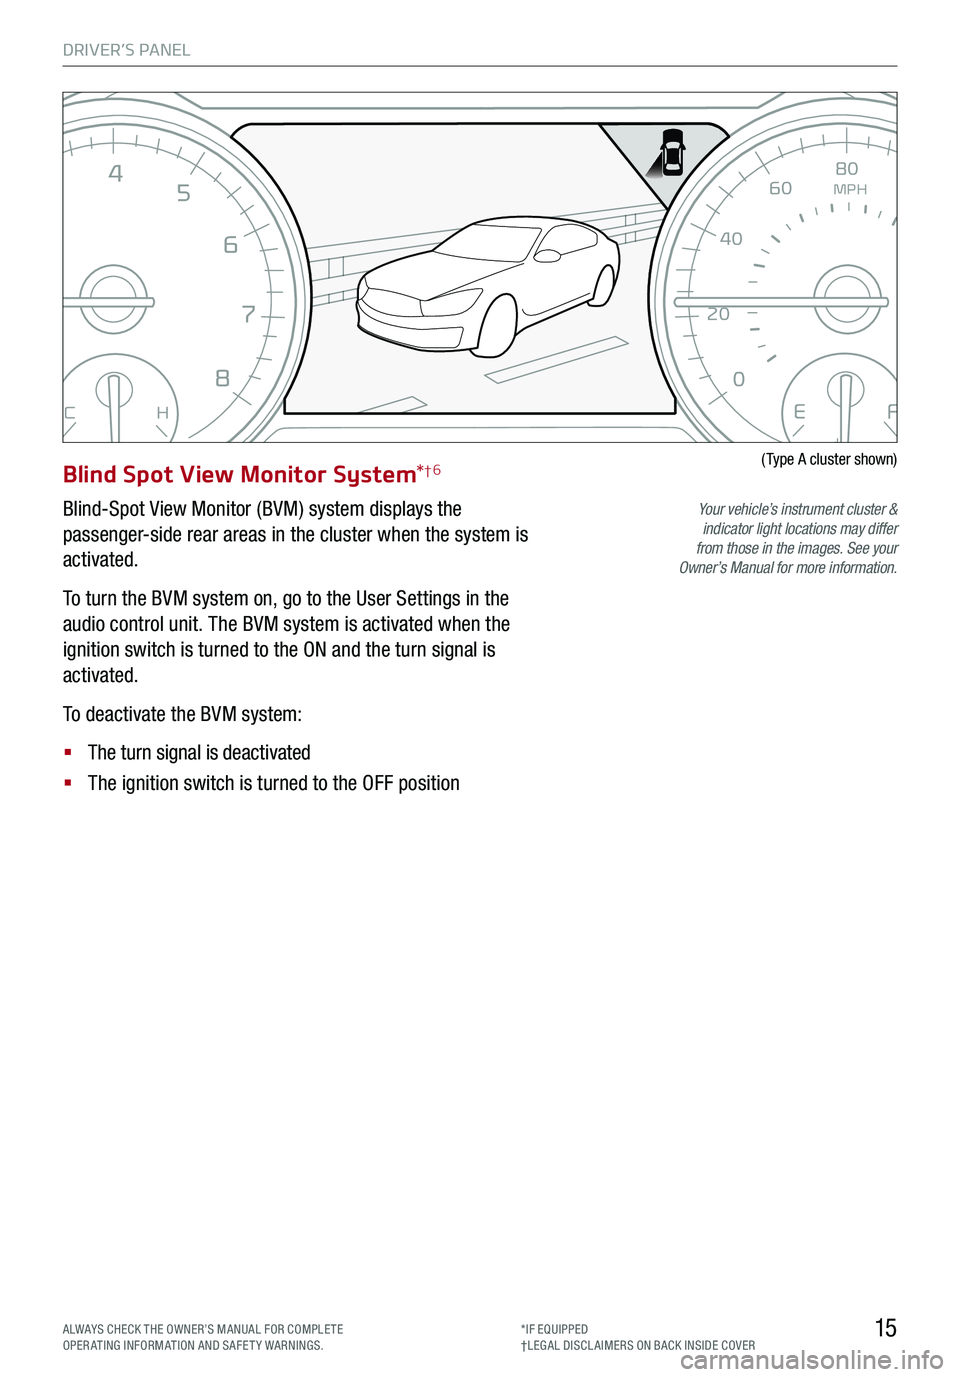
Blind-Spot View Monitor (BVM) system displays the
passenger-side rear areas in the cluster when the system is
activated.
To turn the BVM system on, go to the User Settings in the
audio control unit. The BVM system is activated when the
ignition switch is turned to the ON and the turn signal is
activated.
To deactivate the BVM system:
§ The turn signal is deactivated
§ The ignition switch is turned to the OFF position
(Type A cluster shown)
Your vehicle’s instrument cluster & indicator light locations may differ from those in the images. See your Owner’s Manual for more information.