engine coolant KIA Magnetis 2006 2.G User Guide
[x] Cancel search | Manufacturer: KIA, Model Year: 2006, Model line: Magnetis, Model: KIA Magnetis 2006 2.GPages: 225, PDF Size: 3.77 MB
Page 184 of 225
MAINTENANCE
7-8OWNER MAINTENANCEOWNER MAINTENANCE
SCHEDULEA qualified service technician should
perform these vehicle inspections at the
indicated intervals to ensure safe and
dependable operation.
Bring any problem to the attention of an
Authorized Kia Dealer as soon as
possible.WHEN REFUELING, CHECK:• Engine oil level
• Engine coolant level
• Brake and clutch fluid level
• Washer fluid level
AT LEAST MONTHLY• Tire inflation pressuresEVERY 6 MONTHS, CHECK:• Power steering fluid level
• Automatic transaxle fluid level
You can do the following scheduled
maintenance items if you have some
mechanical ability, a few basic tools and
if you closely follow the directions in
this manual.OWNER MAINTENANCE
PRECAUTIONSImproper or incomplete service may
result in problems. This section gives
instructions only for the maintenance
items that are easy to perform.As explained earlier in this section, several
procedures can be done only by a qualified
service technician with special tools.
Improper owner maintenance during the
warranty period may affect warranty
coverage. For details, read the separate
Kia Warranty and Consumer Information
Manual provided with the vehicle. If
you’re unsure about any servicing or
maintenance procedure, have it done by
an Authorized Kia Dealer.
CAUTION
Be careful when checking your
engine coolant level. The engine
compartment will be hot and you
could be burned.
WARNING - Maintenance
Work
Performing maintenance work
on a vehicle can be dangerous.
You can be seriously injured
while performing some
maintenance procedures. If you
lack sufficient knowledge,
experience or the proper tools
and equipment to do the work,
have it done by a qualified
technician.
MS-CNA-Eng 7.QXD 7/25/2005 5:09 PM Page 8
Page 186 of 225
MAINTENANCE
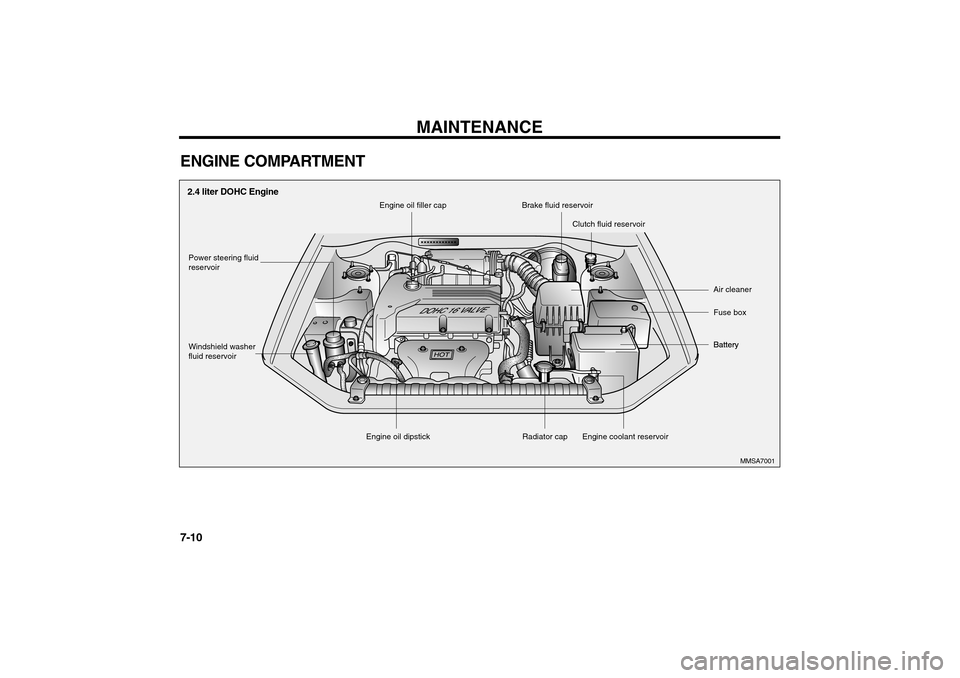
7-10ENGINE COMPARTMENT
MMSA7001
Air cleaner
Fuse box
Battery Battery
Windshield washer
fluid reservoir Power steering fluid
reservoirBrake fluid reservoir
Clutch fluid reservoir
Engine coolant reservoir Radiator cap Engine oil filler cap
Engine oil dipstick
2.4 liter DOHC Engine
MS-CNA-Eng 7.QXD 7/25/2005 5:09 PM Page 10
Page 187 of 225
7-11
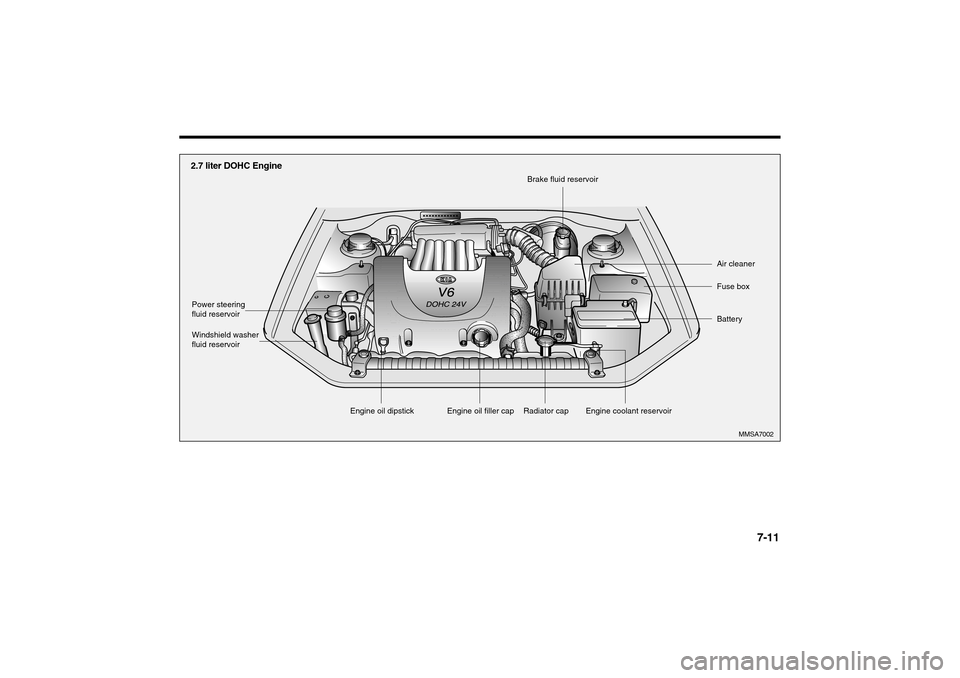
MMSA7002
2.7 liter DOHC Engine
Air cleaner
Fuse box
Battery
Windshield washer
fluid reservoir Power steering
fluid reservoirBrake fluid reservoir
Engine coolant reservoir Radiator cap Engine oil dipstick
Engine oil filler cap
MS-CNA-Eng 7.QXD 7/25/2005 5:09 PM Page 11
Page 190 of 225
MAINTENANCE
7-14ENGINE COOLING
SYSTEMThe cooling system is a high-pressure
type with a reservoir and is filled with
year-round antifreeze coolant at the
factory.
Check the antifreeze protection and
coolant level at least once a year, at the
beginning of the winter season, and
before traveling to a colder climate.
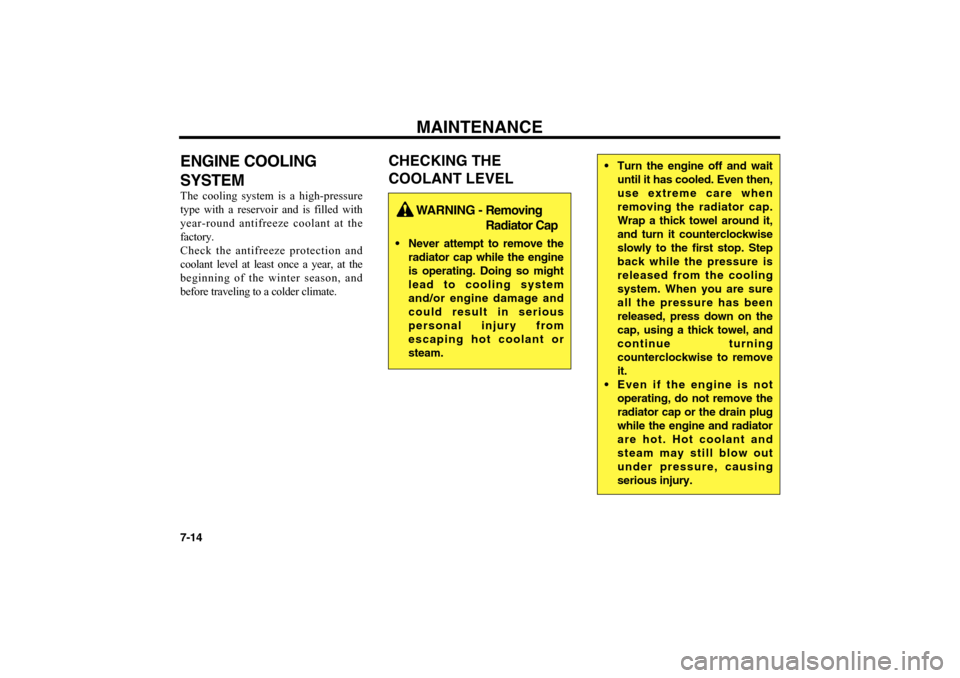
CHECKING THE
COOLANT LEVEL
WARNING - Removing
Radiator Cap
Never attempt to remove the
radiator cap while the engine
is operating. Doing so might
lead to cooling system
and/or engine damage and
could result in serious
personal injury from
escaping hot coolant or
steam.
Turn the engine off and wait
until it has cooled. Even then,
use extreme care when
removing the radiator cap.
Wrap a thick towel around it,
and turn it counterclockwise
slowly to the first stop. Step
back while the pressure is
released from the cooling
system. When you are sure
all the pressure has been
released, press down on the
cap, using a thick towel, and
continue turning
counterclockwise to remove
it.
Even if the engine is not
operating, do not remove the
radiator cap or the drain plug
while the engine and radiator
are hot. Hot coolant and
steam may still blow out
under pressure, causing
serious injury.
MS-CNA-Eng 7.QXD 7/25/2005 5:09 PM Page 14
Page 191 of 225
7-15
Check the condition and connections of
all cooling system hoses and heater
hoses. Replace any swollen or
deteriorated hoses.
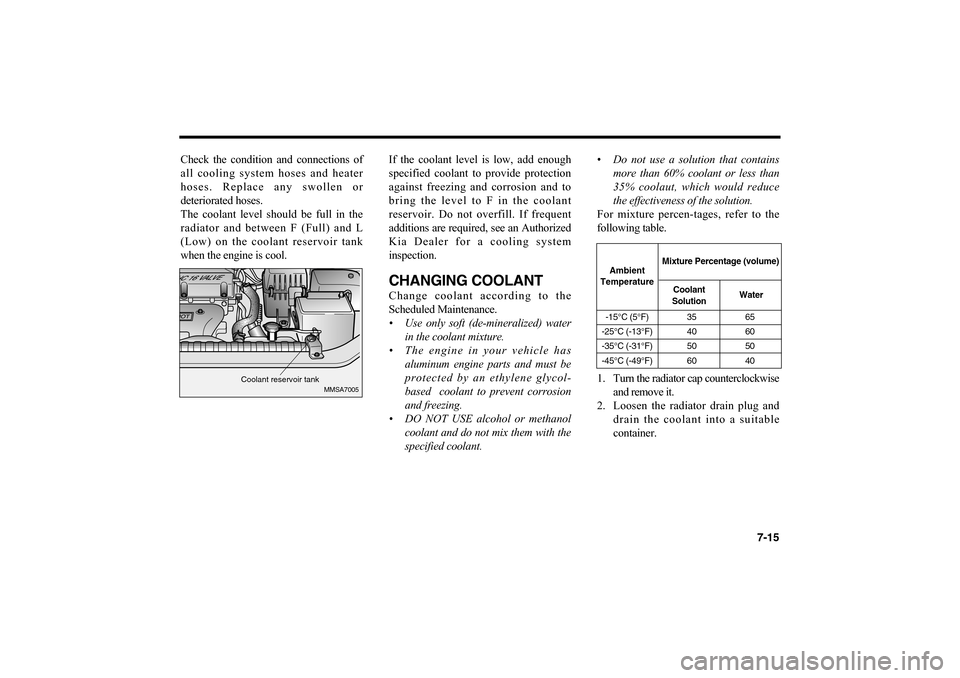
The coolant level should be full in the
radiator and between F (Full) and L
(Low) on the coolant reservoir tank
when the engine is cool.If the coolant level is low, add enough
specified coolant to provide protection
against freezing and corrosion and to
bring the level to F in the coolant
reservoir. Do not overfill. If frequent
additions are required, see an Authorized
Kia Dealer for a cooling system
inspection.
CHANGING COOLANTChange coolant according to the
Scheduled Maintenance.
• Use only soft (de-mineralized) water
in the coolant mixture.
• The engine in your vehicle has
aluminum engine parts and must be
protected by an ethylene glycol-
based coolant to prevent corrosion
and freezing.
• DO NOT USE alcohol or methanol
coolant and do not mix them with the
specified coolant.•Do not use a solution that contains
more than 60% coolant or less than
35% coolaut, which would reduce
the effectiveness of the solution.
For mixture percen-tages, refer to the
following table.
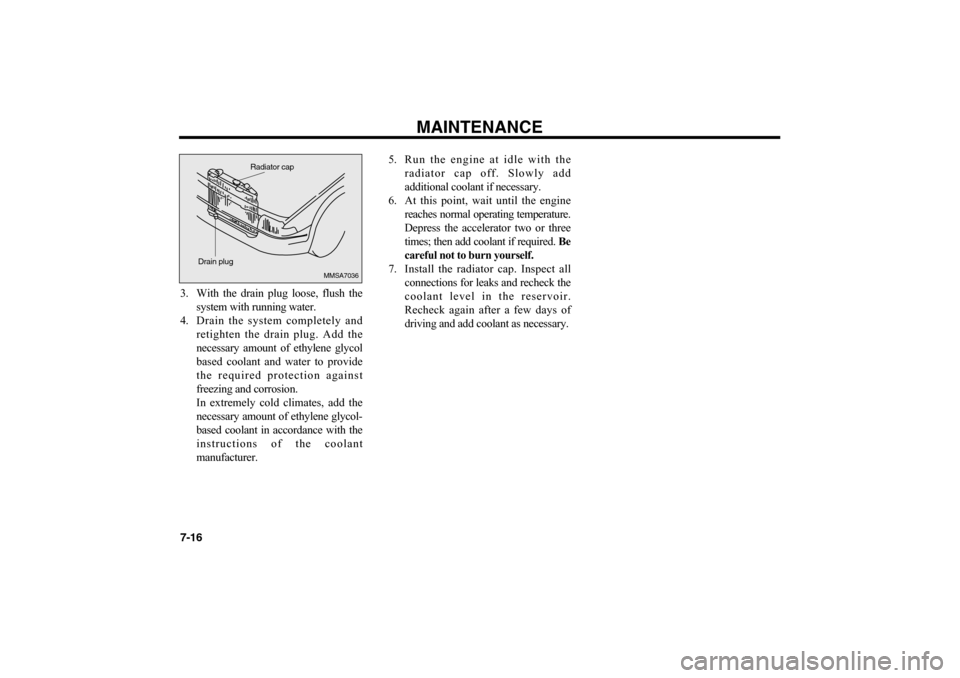
1. Turn the radiator cap counterclockwise
and remove it.
2. Loosen the radiator drain plug and
drain the coolant into a suitable
container.
MMSA7005
Coolant reservoir tank
-15°C (5°F) 35 65
-25°C (-13°F) 40 60
-35°C (-31°F) 50 50
-45°C (-49°F) 60 40Ambient
TemperatureMixture Percentage (volume)
Coolant
SolutionWater
MS-CNA-Eng 7.QXD 7/25/2005 5:09 PM Page 15
Page 192 of 225
MAINTENANCE
7-163. With the drain plug loose, flush the
system with running water.
4. Drain the system completely and
retighten the drain plug. Add the
necessary amount of ethylene glycol
based coolant and water to provide
the required protection against
freezing and corrosion.
In extremely cold climates, add the
necessary amount of ethylene glycol-
based coolant in accordance with the
instructions of the coolant
manufacturer.5. Run the engine at idle with the
radiator cap off. Slowly add
additional coolant if necessary.
6. At this point, wait until the engine
reaches normal operating temperature.
Depress the accelerator two or three
times; then add coolant if required. Be
careful not to burn yourself.
7. Install the radiator cap. Inspect all
connections for leaks and recheck the
coolant level in the reservoir.
Recheck again after a few days of
driving and add coolant as necessary.
MMSA7036
Drain plugRadiator cap
MS-CNA-Eng 7.QXD 7/25/2005 5:09 PM Page 16
Page 197 of 225
7-21
BODY LUBRICATIONAll moving points of the body, such as
doors, hood hinges and locks, should be
lubricated each time the engine oil is
changed.
Use a non-freezing lubricant on locks
during cold weather.
Make sure the engine hood secondary
latch keeps the hood from opening when
the primary latch is released.
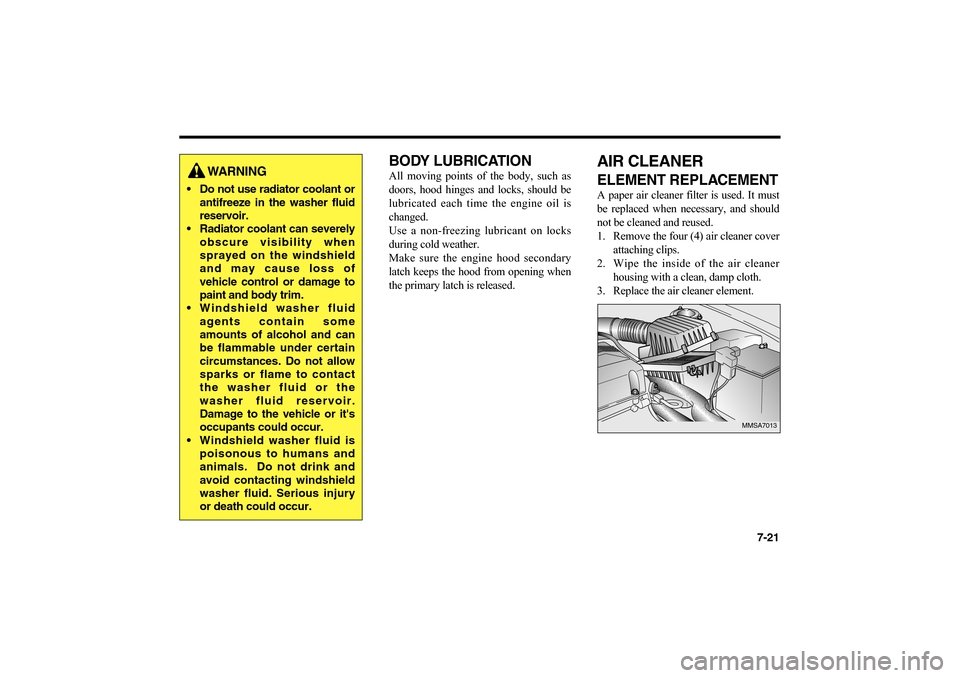
AIR CLEANERELEMENT REPLACEMENTA paper air cleaner filter is used. It must
be replaced when necessary, and should
not be cleaned and reused.
1. Remove the four (4) air cleaner cover
attaching clips.
2. Wipe the inside of the air cleaner
housing with a clean, damp cloth.
3. Replace the air cleaner element.
MMSA7013
WARNING
Do not use radiator coolant or
antifreeze in the washer fluid
reservoir.
Radiator coolant can severely
obscure visibility when
sprayed on the windshield
and may cause loss of
vehicle control or damage to
paint and body trim.
Windshield washer fluid
agents contain some
amounts of alcohol and can
be flammable under certain
circumstances. Do not allow
sparks or flame to contact
the washer fluid or the
washer fluid reservoir.
Damage to the vehicle or it's
occupants could occur.
Windshield washer fluid is
poisonous to humans and
animals. Do not drink and
avoid contacting windshield
washer fluid. Serious injury
or death could occur.
MS-CNA-Eng 7.QXD 7/25/2005 5:09 PM Page 21
Page 218 of 225
MAINTENANCE
7-42HEADLIGHT AIMING
ADJUSTMENTBefore performing aiming adjustment,
make sure of the following.
1. Keep all tires inflated to the correct
pressure.
2. Place the vehicle on level ground and
press the front bumper & rear
bumper down several times.
3. See that the vehicle is unloaded
(except for full levels of coolant,
engine oil and fuel, and spare tire, jack,
and tools). Have the driver sit in the
driver’s seat or use equivalent weight.4. Clean the headlight lenses and turn
on the headlight (Low beam).
5. Open the hood.
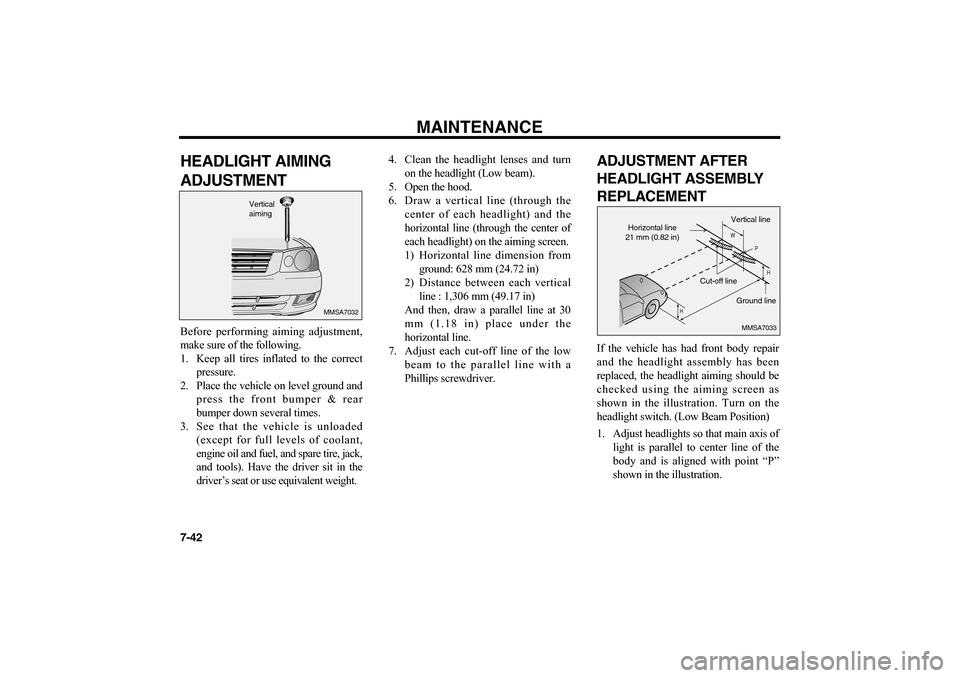
6. Draw a vertical line (through the
center of each headlight) and the
horizontal line (through the center of
each headlight) on the aiming screen.
1) Horizontal line dimension from
ground: 628 mm (24.72 in)
2) Distance between each vertical
line : 1,306 mm (49.17 in)
And then, draw a parallel line at 30
mm (1.18 in) place under the
horizontal line.
7. Adjust each cut-off line of the low
beam to the parallel line with a
Phillips screwdriver.
ADJUSTMENT AFTER
HEADLIGHT ASSEMBLY
REPLACEMENTIf the vehicle has had front body repair
and the headlight assembly has been
replaced, the headlight aiming should be
checked using the aiming screen as
shown in the illustration. Turn on the
headlight switch. (Low Beam Position)
1. Adjust headlights so that main axis of
light is parallel to center line of the
body and is aligned with point “P”
shown in the illustration.
MMSA7032
Vertical
aiming
HH W
P
MMSA7033
Horizontal line
21 mm (0.82 in)
Cut-off line
Ground line Vertical line
MS-CNA-Eng 7.QXD 7/25/2005 5:09 PM Page 42
Page 223 of 225
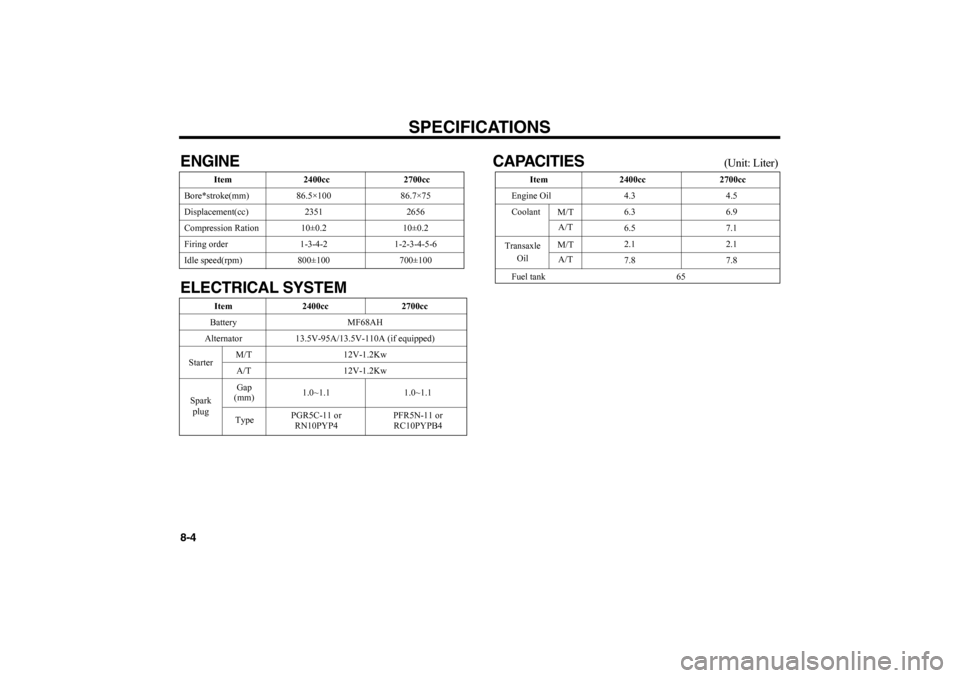
ENGINE
ELECTRICAL SYSTEMCAPACITIES
(Unit: Liter)
SPECIFICATIONS
8-4
Item 2400cc 2700cc
Battery MF68AH
Alternator 13.5V-95A/13.5V-110A (if equipped)
M/T 12V-1.2Kw
A/T 12V-1.2Kw
1.0~1.1 1.0~1.1
PGR5C-11 or PFR5N-11 or
RN10PYP4 RC10PYPB4 Starter
Gap
(mm)
Type Spark
plugItem 2400cc 2700cc
Bore*stroke(mm) 86.5×100 86.7×75
Displacement(cc) 2351 2656
Compression Ration 10±0.2 10±0.2
Firing order 1-3-4-2 1-2-3-4-5-6
Idle speed(rpm) 800±100 700±100
Item 2400cc 2700cc
Engine Oil 4.3 4.5
Coolant 6.3 6.9
6.5 7.1
2.1 2.1
7.8 7.8
Fuel tank 65
Transaxle
OilM/T
A/T
M/T
A/T
MS-CNA-Eng 8.QXD 7/25/2005 5:07 PM Page 4