light KIA Magnetis 2006 2.G Owner's Manual
[x] Cancel search | Manufacturer: KIA, Model Year: 2006, Model line: Magnetis, Model: KIA Magnetis 2006 2.GPages: 225, PDF Size: 3.77 MB
Page 8 of 225
YOUR VEHICLE AT A GLANCE
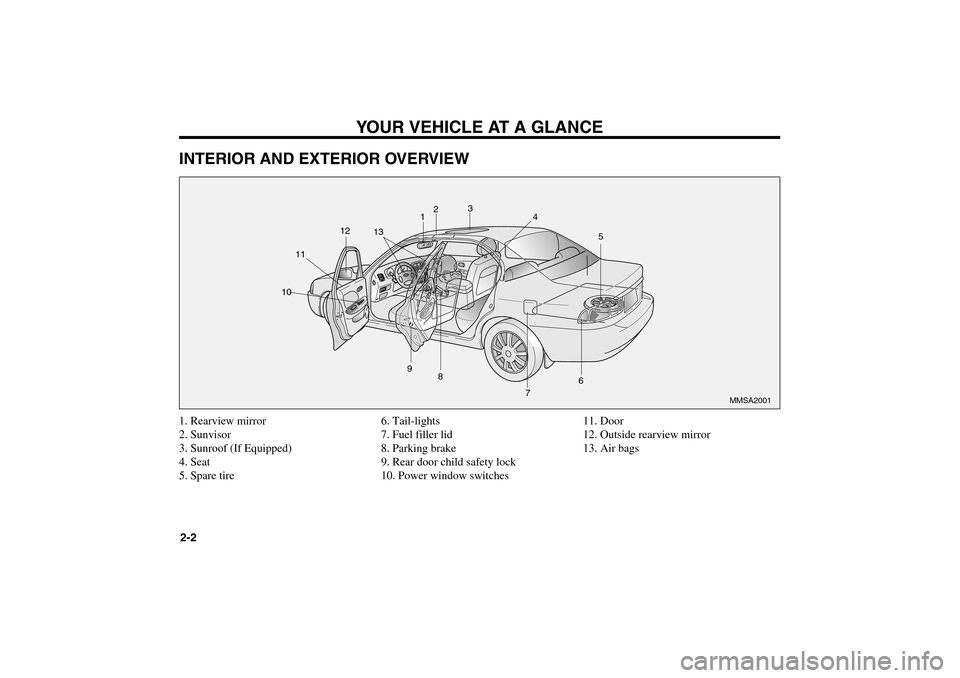
2-2INTERIOR AND EXTERIOR OVERVIEW1. Rearview mirror
2. Sunvisor
3. Sunroof (If Equipped)
4. Seat
5. Spare tire6. Tail-lights
7. Fuel filler lid
8. Parking brake
9. Rear door child safety lock
10. Power window switches 11. Door
12. Outside rearview mirror
13. Air bags
4
5
6
7 8 9 101112
13123
MMSA2001
MS-CNA-Eng 2.QXD 7/25/2005 5:18 PM Page 2
Page 9 of 225
2-3
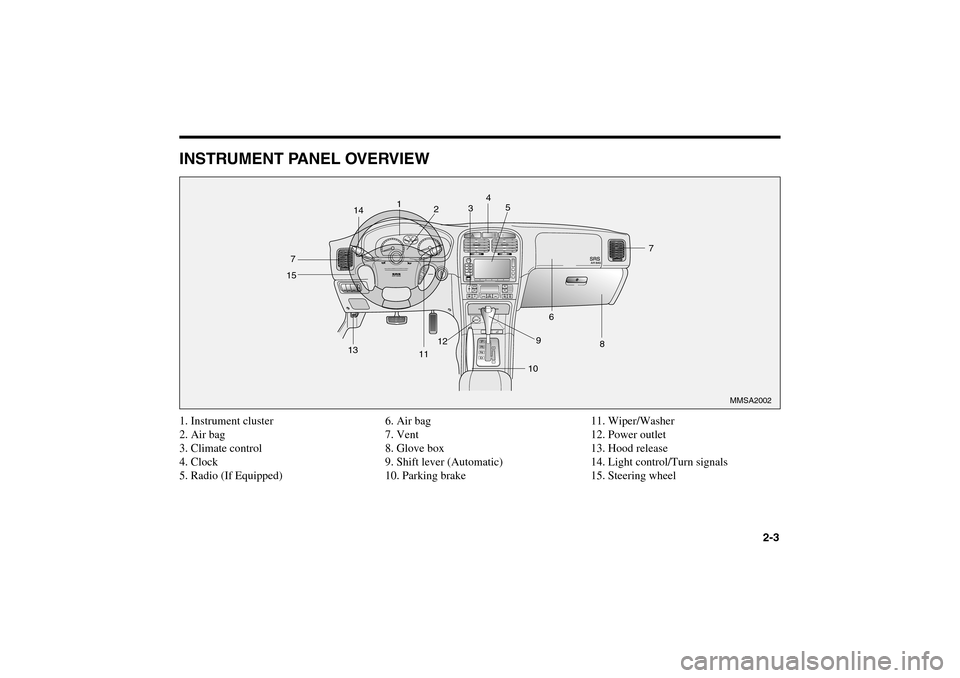
INSTRUMENT PANEL OVERVIEW1. Instrument cluster
2. Air bag
3. Climate control
4. Clock
5. Radio (If Equipped)6. Air bag
7. Vent
8. Glove box
9. Shift lever (Automatic)
10. Parking brake11. Wiper/Washer
12. Power outlet
13. Hood release
14. Light control/Turn signals
15. Steering wheel
R
E
S
AC
C
E
L
CA
N
C
E
LC
O
A
S
TS
E
T
4
5
67
8 9
10 1112
13 7
151
1423
MMSA2002
MS-CNA-Eng 2.QXD 7/25/2005 5:18 PM Page 3
Page 10 of 225
3-1
KNOWING YOUR VEHICLEKeys . . . . . . . . . . . . . . . . . . . . . . . . . . . . . . . . . . . . . . . . . 3-3
Keyless Entry System . . . . . . . . . . . . . . . . . . . . . . . . . . . 3-4
Theft-Alarm System . . . . . . . . . . . . . . . . . . . . . . . . . . . . . 3-5
Immobilizer System . . . . . . . . . . . . . . . . . . . . . . . . . . . . . 3-6
Door Locks . . . . . . . . . . . . . . . . . . . . . . . . . . . . . . . . . . . . 3-9
Windows . . . . . . . . . . . . . . . . . . . . . . . . . . . . . . . . . . . . . 3-11
Seats . . . . . . . . . . . . . . . . . . . . . . . . . . . . . . . . . . . . . . . . 3-14
Safety Belts . . . . . . . . . . . . . . . . . . . . . . . . . . . . . . . . . . 3-22
Air Bag - Supplemental Restraint System . . . . . . . . . . 3-42
Trunk Lid . . . . . . . . . . . . . . . . . . . . . . . . . . . . . . . . . . . . 3-52
Hood . . . . . . . . . . . . . . . . . . . . . . . . . . . . . . . . . . . . . . . . 3-54
Fuel Filler Lid . . . . . . . . . . . . . . . . . . . . . . . . . . . . . . . . . 3-55
Steering Wheel . . . . . . . . . . . . . . . . . . . . . . . . . . . . . . . . 3-58
Mirrors . . . . . . . . . . . . . . . . . . . . . . . . . . . . . . . . . . . . . . 3-58
Interior Lights. . . . . . . . . . . . . . . . . . . . . . . . . . . . . . . . . 3-62
Cup Holders and Console Storage Compartment . . . 3-63
3
MS-CNA-Eng 3.QXD 7/25/2005 5:17 PM Page 1
Page 13 of 225
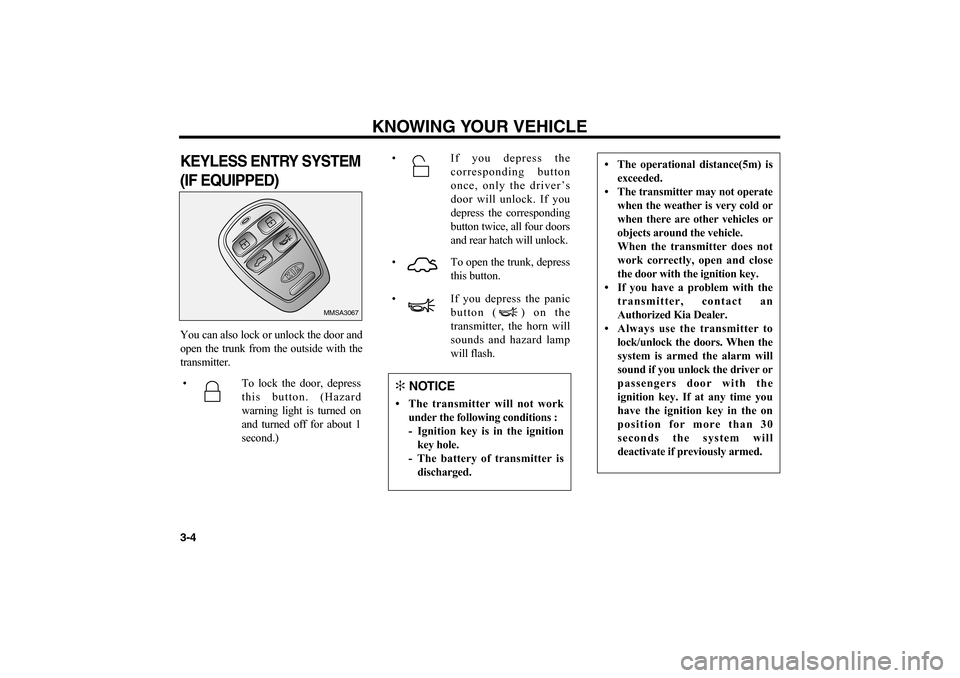
KEYLESS ENTRY SYSTEM
(IF EQUIPPED)You can also lock or unlock the door and
open the trunk from the outside with the
transmitter.
KNOWING YOUR VEHICLE
3-4
MMSA3067
• To lock the door, depress
this button. (Hazard
warning light is turned on
and turned off for about 1
second.)• If you depress the
corresponding button
once, only the driver’s
door will unlock. If you
depress the corresponding
button twice, all four doors
and rear hatch will unlock.
• To open the trunk, depress
this button.• If you depress the panic
button ( ) on the
transmitter, the horn will
sounds and hazard lamp
will flash.✻
NOTICE
• The transmitter will not work
under the following conditions :
- Ignition key is in the ignition
key hole.
- The battery of transmitter is
discharged.
• The operational distance(5m) is
exceeded.
• The transmitter may not operate
when the weather is very cold or
when there are other vehicles or
objects around the vehicle.
When the transmitter does not
work correctly, open and close
the door with the ignition key.
• If you have a problem with the
transmitter, contact an
Authorized Kia Dealer.
• Always use the transmitter to
lock/unlock the doors. When the
system is armed the alarm will
sound if you unlock the driver or
passengers door with the
ignition key. If at any time you
have the ignition key in the on
position for more than 30
seconds the system will
deactivate if previously armed.
MS-CNA-Eng 3.QXD 7/25/2005 5:17 PM Page 4
Page 14 of 225
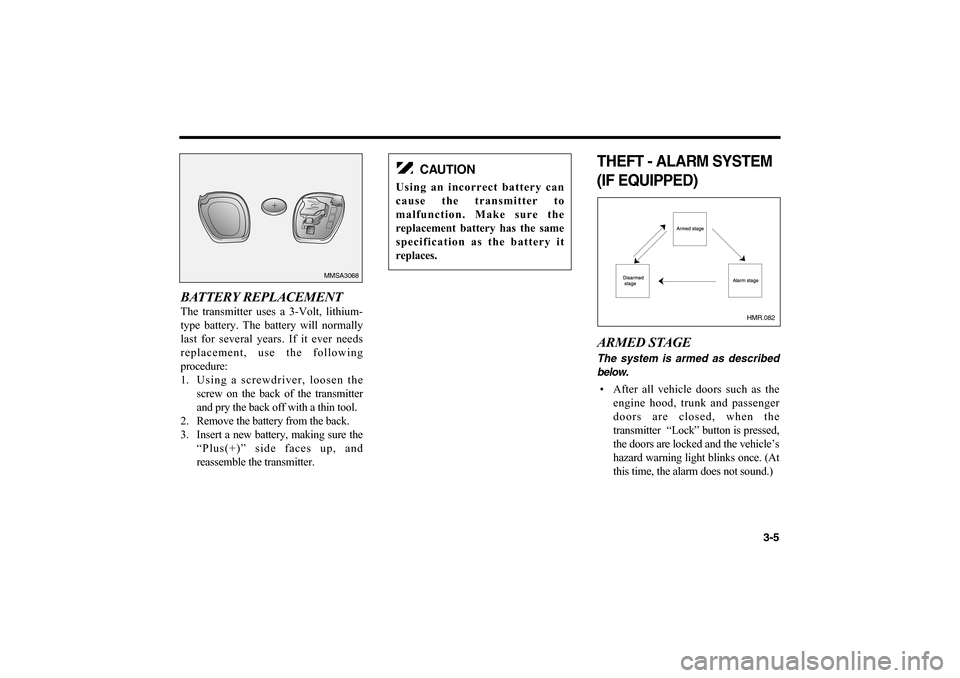
BATTERY REPLACEMENTThe transmitter uses a 3-Volt, lithium-
type battery. The battery will normally
last for several years. If it ever needs
replacement, use the following
procedure:
1. Using a screwdriver, loosen the
screw on the back of the transmitter
and pry the back off with a thin tool.
2. Remove the battery from the back.
3. Insert a new battery, making sure the
“Plus(+)” side faces up, and
reassemble the transmitter.
THEFT - ALARM SYSTEM
(IF EQUIPPED)ARMED STAGEThe system is armed as described
below.• After all vehicle doors such as the
engine hood, trunk and passenger
doors are closed, when the
transmitter “Lock” button is pressed,
the doors are locked and the vehicle’s
hazard warning light blinks once. (At
this time, the alarm does not sound.)
3-5
MMSA3068
HMR.082
CAUTION
Using an incorrect battery can
cause the transmitter to
malfunction. Make sure the
replacement battery has the same
specification as the battery it
replaces.
MS-CNA-Eng 3.QXD 7/25/2005 5:17 PM Page 5
Page 19 of 225
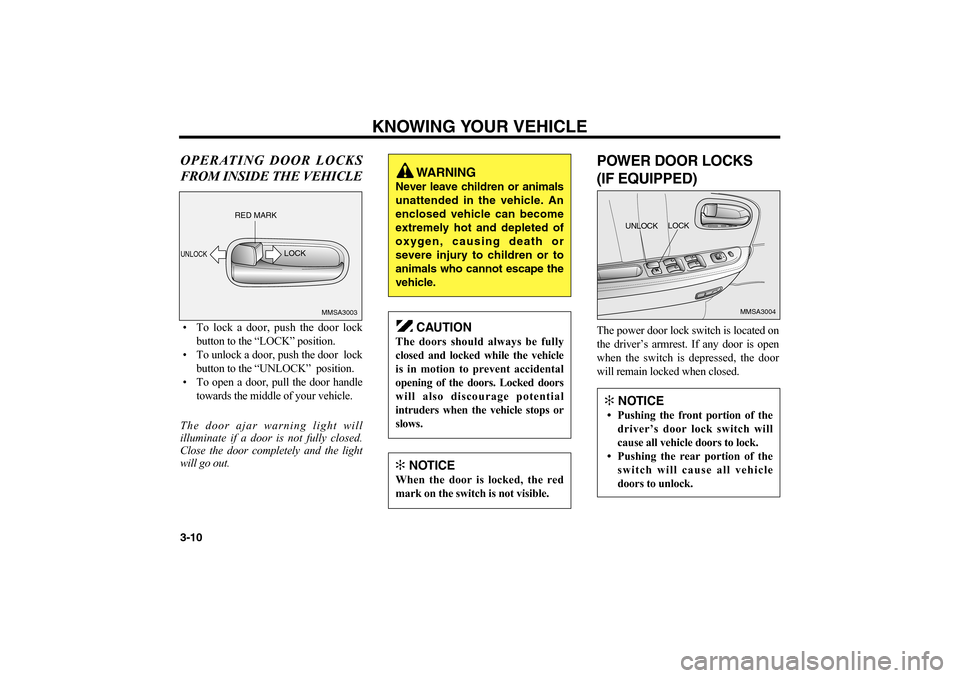
OPERATING DOOR LOCKS
FROM INSIDE THE VEHICLE• To lock a door, push the door lock
button to the “LOCK” position.
• To unlock a door, push the door lock
button to the “UNLOCK” position.
• To open a door, pull the door handle
towards the middle of your vehicle.
The door ajar warning light will
illuminate if a door is not fully closed.
Close the door completely and the light
will go out.
POWER DOOR LOCKS
(IF EQUIPPED)The power door lock switch is located on
the driver’s armrest. If any door is open
when the switch is depressed, the door
will remain locked when closed.
KNOWING YOUR VEHICLE
3-10
MMSA3004
UNLOCKLOCK
MMSA3003
UNLOCK
RED MARK
LOCK
WARNING
Never leave children or animals
unattended in the vehicle. An
enclosed vehicle can become
extremely hot and depleted of
oxygen, causing death or
severe injury to children or to
animals who cannot escape the
vehicle.
CAUTION
The doors should always be fully
closed and locked while the vehicle
is in motion to prevent accidental
opening of the doors. Locked doors
will also discourage potential
intruders when the vehicle stops or
slows.✻
NOTICE
When the door is locked, the red
mark on the switch is not visible.
✻
NOTICE• Pushing the front portion of the
driver’s door lock switch will
cause all vehicle doors to lock.
• Pushing the rear portion of the
switch will cause all vehicle
doors to unlock.
MS-CNA-Eng 3.QXD 7/25/2005 5:17 PM Page 10
Page 22 of 225
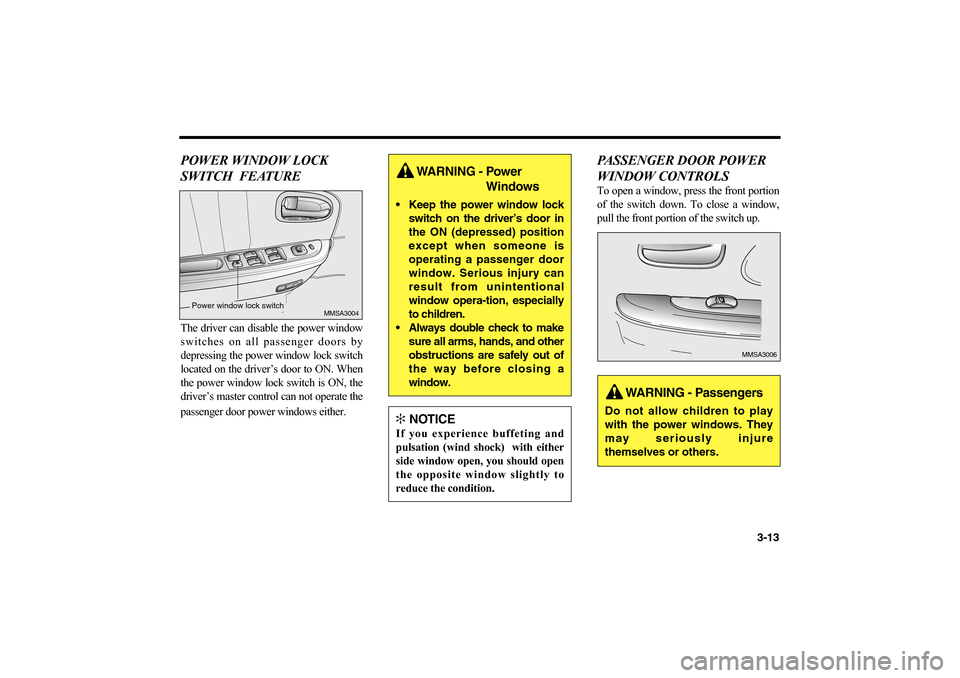
POWER WINDOW LOCK
SWITCH FEATUREThe driver can disable the power window
switches on all passenger doors by
depressing the power window lock switch
located on the driver’s door to ON. When
the power window lock switch is ON, the
driver’s master control can not operate the
passenger door power windows either.
PASSENGER DOOR POWER
WINDOW CONTROLSTo open a window, press the front portion
of the switch down. To close a window,
pull the front portion of the switch up.
3-13
MMSA3006
WARNING - Power
Windows
Keep the power window lock
switch on the driver’s door in
the ON (depressed) position
except when someone is
operating a passenger door
window. Serious injury can
result from unintentional
window opera-tion, especially
to children.
Always double check to make
sure all arms, hands, and other
obstructions are safely out of
the way before closing a
window.✻
NOTICE
If you experience buffeting and
pulsation (wind shock) with either
side window open, you should open
the opposite window slightly to
reduce the condition.
WARNING - Passengers
Do not allow children to play
with the power windows. They
may seriously injure
themselves or others.
MMSA3004
Power window lock switch
MS-CNA-Eng 3.QXD 7/25/2005 5:17 PM Page 13
Page 24 of 225
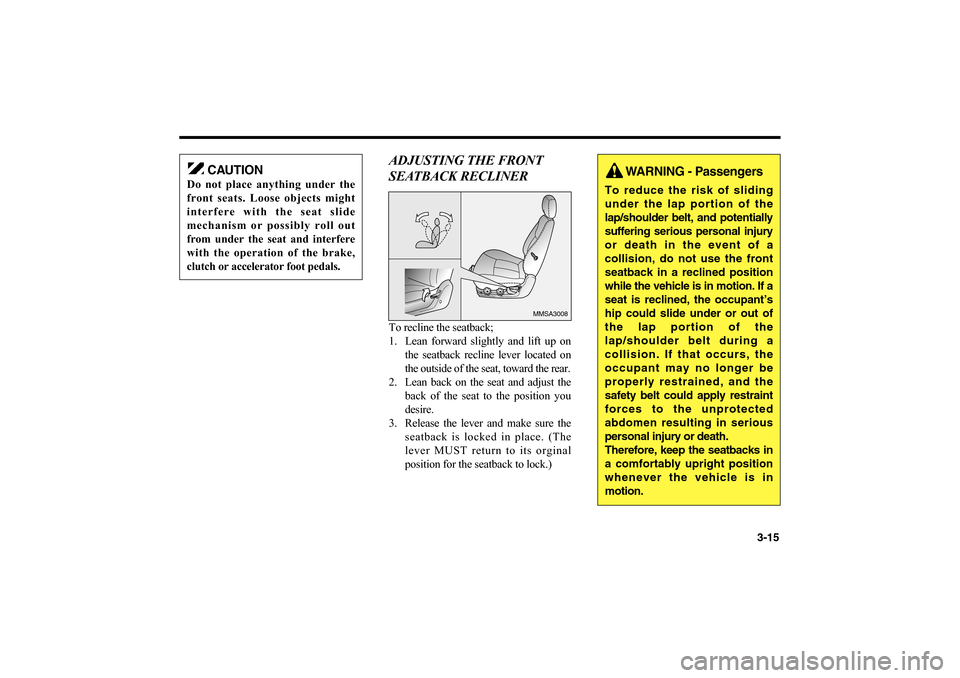
ADJUSTING THE FRONT
SEATBACK RECLINERTo recline the seatback;
1. Lean forward slightly and lift up on
the seatback recline lever located on
the outside of the seat, toward the rear.
2. Lean back on the seat and adjust the
back of the seat to the position you
desire.
3. Release the lever and make sure the
seatback is locked in place. (The
lever MUST return to its orginal
position for the seatback to lock.)
3-15
MMSA3008
CAUTION
Do not place anything under the
front seats. Loose objects might
interfere with the seat slide
mechanism or possibly roll out
from under the seat and interfere
with the operation of the brake,
clutch or accelerator foot pedals.
WARNING - Passengers
To reduce the risk of sliding
under the lap portion of the
lap/shoulder belt, and potentially
suffering serious personal injury
or death in the event of a
collision, do not use the front
seatback in a reclined position
while the vehicle is in motion. If a
seat is reclined, the occupant’s
hip could slide under or out of
the lap portion of the
lap/shoulder belt during a
collision. If that occurs, the
occupant may no longer be
properly restrained, and the
safety belt could apply restraint
forces to the unprotected
abdomen resulting in serious
personal injury or death.
Therefore, keep the seatbacks in
a comfortably upright position
whenever the vehicle is in
motion.
MS-CNA-Eng 3.QXD 7/25/2005 5:17 PM Page 15
Page 31 of 225
KNOWING YOUR VEHICLE
3-22SAFETY BELTSPRE-TENSIONER SEAT
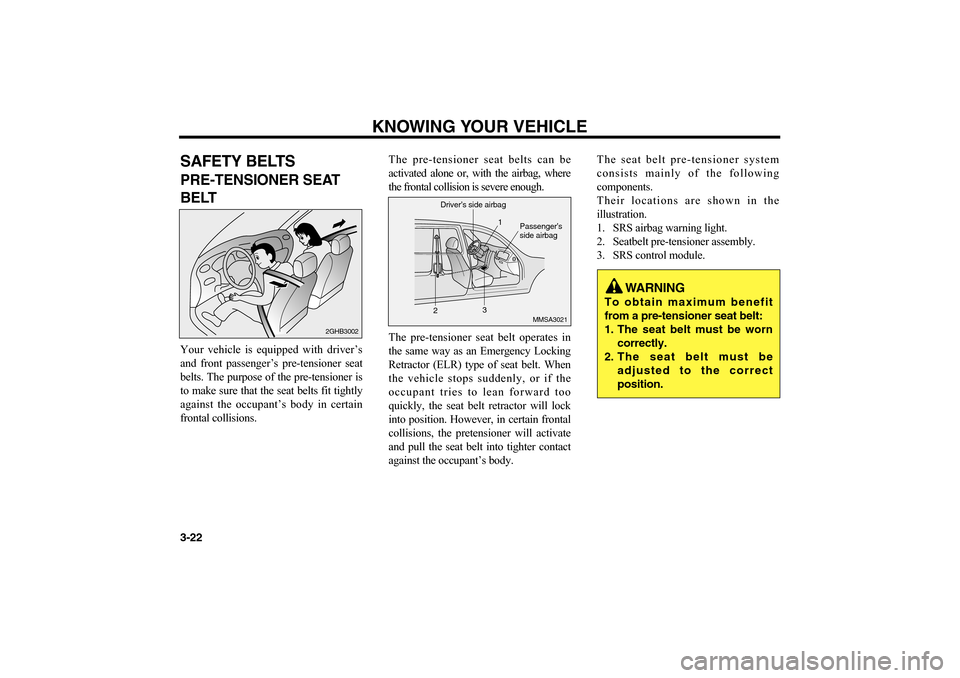
BELTYour vehicle is equipped with driver’s
and front passenger’s pre-tensioner seat
belts. The purpose of the pre-tensioner is
to make sure that the seat belts fit tightly
against the occupant’s body in certain
frontal collisions.The pre-tensioner seat belts can be
activated alone or, with the airbag, where
the frontal collision is severe enough.
The pre-tensioner seat belt operates in
the same way as an Emergency Locking
Retractor (ELR) type of seat belt. When
the vehicle stops suddenly, or if the
occupant tries to lean forward too
quickly, the seat belt retractor will lock
into position. However, in certain frontal
collisions, the pretensioner will activate
and pull the seat belt into tighter contact
against the occupant’s body.The seat belt pre-tensioner system
consists mainly of the following
components.
Their locations are shown in the
illustration.
1. SRS airbag warning light.
2. Seatbelt pre-tensioner assembly.
3. SRS control module.
2GHB3002
MMSA3021
Driver’s side airbag
21
3Passenger’s
side airbag
WARNING
To obtain maximum benefit
from a pre-tensioner seat belt:
1. The seat belt must be worn
correctly.
2. The seat belt must be
adjusted to the correct
position.
MS-CNA-Eng 3.QXD 7/25/2005 5:17 PM Page 22
Page 32 of 225
3-23
✻
NOTICE
• Both the driver’s and front
passenger’s pre-tensioner seat
belts will be activated in certain
frontal collisions. The pre-
tensioner seat belts can be
activated alone or, where the
frontal collision is severe enough,
with the airbags. The pre-
tensioners will be activated
under these conditions even if
the seat belts are not being worn
at the time of the collision.
• When the pre-tensioner seat
belts are activated, a loud noise
may be heard and fine dust,
which may appear to be smoke,
may be visible in the passenger
compartment. This dust is not
hazardous.
• Although it is harmless, the fine
dust may cause skin irritation
and should not be breathed for
prolonged periods. Wash your
hands and face thoroughly after
an accident in which the
pretensioner seat belts were
activated.
CAUTION
• Because the sensor that activates
the SRS airbag is connected with
pre-tensioner seat belt, the SRS
airbag warning light on the
instrument panel will blink for
approximately 6 seconds after
the ignition key has turned to the
“ON” or “ACC” positions. After
the six second period, the air bag
warning light will turn off.
• Please have the SRS airbag
system and the pre-tensioner
system inspected by an
Authorized Kia Dealer if the
following conditions occur:
1. The SRS warning light does
not illuminate when the
ignition switch is turned to
“ON” or “ACC”.
2. When the ignition switch is
turned to “ON” or “ACC” the
SRS warning light stays lit
after blinking for
approximately 6 second.
3. The SRS warning light illum-
inates while the vehicle is being
driven.
AIR
BAG
WARNING
Pre-tensioners are designed
to operate only one time.
After activation, pretensioner
seat belts must be replaced.
All seat belts, of any type,
should always be replaced
after they have been worn
during a collision.
The Pre-tensioner seat belt
assembly mechanisms
become hot during
activation. Do not touch the
pre-tensioner seat belt
assemblies for several
minutes after they have been
activated.
Do not attempt to inspect or
replace the pre-tensioner
seat belts yourself. This
must be done by an
Authorized Kia Dealer.
Do not strike the pre-
tensioner seat belt
assemblies.
MS-CNA-Eng 3.QXD 7/25/2005 5:17 PM Page 23