parking KIA MORNING 2015 Owners Manual
[x] Cancel search | Manufacturer: KIA, Model Year: 2015, Model line: MORNING, Model: KIA MORNING 2015Pages: 420, PDF Size: 42.6 MB
Page 8 of 420
15
Introduction
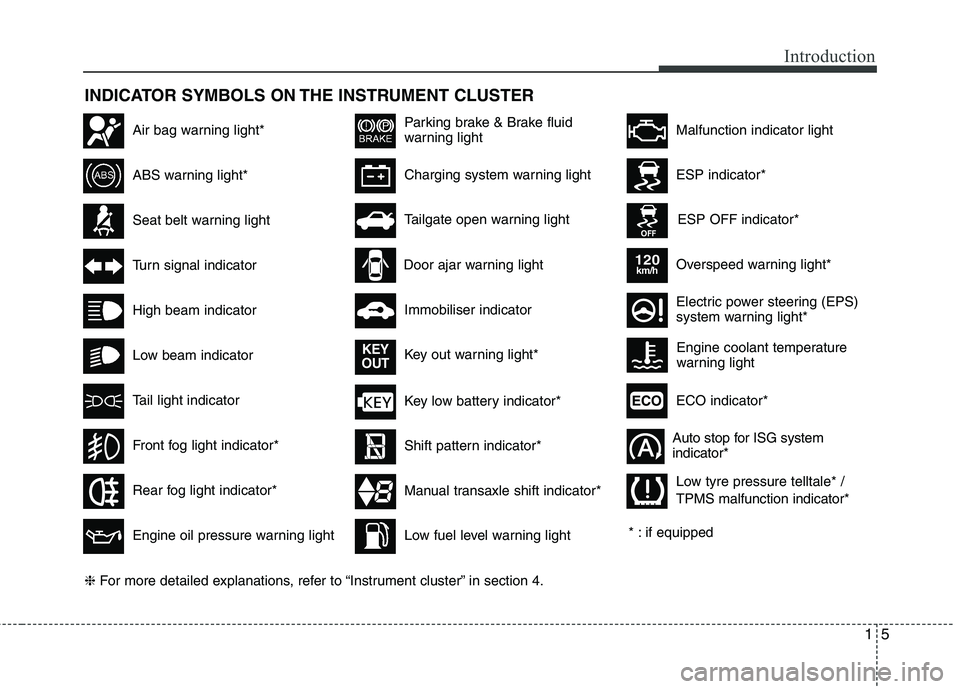
INDICATOR SYMBOLS ON THE INSTRUMENT CLUSTER
Seat belt warning light
High beam indicator
Turn signal indicator
ABS warning light*
Parking brake & Brake fluid
warning light
Engine oil pressure warning light
ESP indicator*
ESP OFF indicator*
Malfunction indicator lightAir bag warning light*
Immobiliser indicator
Low fuel level warning light* : if equipped
Charging system warning light
Overspeed warning light*
120km/h
Tail light indicator
Tailgate open warning light
Front fog light indicator*
Electric power steering (EPS)
system warning light*
Key low battery indicator*
Rear fog light indicator*
Door ajar warning light
Shift pattern indicator*
Manual transaxle shift indicator* Key out warning light*
KEY
OUT
ECO indicator*ECO
Auto stop for ISG system
indicator*
Low beam indicatorEngine coolant temperature
warning light
❈For more detailed explanations, refer to “Instrument cluster” in section 4.Low tyre pressure telltale* /
TPMS malfunction indicator*
Page 11 of 420
23
Your vehicle at a glance
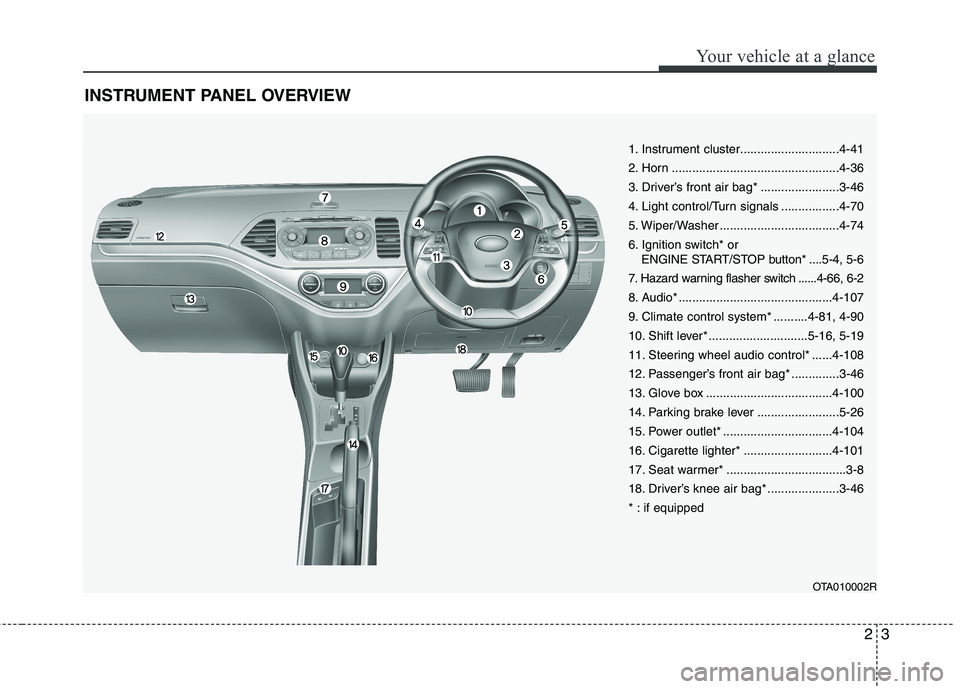
INSTRUMENT PANEL OVERVIEW
OTA010002R
1. Instrument cluster.............................4-41
2. Horn .................................................4-36
3. Driver’s front air bag* .......................3-46
4. Light control/Turn signals .................4-70
5. Wiper/Washer ...................................4-74
6. Ignition switch* or
ENGINE START/STOP button* ....5-4, 5-6
7. Hazard warning flasher switch ......4-66, 6-2
8. Audio* .............................................4-107
9. Climate control system* ..........4-81, 4-90
10. Shift lever* .............................5-16, 5-19
11. Steering wheel audio control* ......4-108
12. Passenger’s front air bag* ..............3-46
13. Glove box .....................................4-100
14. Parking brake lever ........................5-26
15. Power outlet* ................................4-104
16. Cigarette lighter* ..........................4-101
17. Seat warmer* ...................................3-8
18. Driver’s knee air bag* .....................3-46
* : if equipped
Page 27 of 420
315
Safety features of your vehicle
Seat belt restraint system
WARNING
For maximum restraint system
protection, the seat belts must
always be used whenever the car
is moving.
Seat belts are most effective
when seatbacks are in the
upright position.
Children age 12 and younger
must always be properly
restrained in the rear seat. Never
allow children to ride in the front
passenger seat. If a child over 12
must be seated in the front seat,
he/she must be properly belted
and the seat should be moved as
far back as possible.
Never wear the shoulder belt
under your arm or behind your
back. An improperly positioned
shoulder belt can cause serious
injuries in a crash. The shoulder
belt should be positioned midway
over your shoulder across your
collarbone.
(Continued)
WARNING
Seat belts are designed to bear
upon the bony structure of the
body, and should be worn low
across the front of the pelvis or the
pelvis, chest and shoulders, as
applicable; wearing the lap section
of the belt across the abdominal
area must be avoided.
Seat belts should be adjusted as
firmly as possible, consistent with
comfort, to provide the protection
for which they have been designed.
A slack belt will greatly reduce the
protection afforded to the wearer.
(Continued)
(Continued)
Avoid wearing twisted seat belts.
A twisted belt can't do its job as
well. In a collision, it could even
cut into you. Be sure the belt web-
bing is straight and not twisted.
Be careful not to damage the belt
webbing or hardware. If the belt
webbing or hardware is dam-
aged, replace it.CAUTION- Rear seat belts
When returning the rear seatbacks
to the upright position, remember
to return the rear shoulder belts to
their proper position.
WARNING - Cargo loading
Make sure the engine is off, the
automatic transaxle is in P (Park)
or the manual transaxle is in 1st,
and the parking brake is securely
applied whenever loading or
unloading cargo. Failure to take
these steps may allow the vehicle
to move if the shift lever is inadver-
tently moved to another position.
WARNING- Cargo
Cargo should always be secured to
prevent it from being thrown about
the vehicle in a collision and caus-
ing injury to the vehicle occupants.
Do not place objects in the rear
seats, since they cannot be proper-
ly secured and may hit the front
seat occupants in a collision.
SEAT BELTS
Page 74 of 420
4
Keys / 4-3
Remote keyless entry / 4-6
Smart key / 4-9
Theft-alarm system / 4-11
Door locks / 4-14
Tailgate / 4-18
Windows / 4-20
Bonnet / 4-25
Fuel filler lid / 4-27
Sunroof / 4-30
Steering wheel / 4-34
Mirrors / 4-37
Instrument cluster / 4-41
Rear parking assist system / 4-63
Hazard warning flasher / 4-66
Lighting / 4-67
Wipers and washers / 4-74
Interior light / 4-78
Defroster / 4-80
Manual climate control system / 4-81
Automatic climate control system / 4-90
Windscreen defrosting and defogging / 4-97
Features of your vehicle
Page 88 of 420
415
Features of your vehicle
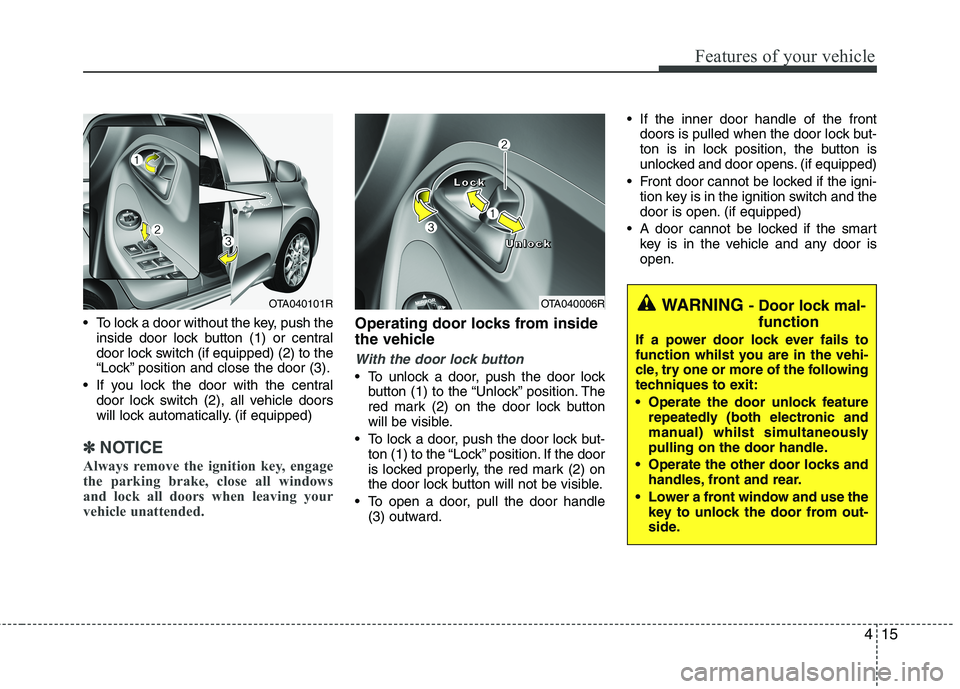
To lock a door without the key, push the
inside door lock button (1) or central
door lock switch (if equipped) (2
) to the
“Lock” position and close the door (3).
If you lock the door with the central
door lock switch (2), all vehicle doors
will lock automatically. (if equipped)
✽ ✽
NOTICE
Always remove the ignition key, engage
the parking brake, close all windows
and lock all doors when leaving your
vehicle unattended.
Operating door locks from inside
the vehicle
With the door lock button
To unlock a door, push the door lock
button (1) to the “Unlock” position. The
red mark (2) on the door lock button
will be visible.
To lock a door, push the door lock but-
ton (1) to the “Lock” position. If the door
is locked properly, the red mark (2) on
the door lock button will not be visible.
To open a door, pull the door handle
(3) outward. If the inner door handle of the front
doors is pulled when the door lock but-
ton is in lock position, the button is
unlocked and door opens. (if equipped)
Front door cannot be locked if the igni-
tion key is in the ignition switch and the
door is open. (if equipped)
A door cannot be locked if the smart
key is in the vehicle and any door is
open.
OTA040006R L L L L
o o o o
c c c c
k k k k
U U U U
n n n n
l l l l
o o o o
c c c c
k k k kWARNING - Door lock mal-
function
If a power door lock ever fails to
function whilst you are in the vehi-
cle, try one or more of the following
techniques to exit:
Operate the door unlock feature
repeatedly (both electronic and
manual) whilst simultaneously
pulling on the door handle.
Operate the other door locks and
handles, front and rear.
Lower a front window and use the
key to unlock the door from out-
side.
OTA040101R
Page 89 of 420
Features of your vehicle
16 4
With central door lock switch
(if equipped)
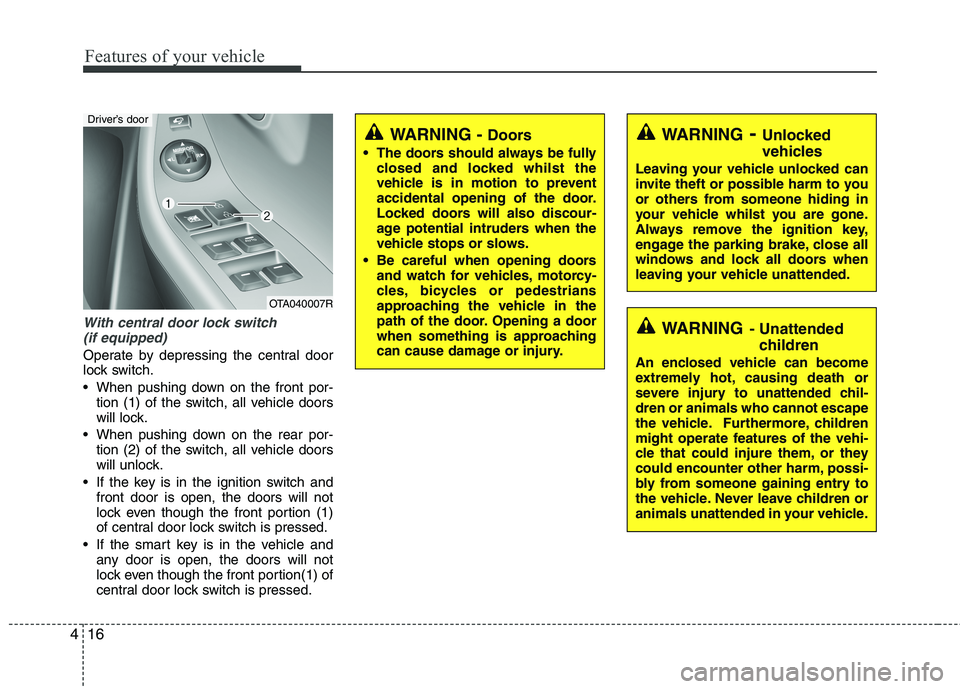
Operate by depressing the central door
lock switch.
When pushing down on the front por-
tion (1) of the switch, all vehicle doors
will lock.
When pushing down on the rear por-
tion (2) of the switch, all vehicle doors
will unlock.
If the key is in the ignition switch and
front door is open, the doors will not
lock even though the front portion (1)
of central door lock switch is pressed.
If the smart key is in the vehicle and
any door is open, the doors will not
lock even though the front portion(1) of
central door lock switch is pressed.
WARNING- Unlocked
vehicles
Leaving your vehicle unlocked can
invite theft or possible harm to you
or others from someone hiding in
your vehicle whilst you are gone.
Always remove the ignition key,
engage the parking brake, close all
windows and lock all doors when
leaving your vehicle unattended.
WARNING- Unattended
children
An enclosed vehicle can become
extremely hot, causing death or
severe injury to unattended chil-
dren or animals who cannot escape
the vehicle. Furthermore, children
might operate features of the vehi-
cle that could injure them, or they
could encounter other harm, possi-
bly from someone gaining entry to
the vehicle. Never leave children or
animals unattended in your vehicle.
WARNING - Doors
The doors should always be fully
closed and locked whilst the
vehicle is in motion to prevent
accidental opening of the door.
Locked doors will also discour-
age potential intruders when the
vehicle stops or slows.
Be careful when opening doors
and watch for vehicles, motorcy-
cles, bicycles or pedestrians
approaching the vehicle in the
path of the door. Opening a door
when something is approaching
can cause damage or injury.
OTA040007R
Driver’s door
Page 98 of 420
425
Features of your vehicle
Opening the bonnet
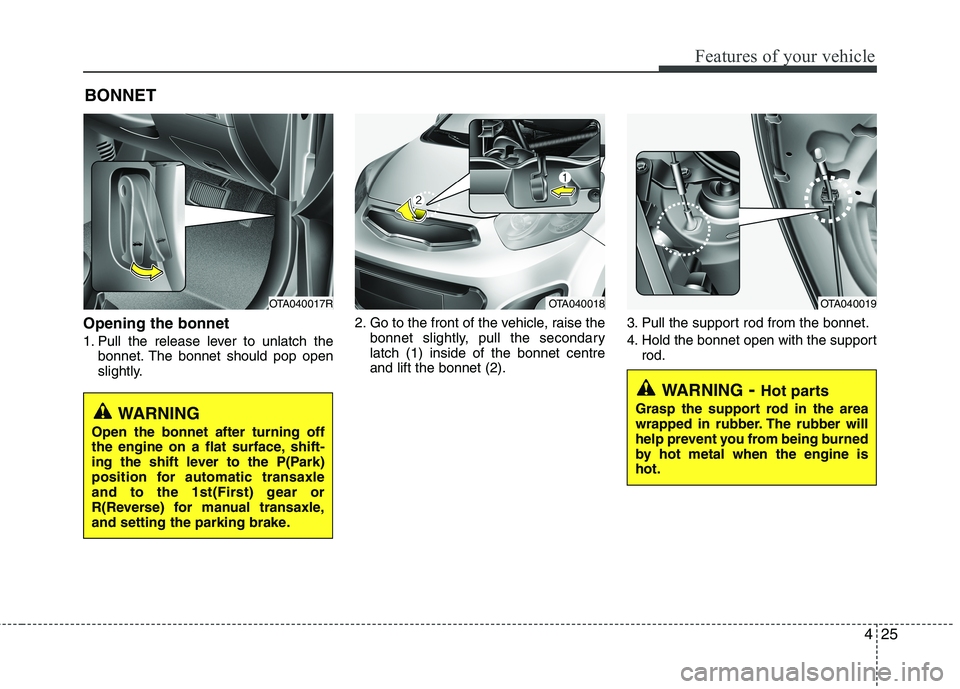
1. Pull the release lever to unlatch the
bonnet. The bonnet should pop open
slightly.2. Go to the front of the vehicle, raise the
bonnet slightly, pull the secondary
latch (1) inside of the bonnet centre
and lift the bonnet (2).3. Pull the support rod from the bonnet.
4. Hold the bonnet open with the support
rod.
BONNET
OTA040017ROTA040018OTA040019
WARNING- Hot parts
Grasp the support rod in the area
wrapped in rubber. The rubber will
help prevent you from being burned
by hot metal when the engine is
hot.WARNING
Open the bonnet after turning off
the engine on a flat surface, shift-
ing the shift lever to the P(Park)
position for automatic transaxle
and to the 1st(First) gear or
R(Reverse) for manual transaxle,
and setting the parking brake.
Page 115 of 420
Features of your vehicle
42 4
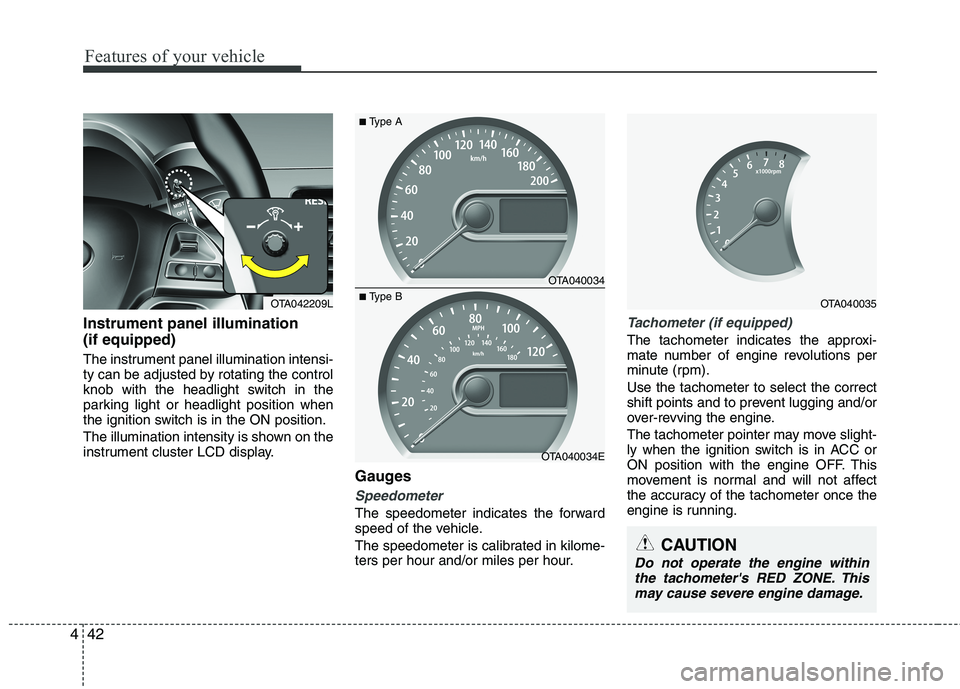
Instrument panel illumination
(if equipped)
The instrument panel illumination intensi-
ty can be adjusted by rotating the control
knob with the headlight switch in the
parking light or headlight position when
the ignition switch is in the ON position.
The illumination intensity is shown on the
instrument cluster LCD display.
Gauges
Speedometer
The speedometer indicates the forward
speed of the vehicle.
The speedometer is calibrated in kilome-
ters per hour and/or miles per hour.
Tachometer (if equipped)
The tachometer indicates the approxi-
mate number of engine revolutions per
minute (rpm).
Use the tachometer to select the correct
shift points and to prevent lugging and/or
over-revving the engine.
The tachometer pointer may move slight-
ly when the ignition switch is in ACC or
ON position with the engine OFF. This
movement is normal and will not affect
the accuracy of the tachometer once the
engine is running.
OTA040034
OTA040034E
■Type A
■Type BOTA040035
CAUTION
Do not operate the engine within
the tachometer's RED ZONE. This
may cause severe engine damage.
OTA042209L
Page 122 of 420
449
Features of your vehicle
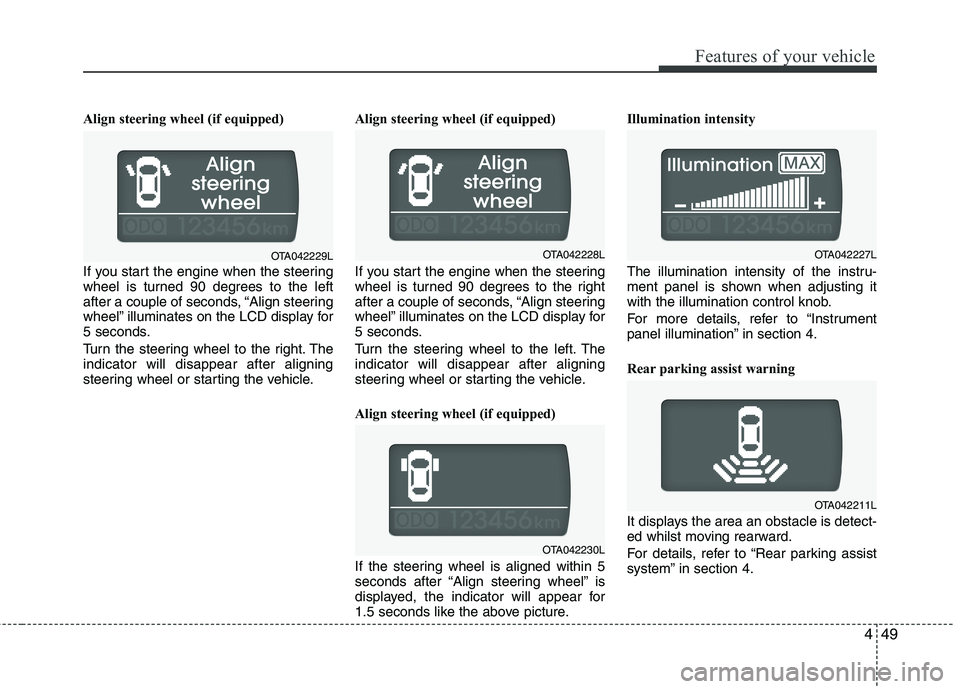
Align steering wheel (if equipped)
If you start the engine when the steering
wheel is turned 90 degrees to the left
after a couple of seconds, “Align steering
wheel” illuminates on the LCD display for
5 seconds.
Turn the steering wheel to the right. The
indicator will disappear after aligning
steering wheel or starting the vehicle.Align steering wheel (if equipped)
If you start the engine when the steering
wheel is turned 90 degrees to the right
after a couple of seconds, “Align steering
wheel” illuminates on the LCD display for
5 seconds.
Turn the steering wheel to the left. The
indicator will disappear after aligning
steering wheel or starting the vehicle.
Align steering wheel (if equipped)
If the steering wheel is aligned within 5
seconds after “Align steering wheel” is
displayed, the indicator will appear for
1.5 seconds like the above picture.Illumination intensity
The illumination intensity of the instru-
ment panel is shown when adjusting it
with the illumination control knob.
For more details, refer to “Instrument
panel illumination” in section 4.
Rear parking assist warning
It displays the area an obstacle is detect-
ed whilst moving rearward.
For details, refer to “Rear parking assist
system” in section 4.
OTA042230L
OTA042227LOTA042229LOTA042228L
OTA042211L
Page 127 of 420
Features of your vehicle
54 4
ECO
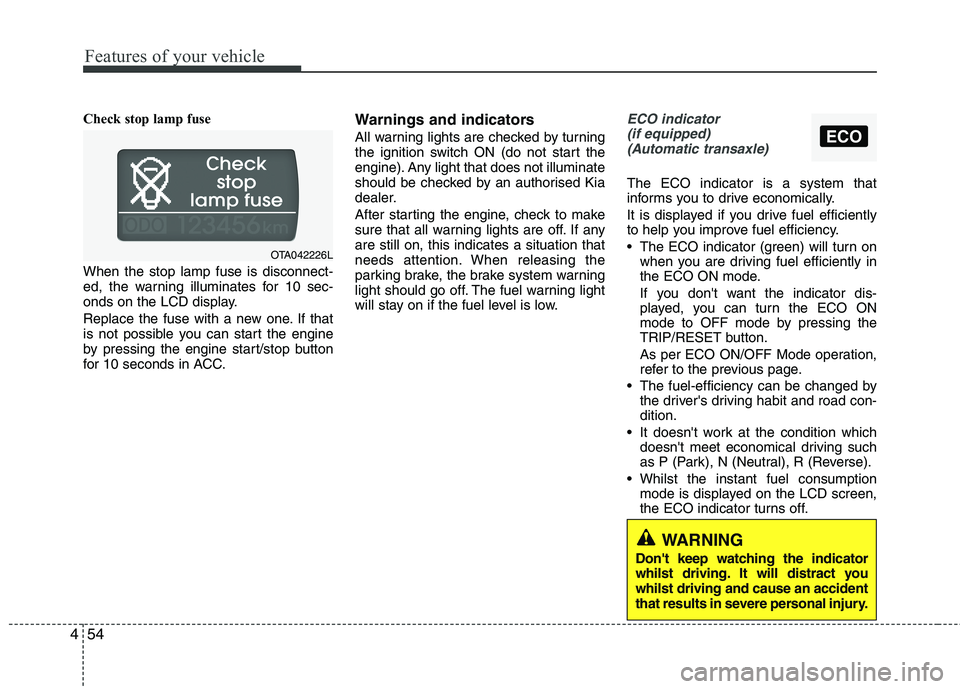
Check stop lamp fuse
When the stop lamp fuse is disconnect-
ed, the warning illuminates for 10 sec-
onds on the LCD display.
Replace the fuse with a new one. If that
is not possible you can start the engine
by pressing the engine start/stop button
for 10 seconds in ACC.Warnings and indicators
All warning lights are checked by turning
the ignition switch ON (do not start the
engine). Any light that does not illuminate
should be checked by an authorised Kia
dealer.
After starting the engine, check to make
sure that all warning lights are off. If any
are still on, this indicates a situation that
needs attention. When releasing the
parking brake, the brake system warning
light should go off. The fuel warning light
will stay on if the fuel level is low.
ECO indicator
(if equipped)
(Automatic transaxle)
The ECO indicator is a system that
informs you to drive economically.
It is displayed if you drive fuel efficiently
to help you improve fuel efficiency.
The ECO indicator (green) will turn on
when you are driving fuel efficiently in
the ECO ON mode.
If you don't want the indicator dis-
played, you can turn the ECO ON
mode to OFF mode by pressing the
TRIP/RESET button.
As per ECO ON/OFF Mode operation,
refer to the previous page.
The fuel-efficiency can be changed by
the driver's driving habit and road con-
dition.
It doesn't work at the condition which
doesn't meet economical driving such
as P (Park), N (Neutral), R (Reverse).
Whilst the instant fuel consumption
mode is displayed on the LCD screen,
the ECO indicator turns off.
OTA042226L
WARNING
Don't keep watching the indicator
whilst driving. It will distract you
whilst driving and cause an accident
that results in severe personal injury.