parking brake KIA MORNING 2015 Owners Manual
[x] Cancel search | Manufacturer: KIA, Model Year: 2015, Model line: MORNING, Model: KIA MORNING 2015Pages: 420, PDF Size: 42.6 MB
Page 8 of 420
15
Introduction
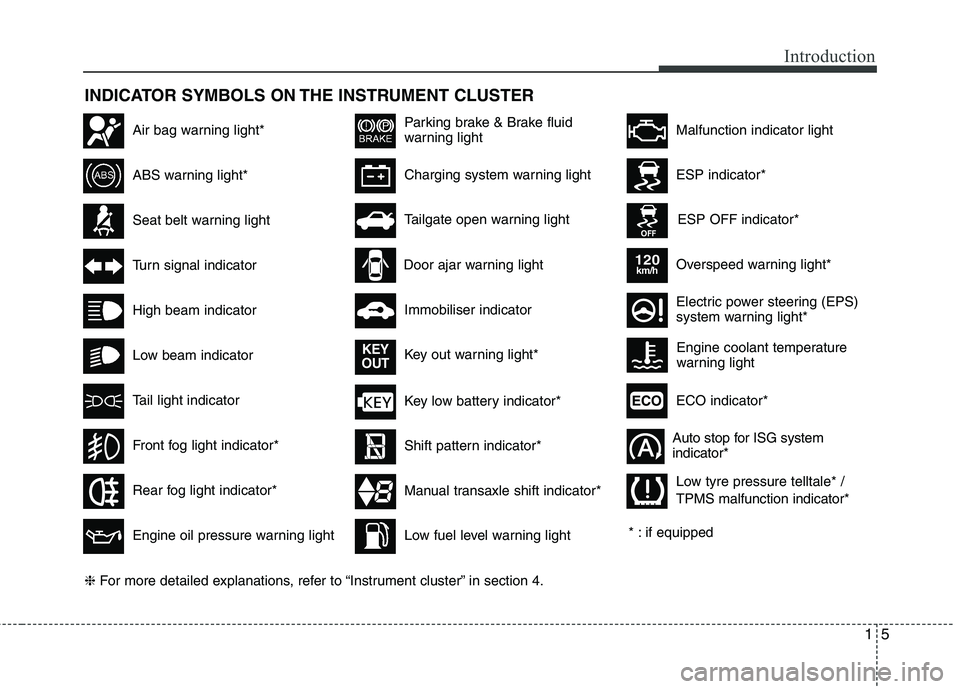
INDICATOR SYMBOLS ON THE INSTRUMENT CLUSTER
Seat belt warning light
High beam indicator
Turn signal indicator
ABS warning light*
Parking brake & Brake fluid
warning light
Engine oil pressure warning light
ESP indicator*
ESP OFF indicator*
Malfunction indicator lightAir bag warning light*
Immobiliser indicator
Low fuel level warning light* : if equipped
Charging system warning light
Overspeed warning light*
120km/h
Tail light indicator
Tailgate open warning light
Front fog light indicator*
Electric power steering (EPS)
system warning light*
Key low battery indicator*
Rear fog light indicator*
Door ajar warning light
Shift pattern indicator*
Manual transaxle shift indicator* Key out warning light*
KEY
OUT
ECO indicator*ECO
Auto stop for ISG system
indicator*
Low beam indicatorEngine coolant temperature
warning light
❈For more detailed explanations, refer to “Instrument cluster” in section 4.Low tyre pressure telltale* /
TPMS malfunction indicator*
Page 11 of 420
23
Your vehicle at a glance
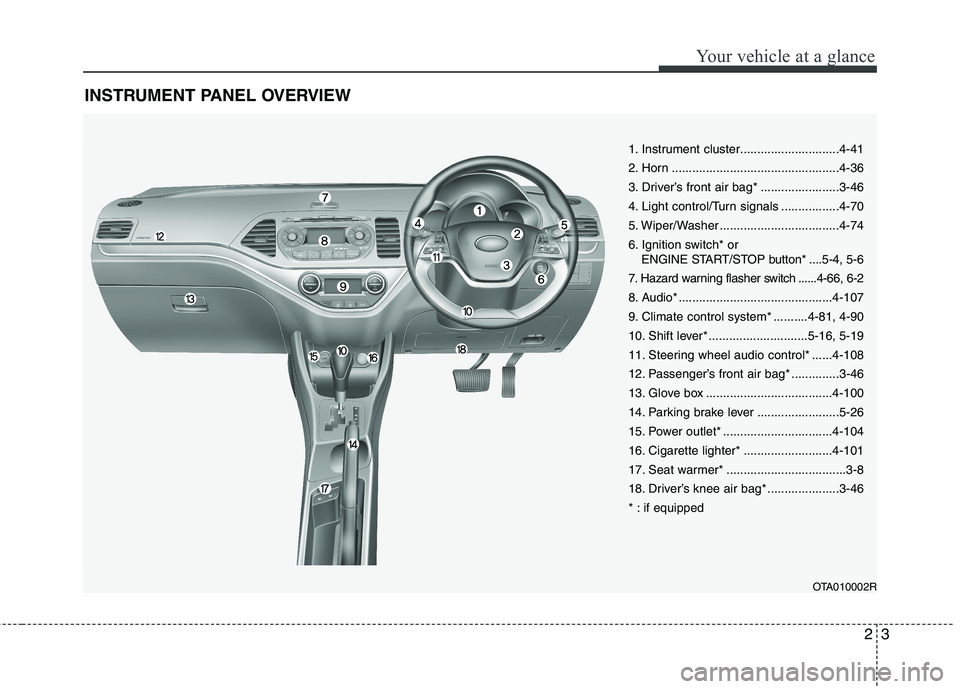
INSTRUMENT PANEL OVERVIEW
OTA010002R
1. Instrument cluster.............................4-41
2. Horn .................................................4-36
3. Driver’s front air bag* .......................3-46
4. Light control/Turn signals .................4-70
5. Wiper/Washer ...................................4-74
6. Ignition switch* or
ENGINE START/STOP button* ....5-4, 5-6
7. Hazard warning flasher switch ......4-66, 6-2
8. Audio* .............................................4-107
9. Climate control system* ..........4-81, 4-90
10. Shift lever* .............................5-16, 5-19
11. Steering wheel audio control* ......4-108
12. Passenger’s front air bag* ..............3-46
13. Glove box .....................................4-100
14. Parking brake lever ........................5-26
15. Power outlet* ................................4-104
16. Cigarette lighter* ..........................4-101
17. Seat warmer* ...................................3-8
18. Driver’s knee air bag* .....................3-46
* : if equipped
Page 27 of 420
315
Safety features of your vehicle
Seat belt restraint system
WARNING
For maximum restraint system
protection, the seat belts must
always be used whenever the car
is moving.
Seat belts are most effective
when seatbacks are in the
upright position.
Children age 12 and younger
must always be properly
restrained in the rear seat. Never
allow children to ride in the front
passenger seat. If a child over 12
must be seated in the front seat,
he/she must be properly belted
and the seat should be moved as
far back as possible.
Never wear the shoulder belt
under your arm or behind your
back. An improperly positioned
shoulder belt can cause serious
injuries in a crash. The shoulder
belt should be positioned midway
over your shoulder across your
collarbone.
(Continued)
WARNING
Seat belts are designed to bear
upon the bony structure of the
body, and should be worn low
across the front of the pelvis or the
pelvis, chest and shoulders, as
applicable; wearing the lap section
of the belt across the abdominal
area must be avoided.
Seat belts should be adjusted as
firmly as possible, consistent with
comfort, to provide the protection
for which they have been designed.
A slack belt will greatly reduce the
protection afforded to the wearer.
(Continued)
(Continued)
Avoid wearing twisted seat belts.
A twisted belt can't do its job as
well. In a collision, it could even
cut into you. Be sure the belt web-
bing is straight and not twisted.
Be careful not to damage the belt
webbing or hardware. If the belt
webbing or hardware is dam-
aged, replace it.CAUTION- Rear seat belts
When returning the rear seatbacks
to the upright position, remember
to return the rear shoulder belts to
their proper position.
WARNING - Cargo loading
Make sure the engine is off, the
automatic transaxle is in P (Park)
or the manual transaxle is in 1st,
and the parking brake is securely
applied whenever loading or
unloading cargo. Failure to take
these steps may allow the vehicle
to move if the shift lever is inadver-
tently moved to another position.
WARNING- Cargo
Cargo should always be secured to
prevent it from being thrown about
the vehicle in a collision and caus-
ing injury to the vehicle occupants.
Do not place objects in the rear
seats, since they cannot be proper-
ly secured and may hit the front
seat occupants in a collision.
SEAT BELTS
Page 88 of 420
415
Features of your vehicle
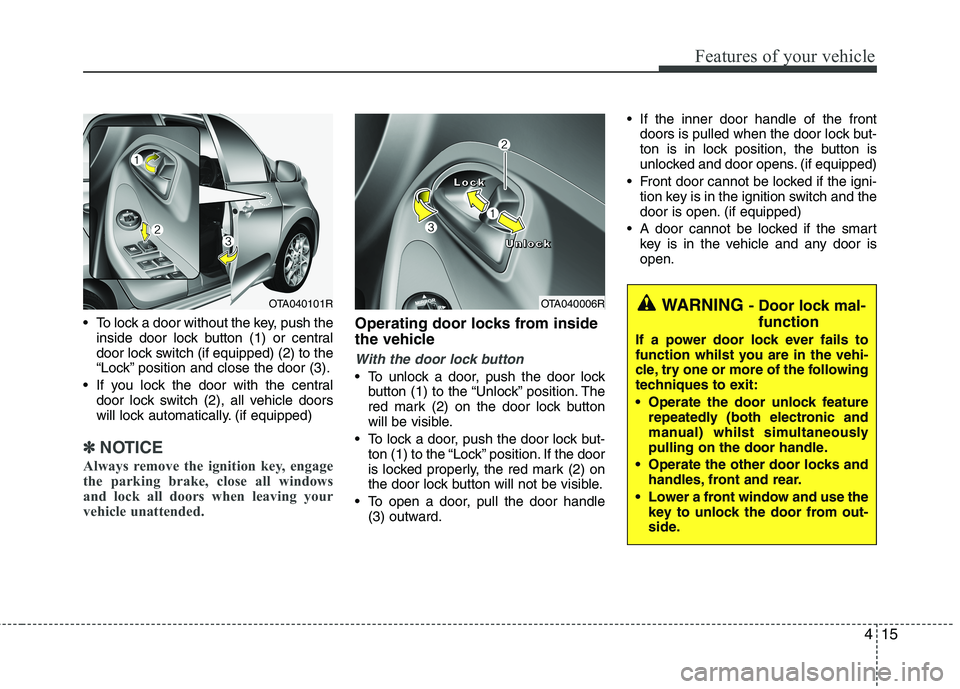
To lock a door without the key, push the
inside door lock button (1) or central
door lock switch (if equipped) (2
) to the
“Lock” position and close the door (3).
If you lock the door with the central
door lock switch (2), all vehicle doors
will lock automatically. (if equipped)
✽ ✽
NOTICE
Always remove the ignition key, engage
the parking brake, close all windows
and lock all doors when leaving your
vehicle unattended.
Operating door locks from inside
the vehicle
With the door lock button
To unlock a door, push the door lock
button (1) to the “Unlock” position. The
red mark (2) on the door lock button
will be visible.
To lock a door, push the door lock but-
ton (1) to the “Lock” position. If the door
is locked properly, the red mark (2) on
the door lock button will not be visible.
To open a door, pull the door handle
(3) outward. If the inner door handle of the front
doors is pulled when the door lock but-
ton is in lock position, the button is
unlocked and door opens. (if equipped)
Front door cannot be locked if the igni-
tion key is in the ignition switch and the
door is open. (if equipped)
A door cannot be locked if the smart
key is in the vehicle and any door is
open.
OTA040006R L L L L
o o o o
c c c c
k k k k
U U U U
n n n n
l l l l
o o o o
c c c c
k k k kWARNING - Door lock mal-
function
If a power door lock ever fails to
function whilst you are in the vehi-
cle, try one or more of the following
techniques to exit:
Operate the door unlock feature
repeatedly (both electronic and
manual) whilst simultaneously
pulling on the door handle.
Operate the other door locks and
handles, front and rear.
Lower a front window and use the
key to unlock the door from out-
side.
OTA040101R
Page 89 of 420
Features of your vehicle
16 4
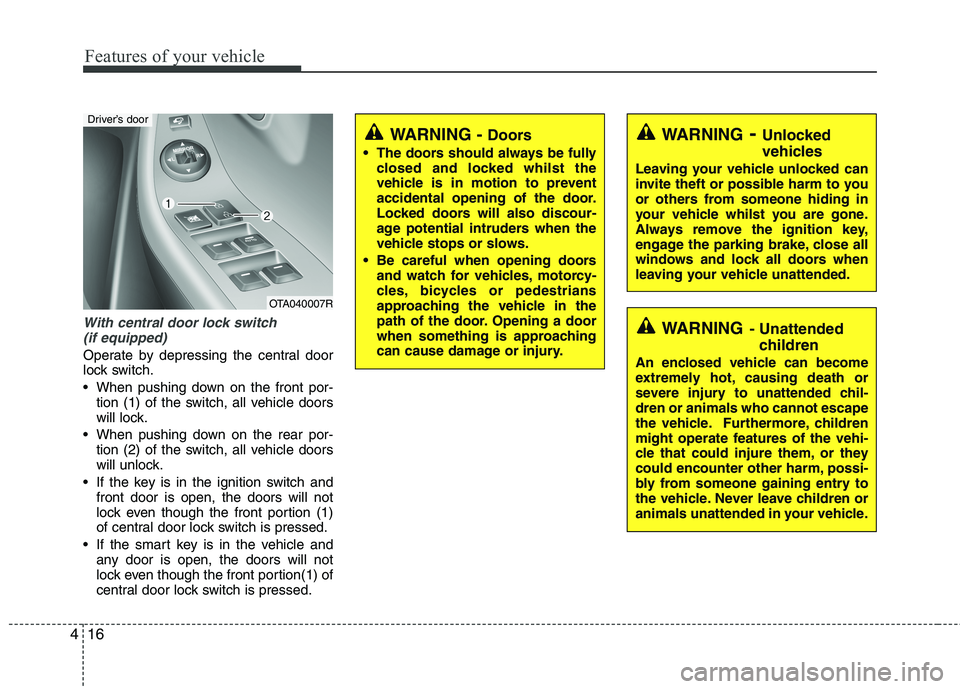
With central door lock switch
(if equipped)
Operate by depressing the central door
lock switch.
When pushing down on the front por-
tion (1) of the switch, all vehicle doors
will lock.
When pushing down on the rear por-
tion (2) of the switch, all vehicle doors
will unlock.
If the key is in the ignition switch and
front door is open, the doors will not
lock even though the front portion (1)
of central door lock switch is pressed.
If the smart key is in the vehicle and
any door is open, the doors will not
lock even though the front portion(1) of
central door lock switch is pressed.
WARNING- Unlocked
vehicles
Leaving your vehicle unlocked can
invite theft or possible harm to you
or others from someone hiding in
your vehicle whilst you are gone.
Always remove the ignition key,
engage the parking brake, close all
windows and lock all doors when
leaving your vehicle unattended.
WARNING- Unattended
children
An enclosed vehicle can become
extremely hot, causing death or
severe injury to unattended chil-
dren or animals who cannot escape
the vehicle. Furthermore, children
might operate features of the vehi-
cle that could injure them, or they
could encounter other harm, possi-
bly from someone gaining entry to
the vehicle. Never leave children or
animals unattended in your vehicle.
WARNING - Doors
The doors should always be fully
closed and locked whilst the
vehicle is in motion to prevent
accidental opening of the door.
Locked doors will also discour-
age potential intruders when the
vehicle stops or slows.
Be careful when opening doors
and watch for vehicles, motorcy-
cles, bicycles or pedestrians
approaching the vehicle in the
path of the door. Opening a door
when something is approaching
can cause damage or injury.
OTA040007R
Driver’s door
Page 98 of 420
425
Features of your vehicle
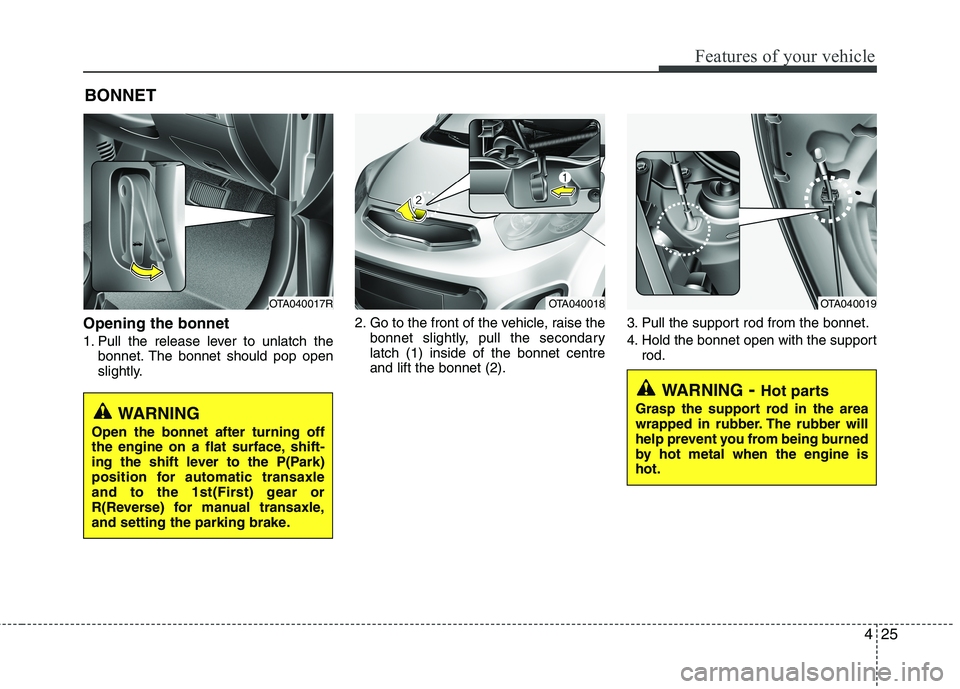
Opening the bonnet
1. Pull the release lever to unlatch the
bonnet. The bonnet should pop open
slightly.2. Go to the front of the vehicle, raise the
bonnet slightly, pull the secondary
latch (1) inside of the bonnet centre
and lift the bonnet (2).3. Pull the support rod from the bonnet.
4. Hold the bonnet open with the support
rod.
BONNET
OTA040017ROTA040018OTA040019
WARNING- Hot parts
Grasp the support rod in the area
wrapped in rubber. The rubber will
help prevent you from being burned
by hot metal when the engine is
hot.WARNING
Open the bonnet after turning off
the engine on a flat surface, shift-
ing the shift lever to the P(Park)
position for automatic transaxle
and to the 1st(First) gear or
R(Reverse) for manual transaxle,
and setting the parking brake.
Page 127 of 420
Features of your vehicle
54 4
ECO
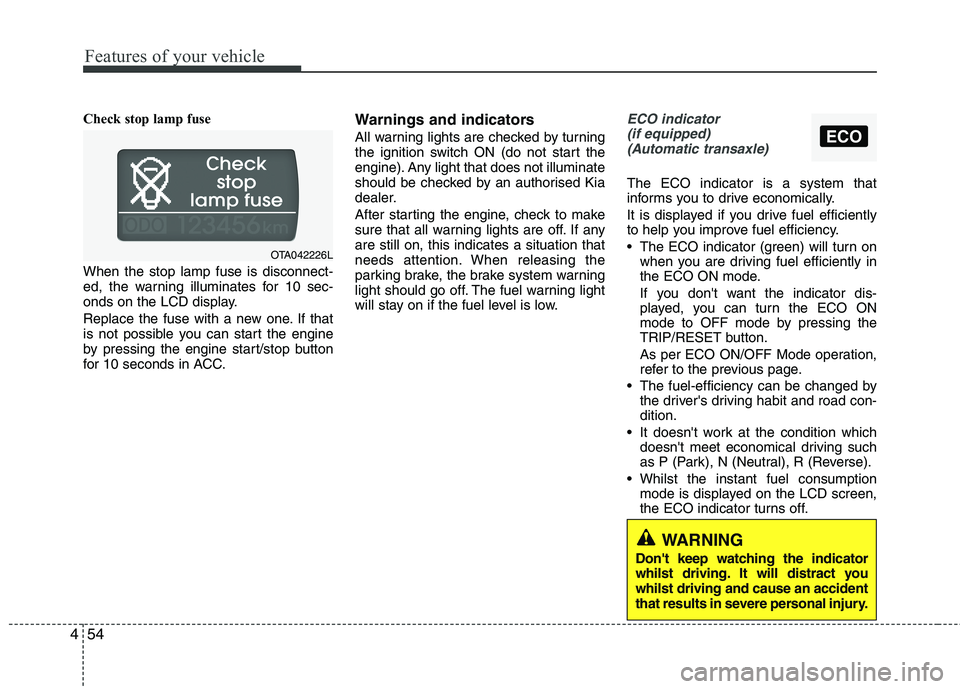
Check stop lamp fuse
When the stop lamp fuse is disconnect-
ed, the warning illuminates for 10 sec-
onds on the LCD display.
Replace the fuse with a new one. If that
is not possible you can start the engine
by pressing the engine start/stop button
for 10 seconds in ACC.Warnings and indicators
All warning lights are checked by turning
the ignition switch ON (do not start the
engine). Any light that does not illuminate
should be checked by an authorised Kia
dealer.
After starting the engine, check to make
sure that all warning lights are off. If any
are still on, this indicates a situation that
needs attention. When releasing the
parking brake, the brake system warning
light should go off. The fuel warning light
will stay on if the fuel level is low.
ECO indicator
(if equipped)
(Automatic transaxle)
The ECO indicator is a system that
informs you to drive economically.
It is displayed if you drive fuel efficiently
to help you improve fuel efficiency.
The ECO indicator (green) will turn on
when you are driving fuel efficiently in
the ECO ON mode.
If you don't want the indicator dis-
played, you can turn the ECO ON
mode to OFF mode by pressing the
TRIP/RESET button.
As per ECO ON/OFF Mode operation,
refer to the previous page.
The fuel-efficiency can be changed by
the driver's driving habit and road con-
dition.
It doesn't work at the condition which
doesn't meet economical driving such
as P (Park), N (Neutral), R (Reverse).
Whilst the instant fuel consumption
mode is displayed on the LCD screen,
the ECO indicator turns off.
OTA042226L
WARNING
Don't keep watching the indicator
whilst driving. It will distract you
whilst driving and cause an accident
that results in severe personal injury.
Page 129 of 420
Features of your vehicle
56 4
WARNING
Driving the vehicle with a warning
light on is dangerous. If the brake
warning light remains on, have the
brakes checked and repaired imme-
diately by an authorised Kia dealer.
Parking brake & brake
fluid warning light
Parking brake warning
This warning light is illuminated when the
parking brake is applied with the ignition
switch in the START or ON position. The
warning light should go off when the
parking brake is released whilst the
engine is running.
Low brake fluid level warning
If the warning light remains on, it may
indicate that the brake fluid level in the
reservoir is low.
If the warning light remains on:
1. Drive carefully to the nearest safe
location and stop your vehicle.
2. With the engine stopped, check the
brake fluid level immediately and add
fluid as required. Then check all brake
components for fluid leaks.
3. Do not drive the vehicle if leaks are
found, the warning light remains on or
the brakes do not operate properly.
Have the vehicle towed to any autho-
rised Kia dealer for a brake system
inspection and necessary repairs.Your vehicle is equipped with dual-diago-
nal braking systems. This means you still
have braking on two wheels even if one
of the dual systems should fail. With only
one of the dual systems working, more
than normal pedal travel and greater
pedal pressure are required to stop the
car. Also, the car will not stop in as short
a distance with only a portion of the
brake system working. If the brakes fail
whilst you are driving, shift to a lower
gear for additional engine braking and
stop the car as soon as it is safe to do so.
To check bulb operation, check whether
the parking brake and brake fluid warning
light illuminates when the ignition switch
is in the ON position.
Seat belt warning and
chime (if equipped)
Seat belt warning light
As a reminder to the driver, the seat belt
warning light will blink or illuminate for
approximately 6 seconds each time you
turn the ignition switch ON regardless of
belt fastening.
For details, refer to the seat belt on chap-
ter 3.
Turn signal indicator
The blinking green arrows on the instru-
ment panel show the direction indicated
by the turn signals. If the arrow comes on
but does not blink, blinks more rapidly
than normal, or does not illuminate at all,
a malfunction in the turn signal system is
indicated. Your dealer should be consult-
ed for repairs.
Page 135 of 420
Features of your vehicle
62 4
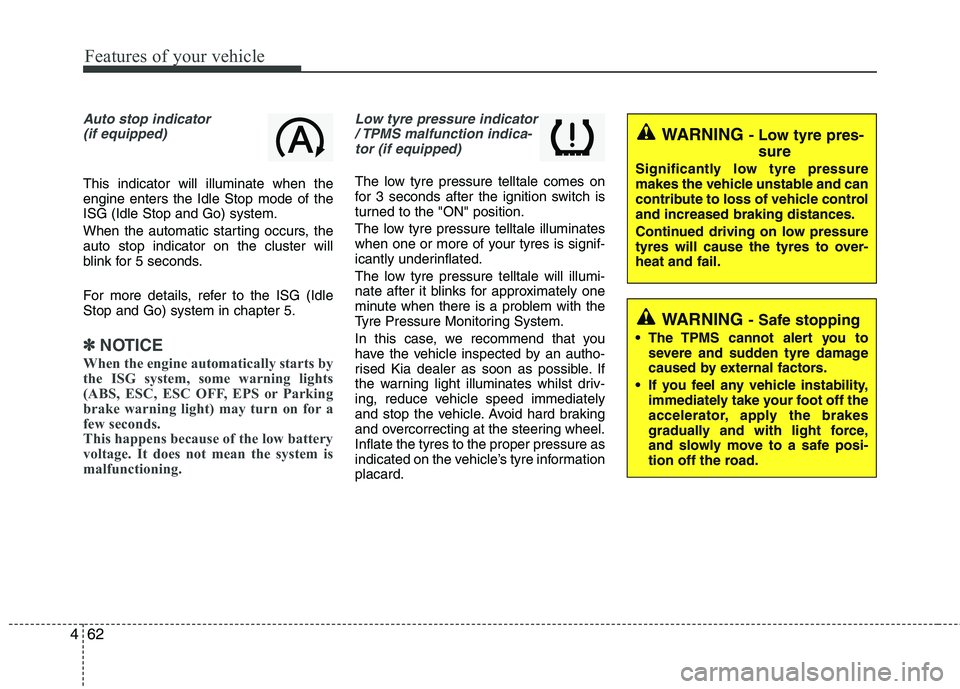
Auto stop indicator
(if equipped)
This indicator will illuminate when the
engine enters the Idle Stop mode of the
ISG (Idle Stop and Go) system.
When the automatic starting occurs, the
auto stop indicator on the cluster will
blink for 5 seconds.
For more details, refer to the ISG (Idle
Stop and Go) system in chapter 5.
✽ ✽
NOTICE
When the engine automatically starts by
the ISG system, some warning lights
(ABS, ESC, ESC OFF, EPS or Parking
brake warning light) may turn on for a
few seconds.
This happens because of the low battery
voltage. It does not mean the system is
malfunctioning.
Low tyre pressure indicator
/ TPMS malfunction indica-
tor (if equipped)
The low tyre pressure telltale comes on
for 3 seconds after the ignition switch is
turned to the "ON" position.
The low tyre pressure telltale illuminates
when one or more of your tyres is signif-
icantly underinflated.
The low tyre pressure telltale will illumi-
nate after it blinks for approximately one
minute when there is a problem with the
Tyre Pressure Monitoring System.
In this case, we recommend that you
have the vehicle inspected by an autho-
rised Kia dealer as soon as possible. If
the warning light illuminates whilst driv-
ing, reduce vehicle speed immediately
and stop the vehicle. Avoid hard braking
and overcorrecting at the steering wheel.
Inflate the tyres to the proper pressure as
indicated on the vehicle’s tyre information
placard.
WARNING - Low tyre pres-
sure
Significantly low tyre pressure
makes the vehicle unstable and can
contribute to loss of vehicle control
and increased braking distances.
Continued driving on low pressure
tyres will cause the tyres to over-
heat and fail.
WARNING - Safe stopping
The TPMS cannot alert you to
severe and sudden tyre damage
caused by external factors.
If you feel any vehicle instability,
immediately take your foot off the
accelerator, apply the brakes
gradually and with light force,
and slowly move to a safe posi-
tion off the road.
Page 137 of 420
Features of your vehicle
64 4
Non-operational conditions of
rear parking assist system
The rear parking assist system may
not operate properly when:
1. Moisture is frozen to the sensor. (It will
operate normally when the moisture
has been cleared.)
2. The sensor is covered with foreign
matter, such as snow or water, or the
sensor cover is blocked. (It will operate
normally when the material is removed
or the sensor is no longer blocked.)
3. Driving on uneven road surfaces
(unpaved roads, gravel, bumps, gradi-
ent).
4. Objects generating excessive noise
(vehicle horns, loud motorcycle
engines, or truck air brakes) are within
range of the sensor.
5. Heavy rain or water spray exists.
6. Wireless transmitters or mobile phones
are within range of the sensor.
7. The sensor is covered with snow.
8. Trailer towingThe detecting range may decrease
when:
1. The sensor is stained with foreign mat-
ter such as snow or water. (The sens-
ing range will return to normal when
removed.)
2. Outside air temperature is extremely
hot or cold.
The following objects may not be rec-
ognized by the sensor:
1. Sharp or slim objects such as ropes,
chains or small poles.
2. Objects which tend to absorb the sen-
sor frequency such as clothes, spongy
material or snow.
3. Undetectable objects smaller than 1 m
(40 in.) in height and narrower than 14
cm (6 in.) in diameter.
Rear parking assist system pre-
cautions
The rear parking assist system may
not sound sequentially depending on
the speed and shapes of the objects
detected.
The rear parking assist system may
malfunction if the vehicle bumper
height or sensor installation has been
modified or damaged. Any non-factory
installed equipment or accessories
may also interfere with the sensor per-
formance.
The sensor may not recognize objects
less than 40 cm (15 in.) from the sen-
sor, or it may sense an incorrect dis-
tance. Use caution.
When the sensor is frozen or stained
with snow, dirt, or water, the sensor
may be inoperative until the stains are
removed using a soft cloth.
Do not push, scratch or strike the sen-
sor. Sensor damage could occur.