reset KIA NIRO 2017 Features and Functions Guide
[x] Cancel search | Manufacturer: KIA, Model Year: 2017, Model line: NIRO, Model: KIA NIRO 2017Pages: 54, PDF Size: 5.21 MB
Page 9 of 54
7*IF EQUIPPED ALWAYS CHECK THE OWNER’S MANUAL FOR COMPLETE OPER ATING INFORMATION AND SAFET Y WARNINGS .
Trip Information / Trip Computer
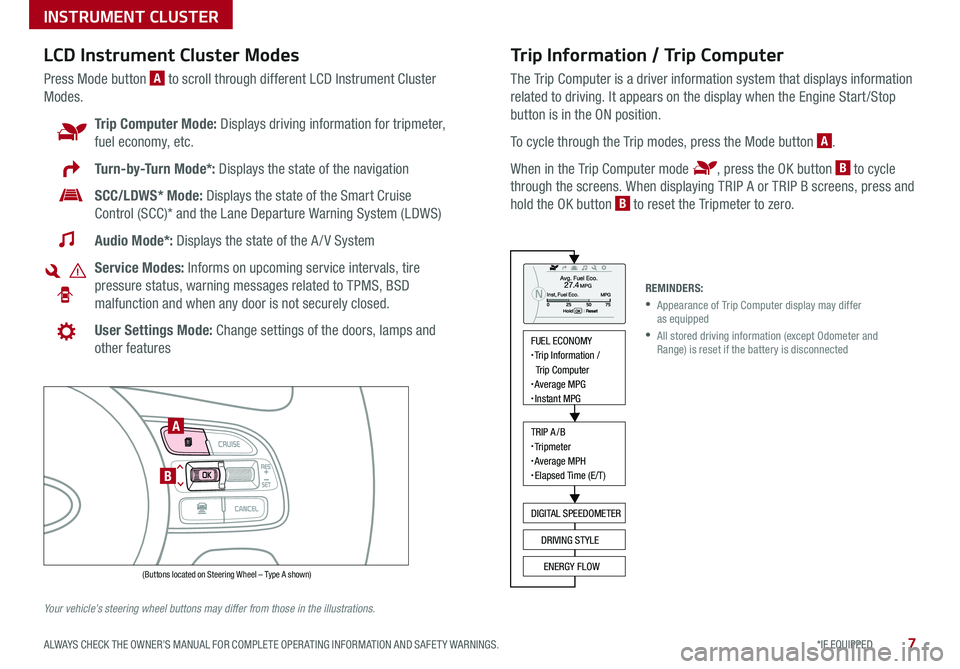
The Trip Computer is a driver information system that displays information
related to driving . It appears on the display when the Engine Start /Stop
button is in the ON position .
To cycle through the Trip modes, press the Mode button A .
When in the Trip Computer mode , press the OK button B to cycle
through the screens . When displaying TRIP A or TRIP B screens, press and
hold the OK button B to reset the Tripmeter to zero .
LCD Instrument Cluster Modes
Press Mode button A to scroll through different LCD Instrument Cluster
Modes .
Trip Computer Mode: Displays driving information for tripmeter,
fuel economy, etc .
Turn-by-Turn Mode*: Displays the state of the navigation
SCC/LDWS* Mode: Displays the state of the Smart Cruise
Control (SCC)* and the Lane Departure Warning System (LDWS)
Audio Mode*: Displays the state of the A / V System
Service Modes: Informs on upcoming service intervals, tire
pressure status, warning messages related to TPMS, BSD
malfunction and when any door is not securely closed .
User Settings Mode: Change settings of the doors, lamps and
other features
Your vehicle’s steering wheel buttons may differ from those in the illustrations.
REMINDERS:
•
Appearance of Trip Computer display may differ as equipped
•
All stored driving information (except Odometer and Range) is reset if the battery is disconnected
INSTRUMENT CLUSTER
MODE
RES
CRUISE
CAN CELOKSET
MODE
RES
CRUISE
CAN CELOKSET
MODE
FUEL ECONOMY• Trip Information /
Trip Computer
• Average MPG• Instant MPG
TRIP A/B• Tripmeter• Average MPH• Elapsed Time (E/T)
DIGITAL SPEEDOMETER
DRIVING STYLE
ENERGY FLOW(Buttons located on Steering Wheel – Type A shown)
A
B
Page 11 of 54
9*IF EQUIPPED ALWAYS CHECK THE OWNER’S MANUAL FOR COMPLETE OPER ATING INFORMATION AND SAFET Y WARNINGS .
Service Mode
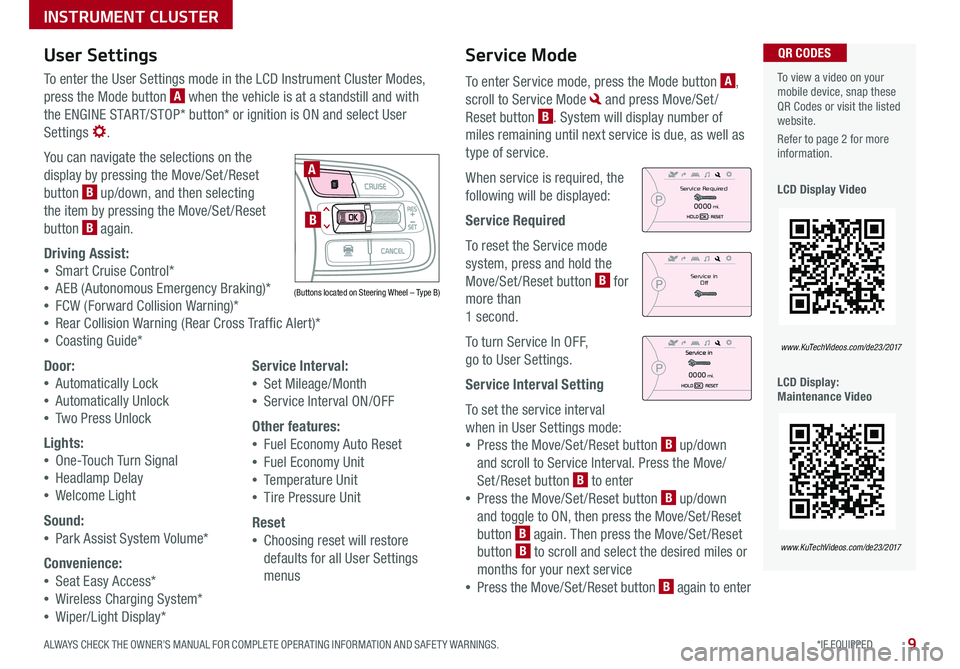
To enter Service mode, press the Mode button A,
scroll to Service Mode and press Move/Set /
Reset button B . System will display number of
miles remaining until next service is due, as well as
type of service .
When service is required, the
following will be displayed:
Service Required
To reset the Service mode
system, press and hold the
Move/Set /Reset button B for
more than
1 second .
To turn Service In OFF,
go to User Settings .
Service Interval Setting
To set the service interval
when in User Settings mode:
•Press the Move/Set /Reset button B up/down
and scroll to Service Interval . Press the Move/
Set/Reset button B to enter
•Press the Move/Set /Reset button B up/down
and toggle to ON, then press the Move/Set /Reset
button B again . Then press the Move/Set /Reset
button B to scroll and select the desired miles or
months for your next service
•Press the Move/Set /Reset button B again to enter
User Settings
To enter the User Settings mode in the LCD Instrument Cluster Modes,
press the Mode button A when the vehicle is at a standstill and with
the ENGINE START/STOP* button* or ignition is ON and select User
Settings .
You can navigate the selections on the
display by pressing the Move/Set /Reset
button B up/down, and then selecting
the item by pressing the Move/Set /Reset
button B again .
Driving Assist:
•Smart Cruise Control*
•AEB (Autonomous Emergency Braking)*
•FCW (Forward Collision Warning)*
•Rear Collision Warning (Rear Cross Traffic Alert)*
•Coasting Guide*
Door:
•Automatically Lock
•Automatically Unlock
•Two Press Unlock
Lights:
•One-Touch Turn Signal
•Headlamp Delay
•Welcome Light
Sound:
•Park Assist System Volume*
Convenience:
•Seat Easy Access*
•Wireless Charging System*
•Wiper/Light Display*
Service Interval:
•Set Mileage/Month
•Service Interval ON/OFF
Other features:
•Fuel Economy Auto Reset
•Fuel Economy Unit
•Temperature Unit
•Tire Pressure Unit
Reset
•Choosing reset will restore
defaults for all User Settings
menus
To view a video on your mobile device, snap these QR Codes or visit the listed website .
Refer to page 2 for more information .
LCD Display Video
LCD Display: Maintenance Video
QR CODES
www.KuTechVideos.com/de23/2017
www.KuTechVideos.com/de23/2017
(Buttons located on Steering Wheel – Type B)
MODE
RES
CRUISE
CAN CELOKSET
MODE
RES
CRUISE
CAN CELOKSET
MODE
A
B
Service in
Off
Service Required
0000mi.
0000mi.
INSTRUMENT CLUSTER
Page 13 of 54
11*IF EQUIPPED ALWAYS CHECK THE OWNER’S MANUAL FOR COMPLETE OPER ATING INFORMATION AND SAFET Y WARNINGS .
UVO eServices with Premium Navigation Display*
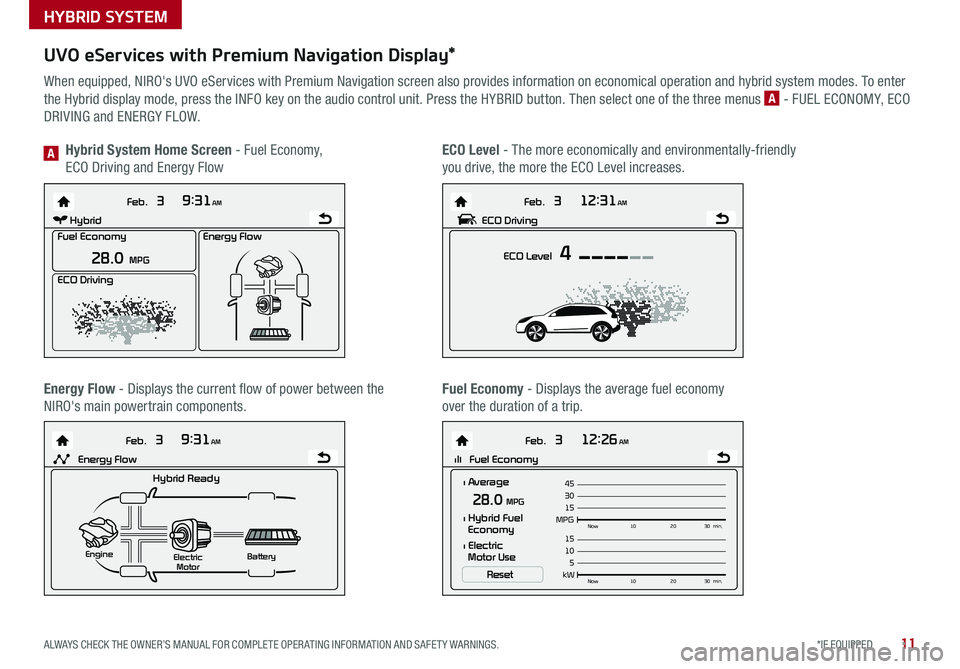
When equipped, NIRO's UVO eServices with Premium Navigation screen also provides information on economical operation and hybrid system modes . To enter
the Hybrid display mode, press the INFO key on the audio control unit . Press the HYBRID button . Then select one of the three menus A - FUEL ECONOMY, ECO
DRIVING and ENERGY FLOW .
Energy Flow - Displays the current flow of power between the
NIRO's main powertrain components .
ECO Level - The more economically and environmentally-friendly
you drive, the more the ECO Level increases .
Hybrid System Home Screen - Fuel Economy,
ECO Driving and Energy FlowA
Fuel Economy - Displays the average fuel economy
over the duration of a trip .
Energy Flow
28.0 MPG
Feb. 3
9:31AM
Fuel Economy
ECO Driving
Feb. 3
12:26AM
lll Fuel Economy
Feb. 3
12:31AM
ECO Level 4
Feb. 3
9:31AM
Hybrid Ready
Electric
Motor Battery
l Average
MPG15Now
102030 min.
30 4528.0 MPG
Reset
l Hybrid Fuel
Economy
l Electric
Motor Use
ECO DrivingHybrid
kW 5Now
102030 min.
10 15Engine
Energy Flow
Energy Flow
28.0 MPG
Feb. 3
9:31AM
Fuel Economy
ECO Driving
Feb. 3
12:26AM
lll Fuel Economy
Feb. 3
12:31AM
ECO Level 4
Feb. 3
9:31AM
Hybrid Ready
Electric
Motor Battery
l Average
MPG15Now
102030 min.
30 4528.0 MPG
Reset
l Hybrid Fuel
Economy
l Electric
Motor Use
ECO Driving
Hybrid
kW 5Now
102030 min.
10
15Engine
Energy Flow
Energy Flow
28.0 MPG
Feb. 3
9:31AM
Fuel Economy
ECO Driving
Feb. 3
12:26AM
lll Fuel Economy
Feb. 3
12:31AM
ECO Level 4
Feb. 3
9:31AM
Hybrid Ready
Electric
Motor Battery
l Average
MPG15Now
102030 min.
30
4528.0 MPG
Reset
l Hybrid Fuel
Economy
l Electric
Motor Use
ECO DrivingHybrid
kW 5Now
102030 min.
10
15Engine
Energy Flow
HYBRID SYSTEM
Page 16 of 54
NIRO FEATURES & FUNCTIONS GUIDE14*IF EQUIPPED
Emergency Starting
Before Jump Starting:
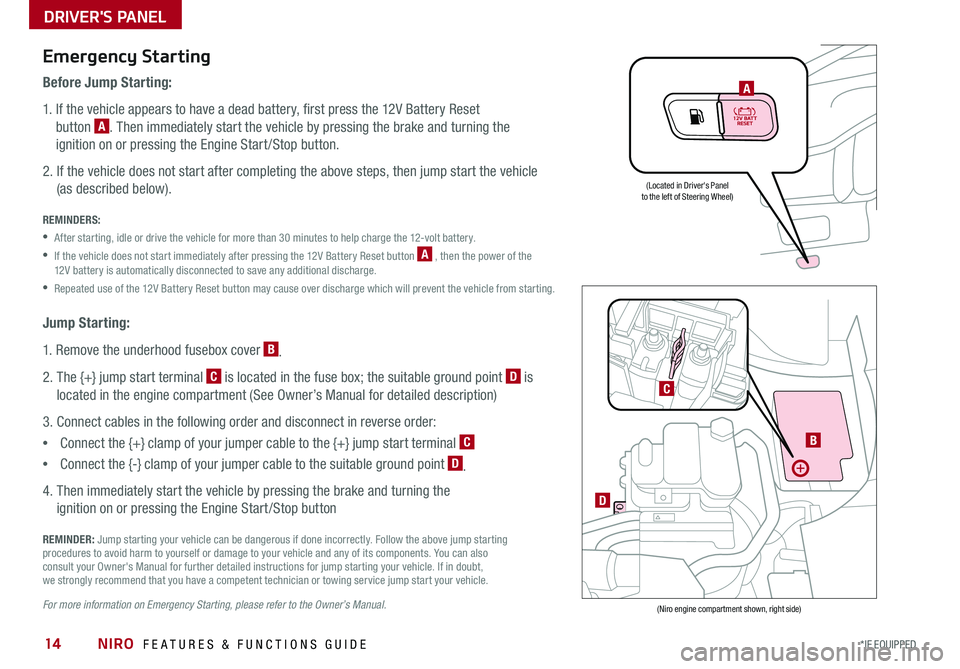
1 . If the vehicle appears to have a dead battery, first press the 12V Battery Reset
button A . Then immediately start the vehicle by pressing the brake and turning the
ignition on or pressing the Engine Start /Stop button .
2 . If the vehicle does not start after completing the above steps, then jump start the vehicle
(as described below) .
REMINDERS:
•After starting, idle or drive the vehicle for more than 30 minutes to help charge the 12-volt battery .
•
If the vehicle does not start immediately after pressing the 12V Battery Reset button A , then the power of the 12V battery is automatically disconnected to save any additional discharge .
•Repeated use of the 12V Battery Reset button may cause over discharge which will prevent the vehicle from starting .
Jump Starting:
1 . Remove the underhood fusebox cover B .
2 . The {+} jump start terminal C is located in the fuse box; the suitable ground point D is
located in the engine compartment (See Owner’s Manual for detailed description)
3 . Connect cables in the following order and disconnect in reverse order:
•Connect the {+} clamp of your jumper cable to the {+} jump start terminal C
•Connect the {-} clamp of your jumper cable to the suitable ground point D .
4 . Then immediately start the vehicle by pressing the brake and turning the
ignition on or pressing the Engine Start /Stop button
REMINDER: Jump starting your vehicle can be dangerous if done incorrectly . Follow the above jump starting procedures to avoid harm to yourself or damage to your vehicle and any of its components . You can also consult your Owner's Manual for further detailed instructions for jump starting your vehicle . If in doubt, we strongly recommend that you have a competent technician or towing service jump start your vehicle .
For more information on Emergency Starting, please refer to the Owner’s Manual.
A
(Located in Driver's Panelto the left of Steering Wheel)
(Niro engine compartment shown, right side)
DRIVER'S PANEL
B
D
C
Page 26 of 54
NIRO FEATURES & FUNCTIONS GUIDE24*IF EQUIPPED
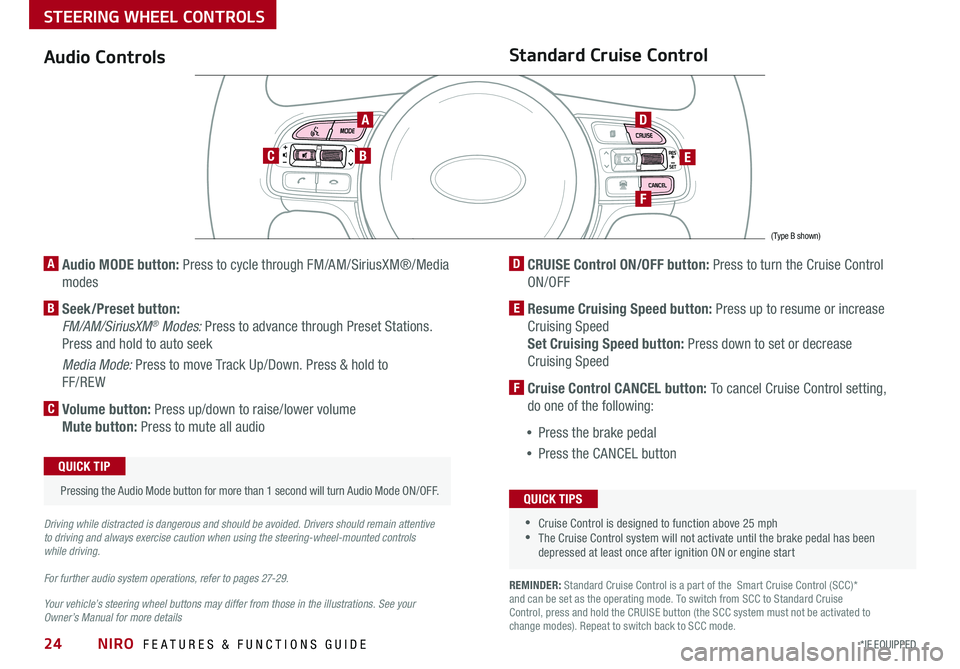
Audio Controls
AD
E
F
CB
Standard Cruise Control
A Audio MODE button: Press to cycle through FM/AM/SiriusXM®/Media
modes
B Seek/Preset button:
FM/AM/SiriusXM® Modes: Press to advance through Preset Stations .
Press and hold to auto seek
Media Mode: Press to move Track Up/Down . Press & hold to
FF/REW
C Volume button: Press up/down to raise/lower volume
Mute button: Press to mute all audio
D CRUISE Control ON/OFF button: Press to turn the Cruise Control
ON/OFF
E Resume Cruising Speed button: Press up to resume or increase
Cruising Speed
Set Cruising Speed button: Press down to set or decrease
Cruising Speed
F Cruise Control CANCEL button: To cancel Cruise Control setting,
do one of the following:
•Press the brake pedal
•Press the CANCEL button
•Cruise Control is designed to function above 25 mph •The Cruise Control system will not activate until the brake pedal has been depressed at least once after ignition ON or engine start
QUICK TIPS
Your vehicle’s steering wheel buttons may differ from those in the illustrations. See your Owner’s Manual for more details
Driving while distracted is dangerous and should be avoided. Drivers should remain attentive to driving and always exercise caution when using the steering-wheel-mounted controls while driving.
For further audio system operations, refer to pages 27-2 9 .
Pressing the Audio Mode button for more than 1 second will turn Audio Mode ON/OFF .
QUICK TIP
(Type B shown)
REMINDER: Standard Cruise Control is a part of the Smart Cruise Control (SCC)* and can be set as the operating mode . To switch from SCC to Standard Cruise Control, press and hold the CRUISE button (the SCC system must not be activated to change modes) . Repeat to switch back to SCC mode .
STEERING WHEEL CONTROLS
Page 27 of 54
25*IF EQUIPPED ALWAYS CHECK THE OWNER’S MANUAL FOR COMPLETE OPER ATING INFORMATION AND SAFET Y WARNINGS .
(Type B shown)
(Actual screen on vehicle may vary)
STEERING WHEEL CONTROLS
To change the Cruise Control mode from SCC to standard Cruise Control, press and hold button A . Repeat to switch modes again ( The SCC system must not be activated to change modes) .
For the SCC System to operate, you must be traveling at a minimum speed of 20 mph, when no vehicle is in front .
The Smart Cruise Control System (SCC) is deactivated when driving under the speed of 6 .0 mph
When following a vehicle, the system will automatically adjust your cruise speed based on the vehicle in front .
Smart Cruise Control (SCC)*
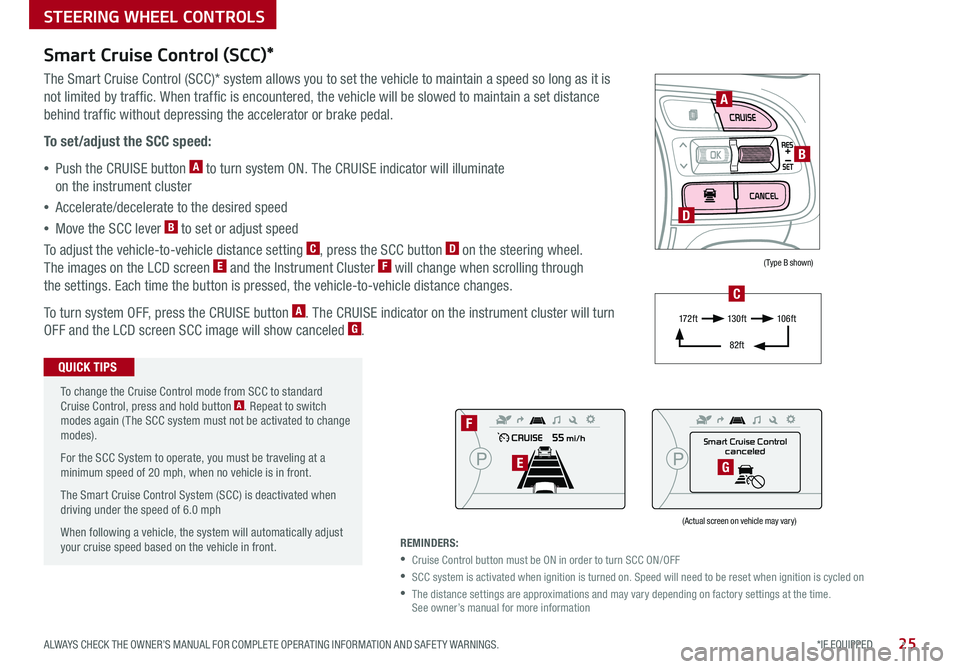
The Smart Cruise Control (SCC)* system allows you to set the vehicle to maintain a speed so long as it is
not limited by traffic . When traffic is encountered, the vehicle will be slowed to maintain a set distance
behind traffic without depressing the accelerator or brake pedal .
To set/adjust the SCC speed:
•Push the CRUISE button A to turn system ON . The CRUISE indicator will illuminate
on the instrument cluster
•Accelerate/decelerate to the desired speed
•Move the SCC lever B to set or adjust speed
To adjust the vehicle-to-vehicle distance setting C, press the SCC button D on the steering wheel .
The images on the LCD screen E and the Instrument Cluster F will change when scrolling through
the settings . Each time the button is pressed, the vehicle-to-vehicle distance changes .
To turn system OFF, press the CRUISE button A . The CRUISE indicator on the instrument cluster will turn
OFF and the LCD screen SCC image will show canceled G .
QUICK TIPS
REMINDERS:
•Cruise Control button must be ON in order to turn SCC ON/OFF
•SCC system is activated when ignition is turned on . Speed will need to be reset when ignition is cycled on
•
The distance settings are approximations and may vary depending on factory settings at the time . See owner’s manual for more information
A
B
D
Smart Cruise Control
canceled
F
EG
17 2 f t13 0 f t
82ft
10 6 f t
C