open hood KIA NIRO 2017 Owners Manual
[x] Cancel search | Manufacturer: KIA, Model Year: 2017, Model line: NIRO, Model: KIA NIRO 2017Pages: 552, PDF Size: 14.92 MB
Page 34 of 552
Your vehicle at a glance
42
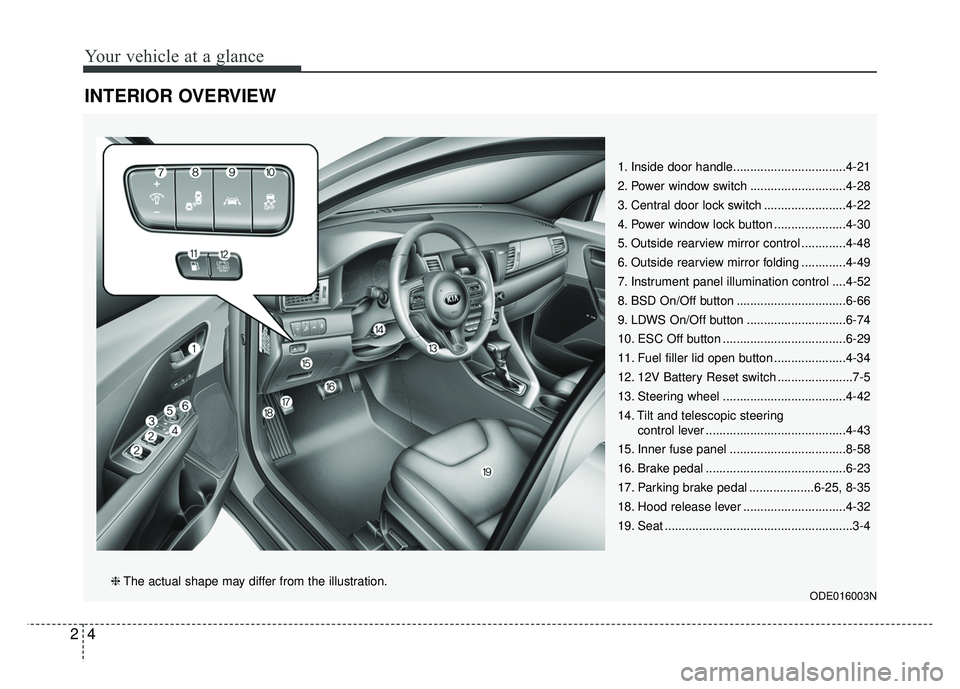
INTERIOR OVERVIEW
1. Inside door handle.................................4-21
2. Power window switch ............................4-28
3. Central door lock switch ........................4-22
4. Power window lock button .....................4-30
5. Outside rearview mirror control .............4-48
6. Outside rearview mirror folding .............4-49
7. Instrument panel illumination control ....4-52
8. BSD On/Off button ................................6-66
9. LDWS On/Off button .............................6-74
10. ESC Off button ....................................6-29
11. Fuel filler lid open button .....................4-34
12. 12V Battery Reset switch ......................7-5
13. Steering wheel ....................................4-42
14. Tilt and telescopic steeringcontrol lever .........................................4-43
15. Inner fuse panel ..................................8-58
16. Brake pedal .........................................6-23
17. Parking brake pedal ...................6-25, 8-35
18. Hood release lever ..............................4-32
19. Seat .......................................................3-4
ODE016003N❈ The actual shape may differ from the illustration.
Page 120 of 552
417
Features of your vehicle
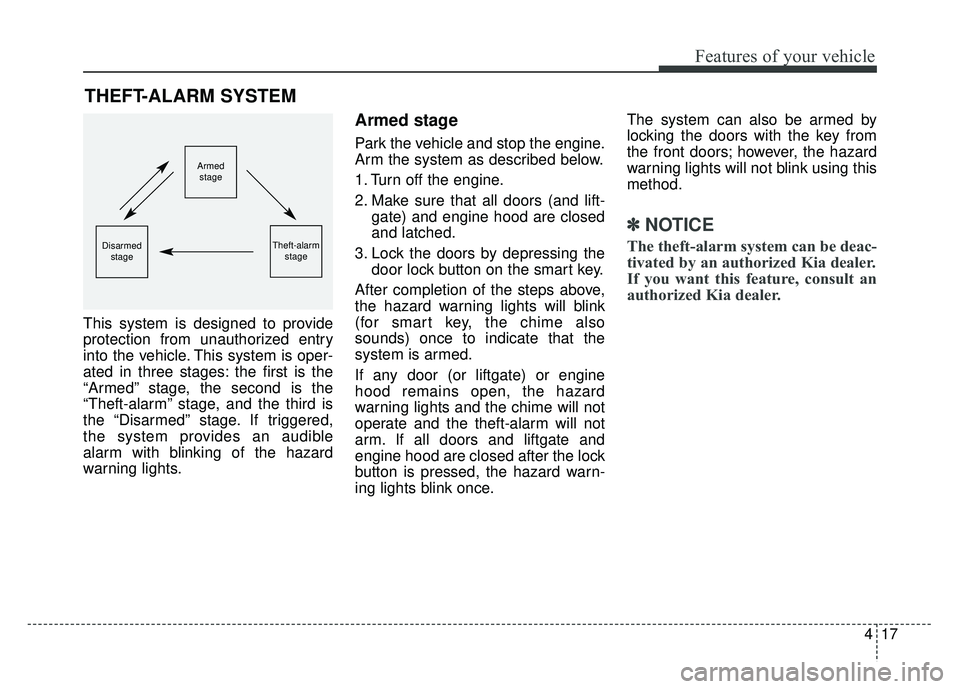
This system is designed to provide
protection from unauthorized entry
into the vehicle. This system is oper-
ated in three stages: the first is the
“Armed” stage, the second is the
“Theft-alarm” stage, and the third is
the “Disarmed” stage. If triggered,
the system provides an audible
alarm with blinking of the hazard
warning lights.
Armed stage
Park the vehicle and stop the engine.
Arm the system as described below.
1. Turn off the engine.
2. Make sure that all doors (and lift-gate) and engine hood are closed
and latched.
3. Lock the doors by depressing the door lock button on the smart key.
After completion of the steps above,
the hazard warning lights will blink
(for smart key, the chime also
sounds) once to indicate that the
system is armed.
If any door (or liftgate) or engine
hood remains open, the hazard
warning lights and the chime will not
operate and the theft-alarm will not
arm. If all doors and liftgate and
engine hood are closed after the lock
button is pressed, the hazard warn-
ing lights blink once. The system can also be armed by
locking the doors with the key from
the front doors; however, the hazard
warning lights will not blink using this
method.
✽ ✽
NOTICE
The theft-alarm system can be deac-
tivated by an authorized Kia dealer.
If you want this feature, consult an
authorized Kia dealer.
THEFT-ALARM SYSTEM
Armed
stage
Theft-alarm stageDisarmedstage
Page 121 of 552
Features of your vehicle
18
4
Do not arm the system until all
passengers have left the vehicle. If
the system is armed while a pas-
senger(s) remains in the vehicle,
the alarm may be activated when
the remaining passenger(s) leave
the vehicle. If any door (or liftgate)
or engine hood is opened within
30 seconds after the system
enters the armed stage, the sys-
tem is disarmed to prevent an
unnecessary alarm.Theft-alarm stage
The alarm will be activated if any of
the following occurs while the system
is armed.
A front or rear door is opened with-
out using the smart key.
The liftgate is opened without using
smart key.
The engine hood is opened.
The horn will sound and the hazard
warning lights will blink continuously
for approximately 27 seconds, and
repeat the horn 3 times unless the
system is disarmed. To turn off the
system, unlock the doors with the
smart key.
Disarmed stage
The system will be disarmed when
The doors (and liftgate) are unlocked with the smart key.
After depressing the unlock button,
the hazard warning lights will blink
and the chime will sound twice (in
smart key) to indicate that the sys-
tem is disarmed.
After depressing the unlock button, if
any door (or liftgate) is not opened
within 30 seconds, the system will be
rearmed.
Page 135 of 552
Features of your vehicle
32
4
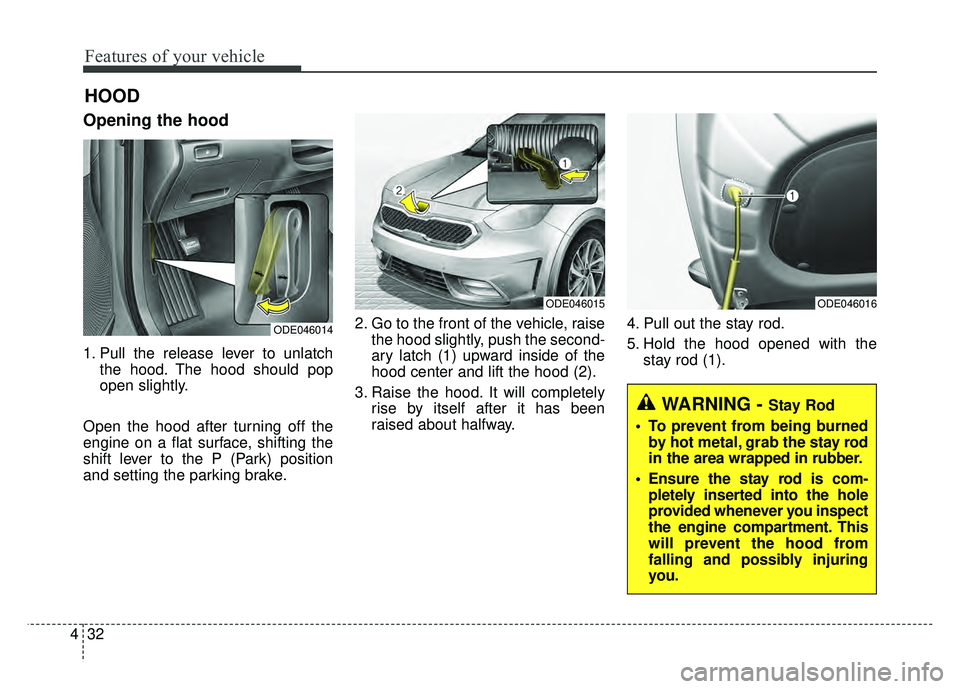
Opening the hood
1. Pull the release lever to unlatch
the hood. The hood should pop
open slightly.
Open the hood after turning off the
engine on a flat surface, shifting the
shift lever to the P (Park) position
and setting the parking brake. 2. Go to the front of the vehicle, raise
the hood slightly, push the second-
ary latch (1) upward inside of the
hood center and lift the hood (2).
3. Raise the hood. It will completely rise by itself after it has been
raised about halfway. 4. Pull out the stay rod.
5. Hold the hood opened with the
stay rod (1).
HOOD
ODE046014
ODE046015 ODE046016
WARNING - Stay Rod
To prevent from being burned by hot metal, grab the stay rod
in the area wrapped in rubber.
Ensure the stay rod is com- pletely inserted into the hole
provided whenever you inspect
the engine compartment. This
will prevent the hood from
falling and possibly injuring
you.
Page 136 of 552
433
Features of your vehicle
Hood open warning
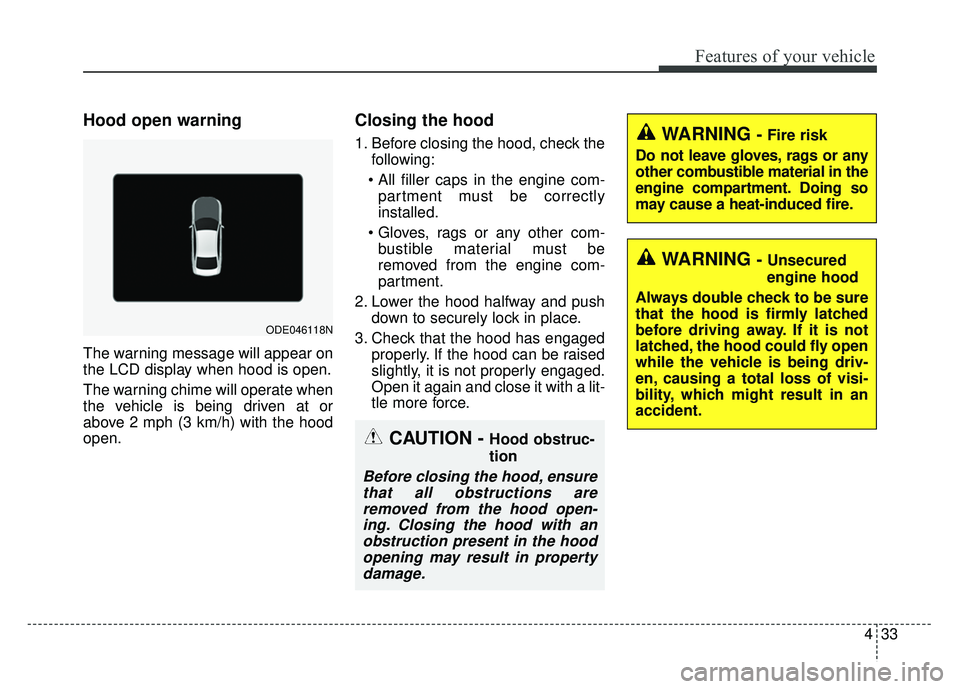
The warning message will appear on
the LCD display when hood is open.
The warning chime will operate when
the vehicle is being driven at or
above 2 mph (3 km/h) with the hood
open.
Closing the hood
1. Before closing the hood, check thefollowing:
partment must be correctly
installed.
bustible material must be
removed from the engine com-
partment.
2. Lower the hood halfway and push down to securely lock in place.
3. Check that the hood has engaged properly. If the hood can be raised
slightly, it is not properly engaged.
Open it again and close it with a lit-
tle more force.WARNING - Fire risk
Do not leave gloves, rags or any
other combustible material in the
engine compartment. Doing so
may cause a heat-induced fire.
WARNING - Unsecured
engine hood
Always double check to be sure
that the hood is firmly latched
before driving away. If it is not
latched, the hood could fly open
while the vehicle is being driv-
en, causing a total loss of visi-
bility, which might result in an
accident.
CAUTION - Hood obstruc-
tion
Before closing the hood, ensure that all obstructions areremoved from the hood open-ing. Closing the hood with anobstruction present in the hoodopening may result in propertydamage.
ODE046118N
Page 175 of 552
Features of your vehicle
72
4
Liftgate Open
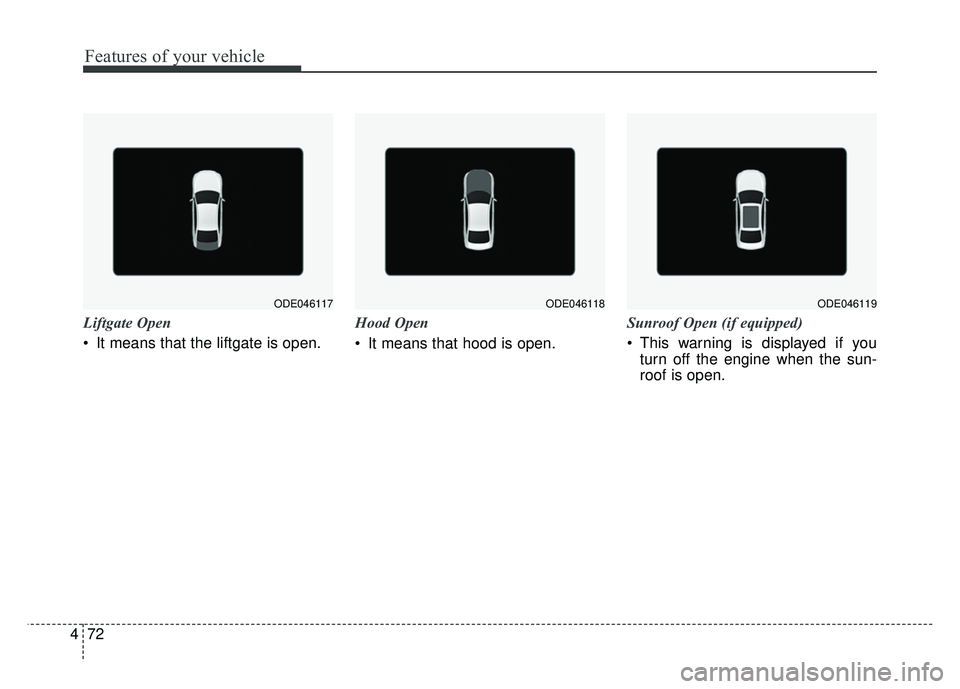
It means that the liftgate is open. Hood Open
It means that hood is open.Sunroof Open (if equipped)
This warning is displayed if you
turn off the engine when the sun-
roof is open.
ODE046117ODE046118ODE046119
Page 391 of 552
What to do in an emergency
10
7
IF THE ENGINE OVERHEATS
If your temperature gauge indicates
overheating, you will experience a
loss of power, or hear loud pinging or
knocking, the engine is probably too
hot. If this happens, you should:
1. Turn on the emergency warning
flasher and stop in a safe place.
Move the shift lever to P (Park)
and engage the parking brake.
2. If hot steam does not come out from the engine room, carefully
open the engine room and check
whether the water pump connec-
tor is properly engaged. If the con-
nector is not properly engaged,
stop the engine immediately and
properly engage the connector.
Then, turn the engine on.
3. Turn on the air conditioner. 4. If the “HEV Warning” light turns on
in the driver instrument cluster, or
engine coolant or hot steam emits
from the engine coolant filler, stop
the engine immediately. Then, call
the nearest authorized Kia dealer
for assistance. If the “Engine
Warning” light remains illuminated
or the engine coolant is not flowing
out, keep the engine running.
Open the engine hood for ventila-
tion to help cool down the engine. 5. Check whether the engine coolant
temperature is low enough by
checking its temperature. If the
engine coolant level is low, please
check the connecting parts
between the radiator hose, heater
hose, and water pump for any
signs of leakage. When there is no
sign of leakage, please refill the
engine coolant. If causes and
signs of engine overheating such
as warning light illumination,
engine coolant leakage, or cooling
fan malfunction are found, stop the
vehicle the earliest. Then, call the
nearest authorized Kia dealer for
assistance.
WARNING- Under the
Hood
While the engine is running,
keep hair, hands and clothing
away from moving parts such
as the fan and drive belts to pre-
vent injury.
Page 429 of 552
Maintenance
68
OWNER MAINTENANCE
The following lists are vehicle checks
and inspections that should be per-
formed by the owner or an author-
ized Kia dealer at the frequencies
indicated to help ensure safe,
dependable operation of your vehi-
cle.
Any adverse conditions should be
brought to the attention of your deal-
er as soon as possible.
These Owner Maintenance Checks
are generally not covered by war-
ranties and you may be charged for
labor, parts and lubricants used.Owner maintenance schedule
When you stop for fuel:
Check the engine oil level.
Check the coolant level in coolantreservoir.
Check the windshield washer fluid level.
Look for low or under-inflated tires.
While operating your vehicle:
Note any changes in the sound of the exhaust or any smell of
exhaust fumes in the vehicle.
Check for vibrations in the steering wheel. Notice any increased steer-
ing effort or looseness in the steer-
ing wheel, or change in its straight-
ahead position.
Notice if your vehicle constantly turns slightly or “pulls” to one side
when traveling on smooth, level
road.
When stopping, listen and check for unusual sounds, pulling to one
side, increased brake pedal travel
or “hard-to-push” brake pedal.
If any slipping or changes in the operation of your transaxle occurs,
check the transaxle fluid level.
Check the dual clutch transmission P (Park) function.
Check the parking brake.
Check for fluid leaks under your vehicle (water dripping from the air
conditioning system during or after
use is normal).
WARNING- Hot coolant
Be careful when checking your
engine coolant level when the
engine is hot. Scalding hot
coolant and steam may blow
out under pressure.
WARNING
When you open the engine
hood, turn the Hybrid system
off. If not, it may result in death
or serious injury because of the
high voltage flow.
Page 501 of 552

Maintenance
78
8
✽
✽
NOTICE
HID lamps have superior perform-
ance vs. halogen bulbs. HID lamps
are estimated by the manufacturer to
last twice as long or longer than halo-
gen bulbs depending on their fre-
quency of use. They will probably
require replacement at some point in
the life of the vehicle. Cycling the
headlamps on and off more than typ-
ical use will shorten HID lamps life.
HID lamps do not fail in the same
manner as halogen incandescent
lamps. If a headlamp goes out after a
period of operation but will immedi-
ately relight when the headlamp
switch is cycled it is likely the HID
lamp needs to be replaced. HID
lamping components are more com-
plex than conventional halogen bulbs
thus have higher replacement cost.
Headlamp (High/Low beam)
bulb replacement
1. Open the hood.
2. Remove the headlamp bulb cover
by turning it counterclockwise.
3. Disconnect the headlamp bulb socket-connector.
4. Remove the bulb-socket from the headlamp assembly by turning the
bulb-socket counterclockwise until
the tabs on the bulb-socket align
with the slots on the headlamp
assembly.
ODE076035
CAUTION
If your vehicle is equipped withHigh Intensity Discharge (HID)headlamps, these headlampscontain mercury. So if you needto have your vehicle disposed,you should remove the HIDheadlamps before disposal. Theremoved HID headlamps shouldbe recycled, re-used or dis-posed as hazardous waste.
Page 503 of 552
Maintenance
80
8
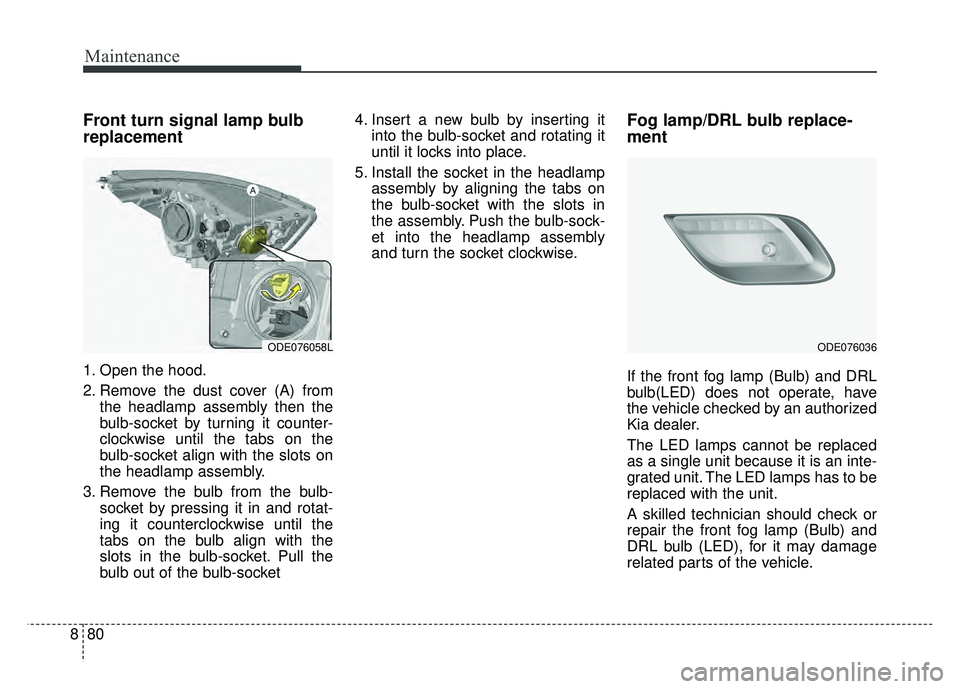
Front turn signal lamp bulb
replacement
1. Open the hood.
2. Remove the dust cover (A) from
the headlamp assembly then the
bulb-socket by turning it counter-
clockwise until the tabs on the
bulb-socket align with the slots on
the headlamp assembly.
3. Remove the bulb from the bulb- socket by pressing it in and rotat-
ing it counterclockwise until the
tabs on the bulb align with the
slots in the bulb-socket. Pull the
bulb out of the bulb-socket 4. Insert a new bulb by inserting it
into the bulb-socket and rotating it
until it locks into place.
5. Install the socket in the headlamp assembly by aligning the tabs on
the bulb-socket with the slots in
the assembly. Push the bulb-sock-
et into the headlamp assembly
and turn the socket clockwise.
Fog lamp/DRL bulb replace-
ment
If the front fog lamp (Bulb) and DRL
bulb(LED) does not operate, have
the vehicle checked by an authorized
Kia dealer.
The LED lamps cannot be replaced
as a single unit because it is an inte-
grated unit. The LED lamps has to be
replaced with the unit.
A skilled technician should check or
repair the front fog lamp (Bulb) and
DRL bulb (LED), for it may damage
related parts of the vehicle.
ODE076036ODE076058L